

Brake Master Cylinder Replacement...(Part Dux)
 08-19-2004, 12:34 AM
#1
Burning Brakes
Thread Starter
Join Date: Jan 2003
Location: Minneapolis MN
Posts: 773
Likes: 0
Received 0 Likes
on
0 Posts
Only here would I admit that I may have crackd my brake master cylinder while tightening a pressure switch. Here's the story: Had no brake lights. Tested the pressure switches and found one to be dead and the other intermittent. Replaced both but may have over tightened one and cracked the port that it screws into. Fluid is leaking from what seems to be a fine crack above the pressure switch.
Anyway, I'm thinking I need to replace the master cyl. I checked the archives and found lots of stuff on it, but no stratight-forward procedure on how to replace the cylinder (nichols site had no detailed procedure either) Everyone says it's easy. Great. How do I do it.- Ruf
Anyway, I'm thinking I need to replace the master cyl. I checked the archives and found lots of stuff on it, but no stratight-forward procedure on how to replace the cylinder (nichols site had no detailed procedure either) Everyone says it's easy. Great. How do I do it.- Ruf
Last edited by Rufus Sanders; 08-19-2004 at 11:23 PM.
 08-19-2004, 01:18 AM
#2
Rennlist Member

It happens. I have seen it once before. The masters are pretty cheap and in a 1982 car, it could probably benefit from a new one anyway. Remove all the lines to the master and the little barrel units that go into it. Once you get this loose, now loosen the two nuts on the passenger and driver's side of the master. (2) 13mm a.c.f. nuts the driver's is more difficult. Break them both loose and then remove the driver's side all the way. Next remove the passengers slowly to avoid stressing the shaft and stud at a wild angle. Remove it and put in the new master in exactly the reverse order. I recommend a bench prime to seat the seals and remove air and make bleeding faster. Bleed all four corners and give the pedal a push several times before driving. Try it out on flat lands and be ready with the ebrake handle. Drive for about a week and test bleed again. Good to go.
Good luck!
Good luck!
08-19-2004, 01:18 AM
#3
Instructor

Rufus,
Just pull off everything you see, the obvious items. :-) Helps to pull the fluid resevoir off first. Just gently wiggle it out, applying upward pressure and it will pop out of the grommets in the master cylinder -- careful, this is where fluid will come running out all over ... Make sure you catch the resevoir right away in a some sort of catch vessel so you don't get fluid all over. And pad the general surrounding area with towels/rags. (If it's a 5spd, you'll also have to pull off the supply line that runs to the clutch master.)
[a just-in-case note: immediately (can't stress this enough) clean any smattering of brake fluid off of exposed paint as brake fluid will eat through paint very quickly. In the engine bay, brake cleaner will suffice. On the body paint, quickly wipe it off then use soap and water right away.]
It will be lots easier to get in there and work if you pull the hose to the brake booster. Then, unscrew the brake lines lines at the master cylinder. Best to use a "flare wrench" so you don't round them out. I believe they're 11mm hex, but I could be wrong. Then, remove the two 13mm nuts that hold the master to the booster and you should be home free. Swap your pressure switches over then installation reverse of removal. Once reinstalled, bleed the system (this is KEY! :-). If you need help at the point of bleeding system, especially if you have not performed this procedure before, try to get a local expert to assist or post again and someone is sure to walk you through it. 'Round these parts the listers seem to prefer vacuum bleaders. I'm partial to pressure bleeders myself, but either will work. Run DOT4 (e.g., Castrol GT/LMA) spec fluid. Some may prefer ATE superblue but if you're not tracking the car, DOT4 should do. Fully drain the fluid resevoir if the system hasn't been bled in a while. I prefer to clean my resevoirs out thoroughly with brake cleaner, slosh it around to remove any residue, repeat several times, then throroughly dry it out with compressed air before reinstalling and refilling with fluid.
Spray some penetrant on the caliper bleeder screws NOW before starting the job. Spray them every so often so they'll be nice and ready by the time you're ready to open them up. Do NOT wrench too hard on the bleeder screws -- breaking them off will likely result in the need to replace the caliper. If they are being difficult, consult back and someone should be able to walk you through getting them open.
Also search the forum for ideas. I'm sure if not all, then bits and pieces of this procedure has been posted at some point in the history of the forum. 924/944 would be a very similar procedure if you don't see anything in 928 forum.
08-19-2004, 07:07 AM
#5
Bumbling Neophyte
Rennlist Member
Rennlist Member

Join Date: Apr 2003
Location: IAX, FL
Posts: 269
Likes: 0
Received 0 Likes
on
0 Posts
I just finished this job a few weeks ago. In addition to the instructions above, you can remove almost all of the old brake fluid from the resevoir with a $1 turkey baster. You'll have to toss the baster afterwards. Don't forget that there is a bleed screw on the master cylinder, I've been told to do this one last. I got my rebuilt MC from Autozone, it was pretty cheap!
One last thing, watch out for air leaking around the threads of the bleed screws, this happen to me, you see a stream of very tiny bubbles (in the clear! hose attached to your vaccum pump!). IF it happens to you, dab a very very small amount of RTV silicone around the screw threads (right at the MC) after it is installed and backed off the 1/4 turn. You don't have to wait for it to dry.
One last thing, watch out for air leaking around the threads of the bleed screws, this happen to me, you see a stream of very tiny bubbles (in the clear! hose attached to your vaccum pump!). IF it happens to you, dab a very very small amount of RTV silicone around the screw threads (right at the MC) after it is installed and backed off the 1/4 turn. You don't have to wait for it to dry.
08-19-2004, 09:59 AM
#6
Burning Brakes
Thread Starter
Join Date: Jan 2003
Location: Minneapolis MN
Posts: 773
Likes: 0
Received 0 Likes
on
0 Posts
Thanks guys! It's nice to know that I'm not the first to do this bone-head move. I could tell something had "given" and thought it was threads on the pressure switch.
I'll check Autozone for a new cyl, or call 928 Intl ($175.00) and see if I can't get it done by the weekend. - Ruf
I'll check Autozone for a new cyl, or call 928 Intl ($175.00) and see if I can't get it done by the weekend. - Ruf
08-19-2004, 11:00 PM
#7
Burning Brakes
Thread Starter
Join Date: Jan 2003
Location: Minneapolis MN
Posts: 773
Likes: 0
Received 0 Likes
on
0 Posts
OK, I'm back. Got the new MC on order form 928 Int't. I've got as far as the last two nuts that hold the old MC to the booster and can't figure out a reasonable way to get at the nut that's closest to the fender!
Feeling sort of lame, but I bet some of you have a trick up your sleeve for this. If you have a tool suggestion, please be specific so I can walk into Sears and ask them for the right thing... - Ruf (and it all started with a cop haunting me, trying to get me to put on the brakes so he could give me a ticket....)
Feeling sort of lame, but I bet some of you have a trick up your sleeve for this. If you have a tool suggestion, please be specific so I can walk into Sears and ask them for the right thing... - Ruf (and it all started with a cop haunting me, trying to get me to put on the brakes so he could give me a ticket....)
Trending Topics
08-20-2004, 09:46 AM
#8
Burning Brakes
Rufus,
The key word here is reasonable. Here are some suggestions listed in order of reason.
1. When I replaced my master: I first used a boxed in wrench to break the nut. I then used a 1/4" drive ratchet (its smaller size helped) with extension and u-joint to finish. Ratchet was positioned near the front of the master (near the strut tower) toward fender side of master. Extension somewhat parallel to master.
2. You could also try one of those ratcheting boxed end wrenches. I thought about this after I finished.
3. You could also try loosening the booster nuts inside the cabin at the firewall and removing the rod from the pedal. This may allow you to angle the booster/master assembly for better access to the nut tucked under the fender.

 08-20-2004, 01:16 PM
#10
Burning Brakes
Thread Starter
Join Date: Jan 2003
Location: Minneapolis MN
Posts: 773
Likes: 0
Received 0 Likes
on
0 Posts
Scott and Old & New,
Thanks for the suggestions. I pondered the u-joint + extent ion idea too, but my u-joint is to bulky and the extension is too short. Plus they're both bigger then 1/4" drive. I'll start with "reasonable" and get crazy from there.
Also I'm quite glad I DONT have a 5-speed right now. The job would be twice as bad if I did, it seems - Ruf
08-20-2004, 01:33 PM
#11
Bumbling Neophyte
Rennlist Member
Rennlist Member
Join Date: Apr 2003
Location: IAX, FL
Posts: 269
Likes: 0
Received 0 Likes
on
0 Posts
Try to find a wobble extension for your ratchet. It is like a normal extension, except that it allows the socket to wobble a few degrees. Looks sort of like a ball end hex/allen wrench. I tried to find one for you at craftsman.com but no luck.
08-24-2004, 12:19 AM
#12
Burning Brakes
Thread Starter
Join Date: Jan 2003
Location: Minneapolis MN
Posts: 773
Likes: 0
Received 0 Likes
on
0 Posts
Hey everyone, Thanks for the suggestions. I finishd the job on Sunday and everything seems to be working well. I thought I'd share what I've learned, and show my "error" so someone else can avoid it.
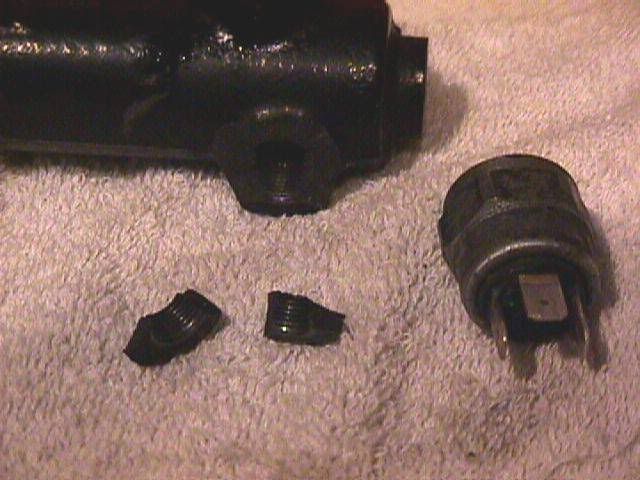
Here's the result of over tightening the pressure sensor in it's port on the underside of the master cyl.... yes, 180 bucks later I had a new one, fresh with new sensors, Now I have 4...
After reading alot and seeing some stuff from Wally P. on the issue I figured out how to
A) rewire the plug that was cracked, making intermitent contact with one sensor's 12V lead
B) run the system with one sensor so you have brake lights in a pinch and
C) how to get that "Brake Pr" warning light to go out, even after you've fixed the pressure sensors and eliminated the 'Stop Lamp" light being on.
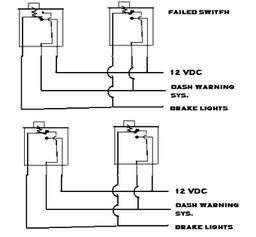

Here's a diagram of how this damb system works. It's really quie simple, but you must remember who designed it... You know those guys...the ones who over engineered everything and allowed us to drive 20 yr old cars with some level of reliablity? Anyway if one switch dies, it will not send power to the brake light lead, but if the other switch works, it will send power to the lights, and you'll have working brake lights, BUT, you'll also have the "Brake Pr" light come on in the dash pod because the dead switch is maintaining a connection between the brake light lead and the "Brake PR" lead (or LCU in the diagram). This is the normal unactivated state of the sensor. So since the sensors are wired in parellel (did I mention that? No? Oh, sorry...), if one switch works, the other one will send power to "Brake Pr" lead.
I suppose the idea is to monitor pressure in each side of the diaginal brake system, and it's really a slick way to do it simply, but it's hard to figure out.
After you change these sensors (or call them swithes) and get your brake lights back, you may still have the "Brake Pr" light anyway. I found that if i just disconnected and reconnected the battery, it would go out. Must be a relay holding it on until power is lost...? This is the answer to C) above.
If you have the "Brake Pr" light on but not the "Stop Lamp" light on, you can unplug the three-lead plug from the dead switch and kill the "Brake Pr" light, but you'll have no warning if that side of the brake circuit actually does lose pressure. Unplug each and see which one does the trick. This is the answer to B) above.
Finally, if you have a broke plug (part of my original problem...) you can rewire the connections with standard female "blade" connectors (the ones with the plastic cover), based on the pin identification on the diagram. This is the answer to A) above and comes in really handy to diagnose a failed switch or even to just make it easier to make the connection back to the sensors after working around the master cylinder area. Also, if you have the "Brake Pr" light on, but it goes out when you step on the brakes, it means you have the leads for the 12V and the brake lights reversed.
For total clearity, in the photo above, the pin on the right is for the brake lights, the center is for the "Brake Pr" light, and the left one is 12V
So, hope this helps those who have older cars with this system. They changed it in 1985, for reasons that are beyond me. - Ruf
PS - I used a Mightyvac to bleed the system. Don't bother. So many bubbles come throught with the fluid that you never know if you're done bleeding or not, (Pun? No.) I went back to old school "helper pump the pedal" and it worked fine.
Here's the result of over tightening the pressure sensor in it's port on the underside of the master cyl.... yes, 180 bucks later I had a new one, fresh with new sensors, Now I have 4...
After reading alot and seeing some stuff from Wally P. on the issue I figured out how to
A) rewire the plug that was cracked, making intermitent contact with one sensor's 12V lead
B) run the system with one sensor so you have brake lights in a pinch and
C) how to get that "Brake Pr" warning light to go out, even after you've fixed the pressure sensors and eliminated the 'Stop Lamp" light being on.
Here's a diagram of how this damb system works. It's really quie simple, but you must remember who designed it... You know those guys...the ones who over engineered everything and allowed us to drive 20 yr old cars with some level of reliablity? Anyway if one switch dies, it will not send power to the brake light lead, but if the other switch works, it will send power to the lights, and you'll have working brake lights, BUT, you'll also have the "Brake Pr" light come on in the dash pod because the dead switch is maintaining a connection between the brake light lead and the "Brake PR" lead (or LCU in the diagram). This is the normal unactivated state of the sensor. So since the sensors are wired in parellel (did I mention that? No? Oh, sorry...), if one switch works, the other one will send power to "Brake Pr" lead.
I suppose the idea is to monitor pressure in each side of the diaginal brake system, and it's really a slick way to do it simply, but it's hard to figure out.
After you change these sensors (or call them swithes) and get your brake lights back, you may still have the "Brake Pr" light anyway. I found that if i just disconnected and reconnected the battery, it would go out. Must be a relay holding it on until power is lost...? This is the answer to C) above.
If you have the "Brake Pr" light on but not the "Stop Lamp" light on, you can unplug the three-lead plug from the dead switch and kill the "Brake Pr" light, but you'll have no warning if that side of the brake circuit actually does lose pressure. Unplug each and see which one does the trick. This is the answer to B) above.
Finally, if you have a broke plug (part of my original problem...) you can rewire the connections with standard female "blade" connectors (the ones with the plastic cover), based on the pin identification on the diagram. This is the answer to A) above and comes in really handy to diagnose a failed switch or even to just make it easier to make the connection back to the sensors after working around the master cylinder area. Also, if you have the "Brake Pr" light on, but it goes out when you step on the brakes, it means you have the leads for the 12V and the brake lights reversed.
For total clearity, in the photo above, the pin on the right is for the brake lights, the center is for the "Brake Pr" light, and the left one is 12V
So, hope this helps those who have older cars with this system. They changed it in 1985, for reasons that are beyond me. - Ruf
PS - I used a Mightyvac to bleed the system. Don't bother. So many bubbles come throught with the fluid that you never know if you're done bleeding or not, (Pun? No.) I went back to old school "helper pump the pedal" and it worked fine.