When you click on links to various merchants on this site and make a purchase, this can result in this site earning a commission. Affiliate programs and affiliations include, but are not limited to, the eBay Partner Network.
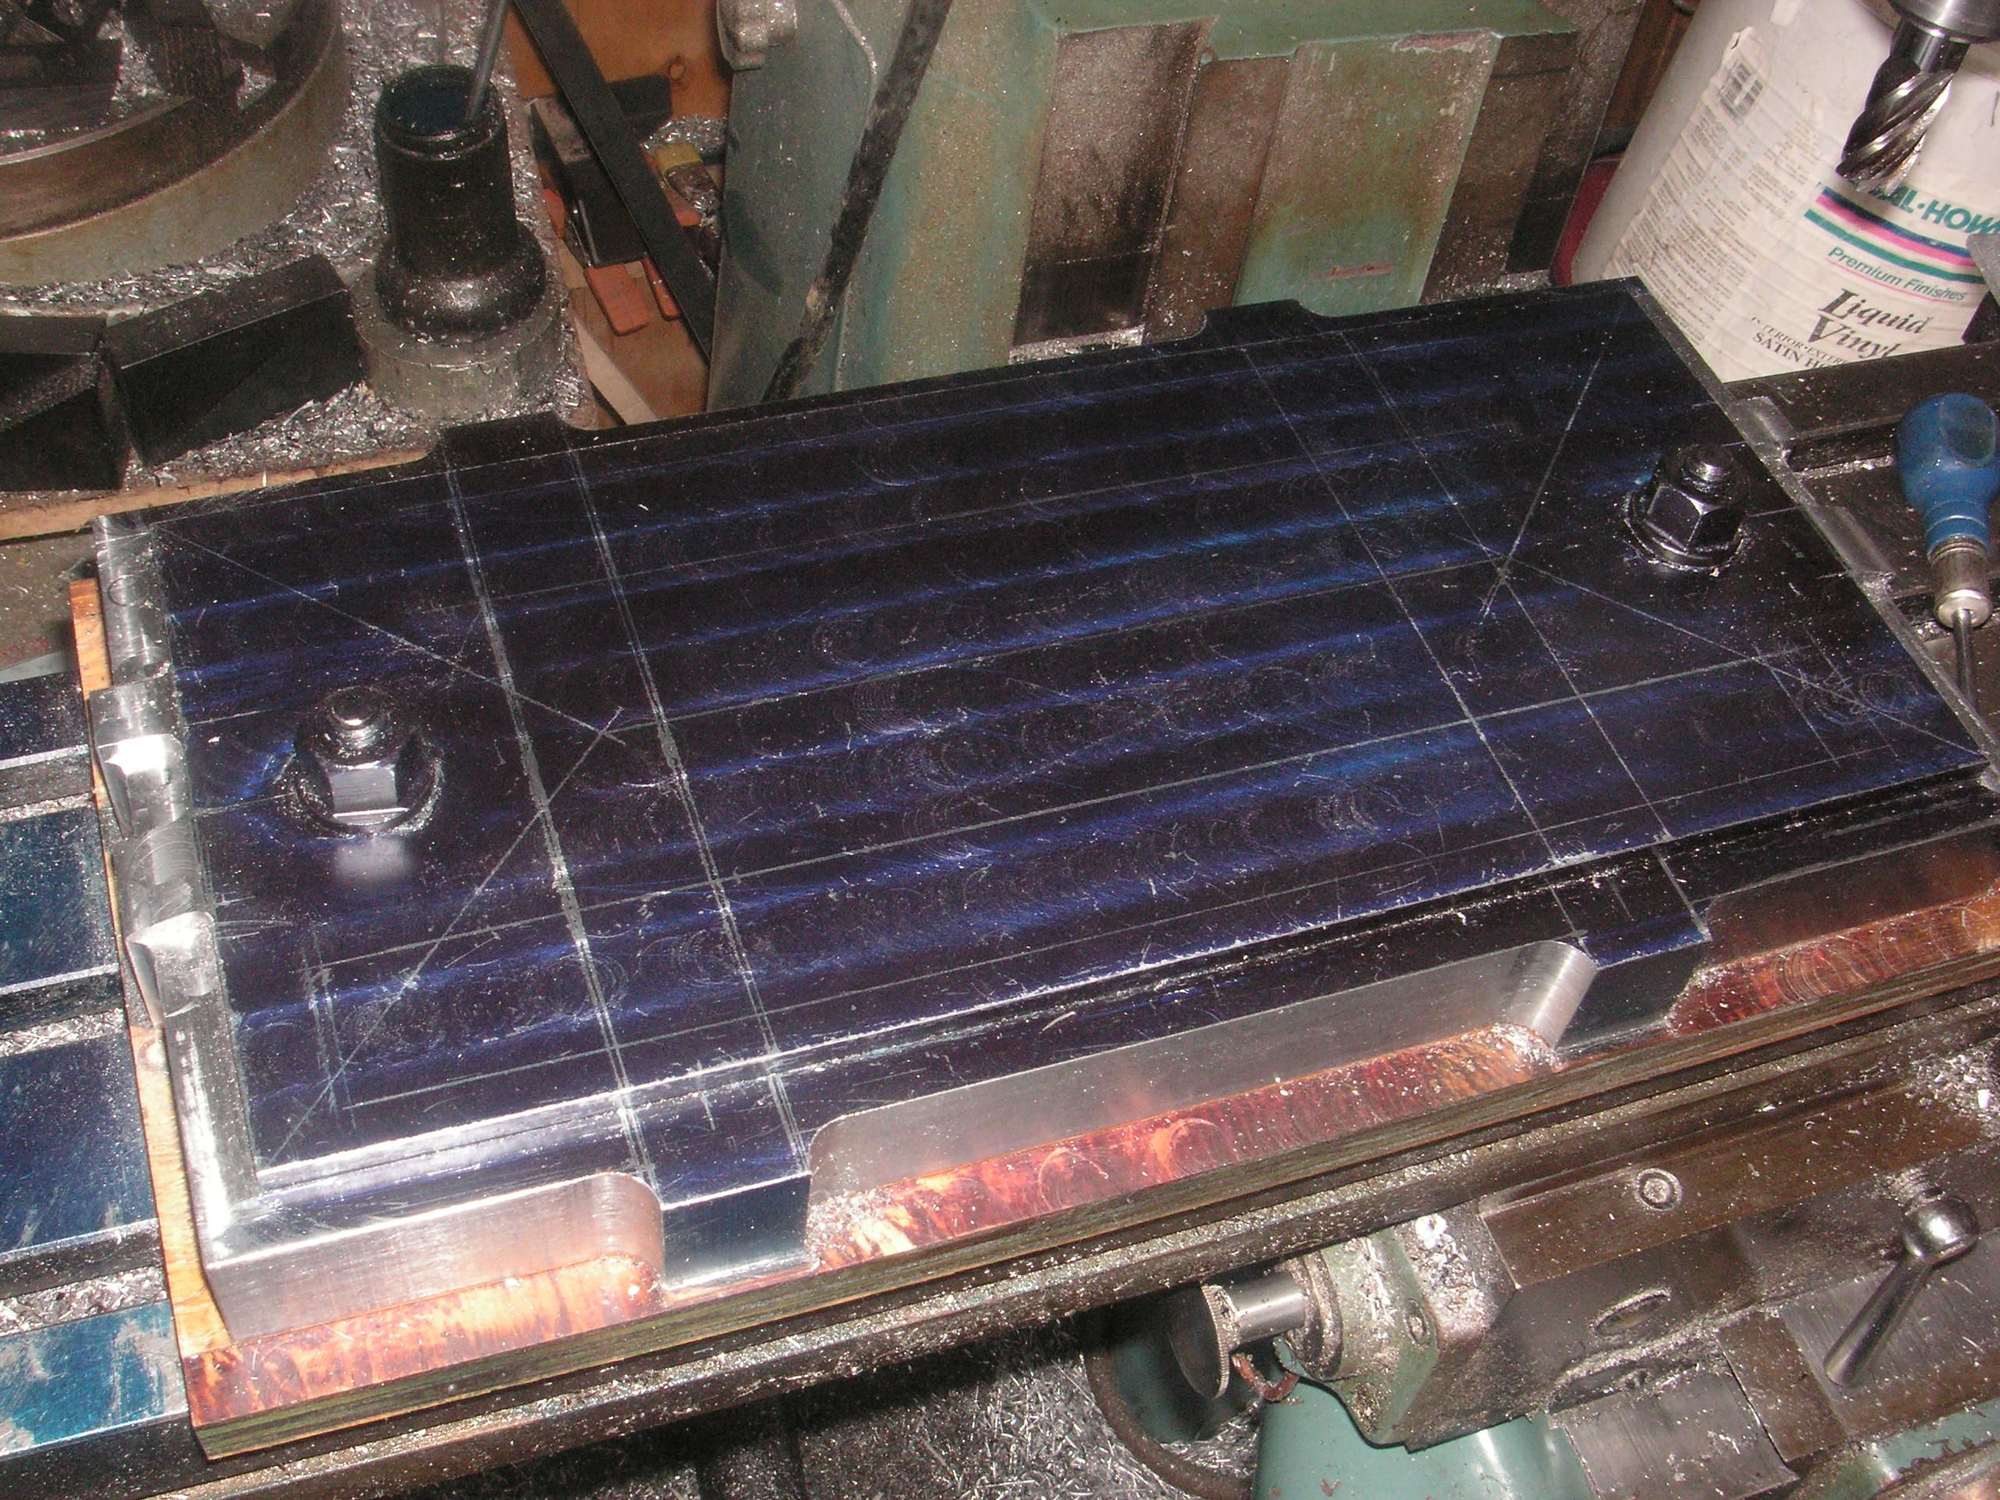
I drilled all of the holes in the top of this die to pretty much mark the corners and ends of the reliefs to be milled in it. I drilled with a 3/16 inch bit since that has the radius of the corners and ends that I want. Then I started to mill out one of the corners of the long rubber recess and while I was thinking about how long that was going to take since it was going very slow, I remembered that I had planned to mill those two recesses out with a larger bit, and about then I broke the tiny 3/16 bit I was using. Fortunately there is enough of the shank left on it to use it again. I'll still need it to mill the slots between the other holes in a kind of connect-the-dots fashion.
I figured out why what I have called a mistake in the layout of the central lines in the lid was made, and it really isn't a mistake and maybe not even an error in judgment, but simply a different judgment about how to get it all to fit. I think the long rubber recess had already been decided on in terms of length and that it was to be laid out evenly spaced with the stud bosses. With that in place when the central lines were then laid out with the arrow angle ends pointing at the corners, one of the angle lines simply dies in the side of the rectangle, but the other one, contrary to my first thought, missed the corner of the rectangle by about half of the width of the line to be formed. I thought it passed right through the corner, but when I got to drilling the hole that I thought was common to the end of the line and the corner of the rectangle I found that they are about half the diameter of the hole off from each other. So I simply moved the corner of the rectangle over about 3/32 inch so they coincide.
I think that rather than change the size of the rectangle they wanted the line to die in the side of it rather than half way miss the corner, so that is why they changed the angle of that line. I like my solution better even though it will require me to lengthen the rectangle at the other end about 3/32 inch so it still is evenly space with the stud bosses. The difference in the lids will be very small but now the design "hums."
This is another reason that I think this box and lid probably came from Mercedes since I am sure that my design buddies at Porsche would have done it my way had they had the need to design this box and lid.
Last edited by Jerry Feather; 06-03-2021 at 11:12 AM.
n fact I doubt that anyone in a 928 has ever had a battery installed that is long enough to actually fit this box.
There were two battery options in '78, the larger group 49 (AKA H8) or the smaller group 48 (AKA H6). The group 49 (which is the battery spec for your '82 380SL) will fill the entire battery box (see https://rennlist.com/forums/928-foru...onnection.html )
The larger battery was option M197 (Stronger battery (88 Ah)- Norway, Finland, Denmark, Canada, Sweden), presumably for colder climates.
Here's a group 49 filling the battery box, more or less.
These recesses in the lid I got from Barry appear to be pressed about a sixteenth of an inch. They also look kind of shallow, especially compared to the recesses shown in a couple of the other lids pictured. I plan to form mine about a tenth of an inch. Since I am cutting the shape of the recesses into this male die that makes it look like they are going to be negative, but what I am going to do is put in my recesses some positive form elements that will stick up so they can be formed as recesses in the female form, or rather the work piece metal in between.
For the recess forms to fit into these present recesses I'm going to use some cold rolled steel flat bar stock. Some of it will be 3/8 inch thick by 1 1/4 inches wide. The other will be 3/8 inch wide by 3/16 inch thick. I'll fasten the larger pieces in the die with flat head screws and the others, for the lines, I'll simply form to fit and then peen the edges of the groves then hammer the die elements in snug.
Last edited by Jerry Feather; 04-08-2021 at 10:50 AM.
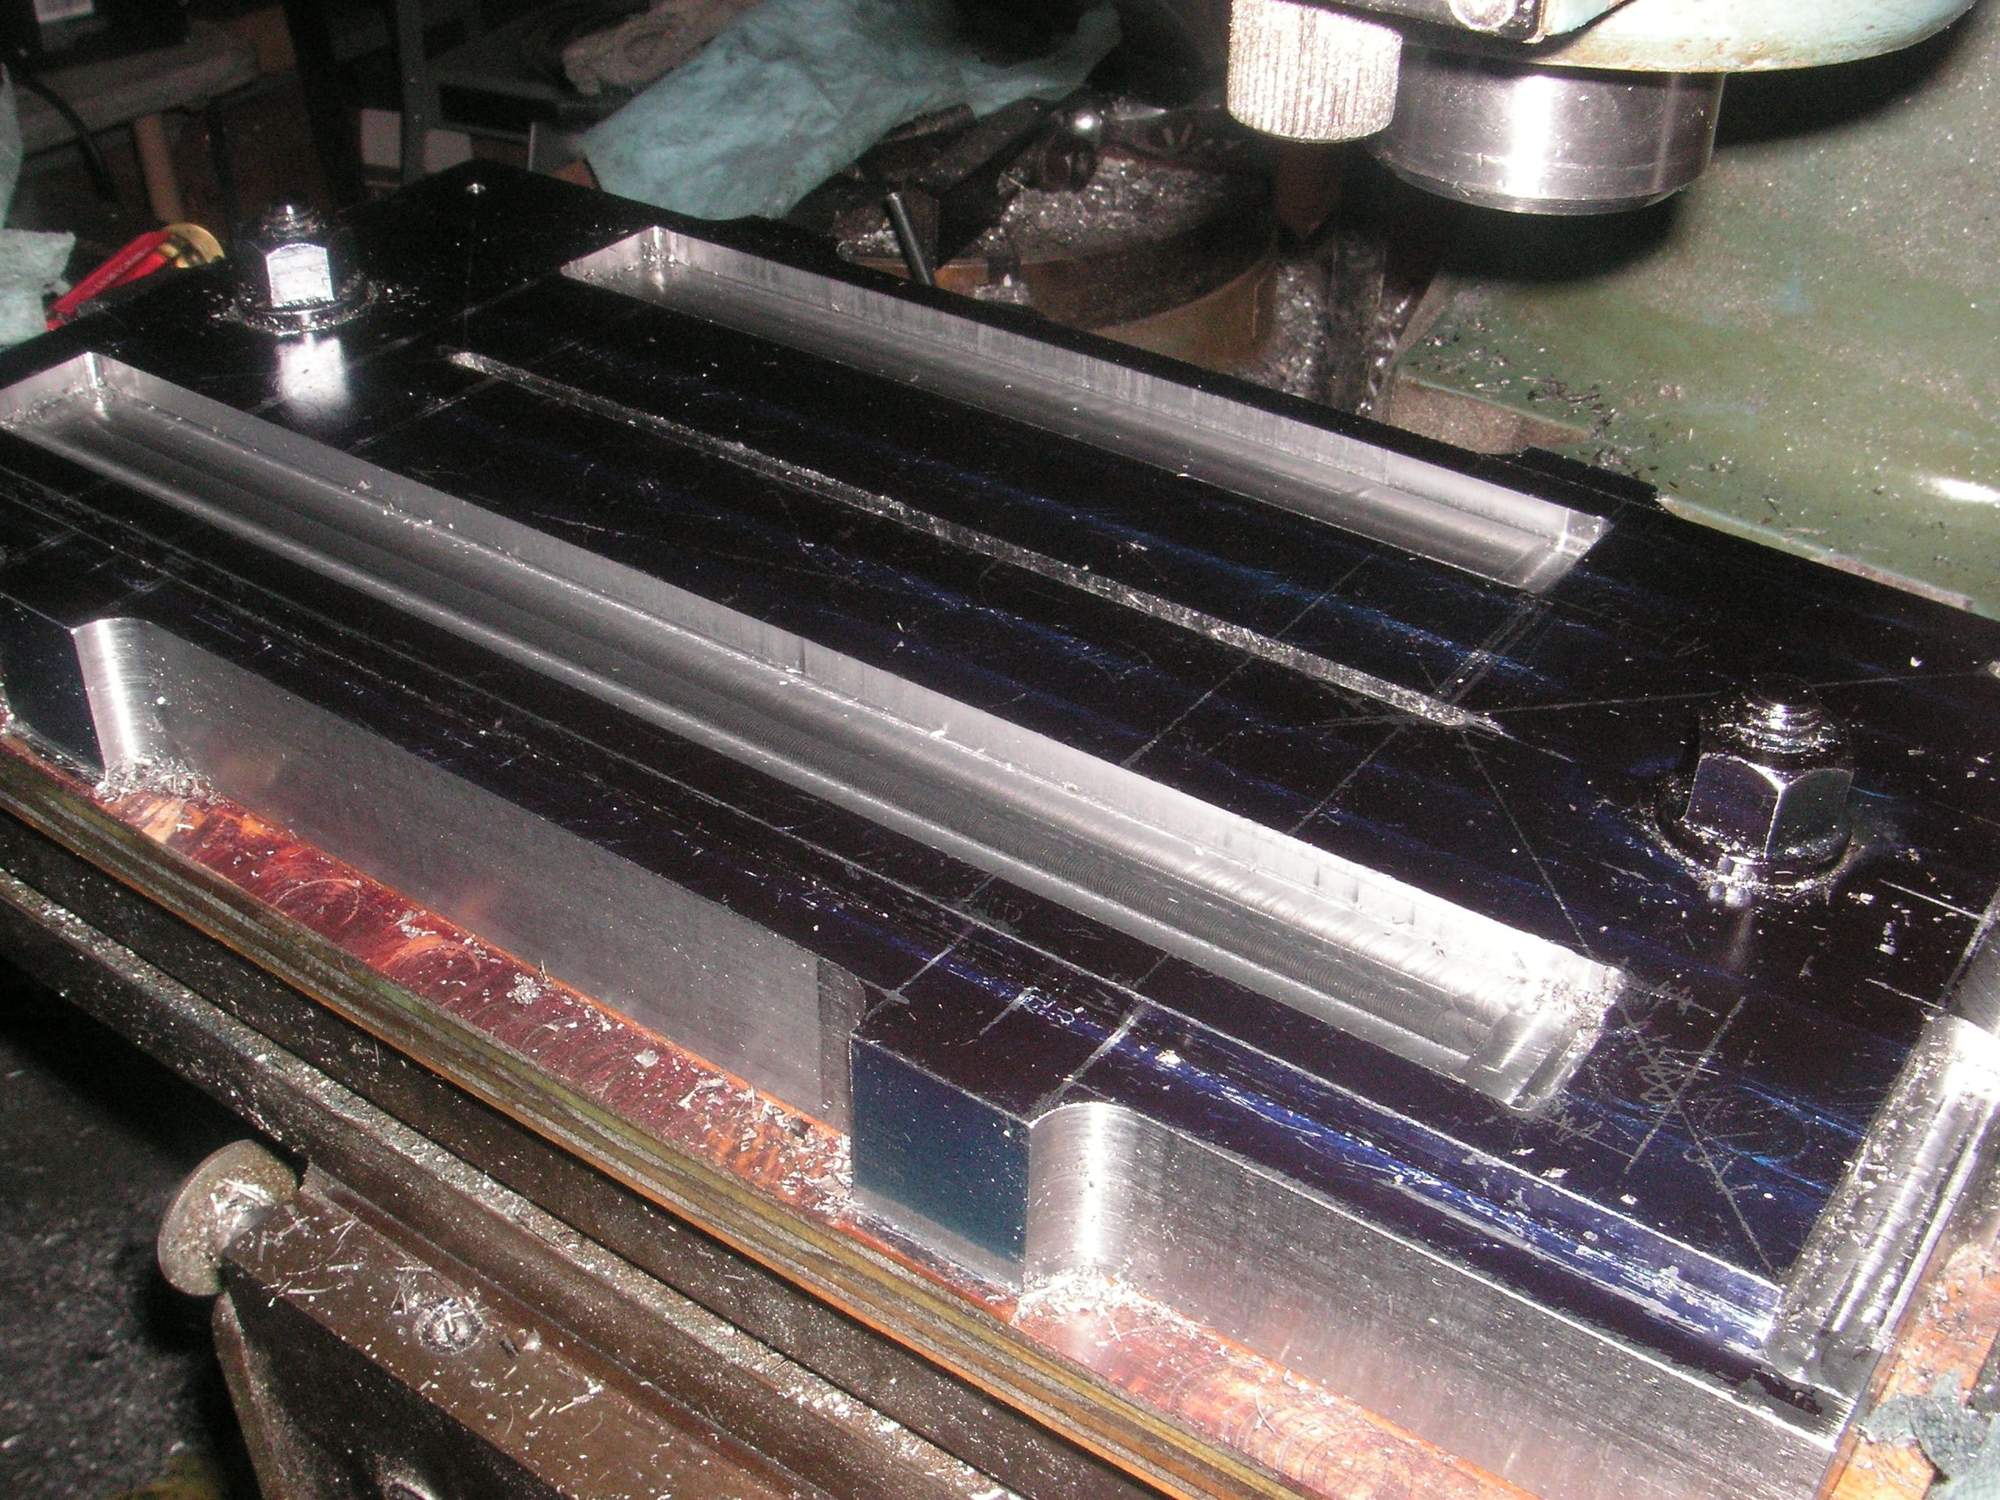
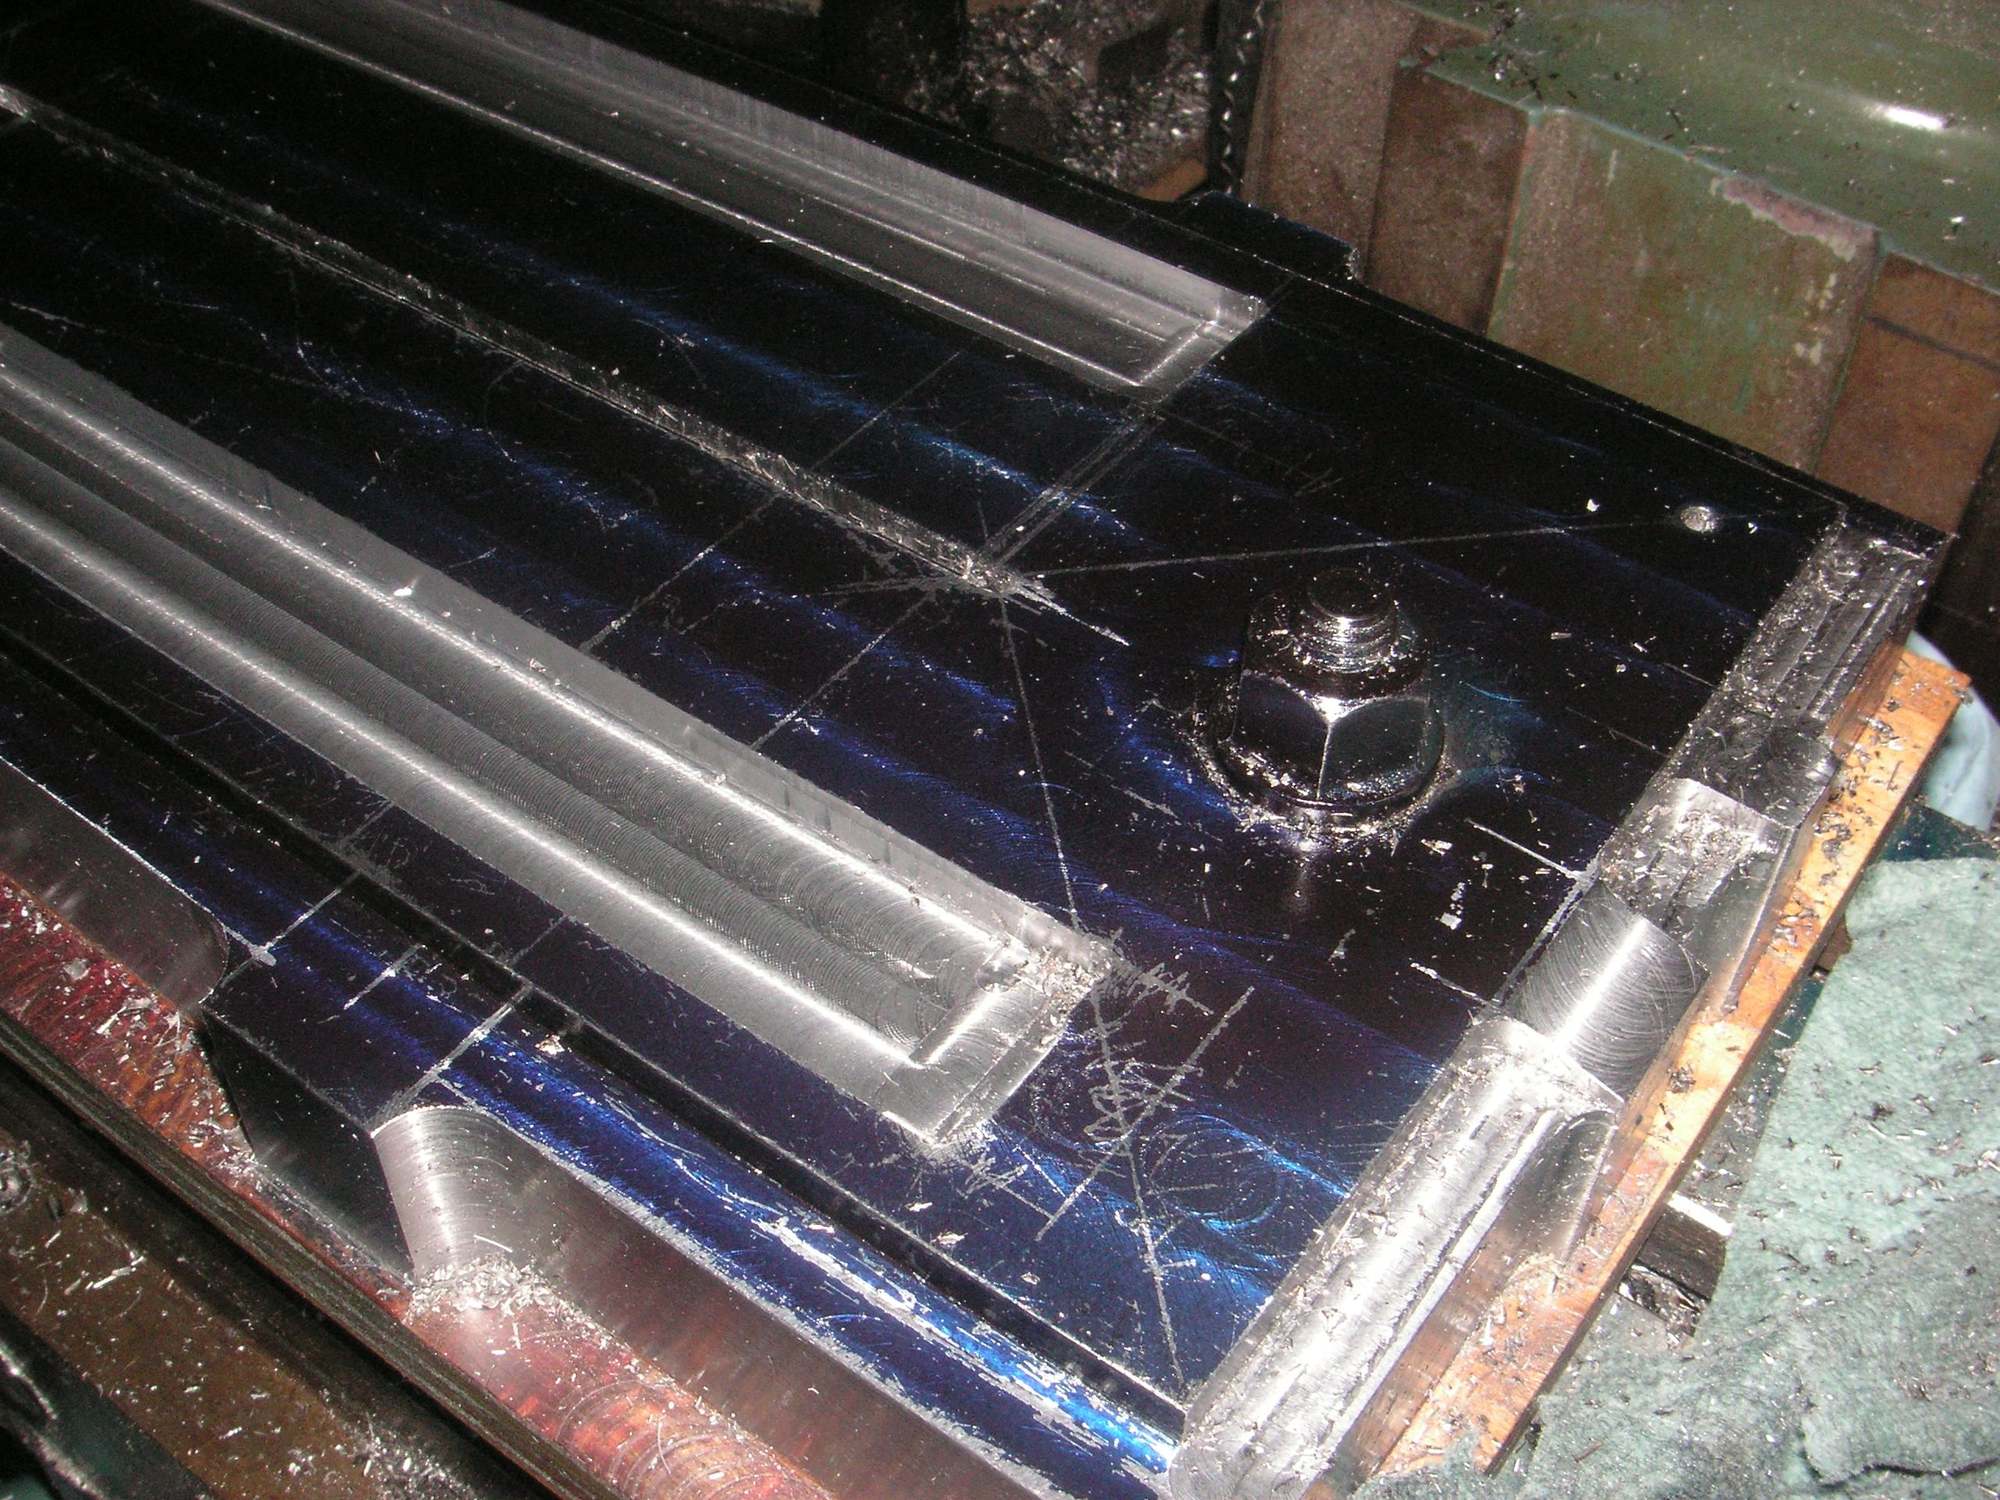
I have the longways recesses milled and that turned out pretty well. Now I must loosen the holding studs and nuts and turn the die 45 degrees so I can mill the angle lines and then dock several of the corners. After that will be some hand finishing with a grinder and file then smoothing it with sandpaper.
Before I turn the die 45 degrees I think I'll work up at least two of the recess inserts. I picked up some bar stock for those today. Here are some pictures of where they will go.
Now that I have pretty much figured out the real history and nature of this battery box lid and its associated box, about which I have posted in the other thread where this project pretty much started, I find myself in a kind of serious dilemma about how to proceed. One of the things that I have taught myself over the years in doing this kind of stuff is that it is often a mistake to try to duplicate something from the thing itself rather than replicating it to perform what I can determine was its intended purpose. For example, in designing my version of the 928 Cowl Covers I first worked up my plastic forms to match an original cowl cover, but in the course of that project I happen to notice that the originals do not actually fit the car. So I revised my form to match the car rather then the original cover. I think that is in large part what gave rise to my use of the term "ReDesign" in my other membership handle.
In regard to this Lid project I pretty much abandoned what I had learned about some of these things and decided to follow some pretty strong advise of duplicating an original lid rather that incorporating any redesign of it. Too, I don't have an original 78 car and have only an original lid to work with. Nevertheless, with the pictures you guys have posted and with my intuition about the various aspects of the lid and box I have been able so far to reach a duplication point with only very minimal deviations.
The problem is that with continued analysis of the whole thing I have concluded that the box and lid were repurposed from somewhere else and not a Porsche design, and that the application by Porsche in the 78 928 was done probably the best they could do with the items, but pretty much less that Porsche-like. In fact I think that is the reason that the box was abandoned in 79 for something more Porsche-like.
The dilemma for me is that I am now faced with the idea of duplicating the relative non-Porsche-like approach in favor of something that I think is more Porsche-like in respect to the Lid. I have decided to do the lid over in such a way that I think it would have been done if Porsche had designed it in the first place. That means that I either ****-can what I have machined so far and start over, or take some steps back and revise what I have done to this point so that it meets my current goal. I'm going to do the latter.
I'm going to keep what I have so far except for some revision of the details in the top surface so that it still follows the original theme, but does so to also match the Porsche 928 application. The difference will be very obvious but not distastefully so. Basically I am going to eliminate the short rubber recess and move the long one to the other side. The other relief lines with angle lines will still be there and will be incorporated with the rubber relief much as with the original. Then there will be a need for only one long narrow rubber protection strip inside the lid. There will be no "Porsche Patch" rubber required.
Last edited by Jerry Feather; 04-10-2021 at 11:06 AM.
Jerry, so that the cover looks right, meaning looks original... how about just follow the original design, then supply the cover w/a large rubber sheet than matches the entire inner profile of the cover.
The end user could choose to keep the sheet 'loose' or bond it to the back of the cover.... OR purchase the original 3 rubber pieces and use those if they desire the original config.
Seems to me this would be a good compromise btw originality and better functionality.
I usually install a sheet of 1/4" closed-cell neoprene. With the slightly taller group 49 battery, it gives just the right amount of compression btw the cover and battery for a snug fit. And this way keeps all the original cover pieces intact.
Thanks, Jim, for some input on this project. It helps me with my thought process. I had announced above I think, that I have decided to change the dies to basically "fix" what I perceive as, not really an error, but kind of an issue with the Porsche application of the repurposed box and lid. However since then I have found myself still in a dilemma in that I'm not sure just how best to fix it. With your input however I discovered a new thought about this and that is what about the possibility of working the dies up so that I could form either version of the lid, a near duplicate of the original and a revised version to coincide with what I think Porsche might have done had they in fact designed the box and lid in the first place.
Just how to fix the issue has to do with what is really needed in terms of the rubber protection. It occurs to me that really only one post of the battery needs to be protected from the lid and in our 928 case that is of course the positive post. The negative post is already connected to the car, the box and the lid, I think, or even if not somehow, isolating the positive post still eliminates a possible short circuit. In fact that is all Porsche did with the Porsche patch since the short rubber strip still leaves the negative post open to the lid, at least with the Group 49 battery.
There are a lot of errors in the '78 battery box design, and you certainly can't solve all of them. Personally, I don't think you need to solve any of them.
For 44 years the factory cover has worked. It's biggest problem was it tended to go missing.
So the real problem you are solving here is reproducing something nonextant and in fair demand. That is the reDesign of this project, as I see it.
Building a 'better mousetrap' to solve one or two faults in a heavily faulted original design will not yield additional sales, and may possibly detract from them.
Know your market... establist cost, margin, volume sales estimates... excecute reDesign... product to market. Go!
I have abandoned my decision to change the design of this battery box lid to something that I thought would correspond to what I thought Porsche would have done with it had it been their own design. I have to thank Jim D. for that to some extent because his kind of insistence that I make duplicates of the original lids has at least put me off in my planning. I am not a big officiando of originality, as one might tell form my other 928 endeavors, but Jim's thoughts and postings have given me cause to reflect on the overall project and has put me off making any changes in my original course of action. Thanks Jim!!!
My other thanks is to Rob E. whose postings, moreso than what he has said, but pretty much what he has brought to our attention, has provided me with the information needed to actually figure this thing out. Rob posted a link to a 2016n thread where this topic was extensively discussed (and including a reference to me about maybe making some of these lids). I had read through that thread a couple of times and didn't then notice what turns out to me to be the most telling aspect of this lid. I read his linked thread again this morning and noticed for the first time the mention that this lid is in fact the "hold down for the battery in this box."
After I gave that phrase some thought and again looked at the pictures in that thread and the one Rob posted in this thread, (or the other one I started), and a picture of the G49 battery in this box, it finally occurred to me that I was wrong about the purpose of the two long rectangular strips of rubber put in the recesses in this lid. When I studied the picture of the G49 battery in this box and then looked at the rubber strips again in my lid from Barry, I could see that they are not there as insulation for the electricity from the battery terminal posts, but rather they are mere cushions or pads for between the lid and the top of the plastic battery case. That's why they don't quite reach the terminal posts, as Rob tried to point out, and why they don't provide any protection for the positive post in the 78 928 application of this box. The Porsche Patch is the only rubber patch that is put there by Porsche for the protection of the positive post of a battery in this box in the 78 928. I suppose that is for "just in case."
One thing I suspect is that the rubber strips may not be thick enough to do much cushioning; and I am going to consider using some rubber that is a bit thicker. What I would like to end up with is a system where the battery can either be set on top of some rubber pad and/or with thicker cushions in the lid, so that when the lid is screwed into place there is in fact some hold down tension provided onto the battery. That may have to vary depending on just which later market battery might be installed. Their height measurements seem to be all across the board.
Last edited by Jerry Feather; 04-23-2021 at 11:41 AM.
This project finally came back to life. A couple of weeks before I took the time off to go to Texas to get the 86 I bought from Herman K., I had bought the necessary bar stock to make the die inserts for the top of the male die I have bolted in my mill. Then when I got ready to try to work that up I couldn't find it, and I still haven't. So I bought it all again. Now I have the two male pieces cut and fit and pilot drilled for the screws to hold them in the die. I need to find the right size countersink to finish out the holes and then tap them for the quarter inch screws, so that is another errand to run.
Spring is here so I seem to suddenly have several various projects to catch up on. The least of those is not the Belly Pan; so I am planning to make some progress on those later today. The overhead door in my remote shop does not raise except with more effort than I can muster at my age, so son Tim is going to meet me out there and try to wind the spring some to see if that will help.
Last edited by Jerry Feather; 06-06-2021 at 10:56 AM.
Be careful with that spring. They can be incredibly dangerous. But I bet you know that already.
Cheers
Thanks. Tim basically put himself through engineering college hanging garage doors. Then he worked for a couple of years doing the same as a garage door engineer before he found a job doing regular mechanical engineering. Now he still does it a little bit on the side. His golfing kind of got in the way today, so we will put the spring off for another day.
__________________
ReDesign by FEATHER
by Jerry Feather
Producer for 928 of:
-Hatch Latch Receiver Liner--All Versions
-Replacement Heavy Duty Spare Tire Cover
-Flush Center Console Conversion
-Cowl Cover, Cowl Seal, & Shell Stickers--All versions
(RHD included)
-Aluminum Gas Cap Ratcheting Pawl
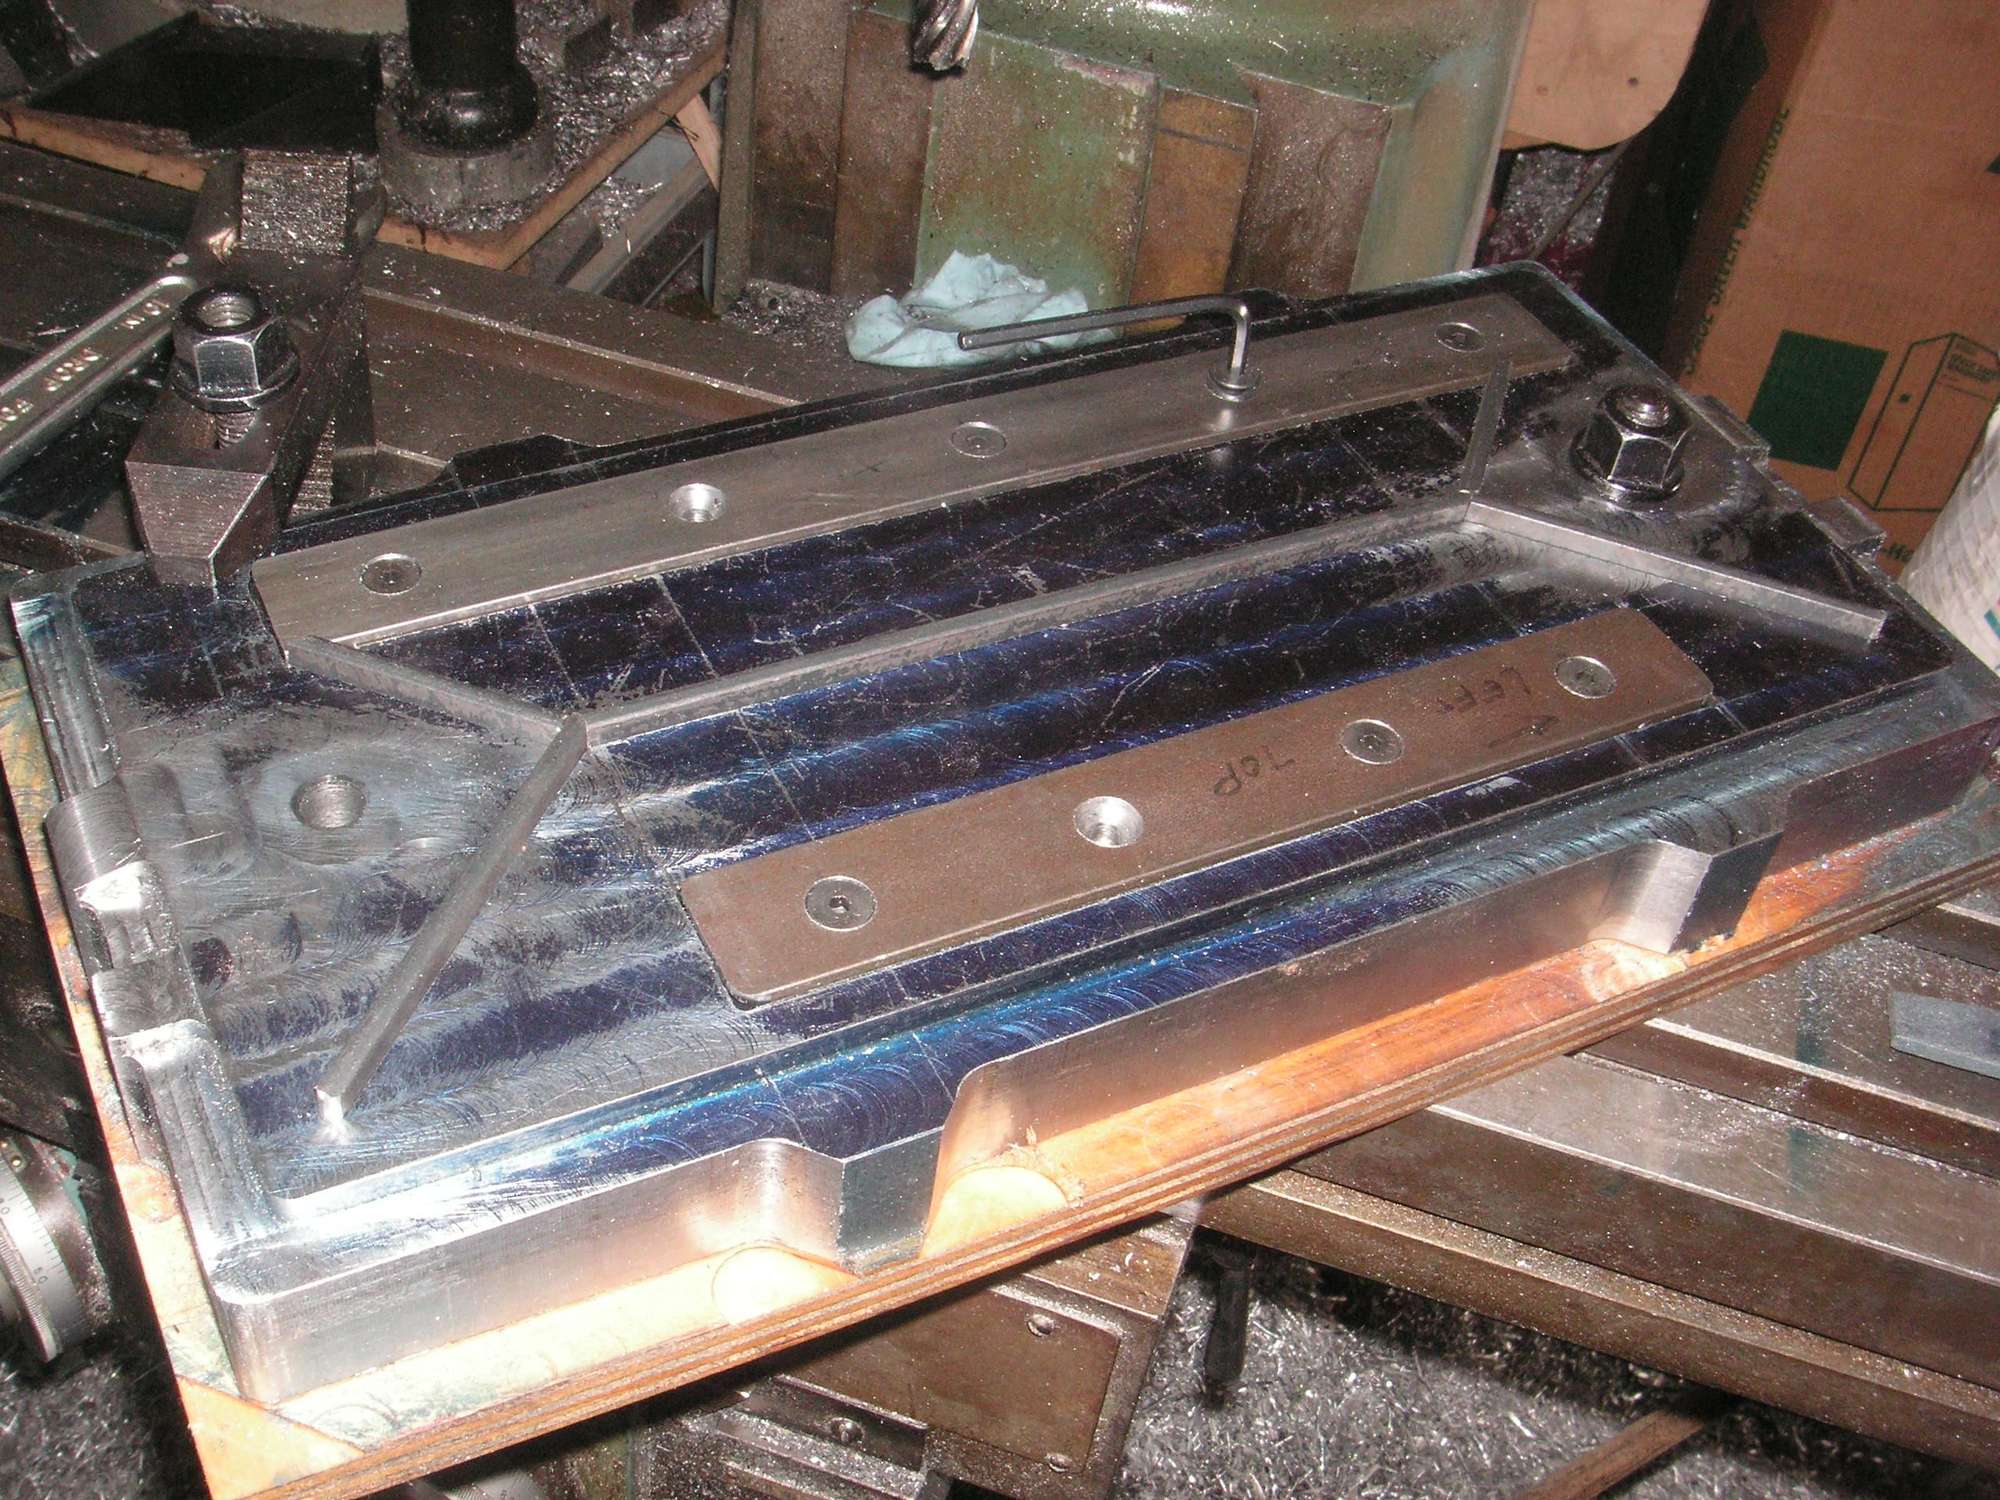
This post is almost more important to the Belly Pan thread than here since it involves the near completion of one of the other projects I took on that has had my mill tied up to the point of reluctance to untie it so I could do the final milling on the production belly pans that is needed before I get the adjustable mounting tabs anodized. Anyway, I finally nearly finished the milling on the male battery box lid die so that i can now use the mill for something else.
Here are some pictures of the male lid die as it now is waiting for only minor mill work on some of the inserts and much hand finishing.
Last edited by Jerry Feather; 06-07-2021 at 04:22 PM.


 04-07-2021 | 11:21 AM