When you click on links to various merchants on this site and make a purchase, this can result in this site earning a commission. Affiliate programs and affiliations include, but are not limited to, the eBay Partner Network.
OK I AM A NEWBIE SO BE KIND
HAVE REVIEWED FORUM POSTS ON BLASTING
STILL CONFUSED
MY INTAKE APART AND WAS GOING TO TAPE OFF AND GLASS BEAD
THE INSIDE ID COVERED W SOME SORT OF PAINT THAT IS FLAKING OFF AND I WANT TO BLAST THE INSIDE TOO
AM CONCERNED ABOUT DESTROYING MY ENGINE
Hi Joe, what year is your car? Have you removed the intake from the engine? Several on here have ruined their engines by incomplete or insufficient cleaning after blasting. The secret is through cleaning after blasting with various brushes, lots of scrubbing and lots of water from every possible direction. I know when I blasted mine I washed it for over an hour with every brush at my disposal. You can use various blasting media, however I have not heard of anyone using dry ice, although they use dry ice to blast the paint off of aircraft.
Roger has a pretty sharp fella that he sends intakes to, all professional top notch operations, he has some 928 Intake videos on youtube being blasted etc.
OK I AM A NEWBIE SO BE KIND
HAVE REVIEWED FORUM POSTS ON BLASTING
STILL CONFUSED
MY INTAKE APART AND WAS GOING TO TAPE OFF AND GLASS BEAD
THE INSIDE ID COVERED W SOME SORT OF PAINT THAT IS FLAKING OFF AND I WANT TO BLAST THE INSIDE TOO
AM CONCERNED ABOUT DESTROYING MY ENGINE
HAVE A PRESSURE WASHER AND BORESCOPE
SUGGESTIONS?
ANYONE TRIED DRY ICE BLASTING?
Don't bead blast it.
I rebuilt 3 engines ruined from this, last year, alone.
Send it to Donald. Although I have not had him do an intake, he seems to understand all the issues.
Last edited by GregBBRD; Jun 13, 2020 at 09:15 PM.
I just finished this one on Saturday. Some things you just can not do (well and correctly) in a DIY manner. The reasons I think many engines self destruct is owners undertake this process themselves. I laugh AND cringe at the same time when I read the carnival of options owners undertake to clean their manifolds...when they said they put them in the dishwasher is when I got involved in this merry go round to stop this craziness.
To recap; you must have a LOT of air, like 175cfm worth of air. The most the compressors at Lowes and Home Depot and Tractor Supply and Northern Tool will offer is 25 maybe 30 cfm which will not be sufficient. You 'should' use light weight blasting media, the lighter it is, the more it costs. You need to be ready to spend $1.75 per pound for say a good Plastic, type IV Acrylic, and have at least 500 pounds in the system, and, an enclosed continuous recycle system. You should go over each manifold by hand with a small steel pick and chip away the coatings, (GTS manifolds this process takes 5 hours). You should have a small tool to hold the Manifold in place like this Rotisserie I built for just this purpose. All this considered; we have up to 2 hours in labor costs for an S4, 5-7 hours for a GTS (both including Cam Covers).
You should never use chemicals to loosen up the paint as you likely do not have enough air to remove the softened and now hardening gunk. You then likely will want something sharper so you buy Alum Oxide for way too much money and it has a much harder MOH scale and takes more air to move it so it comes out slower and you become frustrated and then proceed to the dishwasher. When this all is done, you may have 18 hours in your manifold and it looks like garbage -- completely not ready for any paint or powdercoating.
Greg, send me one, I'll comp you so you can 'see' and evaluate,
And the USA S3 "organ pipe" intakes (1985-1986.5) seem especially difficult to clean, because the crevices behind their plenum bell mouths are difficult (impossible?) to access.
Would it be OK to tape off all the S3 plenum openings and just blast and paint or powder coat the outside only?
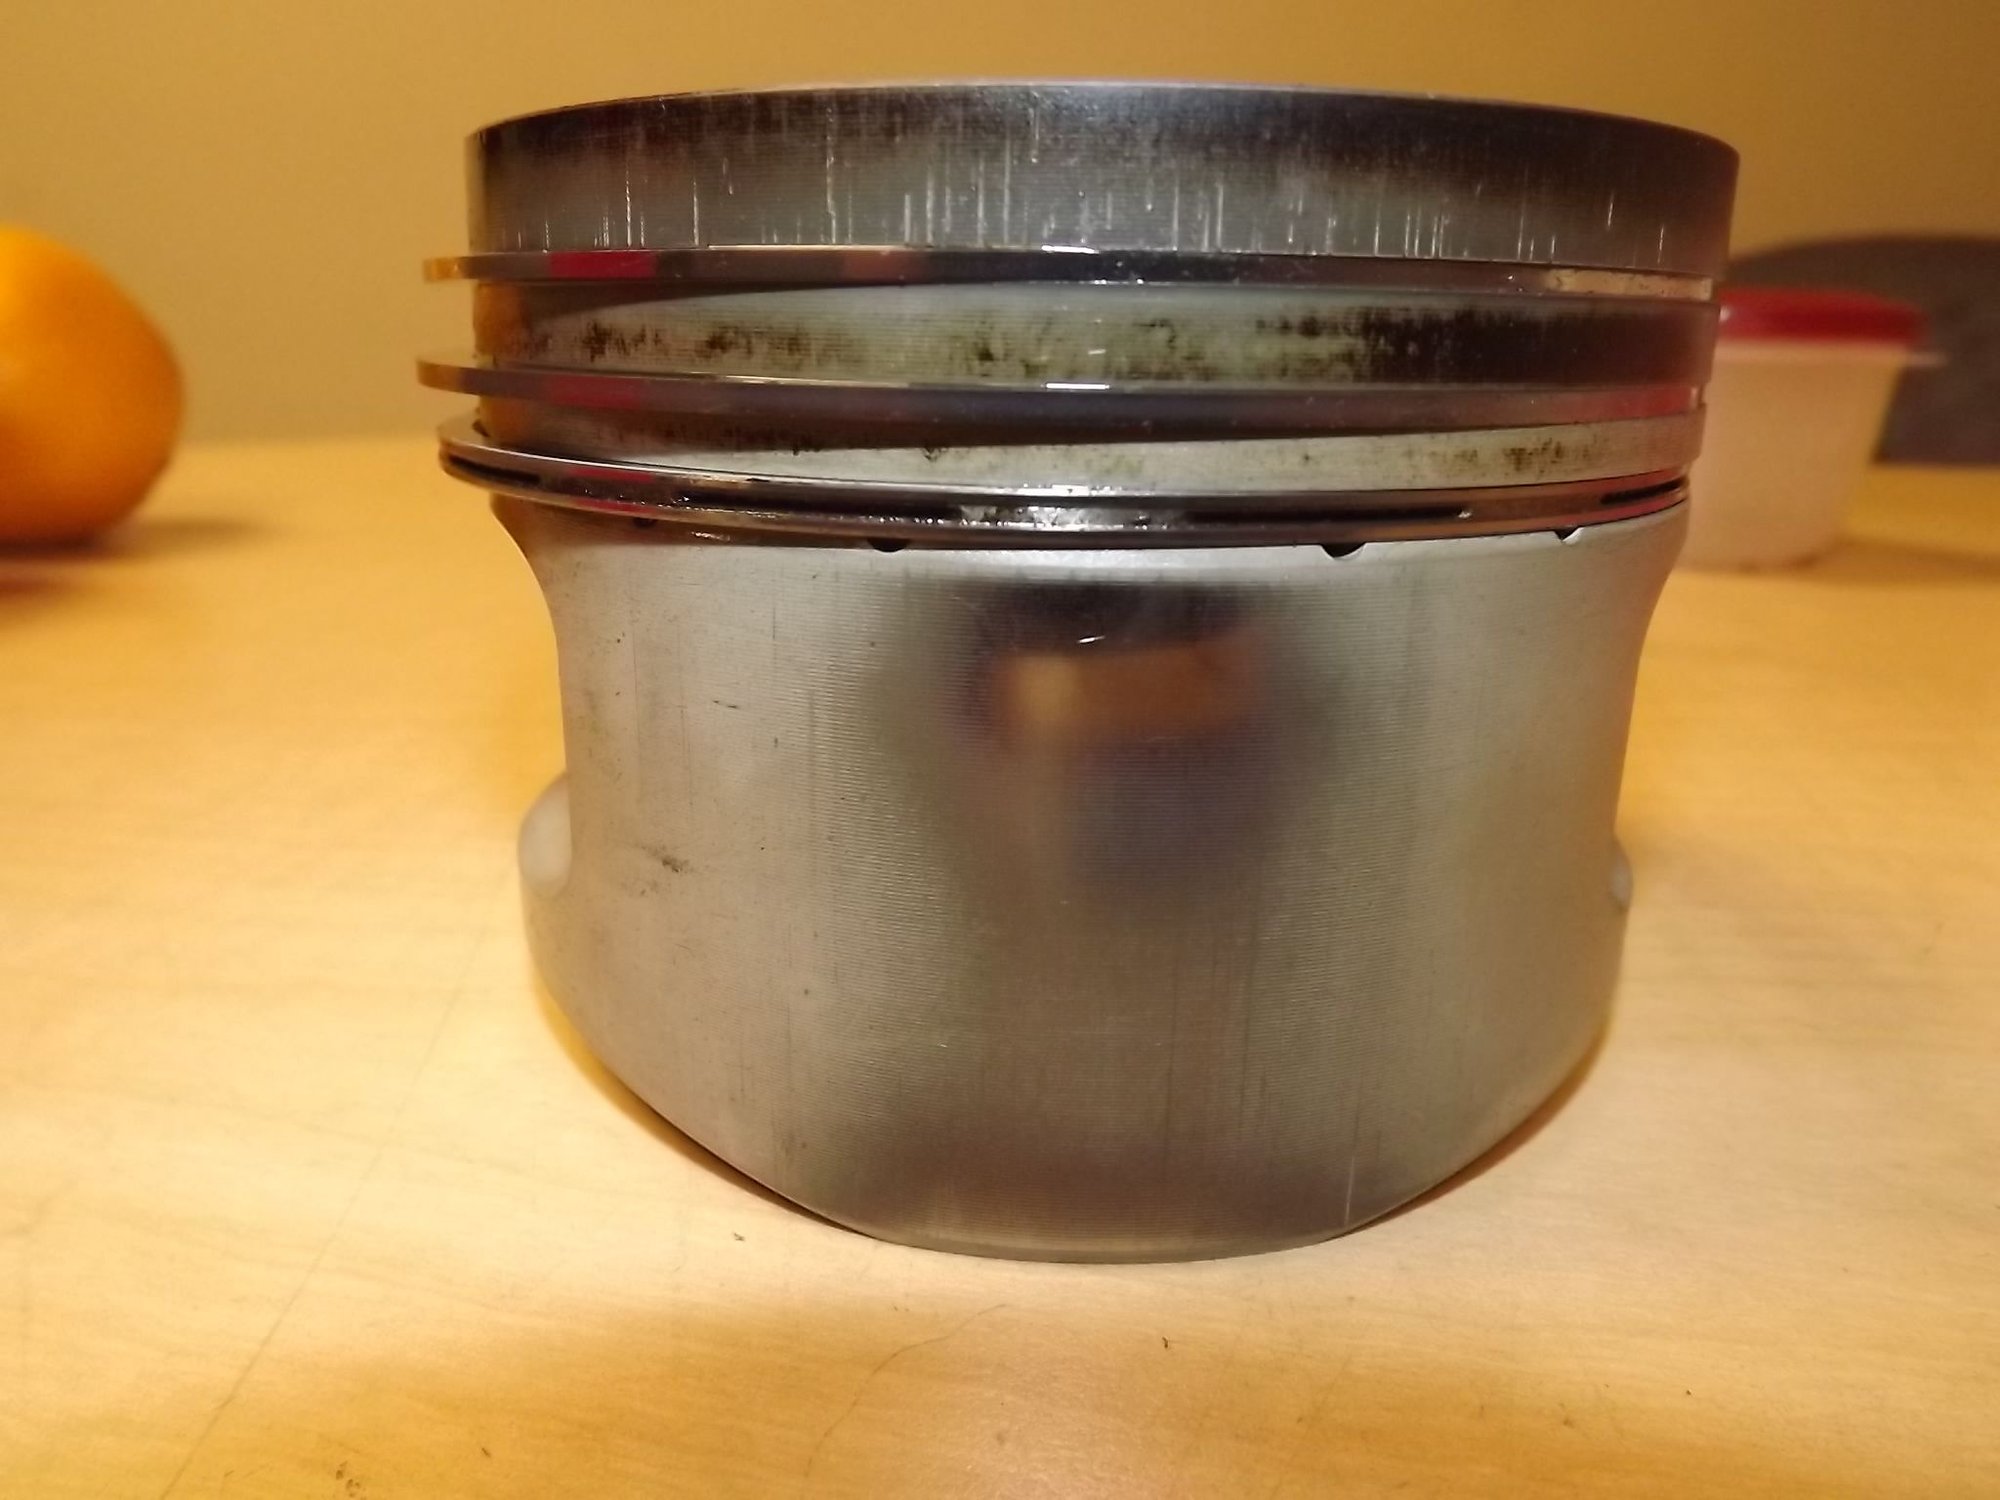
I just took apart a 951 engine for a client, who insisted/begged me to do it. #1 cylinder had low compression/crazy leakdown. (I've built a zillion of these engines, in years past....apparently the amount of people that know how to do these engines is getting "thin".....I probably get a call every week from people looking for someone to rebuild their 951 engine.
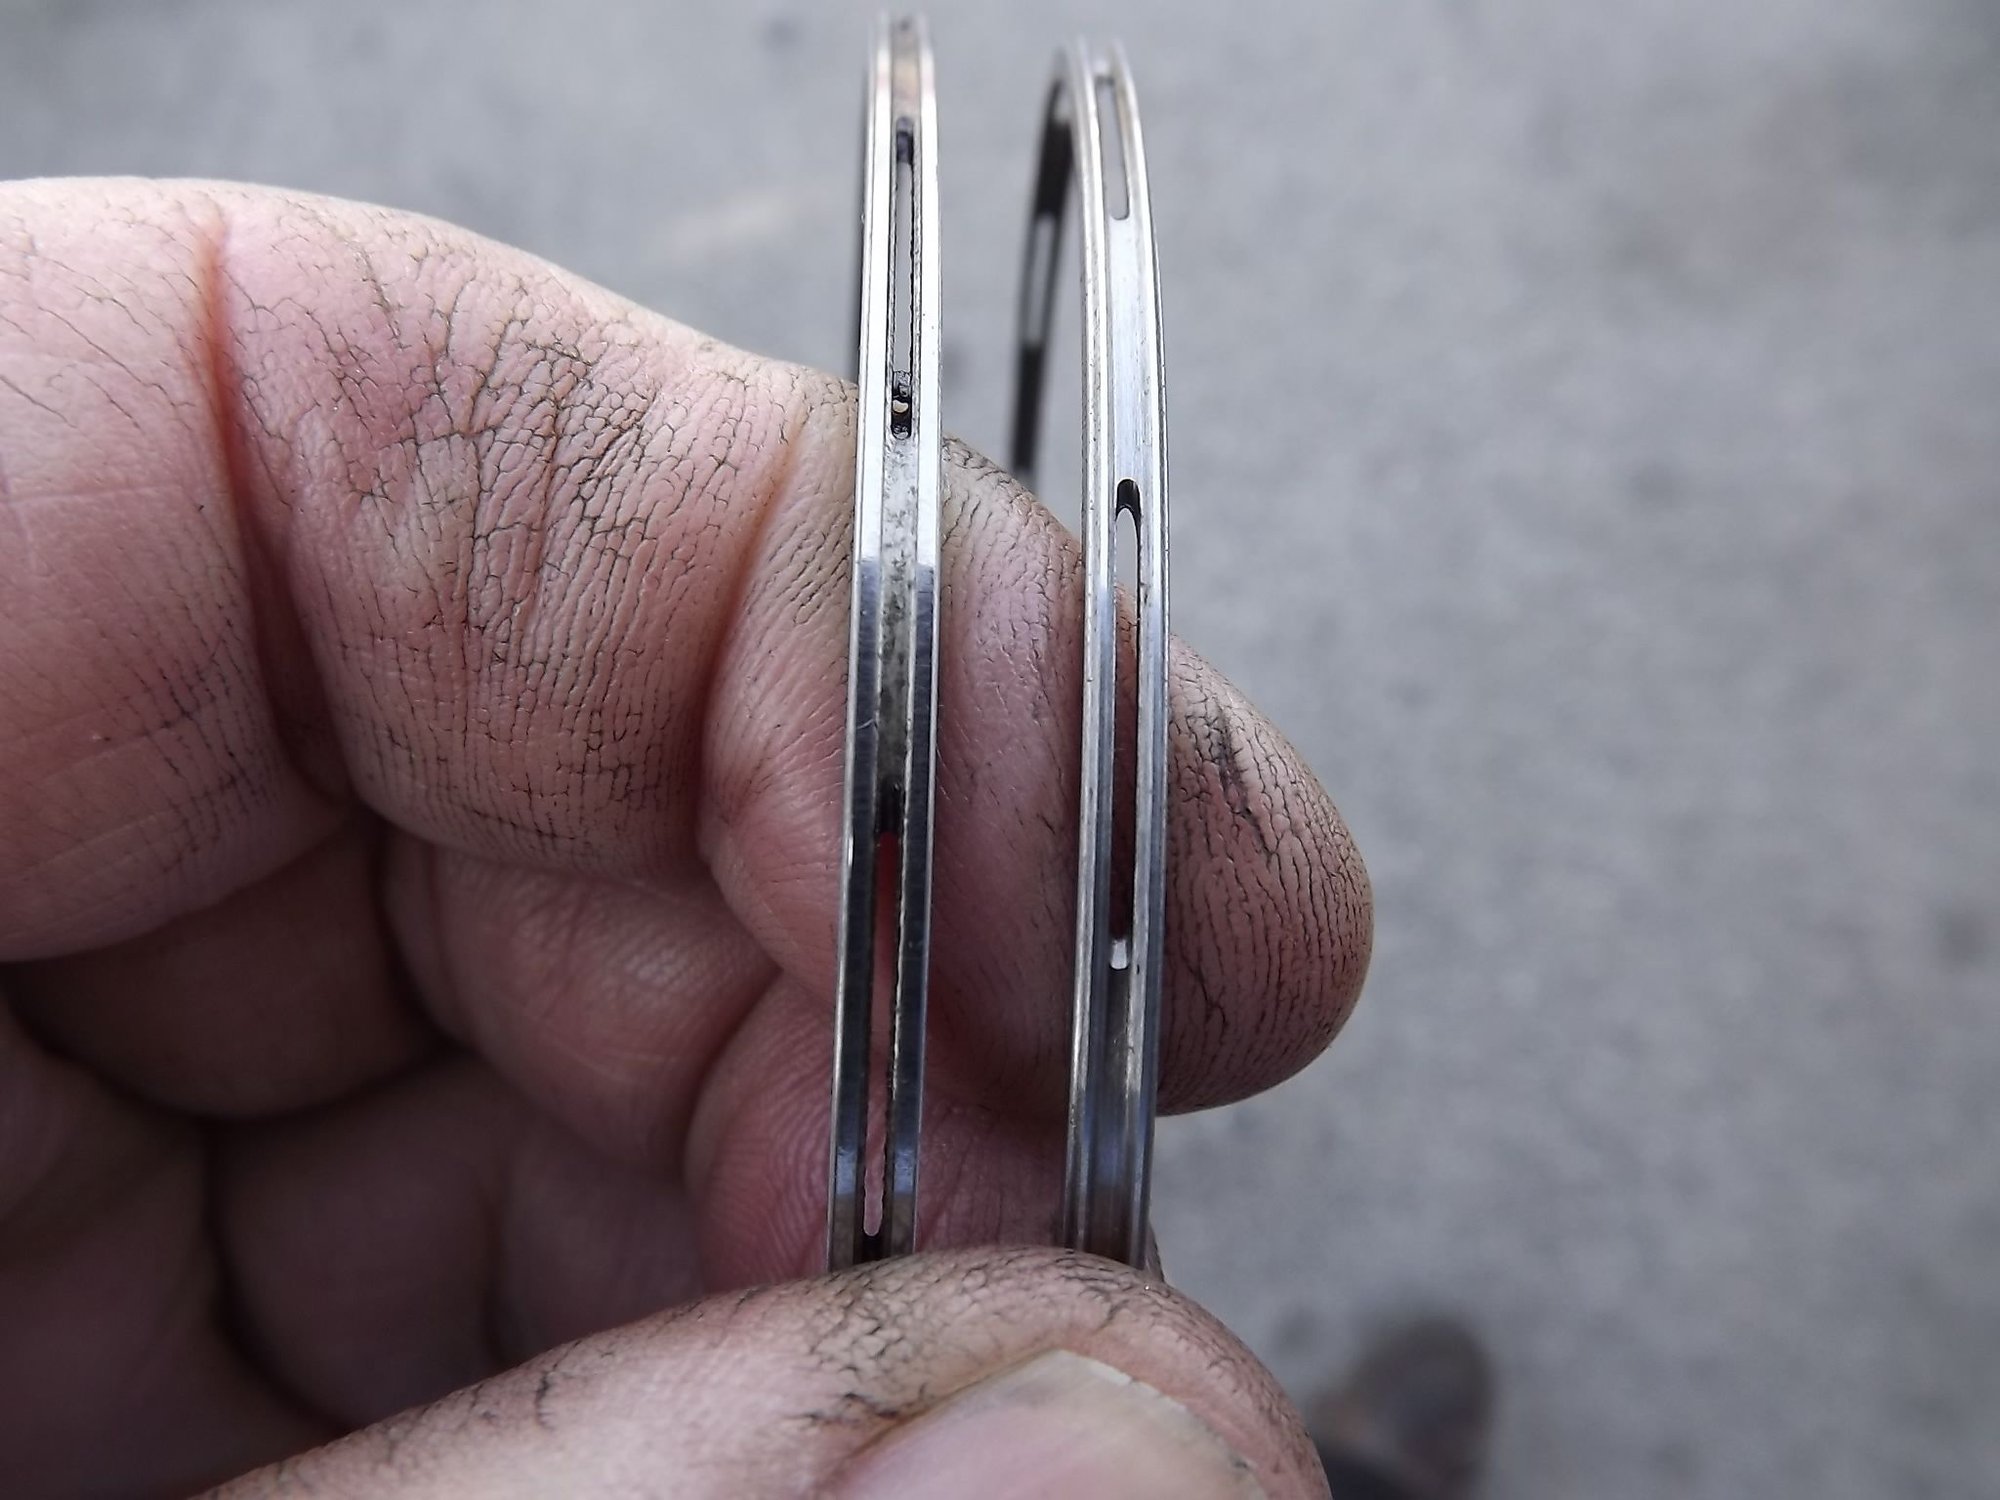
The oil control rings were "sanded" flat....virtually nothing left, with #1 cylinder the worst.
The #1 piston was covered with really thin scratches down the walls, which also damaged the bore. #1 cylinder had crazy wear 90 degrees away from the piston side skirt surface (away from the thrust surface), where there is never any wear.
Ordered 1st oversize pistons (100.5mm) (the only oversize Porsche offers.)
Took it my machine shop and got a call that the wear on the non-thrust wall was too deep for the first oversize bore diameter to cure.
That's crazy and simply can't happen, under normal circumstances.
Guess what? The intake manifold had been off this engine and got bead blasted to look "better".
We're starting to call this intake manifold cleaning and re-painting/powder coating "job security".
Fine scratches above top ring...which means whatever scratched the piston originated from the combustion chamber side. Note the scratches below the rings, on the skirt. Whatever did the scratching above the rings was fine enough to get past the rings. Almost completely flat oil control ring on left. Normal oil control ring on right. That wear is not normal, even on extremely high mileage engines.
When this displayed intake manifold returns from the Powder coater I will take photos of that sealing surface for examination and analysis. Here's this Intake...
The mating surface on the Intake looks a little rough...but the Cam covers' surface does not. As my blasting media gets smaller it cuts better at the end of it's life - much like we get better looking as we age and get gray hair and beards - which is always the Ying and Yang, Cause and Effect herein.
Talos Takes Your 991 Porsche 911 GT3 to the Next Level for a Cool $1.13 Million
Slideshow: Talos Vehicles has transformed the Porsche 911 GT3 RS into a carbon-bodied, race-inspired machine that costs well over $1 million before the donor car is even included.
9 Vehicles Porsche Helped Engineer that Aren't Porsches
Slideshow: Long before engineering consulting became trendy, Porsche was quietly helping other automakers build everything from supercars to economy hatchbacks.
9 Features and Characteristics That Only Porsche People Understand
Slideshow: Some brands build cars. Porsche builds traditions, obsessions, and a few habits that stopped making sense decades ago but somehow became part of the charm.
This Builder Is Turning Heads With Its Slantnose 911 Creation
Slideshow: A small Polish tuner has reimagined the Porsche 911 Slantnose for the modern era, blending 1980s nostalgia with widebody tuning culture and serious performance upgrades.
Porsche 911 GT3 Artisan Edition Pays Homage to Japanese Culture
Slideshow: Porsche has created a Japan-only 911 GT3 Artisan Edition that blends track-ready hardware with design cues inspired by traditional Japanese craftsmanship.
Porsche Reveals Coupe Variant of the Electric Cayenne With a Fresh Look
Slideshow: Porsche's latest electric Cayenne Coupe blends dramatic styling with supercar acceleration, turning the brand's midsize SUV into a 1,139-horsepower flagship.