When you click on links to various merchants on this site and make a purchase, this can result in this site earning a commission. Affiliate programs and affiliations include, but are not limited to, the eBay Partner Network.
My first 928 was an 86.5. My memory does not go back that far. I know the 86 and 85 I owned had 2 piece cam bolts and the joy of heating them with a torch to back them out.
I live in fear of those two piece bolt/standoff sets.
😳
Kevin, to my understanding, that hardware is stock for 1986.5 S3’s.
1985 and 1986 S3’s had the two piece, hex head hardware and stand offs.
Just a data point, this 86.5's last 4 digits of the vin are 2512, so it's a late 86.5. The driver cam cover had clearly been off recently as I found lots of RTV inside on the spark plug hole gaskets and on the sides of the cam carriers and there was no sealant in required corners per the WSM. Needless to say it was leaking badly. I believe the bolts were over-torqued as well. The passenger side was drama-free and looked original.
This car also has the S4 chain tensioners. Pads were not worn that bad but were showing some cracks.
Just waiting for intake to come back from my powder coater, we are going shimmer gold with a satin clear.
My 1500 vin range 86.5 S has new style one piece bolts. Getting some of these lower bolts out is a real PITA. The harness brackets are in the way on 2 and otherwise no room. I don't ever see being able to torque a bunch of them, let alone getting the bolts back in.
Originally Posted by Adamant1971
This car also has the S4 chain tensioners. Pads were not worn that bad but were showing some cracks.
Is there a pic of the difference ? I should have the covers off tomorrow.
What's the best low profile ratcheting bit driver for this job ?
My 1500 vin range 86.5 S has new style one piece bolts. Getting some of these lower bolts out is a real PITA. The harness brackets are in the way on 2 and otherwise no room. I don't ever see being able to torque a bunch of them, let alone getting the bolts back in.
Is there a pic of the difference? I should have the covers off tomorrow.
What's the best low profile ratcheting bit driver for this job?
Yes, you need to disconnect the harness bracket, that is the hardest bolt IMO. I use a standard 1/4" torque wrench with Allen key sockets, on the two bolts by the shock tower I sometimes use a u-joint adapter, I also cut down on of my Allen key sockets to gain clearance. But I usually end up doing a couple of the bolts by hand with a standard Allen key. Once I have torqued a few down I go back to a torqued bolt and get a feeling for how tight it is with the Allen key, then I jump over to hard to reach bolt and tighten with the Allen key, swapping back and forth between bolts to get a consistent feel on each. Much easier with the engine out. There may be a slick s Snap-On tool for this job, so maybe we will get more input from the gurus here.
Once you pull the tensioner and disassemble, the easiest way to tell is there is no spring in the later tensioner. Pics attached showing the cylinder sans spring and the wear on the pads from this car.
As far as other tools for the job, I personally hate undoing the bolts, the threads are long. The tool in my previous photo works like a charm on the passenger rear bolt while holding the wire harness back an inch or so, then one finger on the tool and ratchet it out. It's also a great tool to have in the glove box.
Just take your time undoing the bolts. If they fight don't go all gorilla armed, put some heat on the head, let it cool and give it another go. And make sure the Allen keyholes are clean and that your keys are in good shape and fit snuggly. I clean with a pick or tiny wire brush then compressed air to blow them out before attempting to loosen. If you have tough bolts that have easy access I would use the previous advice to use an impact gun, manual impact, shock it with a hammer and punch etc.
Just a data point, this 86.5's last 4 digits of the vin are 2512, so it's a late 86.5. The driver cam cover had clearly been off recently as I found lots of RTV inside on the spark plug hole gaskets and on the sides of the cam carriers and there was no sealant in required corners per the WSM. Needless to say it was leaking badly. I believe the bolts were over-torqued as well. The passenger side was drama-free and looked original.
This car also has the S4 chain tensioners. Pads were not worn that bad but were showing some cracks.
Just waiting for intake to come back from my powder coater, we are going shimmer gold with a satin clear.
Adam, my Red Witch is VIN 2266, and had her cam covers off once before me, back in the late 90's. They were powder coated and reinstalled with new gaskets. Nothing on the invoice showed anything about new hardware. She also has the S4 cam chain tensioners with the hybrid S3 oil feed lines. Nothing in her service history shows anything about replacement.
Adamant1971 - Thanks, very helpful. I got all bolts out with the exception of the Pass side, lower rear that is under the rear harness bracket. Did you remove that bracket ? This one is the hardest for me so I let it sit for the night and went to my Saturday night virtual cocktail hour with friends and Whistle Pig.
I'm looking for a small ratcheting bit wrench like yours in post 6 but not sure of the quality and fit of those on Amazon. Those lower bolts were a PITA - luckily after a few turns they all came out with fingers, knuckle cuts and all.
Also, there are a few bolts that do not have o'rings - certain locations do not have the recess for them and it's a flush mount to the block. But, my pending order has 24 o'rings - is consensus to now put o'rings on these locations ? I think they would just be crushed rather than seated.
As an FYI, I'm confident Cam Covers have never been off.
I've had pretty good experiences with GearWrench, so I think it should be trustworthy. If you really want to spend a bit more, Wiha makes a set for ~$50.
Adamant1971 - Thanks, very helpful. I got all bolts out with the exception of the Pass side, lower rear that is under the rear harness bracket. Did you remove that bracket ? This one is the hardest for me so I let it sit for the night and went to my Saturday night virtual cocktail hour with friends and Whistle Pig.
I'm looking for a small ratcheting bit wrench like yours in post 6 but not sure of the quality and fit of those on Amazon. Those lower bolts were a PITA - luckily after a few turns they all came out with fingers, knuckle cuts and all.
Also, there are a few bolts that do not have o'rings - certain locations do not have the recess for them and it's a flush mount to the block. But, my pending order has 24 o'rings - is consensus to now put o'rings on these locations ? I think they would just be crushed rather than seated.
As an FYI, I'm confident Cam Covers have never been off.
You will need to disconnect the harness bracket where it attaches to the rear of the cam tower, 1 or two 10mm bolts IIRC, then hold the harness out of the way while you deal with that little bastard.
I need to review the placement of o-rings when I get the cam covers back from my Powder Coater, I noticed the same, not all had o-rings.
I've had pretty good experiences with GearWrench, so I think it should be trustworthy. If you really want to spend a bit more, Wiha makes a set for ~$50.
Adam - what did you use to get the nuts of the breather connectors ? Dwayne intake refresh uses an antenna lock socket but he doesn't say what size. Tried needle nose pliers but they are on too tight.
I noticed in the pic below, that where the rear Pass harness bracket attaches to the block, it has the bolt and a screw plug - same screw plug on the other side (rear driver) in the block - Anyone ?
I use a pair of needle nose vice grips. First I bend back the metal lock tab, and the pliers I have fit right in the notches allowing me to turn those nuts easily.
For the harness bracket, it bolts to the rear of the cam tower, close to the firewall, 10 mm. You will need to remove the passenger side engine hook as well to gain clearance to remove the cover. Also on this 86.5 I had to remove the air pump valve as it was in the way too.
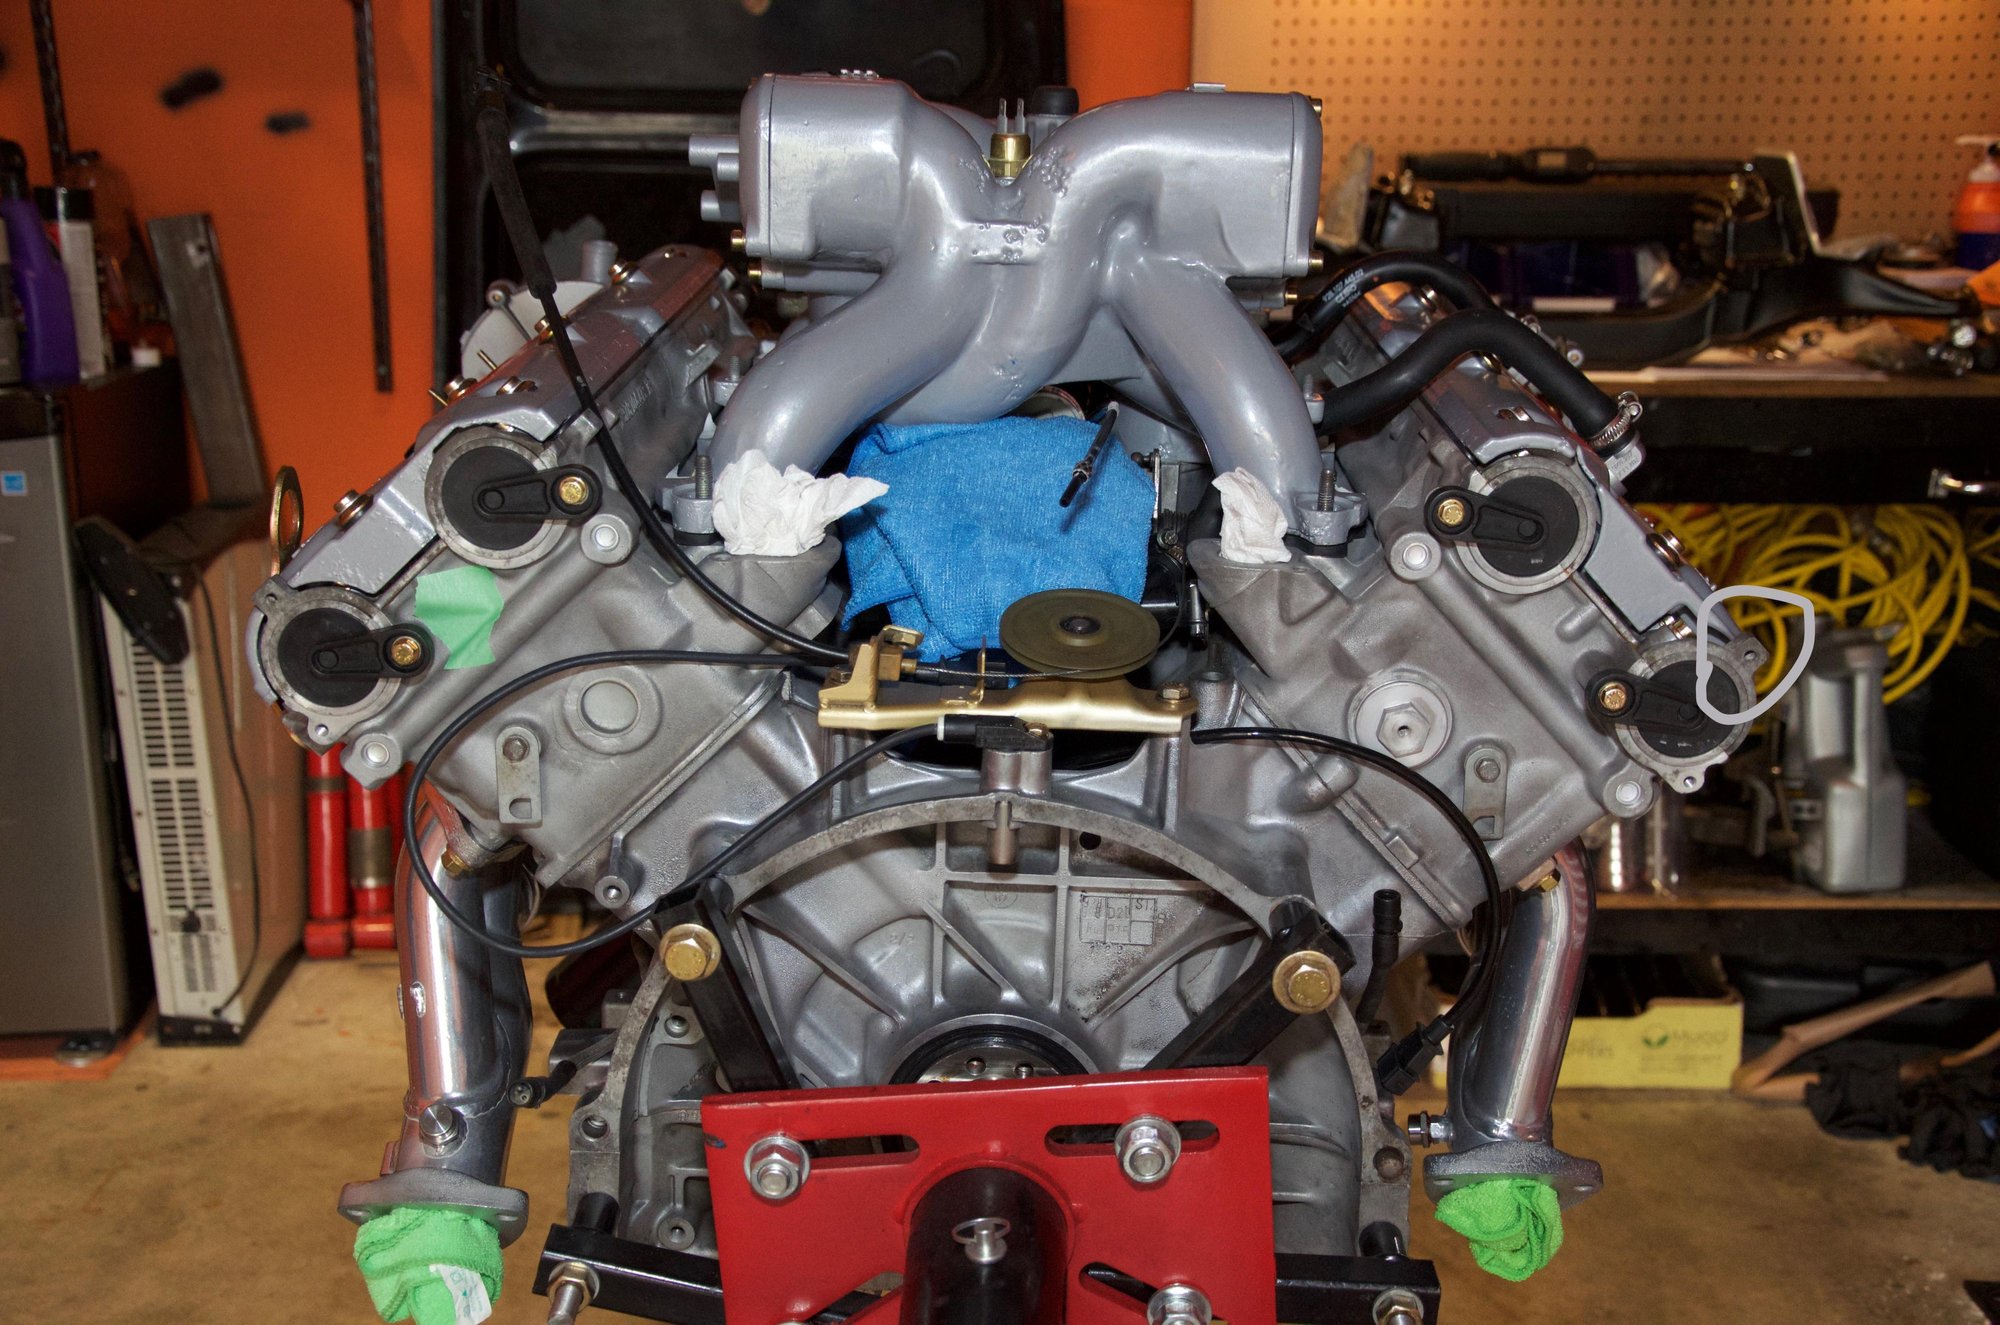
Update: I forgot that I had pictures of Daniels motor before I put back in his 89. Bolts to the hole circled in grey.
Also, there are a few bolts that do not have o'rings - certain locations do not have the recess for them and it's a flush mount to the block. But, my pending order has 24 o'rings - is consensus to now put o'rings on these locations ? I think they would just be crushed rather than seated.
Reinstalling cam covers- Never got definitive response on this. There are 3 bolts on each side that did not have o'rings and are flush mount to the head (that is, no seat bored out for the o'ring) - is consensus not to put o'rings here ? Roger sends a standard pack of 24 but I'm thinking it should be18 and the others are extra.
Those bolts in question do not seal oil areas. If you look closely, they are outside the perimeter of the cam cover seal. They do not need to seal, just apply clamping pressure.
I noticed this when I took the cam covers off the engine in the Red Witch.
I�d plan on using the O-rings on ALL the cam cover bolts. If nothing else than for even clamping pressure.
Regarding the two piece vs. the one piece cam cover bolt hardware. It appears the changeover occurred early in the 86.5 generation. I own two 86.5 cars, vin 1220 has two piece bolts, vin 2582 has one piece bolts. Anyone have a vin greater than 1220 and two piece bolts? Of course any of the one piece bolts could have been retrofit.


 04-06-2020, 07:45 PM