When you click on links to various merchants on this site and make a purchase, this can result in this site earning a commission. Affiliate programs and affiliations include, but are not limited to, the eBay Partner Network.
Sorry you take everything so personal. I sometimes get confused and think we are all here to help each other "improve" their 928's. When I "miss" something obvious, I encourage people to point it out.
In this case, I'm just pointing out the obvious, which Porsche knew, before they make the first 928 chassis. Automotive sheet metal is very prone to "work hardening" from flexing...ask any body guy on the planet. Tiny amounts of flex result in cracks in this kind of metal...very quickly. Add in a bunch of tiny holes for pop rivets (stress risers will form in the sheet metal radiating from these holes) and you've got a guaranteed disaster on your hands.
Even the very first production 356's and the very first production VW's had double wall firewalls for the brake master, to keep the firewall/front bulkhead from flexing and cracking. All of the 914's and all of the pre-power brake 911's (which both had an extremely sturdy inner pedal box) added a double wall to this area.
I do have some very constructive suggestions, to help you with you with this design, if you are interested.
In the meantime, I'll bow out and you can soldier on.
Semi-retired, as of Feb 1, 2023.
The days of free technical advice are over.
Free consultations will no longer be available.
Will still be in the shop, isolated and exclusively working on project cars, developmental work and products, engines and transmissions.
Have fun with your 928's people!
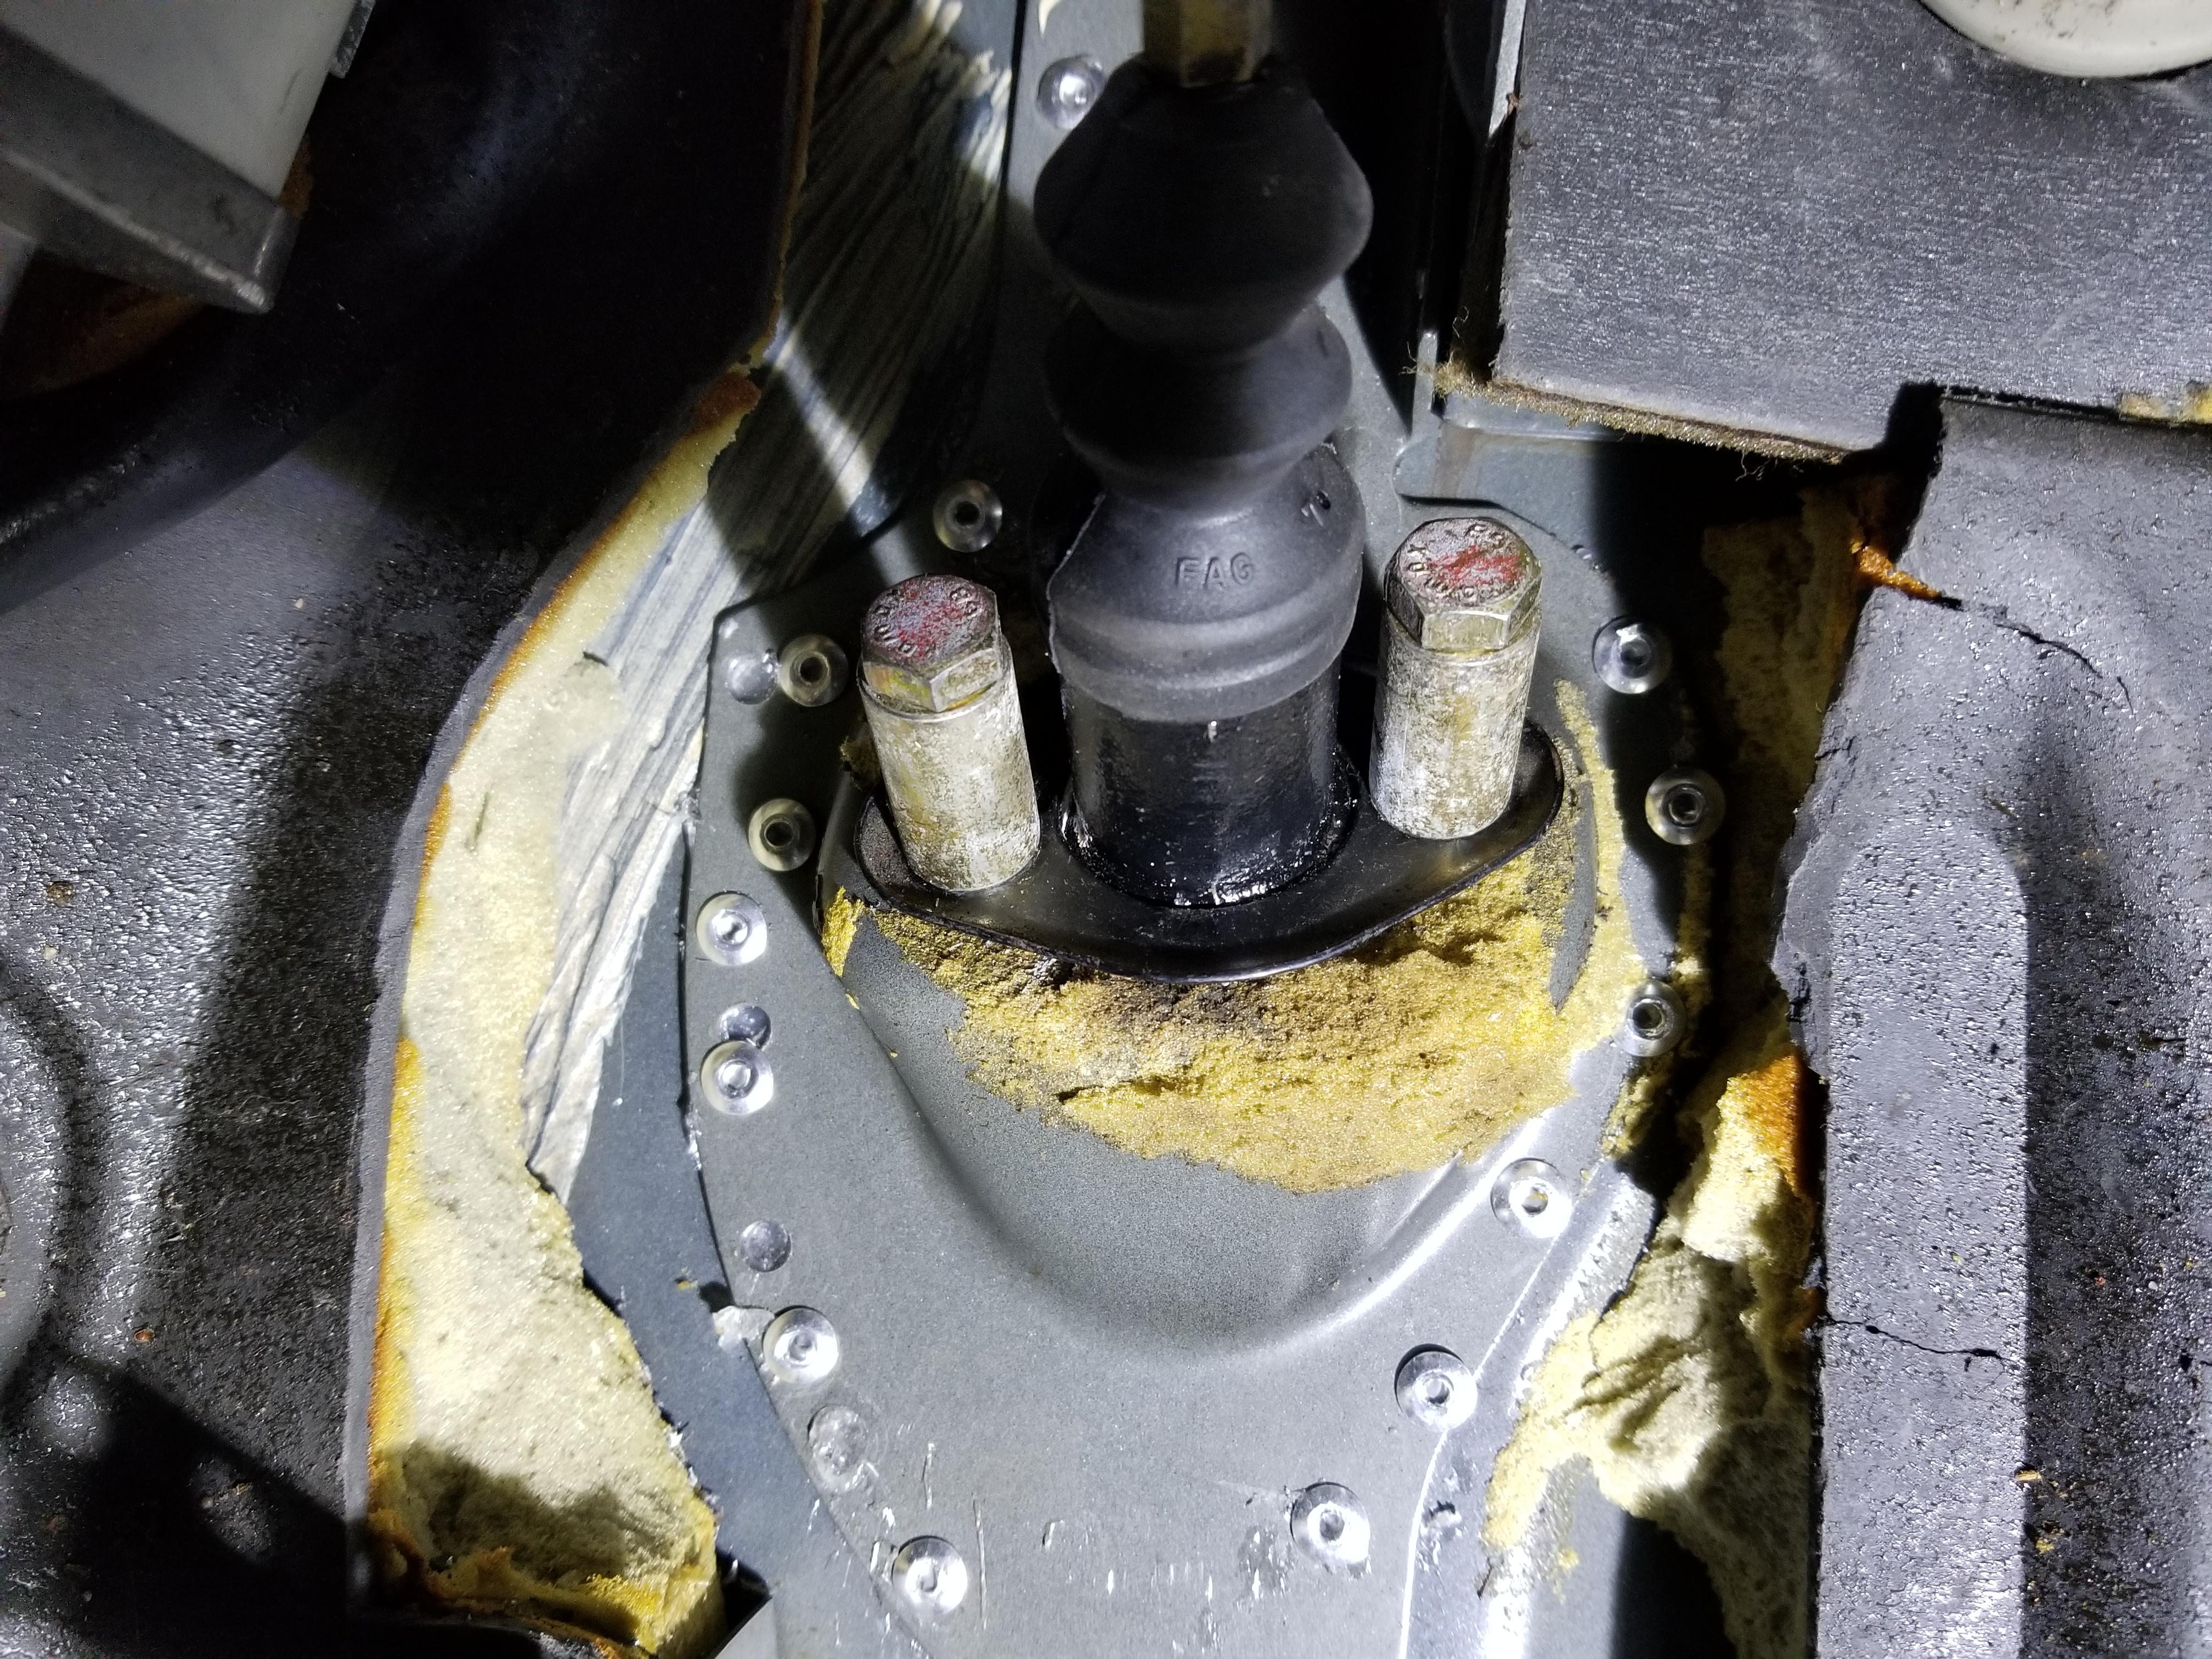
Is this the piece you're talking about? This made me remember seeing some piece of metal that was shaped like the clutch master in the box of parts that I bought from the donor car. I didn't know what it was at the time and it was still sitting in the box of stuff left over from my swap. Looks like it goes here from the pet, so I just went out to the garage and put it on the car.
Greg, I was asking you to get to the point. Are you trying to say that you think the amount of the mounting flange on our clutch master mount is smaller than the OEM mount, and so would allow more flexing of the firewall?
I have a few thoughts on that:
1) the material Porsche used to make their part is 2.0mm thick mild steel. We made are part from a little heavier stock, using 0.10" thick steel, which translates to 2.54mm. We did not do this for strength as much as we did it for our process.Porsche pressed their part into a die, ours was designed as a weldment to be TIG welded, so the thicker material was easier for us to work with. None the less, our part should flex less than the OEM part because it is a little thicker.
2) our part has wider mounting flanges on the left and right sides than the OEM part. I did that to make it easier to get the rivet gun head in place to pull the rivets, and that where Porsche used spot welding, our customers would be using rivets and needed room. A look at Matt's pic just above shows how hard it is to get the rivets into those narrow flanges, especially on the right side. So I made mine wider to provide more room for the rivets.
3) our part is not as tall as the OEM piece. Where they extended all the way up to the seam between the tub and the top section, we did not. I was trying to make it easier to install than the stock part. Those upper-most rivets are a bear to get at as they are up behind the dash, as you know.
So, speculation. Will the 928 with a clutch master cylinder mounted with this master cylinder mount cause flexing of the firewall over time such that it may crack the firewall, where the original part would not? I don't think so. I could make the next batch taller, more like the original part, and then it would be up to the installer whether they want to fight to put rivets in up there or not.
I have had clutches many times over stock strength for many years in my racer. First supercharger was installed on this car in 2002, first upgraded clutch went in in 2003. So, 17 years of several makes and brands of clutch upgrades, each one stronger than the last, all the way up through Spec Level V and now we have a Tilton triple disk. No cracks in the firewall on my 1978 yet! (knock on wood).
Understand. My brand new clutch requires 50 lbs to push down...about the same as a stock used GTS clutch, with the "early" S4 assist spring. (Clutch diaphragms "work harden" as they age, requiring more effort to compress.)
*The stock clutch master cylinder gusset piece has that 90 degree bend in it and is spot welded to the support bracket for the master cylinder. That 90 degree plane, away from the flat firewall plane adds a tremendous amount of strength, keeping the firewall from flexing when the clutch is depressed. Your piece attaches to the firewall, without any "shear" strength from the 90 degree bend on the stock gusset piece. It's going to flex. And pop rivets are very soft in shear....you need to weld that 90 degree piece to the brake booster gusset.
*Since your piece is not as "size" limited as the original, I'd suggest that you make the flanges larger, to spread the load out on the firewall, as much as possible. For instance, if you make the left side slightly bigger, you can actually get out into the area where the firewall is double thickness (out there where those factory spot welds are.)
*All those little holes for the pop rivets are going to be places where any flexing of the firewall will allow cracks to migrate from. I'd suggest that you put bigger holes in your increased flanges (like 1/4") and simply MIG weld your new piece directly to the firewall, by filling those 1/4" holes. (When body guys are replacing spot welded in body panels, this is their approach....drill out the old spot welds, being careful to not go through the second layer, peel the old part off, drill holes where the spot welds were, and MIG the new part into place.) This will prevent all those tiny little rivet holes from having stress risers migrate from them, when the firewall flexes (which it will.) Fixing migrating cracks in a flat panel is virtually impossible...the metal is essentially damaged beyond use, from work hardening (essentially hydrogen embrittlement.)
You've got a good idea, with a good start on a viable part. Subtle little changes will make it fantastic and ensure that there will never be issues.
I'd suggest that you make the flanges larger, to spread the load out on the firewall, as much as possible.
Agreed. I have 20 of these things that I'd rather not throw away. ($$) So I'm looking at making a second piece that would have the span up and down that this piece lacks that would be installed under this piece. The two pieces would be installed at the same time. It would have the same general effect, only that some sections would be two layers thick (like Porsche design) and some would be three layers thick (even better). If I get a chance this week to drawn something up, I'll post it.
Yes, depending on the material used. If aluminum, you are absolutely right. We use zinc plated steel rivets with a steel mandrel, tensile strength of 810 lbs. and shear strength of 590 lbs. More than strong enough. Like your idea of drilling larger holes in the mount and MIG welding through it, except the risk of starting a fire worries me. Wouldn't want to do it myself.
Last edited by Carl Fausett; 01-06-2020 at 02:53 PM.
pushing the clutch pedal , means push that piece against the firewall.... so i assume the rivets don't do "that" much ? If that piece is strong enough, i would assume alu rivets are fine ?
Yes and no. Yes, you are pressing the clutch master into the firewall, so the rivets are not really under a great tensile load. But, you are going to cut a fair sized hole in the firewall at that location, and we want to strengthen the firewall and prevent flexing and cracking. So I don't like aluminum rivets for this very much - the shear strength of aluminum is not great. When we install them here we use zinc plated steel rivets with a steel mandrel, tensile strength of 810 lbs. and shear strength of 590 lbs. That's for just one rivet and you will be installing about 18 of them. The shop uses a rivet setting tool that's about 20" long and has a good mechanical advantage and even with that they aren't easy to pull!
Everyone used to install "early 911 style" sway bars into the '74 to '89 911's (which had the sway bars attached to the suspension.) The "early style" ran through holes in the front chassis on the perpendicular wall, inboard from the tire. People would install "early style" sway bars (worked much better), by drilling a few holes and put bolts in to hold the outer bracket for the sway bars. The chassis cracked like crazy.
The next step was that they built an inner re-enforcement plate that the hardware was threaded into.....and sandwiched the metal on the chassis between this inner re-enforcement plate and the outer support. The chassis cracked just as bad. The last one I fixed took me days....huge multiple cracks radiating from the holes...like 6" long.
It doesn't take seeing much of this stuff, before you figure out the properties of sheet metal and keep it from flexing, from the "get go".
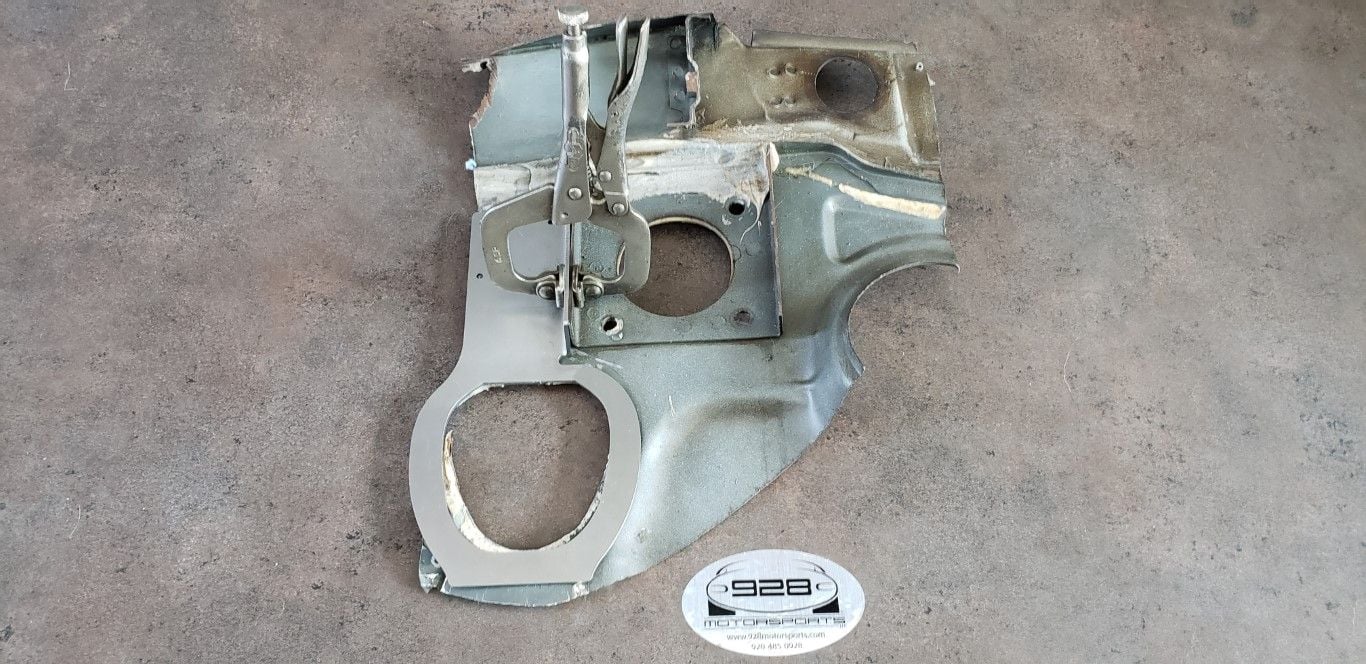
Go back and look at Captain OCD's pictures at the end of his post #8.
Look at the big "90 degree" angle piece, on the stock re-enforcement inner piece, which is spot welded to the "pedal box" in three different spots, to keep the load away from the firewall and into the "pedal box". Look at how they "formed" a "U" strengthening channel on the upper flat portion of both the firewall and the stock inner re-enforcement piece to keep it from flexing.
There's "clues" there about the amount of effort they went to to keep the firewall from flexing.
So the question is going to be asked: "Why is Greg involved in this thread and why does he care?"
The reality of this is that I've probably been asked 40 times to do an automatic to manual conversion.....and the truth is that I have never done one of these conversions....I simply tell people that have an automatic (and want a 5 speed) to sell their automatic and go buy a 5 speed.
Why?
Because I have never figured out a "sano/bulletproof" way to install the clutch master!
So, if Carl can perfect this....I can do these conversions, without having to "invent" yet another piece!
"Inventing" takes time, costs money, and you have to be willing to toss prototypes in the trash, and "try" again.
(Trust me...I've got boxes full of stuff that didn't work as planned....this is "part" of the development process!)
That's why I'm tossing in my ideas....to try and get a really good, usable end product!
i was tempted once to convert a auto to manual ( as i have all manual pieces in a parts car and could buy a really nice auto , cheap and with all the classic problems renewed .... ) .
But i would have tried to use a dedicated pedal box for the clutch master mounted on the floor, like Tilton has so many models…
Ok, i can imagine "purists" want that OEM look ...and OEM pedal .
Has also the advantage that there are options in master diameter , so pedal travel and force needed can be selected.
For the 928 rally build i just bought a new master , as it is a manual , so that was obvious .If i would ever want to change that , i would go directly for a Tilton 3 pedal box. ( Balance front/rear brakes and no booster anymore ) as i have done in my rally BMW.
But Carl will be able to upgrade his piece so that it not stresses the firewall to much….just make it bigger ( transfer loads to corners,brake pedal support ) , i think
Yes. I agree with Greg on the value of having more attachment points to what he calls the pedal box and what I call the brake booster support. That flange is important. Already working on the next iteration. I think it will be very good because it will also serve as a template to let the installer know where to cut the hole.
Last edited by Carl Fausett; 01-07-2020 at 01:48 PM.
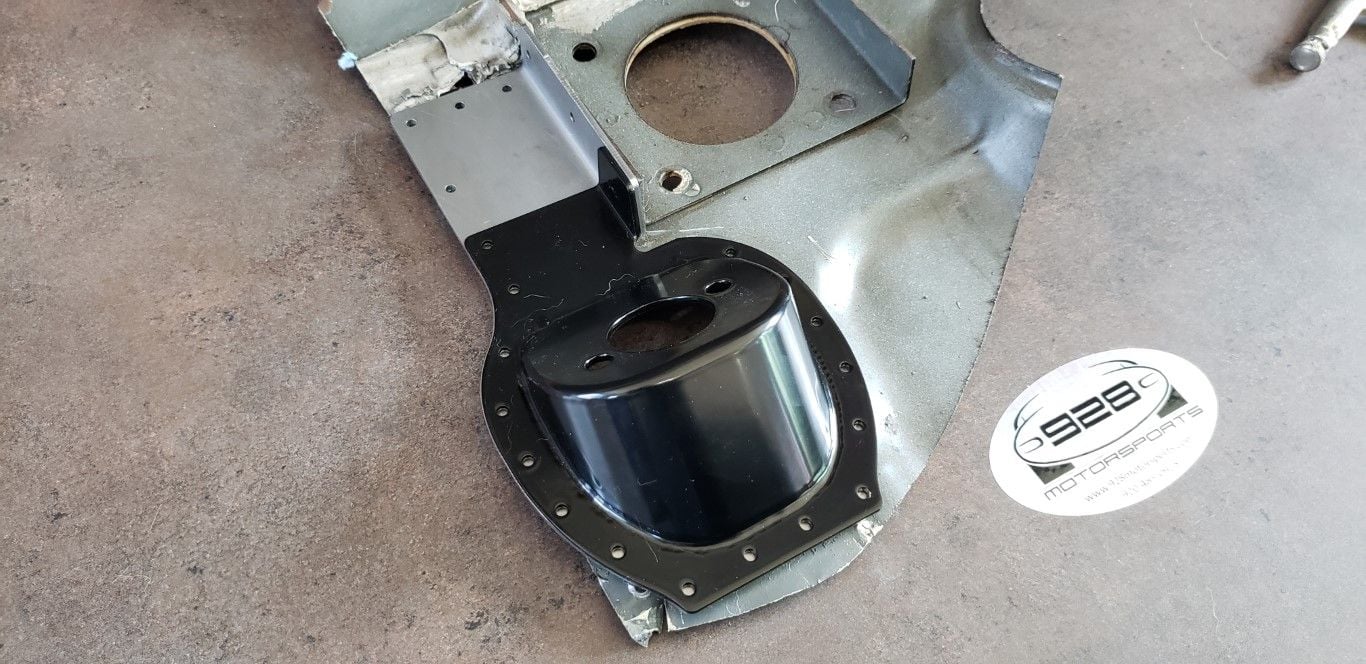
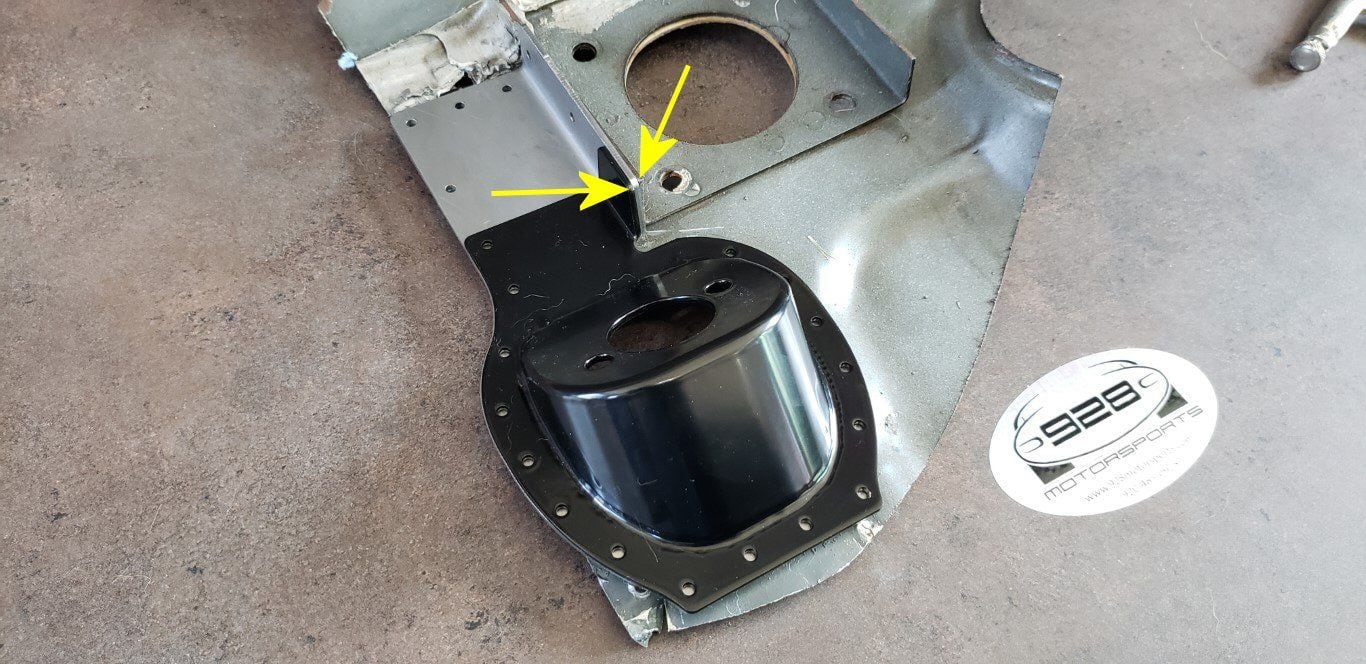
Here is the second iteration of the Clutch Master Mount
I was able to not only reinforce the firewall in the clutch master area in the same way that Porsche does, but also able to provide a template for the installer so he will know where to cut his holes. This is a question I'm always asked, and I get its a little nervy to bore a big hole in your Porsche firewall. Now you will have a template that will show you exactly where it goes.
The rest of my comments are in the captions to the pictures themselves, below. In these pictures, the reinforcement template has not been painted. The finished part will be black powder-coated, like the clutch mount.
The reinforcement/template is on the left, the clutch mount is on the right. To install, clamp the reinforcement/template to the brake booster mount as shown, and draw a circle through the template on your firewall so you know where to make your hole. The corners line up, so you know you have it positioned right. After your hole is made, then add the clutch master mount over the top, and rivet or bolt through both pieces. A small smear of sealant under the parts before mounting permanently to the firewall will make it water-tight. How the assembly looks from the other side. Its designed so that all you need to do is line up these two corners and you know the template is in the right place.
Spacing out the bracket is a difficult idea. I've seen a couple installations that have seen more rapid wear on the master piston due to this bracket being out of alignment to the clutch pedal.
I also don't relish the idea of Greg's about welding it in. The chassis is hot-dip galvanized and if you don't clean all that off the metal before welding, you could kill yourself from inhaling the fumes.....
Instead of sealing this plate with silicone, you really should suggest a panel bonding adhesive to help hold things together.
I've done a number of manual conversions both with the factory firewall bracket as well as doing a floor-mounted pedal (Wilwood). I've never seen a firewall crack start and have never been able to measure any movement on that bracket. I suggest that you have everything attached and set up on the car and then mount a dial indicator on the car and measure how much movement is there to know if you are really going to be seeing an issue or not.
Extending the bracket further down as the factory did is a wise idea, as is making the flanges much wider.

 01-03-2020, 05:08 PM