When you click on links to various merchants on this site and make a purchase, this can result in this site earning a commission. Affiliate programs and affiliations include, but are not limited to, the eBay Partner Network.
Pulled the rubber boot off (which crumbled to dust). Took the adjusting bolt out of the back. Now what? Nothing else wants to move and I don't want to force it.
One of the WSM diagrams shows a circlip but I just don't see it.
once the boot is off then the innards will press out or fall out depending on if it had oil in it or not.
Once the long bolt is out then take a thin long screwdriver insert into the bolt hole and tap it,
this will push the innards out of the body.
The bore is lined with teflon so handle with care.
NOTE take a picture of what comes out before you touch it,
then match your picture to the one in the WSM.
NOTE the C clip on the inside of the boot should have the open end facing up to hold the boot.
The outer clamp should be positioned at about 11 O clock while looking at the piston boot end.
I use hondabond on the edge of the gasket to assist with sealing ontop of the blue sealing rib of the gasket
I use STP oil treatment to fill it and use a visene bottle with the tip drilled out to put the STP into the hole thats closest to the right fender.
NOTE using a pressure oil pump could overpressure the tensioner and force the inner C clip off the boot BTDT
I tried gently tapping it with a drift through the adjustment hole and it didn't budge. I'll give it a good soaking in something-or-other and try again. At least I know that's the way forward. You'll appreciate that I was very reluctant to start assaulting it with a hammer
I tried gently tapping it with a drift through the adjustment hole and it didn't budge. I'll give it a good soaking in something-or-other and try again. At least I know that's the way forward. You'll appreciate that I was very reluctant to start assaulting it with a hammer
It should come apart without much force. If it hasn't been apart in a while, it may take some 'soak time'.
And the BFH technique is always a good way to disassemble stuff.
It's not always the best way if you want to put it back together again.
There were two different arrangements of washers in there, so make sure you note the sequence before you disturb it - try not to have them all fall out in a mess! I have not noticed a circlip inside mine, and I dont see one listed on PET?
For 83 PET shows 35 washers!
Here is a diagram off google:- https://www.google.com/search?q=928+...Flz9Ab9RKz0_M:
jp 83 Euro S AT 57k
PET appears to be unreliable regarding the tensioner, at least in the 87-91 version I consult for my MY91.
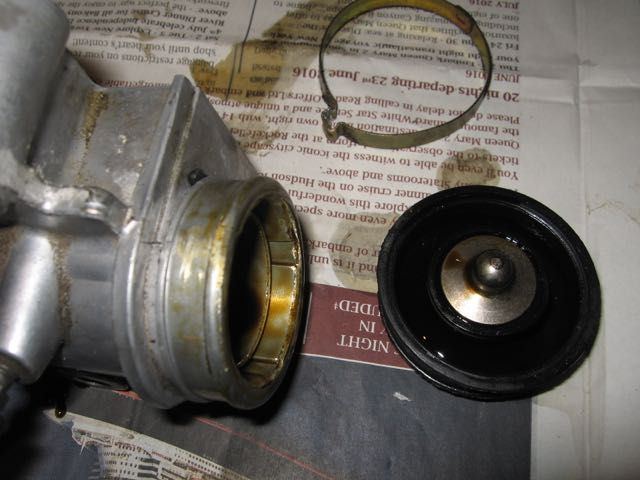
There's a metal part under the boot which you can see in this photo taken when I last changed TB
, and you can just make out the circlip attaching it to the rubber boot (it's just an open metal band). Neither the metal part nor the clip are shown in PET � when you rebuild the tensioner you have to transfer these parts to the new boot.
PET appears to be unreliable regarding the tensioner, at least in the 87-91 version I consult for my MY91.
There's a metal part under the boot which you can see in this photo taken when I last changed TB
, and you can just make out the circlip attaching it to the rubber boot (it's just an open metal band). Neither the metal part nor the clip are shown in PET � when you rebuild the tensioner you have to transfer these parts to the new boot.
Ahh... that must be the circlip I could see in the manual.
I think the piston is just stuck solid. I've left it soaking in WD-40 and will come back to it tomorrow.
Ahh... that must be the circlip I could see in the manual.
I think the piston is just stuck solid. I've left it soaking in WD-40 and will come back to it tomorrow.
I'm sure just tapping it out through the adjuster bolt hole will shift it — nothing holding it in but habit and a small o-ring, and they'll be at least some oil to ease it out.
Many guys ditched these in favor of porktensioner, so if you need a replacement chances are somebody has a spare that's worked it's way to the bottom of their parts bin.
The bolt in the back pushes on the conical Belleville washers that then push on the piston. You may be able to put the bolt back in and take it to full bottom without the nut and get the piston to move that way. The tapping on the back with a screwdriver technique helps if the piston isn't too stuck, else you just exercise those spring washers. A longer bolt might do you well.
The bore in the tensioner is plastic lined to let the piston slide though with zero-zero clearance. There's a check valve in there and a bypass passage around the piston. For it all to work correctly, the piston does need to actually move in the bore. If it's truly seized hard in there, you'll likely damage at least that lining as you extract the piston. If the lining is damaged, there's no way to restore it unfortunately. Shop for a good used one if you want to stick with the original, or install the Porken tensioner through Roger. It uses a self-compensating Audi piston tensioner in a custom bracket, eliminating the need to adjust. There's been plenty of discussion on the system over the years, worth some reading time if you have concerns.
It shouldn�t require more than a firm push with a long punch or screwdriver. Maybe a single tap with a hammer to break the o-ring at the bottom of the stack loose.
If you need a long screw driver and a hammer to beat the washer stack out, then your tensioner body is KIA.
The cause is no oil in the tensioner for a long, long time. The expansion, contraction, movement of the washer stack inside the unlubricated tensioner bore destroys the bore.
If the inside of the bore isn't �slick� and the washer stack with a little oil on it won�t move freely then the tensioner is dead.


 10-26-2019, 04:58 PM