When you click on links to various merchants on this site and make a purchase, this can result in this site earning a commission. Affiliate programs and affiliations include, but are not limited to, the eBay Partner Network.
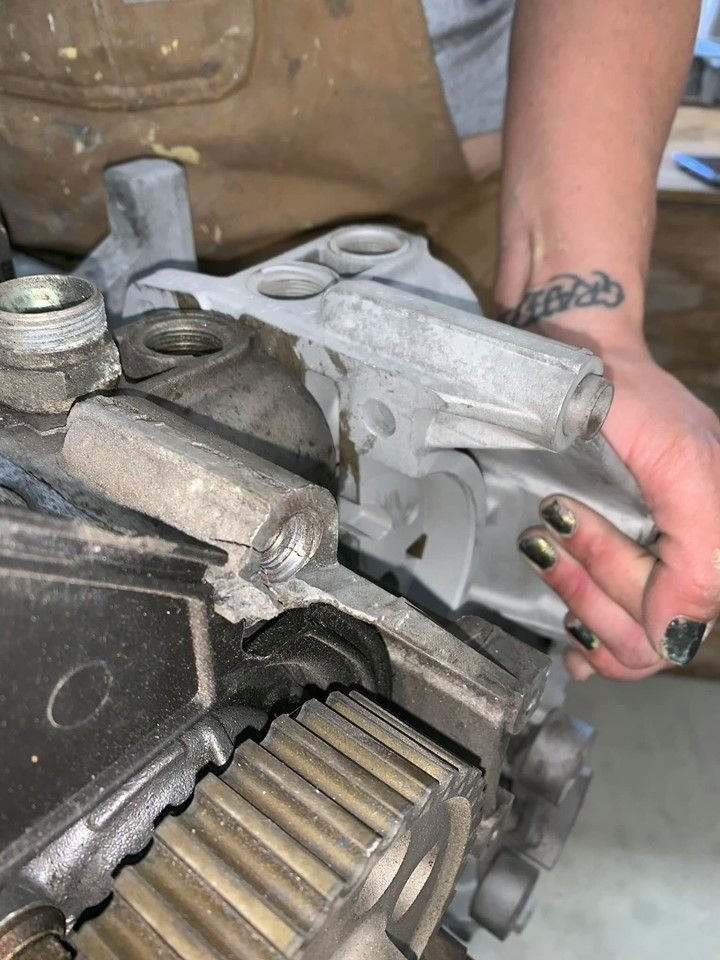
After reading the post and replies about cleaning the 928 crankshaft I now ponder my situation with my replacement S4 motor. To bring you up to speed quickly and succinctly; RichVM in Atlanta saw my Chassis Dolly, he wanted one, we agreed to a ‘trade’ I build him one for a good running S4 motor. I got there, delivered the Dolly, the engine in question was questionable. Maybe I didn’t specify what running meant…but he assured me it ‘was’ in running order. I noticed immediately the Alternator main bracket was smashed and missing a large part of the tab, and, some small cracks extending from this broken off tab, I told Richard and he offered to give me the motor out of the white S4 he was breaking apart for salvage. Time was not something I had much to spare, so, I appreciated his offer and took the S4 motor that had this broken tab and also was missing Cam Covers and an Oil Pan. Certainly these areas will need to be completely cleaned upon servicing this motor.
Well, some months later I’m ready to start working this motor’s issues and start the build of my S4. I have 2 cradles from other motors I figured to use, but, line boring issues and matching seems problematic. Finding a skilled welder able to cut off the Tab from an older cradle and graft it onto this one also is problematic. I’m a skilled welder, but, I have not welded Aluminum is 20 yrs so I figure just find someone here locally to do this that does this daily – right? I’m down to making a spacer to ‘fit in there’ in lea of the aforementioned welding process. I’m also going to get those bash bar plates to keep this from happening again!
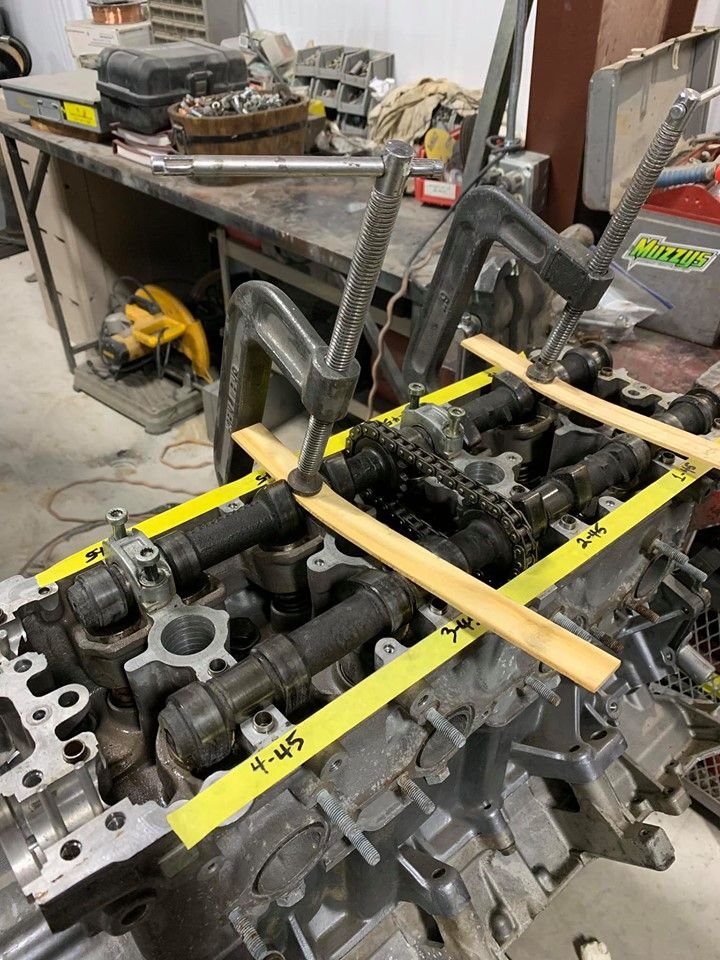
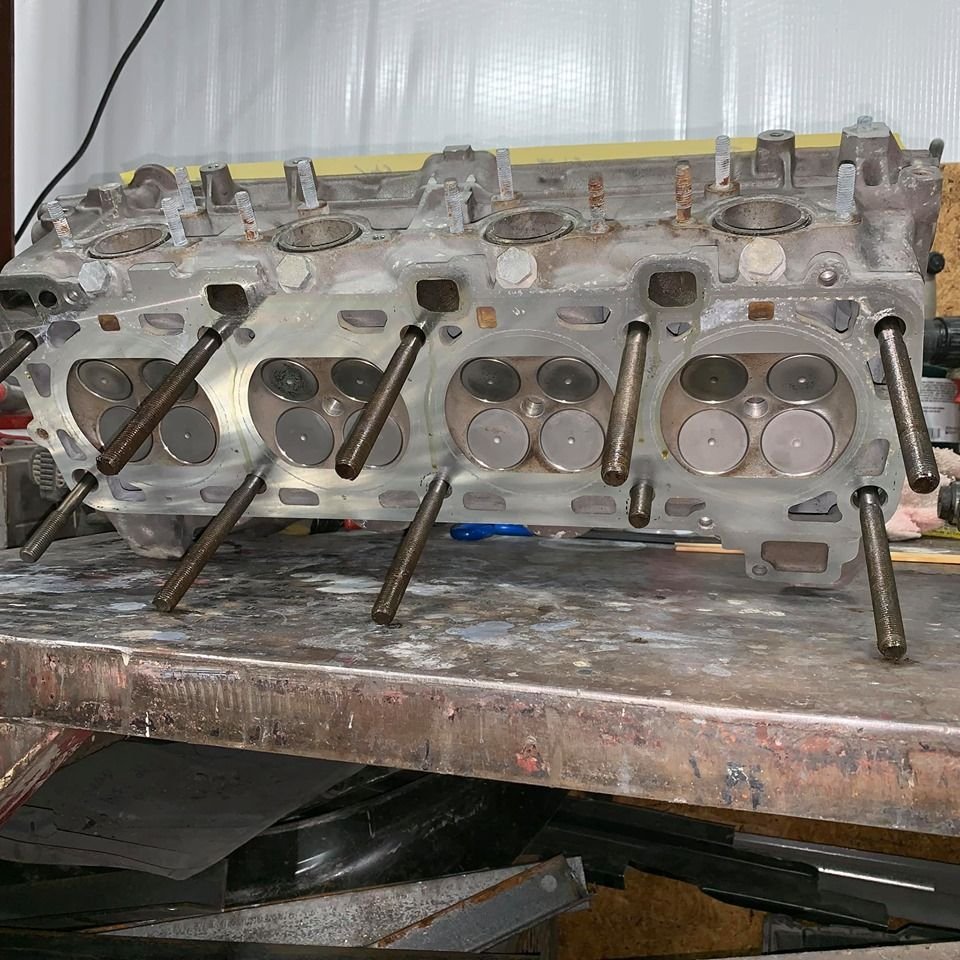
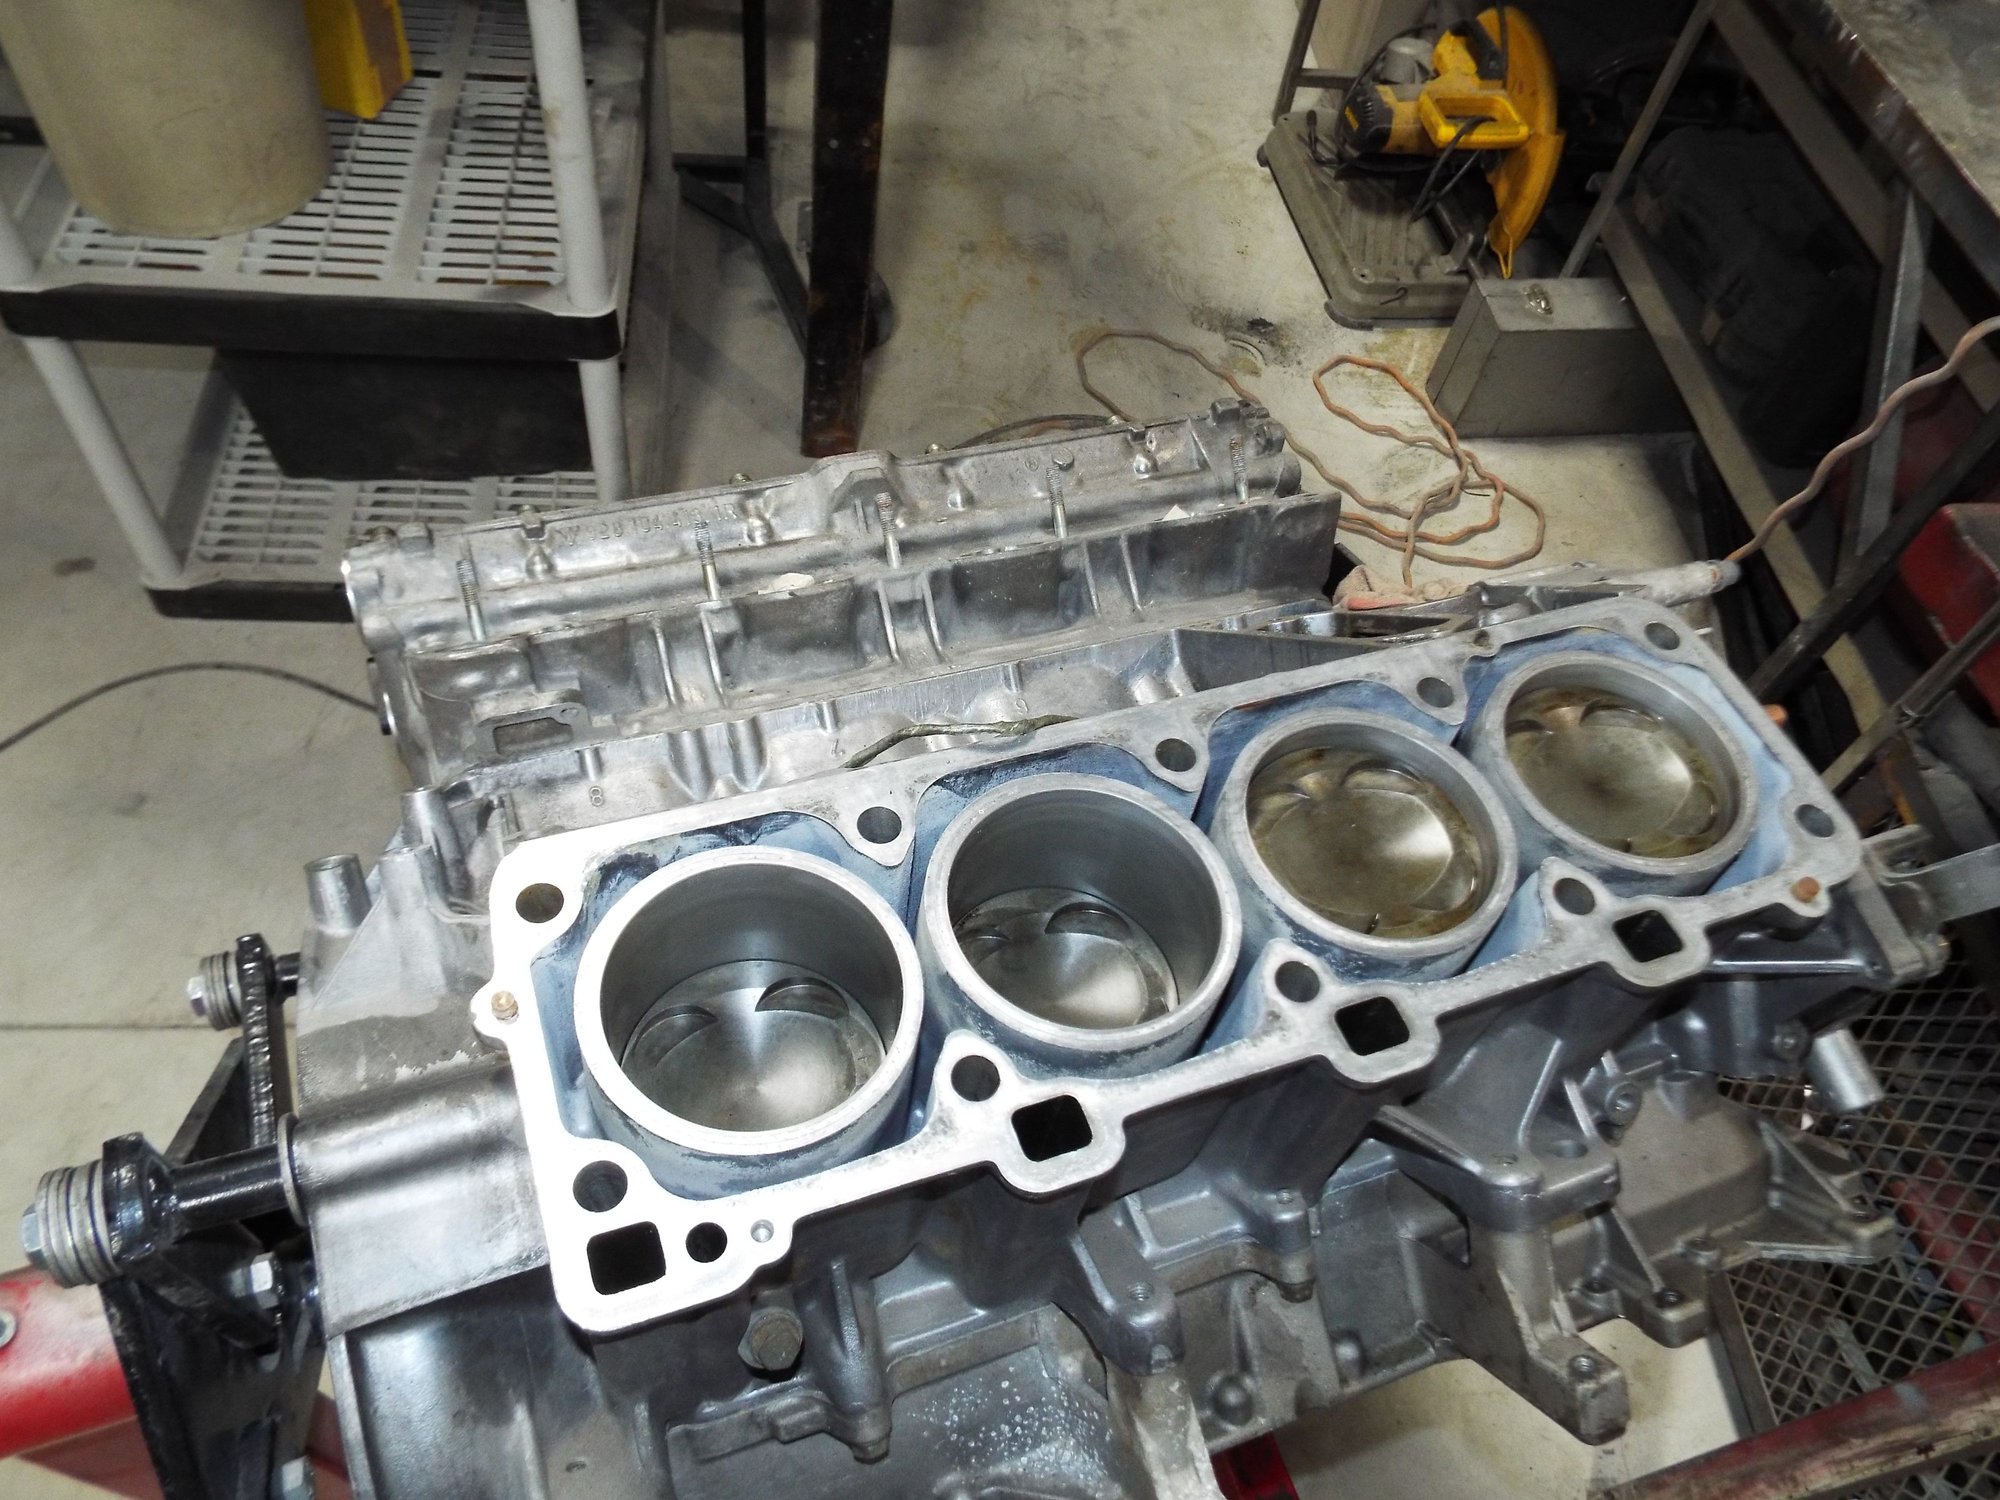
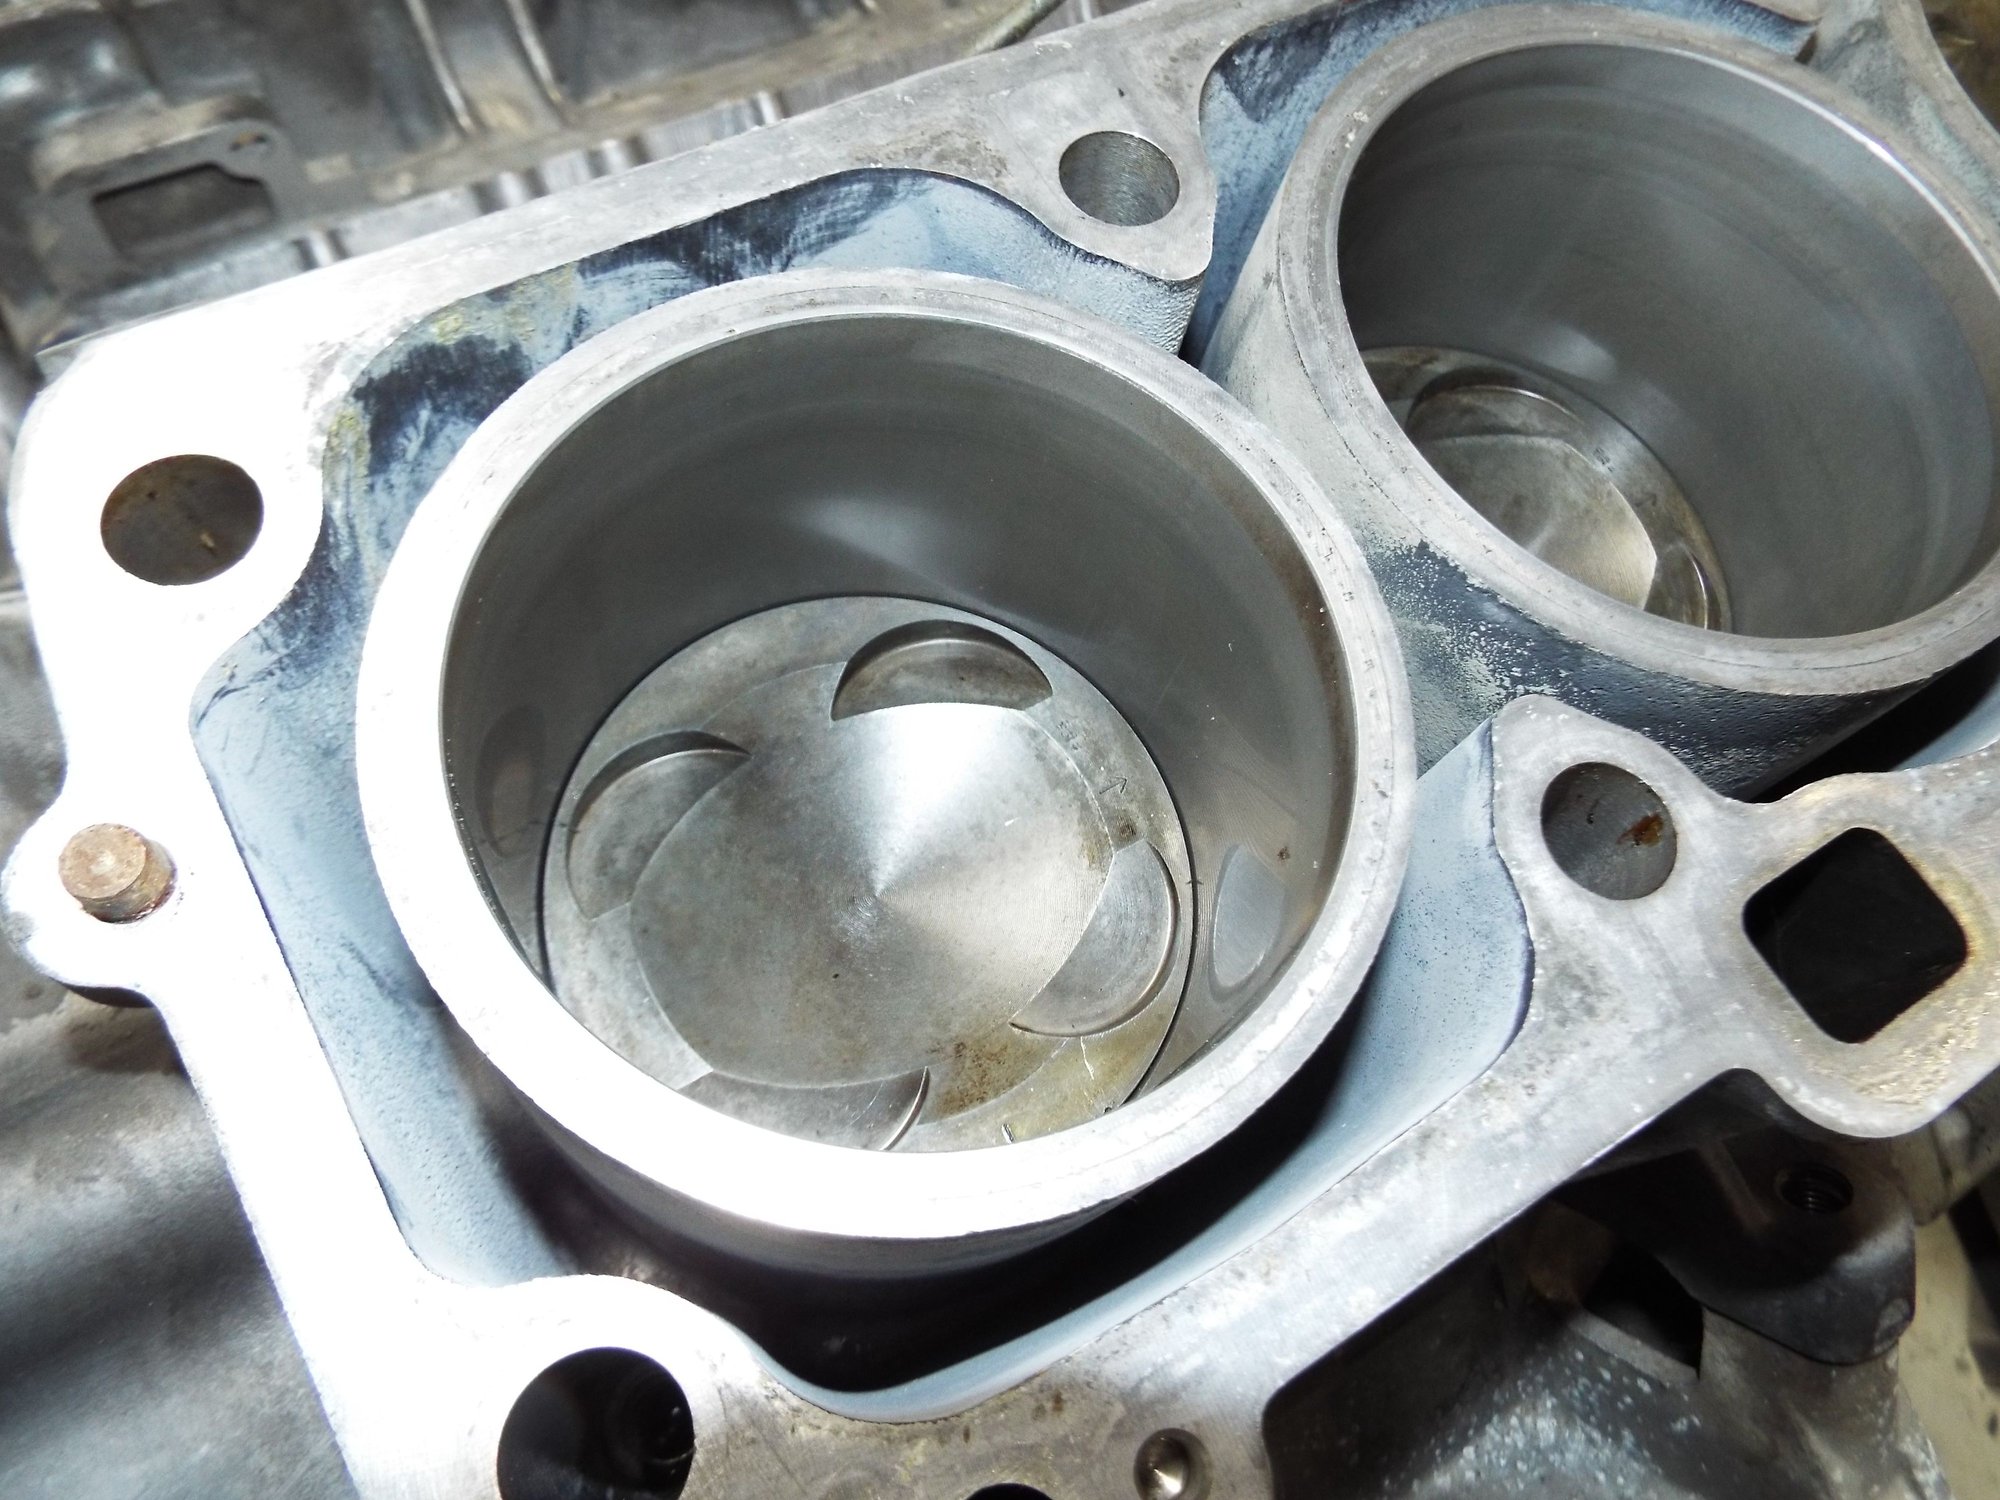
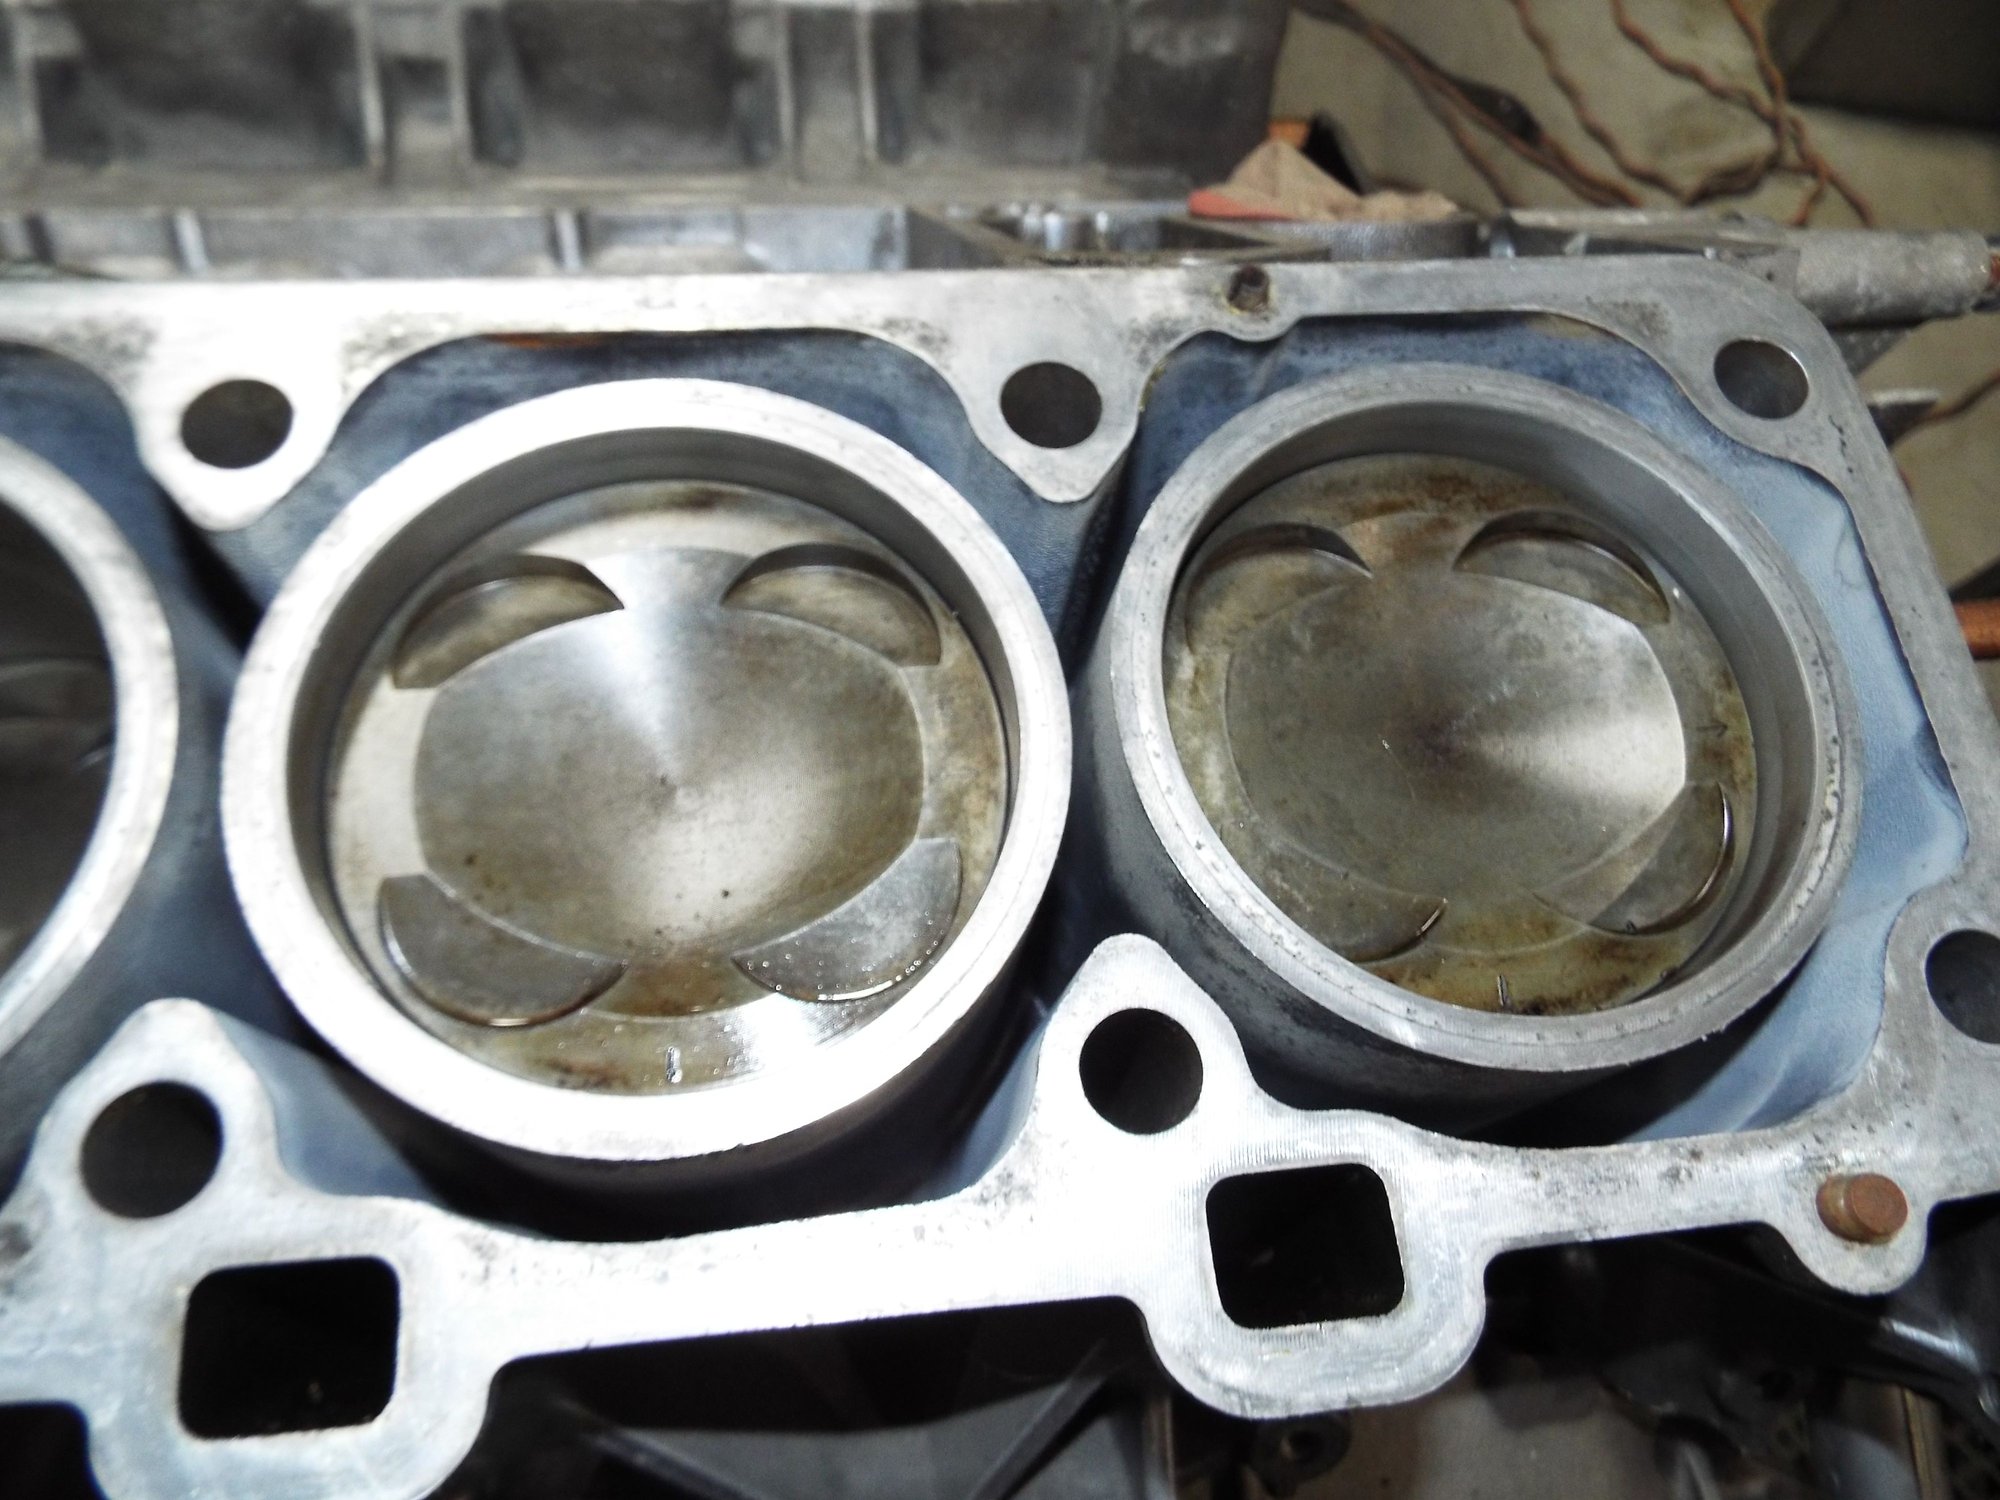
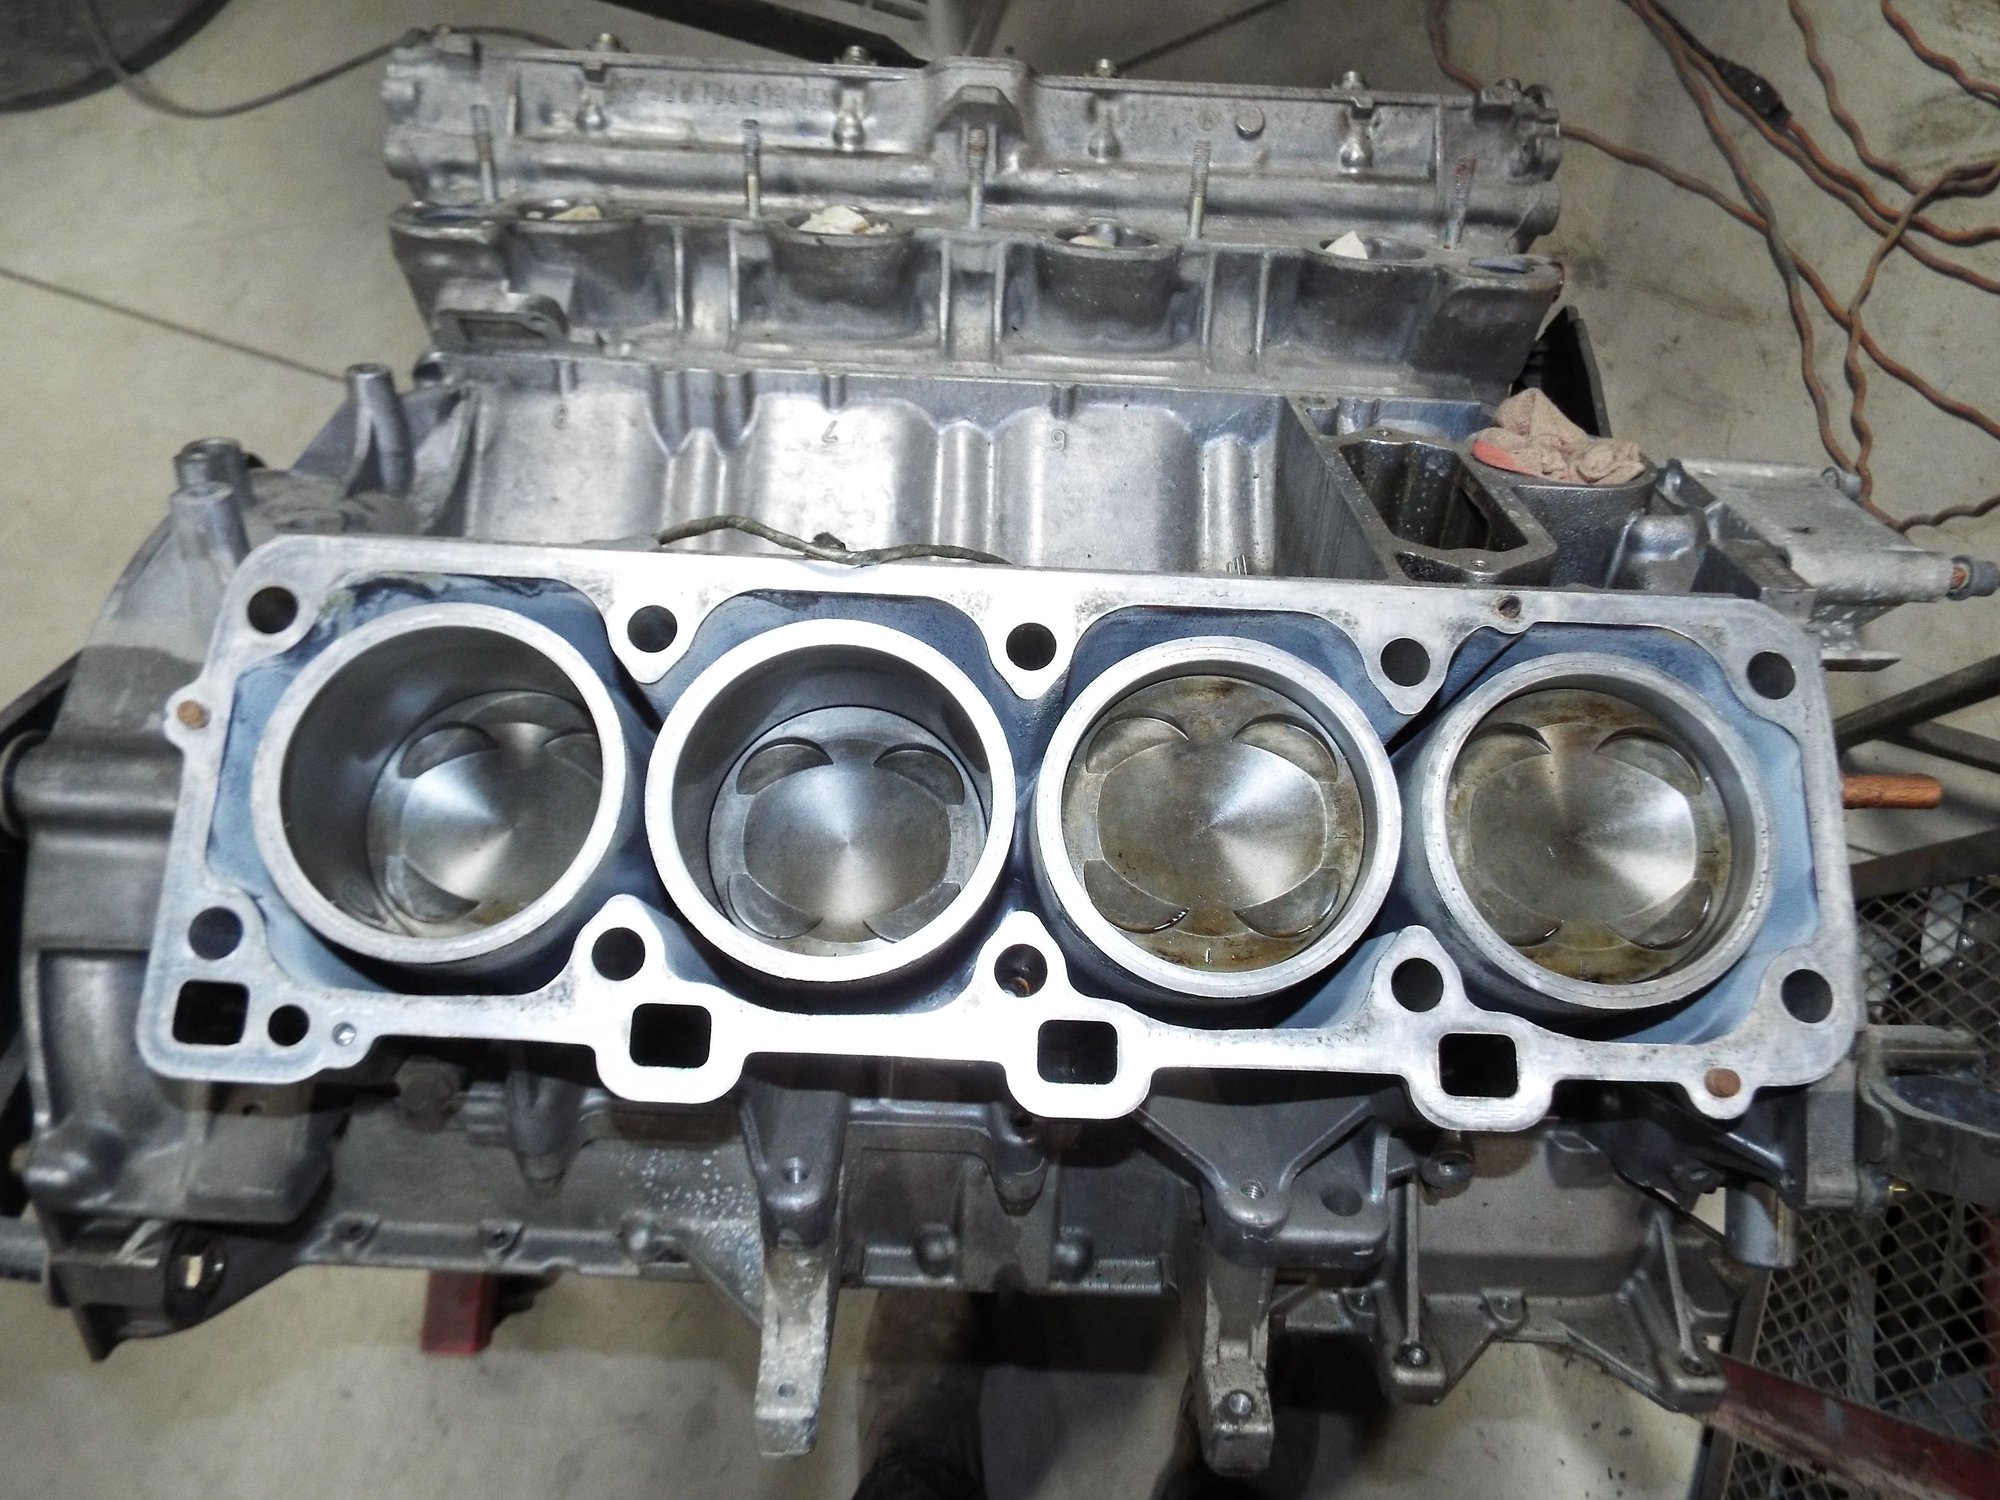
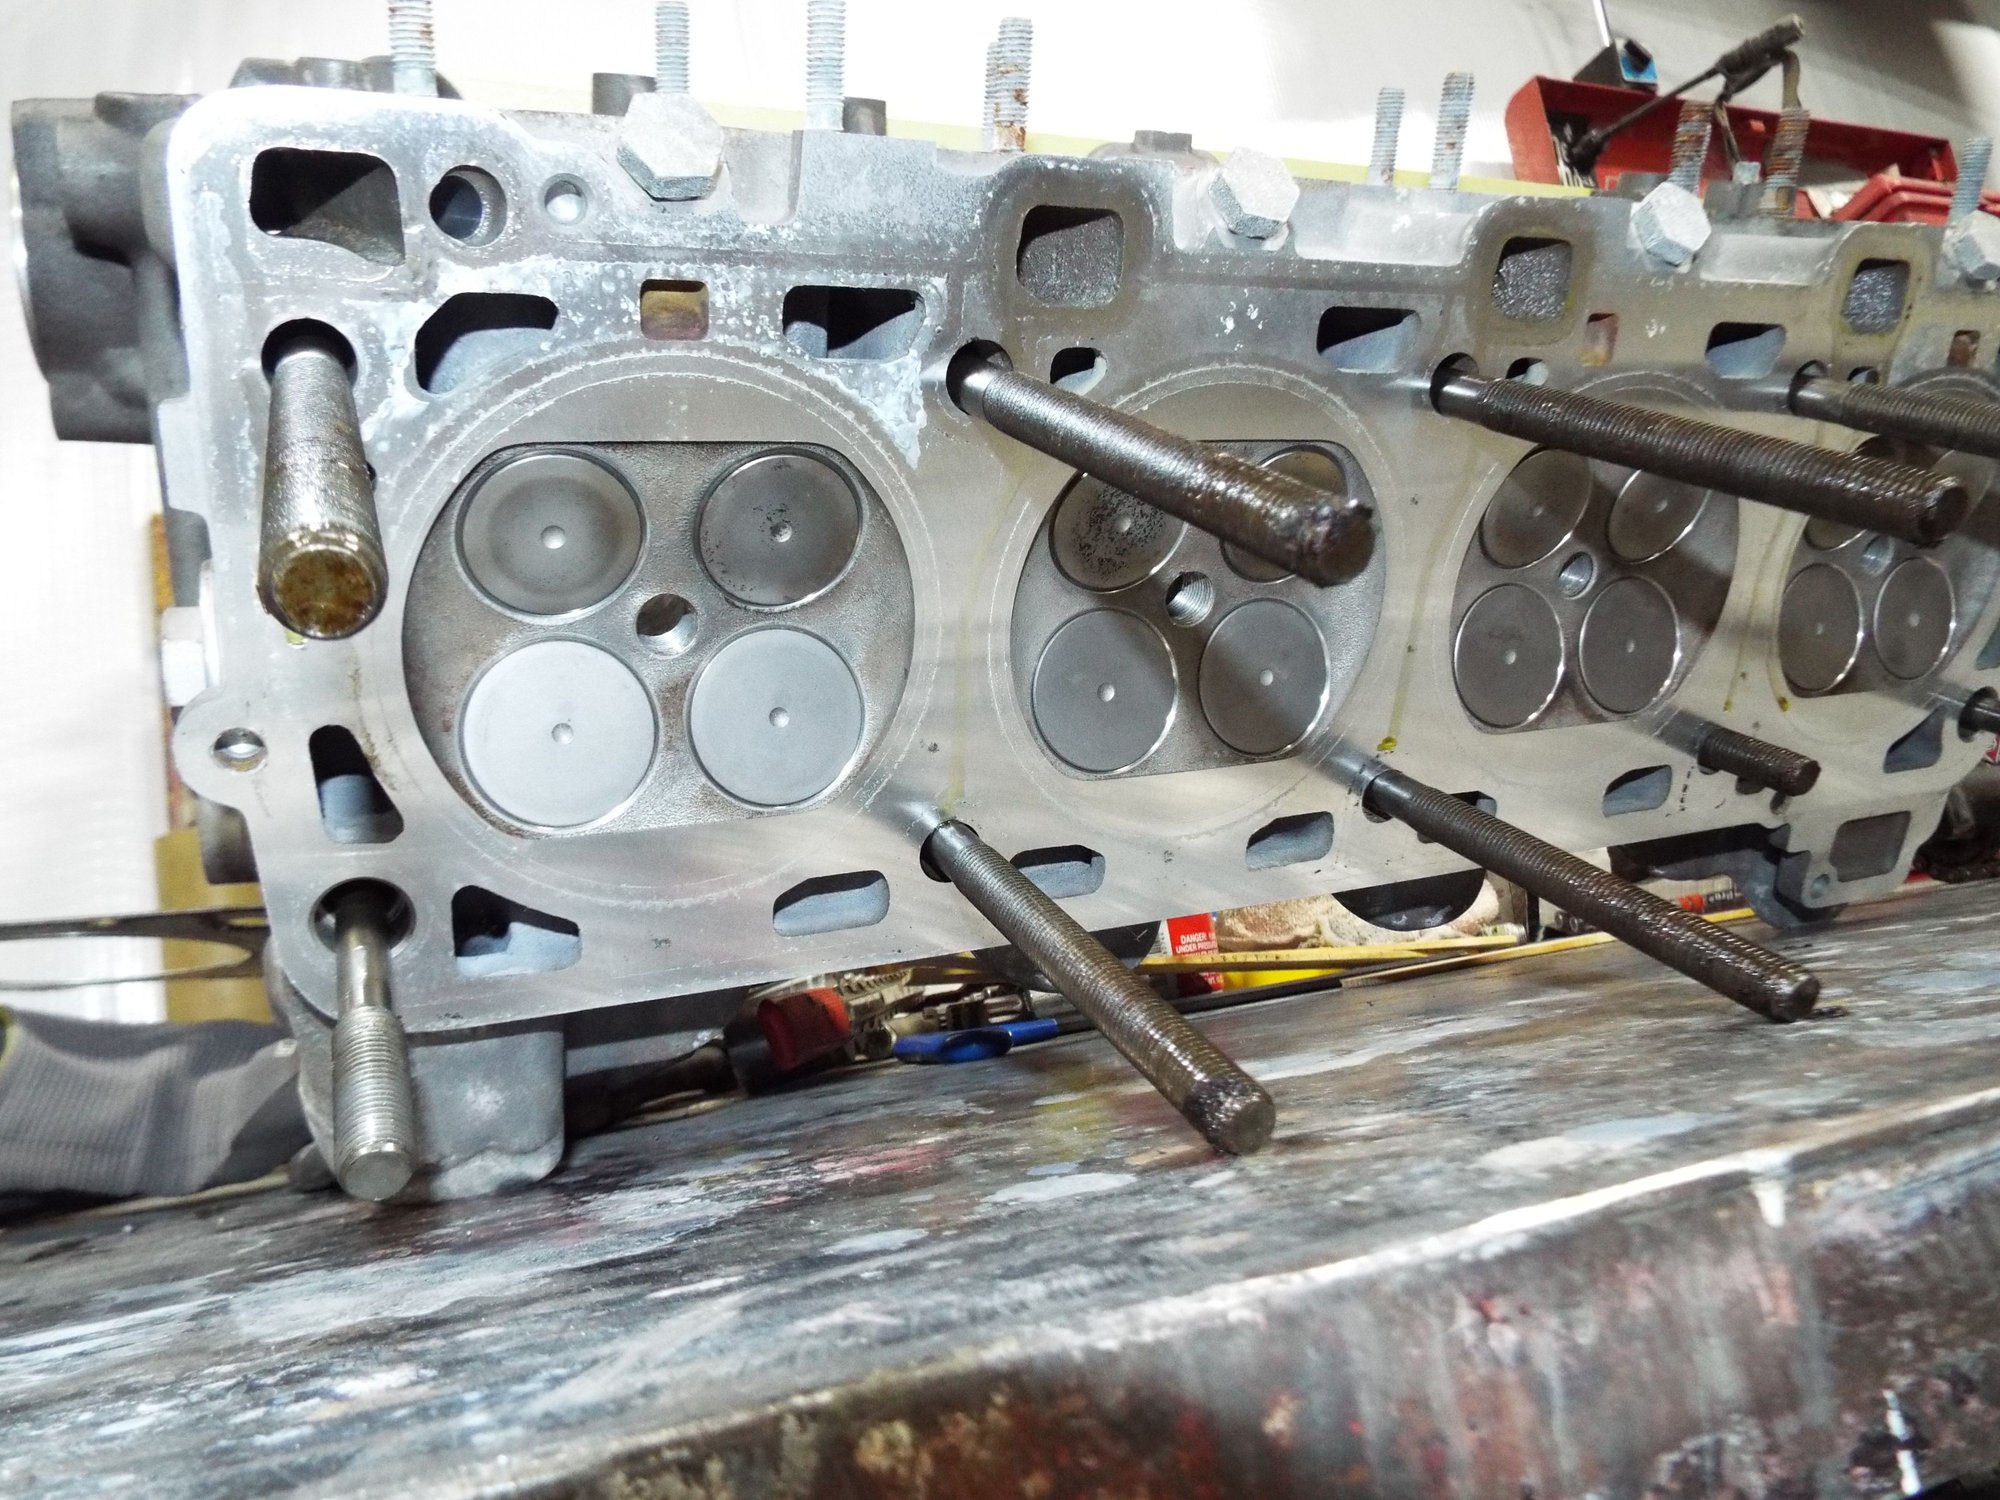
Ok, this motor I got from Richard, since the Cam Covers were off and they were dusty in there I pulled the heads off to also clean inside and scout around…the insides of this motor look BRAND NEW! No wear marks in the cylinders, and the Heads’ valves are spotless, all completely brand new looking! I was very surprised! So…here’s the question; should I keep tearing this motor down, pull the lower cradle off to facilitate better repairs on the Tab, and, check the bearings out, and of course clean the crankshaft as Greg Brown elaborates on how to do this? I never would have thought of doing this! Details always matter…I appreciate details. But, with the condition of the Heads, I almost want to assume the lower end is just as good, but, in writing this epistle I have made my mind up…the lower end is coming apart, the risks of NOT doing this is not worth it, especially after reading this Crankshaft cleaning post. I really do NOT want to dive deeply into this motor, but I can’t just remove a few main bearing caps as a typical V8! But, I would be deeply upset if I did not do this and put it all together and body on the chassis, and start it up only to have this Alternator Tab become a bigger issue and then the lower end having issues.
Sometimes just writing about an issue you find your answer! Attached are a few photos of the Heads and broken Alternator tab and the engine insides.
Looks like that motor's already been apart and was on its way back together, and then stopped. Not sure I'd mess with the bottom end unless you're not confident it was assembled properly. Start by flipping it over and pulling a rod cap and have a look at the bearing shells.
After reading the post and replies about cleaning the 928 crankshaft I now ponder my situation with my replacement S4 motor. To bring you up to speed quickly and succinctly; RichVM in Atlanta saw my Chassis Dolly, he wanted one, we agreed to a ‘trade’ I build him one for a good running S4 motor. I got there, delivered the Dolly, the engine in question was questionable. Maybe I didn’t specify what running meant…but he assured me it ‘was’ in running order. I noticed immediately the Alternator main bracket was smashed and missing a large part of the tab, and, some small cracks extending from this broken off tab, I told Richard and he offered to give me the motor out of the white S4 he was breaking apart for salvage. Time was not something I had much to spare, so, I appreciated his offer and took the S4 motor that had this broken tab and also was missing Cam Covers and an Oil Pan. Certainly these areas will need to be completely cleaned upon servicing this motor.
Well, some months later I’m ready to start working this motor’s issues and start the build of my S4. I have 2 cradles from other motors I figured to use, but, line boring issues and matching seems problematic. Finding a skilled welder able to cut off the Tab from an older cradle and graft it onto this one also is problematic. I’m a skilled welder, but, I have not welded Aluminum is 20 yrs so I figure just find someone here locally to do this that does this daily – right? I’m down to making a spacer to ‘fit in there’ in lea of the aforementioned welding process. I’m also going to get those bash bar plates to keep this from happening again!
Ok, this motor I got from Richard, since the Cam Covers were off and they were dusty in there I pulled the heads off to also clean inside and scout around…the insides of this motor look BRAND NEW! No wear marks in the cylinders, and the Heads’ valves are spotless, all completely brand new looking! I was very surprised! So…here’s the question; should I keep tearing this motor down, pull the lower cradle off to facilitate better repairs on the Tab, and, check the bearings out, and of course clean the crankshaft as Greg Brown elaborates on how to do this? I never would have thought of doing this! Details always matter…I appreciate details. But, with the condition of the Heads, I almost want to assume the lower end is just as good, but, in writing this epistle I have made my mind up…the lower end is coming apart, the risks of NOT doing this is not worth it, especially after reading this Crankshaft cleaning post. I really do NOT want to dive deeply into this motor, but I can’t just remove a few main bearing caps as a typical V8! But, I would be deeply upset if I did not do this and put it all together and body on the chassis, and start it up only to have this Alternator Tab become a bigger issue and then the lower end having issues.
Sometimes just writing about an issue you find your answer! Attached are a few photos of the Heads and broken Alternator tab and the engine insides.
The cradle has what appears to be a thick grey bead of what is probably a "Hylomar style" (aka Yamabond and other names) oozing out. "Hylomar style" products are a great sealant, but these do not "squish" down to nothing...there is always a layer of the stuff left whatever it is between...sometimes significant in thickness, depending on how it was applied.
The 928 engine is align bored with the two surfaces touching each other....metal to metal. It is assembled using an extremely thin layer of Loctite 574, which, when done properly, squishes out virtually 100%. This is done to ensure that the main bearing clearance is as close to the perfect specification as possible. Any kind of thickness of sealant increases the proper clearance, sometimes significantly. When I "redo" engines, it is common to see .005"+ of dried sealant (from improper application of Loctite 574 or from use of some other sealant.) This thickness of sealant triples the main bearing clearance. Increased main bearing clearance reduces the amount of oil that can reach the rod bearings, which can/will lead to very rapid failure of the rod bearings.
There's a huge amount of "tricks" required to properly assemble a 928 engine. Cut any corner, do virtually anything wrong, and rapid engine failure is extremely common. Mark Anderson (928 International) once said: "I think that the percentage of 928 engines that are taken apart which never run again...or run for very short periods of time is extremely high."
From what I "get" to see, I agree, completely.
Start over. Do the job correctly. (Besides the obvious issue with the Hylomar, look at the filth on the very bottom of the head bolts, from not getting the blind holes clean in the block....what does the rest of the engine look like?)
Interesting. I did not (and still do not) see this yamabond on the Cradle/Block junction. I'm going to China Freight to get a remote controller for my winch, and, am determined to discover this Yamabond material Greg speaks of, the Head Bolts...excellent analysis! Thankfully the local Porsche mom and pop shop (Jones Auto Werks) is mainly an engine builder, I have gotten his attention a few times so far when I dangle media blasting on his 356 and other 911 parts (Doors, Hoods, and Fenders) and he does things like put new bearings in my torque tube. I'll prep the motor for traveling to him with objective to A. Fix the broken alternator tab and B. Assess the lower end, clean crankshaft, and return it to me as a nice short block. This may get interesting. I won't even 'dive in' to build this S4 motor, or assemble it. I'd rather blaze the trail of faster/better/more complete entire package 'restoration' as I'm doing my S4 and 1981 car; Body off, complete and easy access to ALL systems, clean and make pretty all systems. Things like the motor, Torque Tube, Transaxle I'll send out or bring an expert in. Brakes, suspension, rust, blasting, I'll handle. Thank you for all your replies.
Interesting. I did not (and still do not) see this yamabond on the Cradle/Block junction. I'm going to China Freight to get a remote controller for my winch, and, am determined to discover this Yamabond material Greg speaks of, the Head Bolts...excellent analysis!
Your pictures are the size of a postage stamp, on my phone. Could easily an optical illusion.
Regardless. I'm betting your engine specialist will want the cradle off the block, to weld on it.
Wow, after reading what Greg wrote, I feel pretty good that my motor that I disassembled and reassembled 7 years ago and have run with boost for 50,000 miles still runs well!
I never split the block to my engine because of what Greg wrote. The rod bearing were still within spec so I replaced them because I had some, and put the engine back together after balancing the pistons and rods.
With these engines if the rod bearings look fine and measure withing spec, replace them and leave the block alone. The main bearings wear much less than the rod bearings.
Resealing the engine is a time crunch that uses expensive single use hardware. It can be a very expensive mistake if done wrong, as Greg says.
If you do replace the rings, use 951 rings. They have a better, stronger design that uses chrome plated scraper rings without chamfers and a 1 piece oil control ring.

 10-13-2019, 01:03 PM