
tensioner idler bolt
 02-18-2004, 04:12 AM
#1
Instructor
Thread Starter
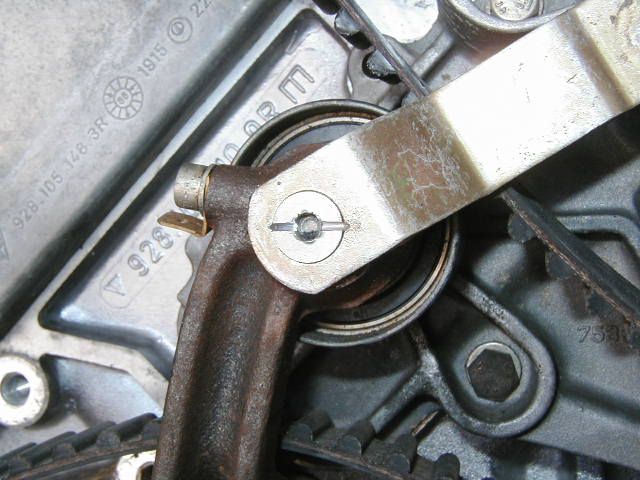
My tensioner idler assembly is pivoting on a 10mm slotted hex bolt, which hardly protrudes enough to put a wrench on. Is this thing supposed to be an allen bolt as I have read in one reference? I have had little luck with getting a good bite in the slot thus far, so I am wondering if this is the right part...
TIA,
Neil
(not the best picture)
TIA,
Neil
(not the best picture)
 02-18-2004, 06:12 AM
#2
Drifting
You seem to be missing the 4" arm that stabilises the pivot, the allen bolt holds it in place, it secures on to the waterpump towards the right with two further bolts.
02-18-2004, 08:13 AM
#3
Rennlist Member
Not sure what you mean re. a "slotted hex bolt". Paul has noted the missing pieces - suspect the PO has cobbled together a washer/bolt to hold the carrier arm on the pivot stud. In any event, it has to come off, for as I recall, the arm covers some of the water pump bolts.
Liberal shots of a good penetrating oil can help - heat as a last resort, or the delrin bushings in the carrier arm will fry. Frequently, the shock from a single sharp blow on the bolt head (with a brass drift preferably) will allow release - if the penetrating oil doesn't do it's thing completely.
Liberal shots of a good penetrating oil can help - heat as a last resort, or the delrin bushings in the carrier arm will fry. Frequently, the shock from a single sharp blow on the bolt head (with a brass drift preferably) will allow release - if the penetrating oil doesn't do it's thing completely.
02-18-2004, 01:06 PM
#4
Addict
Rennlist Member
Rennlist Member

Join Date: Jul 2002
Location: St. John's, NF, Canada
Posts: 383
Likes: 0
Received 0 Likes
on
0 Posts
Maybe this will help...zoomed PET exploded view of the tensioner roller and idler. The fastener in question is #43...listed as "screw, csk. -head 6x12". So it should have a slot in it (or at least so it appears in PET).
If you really need to remove this and it will not come off conventionally, drill/cut it off and then replace both the screw and guide ping (# 11 in the diagram). You might be able to salvage the guide pin once off the car...
Regards,
SteveCo in St. John's
If you really need to remove this and it will not come off conventionally, drill/cut it off and then replace both the screw and guide ping (# 11 in the diagram). You might be able to salvage the guide pin once off the car...
Regards,
SteveCo in St. John's
02-18-2004, 01:52 PM
#5
Addict
Rennlist Member
Rennlist Member
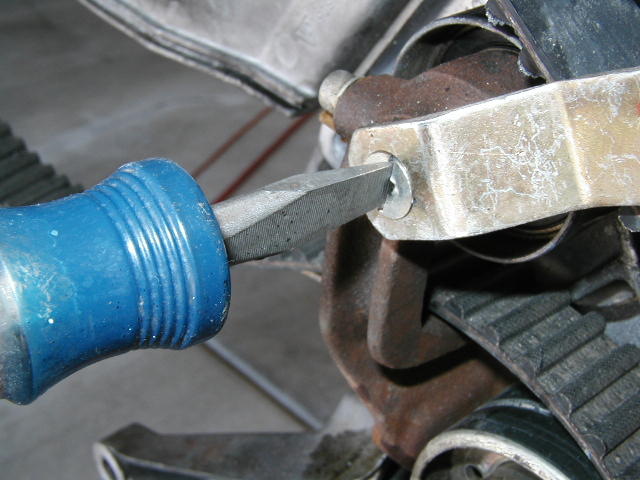
When I disassembled mine, screw #43 was an allen screw, but the allen socket was stripped, so I used a dremel to make it a slotted screw, and used an impact screwdriver to break it loose. Maybe Neil's PO had to do this, and reinstalled the screw instead of replacing it?
If I were Neil, I'd clean up that bolt head, see what's under the corrosion, and consider adding a slot (or cleaining up the existing slot) with a dremel and a cutoff wheel.
Here is the stabilizing arm that Paul notes is missing (part 11):

If I were Neil, I'd clean up that bolt head, see what's under the corrosion, and consider adding a slot (or cleaining up the existing slot) with a dremel and a cutoff wheel.
Here is the stabilizing arm that Paul notes is missing (part 11):
02-18-2004, 08:35 PM
#6
Instructor
Join Date: May 2003
Location: 10 miles east of Edinburgh
Posts: 190
Likes: 0
Received 0 Likes
on
0 Posts
I've just stripped mine down today and it is a countersunk allen bolt that takes a 4 mm allen socket. I assume the countersink is there to stop any potential sideways movement on assembly.


Trending Topics
 02-18-2004, 09:43 PM
#9
Instructor
Thread Starter
Thanks, guys! yes, it appears to be the #43 screw, and I am guessing that the arm might not be necessarty, since I have been driving so long without it. What is it supposed to do? Just an extra brace I guess? I'll try to free it up again tonight. The I guess I did not explain it very well, but it is a bolt with a 10mm head. There is a cut across the to ala Tony, but I am not getting proper leverage I guess. I will make a run to the hardware store tonight to see what I can find to help.
02-18-2004, 10:06 PM
#10
Drifting
When I purchased a new waterpump recently the stabilising arm was included. It may well be that parts of the car are over engineered, but assuming that part of the cam belt mechanism is unnecessary might not be a great idea - believe me - you don't want it to fail...
02-18-2004, 10:53 PM
#11
Instructor
Thread Starter
I realize that, and it really bugs me to have it incomplete even if it is unnecessary.
There is about 20K on the waterpump and timing belt, and the previous person to work on it left the tensioner alone apparently. The boot was incredibly dry and cracked, and the locknut was overtorqued forcing me to remove the tensioner in order to slacken the belt. About five or ten dollars worth of parts and a little more attention when the TB was done would have saved me the huge hassle I am going through now (but I had nothing to do with it then). Since I had to do it to retension the belt properly, it has now cost a couple hundred more (might as well replace the TB and pump) and a whole lot of aggravation.
There is about 20K on the waterpump and timing belt, and the previous person to work on it left the tensioner alone apparently. The boot was incredibly dry and cracked, and the locknut was overtorqued forcing me to remove the tensioner in order to slacken the belt. About five or ten dollars worth of parts and a little more attention when the TB was done would have saved me the huge hassle I am going through now (but I had nothing to do with it then). Since I had to do it to retension the belt properly, it has now cost a couple hundred more (might as well replace the TB and pump) and a whole lot of aggravation.
02-19-2004, 12:21 AM
#12
Addict
Rennlist Member
Rennlist Member
Originally posted by N.Masco
Thanks, guys! yes, it appears to be the #43 screw, and I am guessing that the arm might not be necessarty, since I have been driving so long without it. What is it supposed to do? Just an extra brace I guess? I'll try to free it up again tonight. The I guess I did not explain it very well, but it is a bolt with a 10mm head. There is a cut across the to ala Tony, but I am not getting proper leverage I guess. I will make a run to the hardware store tonight to see what I can find to help.
Thanks, guys! yes, it appears to be the #43 screw, and I am guessing that the arm might not be necessarty, since I have been driving so long without it. What is it supposed to do? Just an extra brace I guess? I'll try to free it up again tonight. The I guess I did not explain it very well, but it is a bolt with a 10mm head. There is a cut across the to ala Tony, but I am not getting proper leverage I guess. I will make a run to the hardware store tonight to see what I can find to help.
I just realized, on rereading, that you explained it fine and I misunderstood. You don't appear to have the original screw, which should be a socket cap screw, rather than a hex head.
I used a hand impact driver to break the screw loose after slotting it like Tony did (when I saw his photos, I thought, "What is he doing in my engine bay?").
You might want to use a dremel to clean up the slot so that the sides are straight and your screwdriver can really get set.
Mark.
02-19-2004, 12:39 AM
#13
Addict
Lifetime Rennlist
Member
Lifetime Rennlist
Member
I used a hand impact driver to break the screw loose after slotting it like Tony did (when I saw his photos, I thought, "What is he doing in my engine bay?").
02-19-2004, 01:57 AM
#15
Instructor
Thread Starter
..Strange, I thought I put another post up a few minutes ago.
I got it off!
The slot of the screw was filled with loc-tite or something (that wasn't corrosion) and kept me from getting proper grip. A turn on the obscuring washer that it was stuck to, using vise-grips, broke it loose.
I am curious about the MBMB's picture and SteveCo's picture. It seems one has allowances for the bracket and the other does not. Is this a model year difference?
Yeah, Tony, I am wishing I had pulled the motor a long time ago. It would have made everything go much more quickly and easily. This started with me taking off the intake and cam covers for powdercoating while replacein g the breather hoses, knock sensors, and a whole lot of other things that have been neglected for too long. As I progressed, I found more to fix.
After this the steering rack is getting replaced. Am I ever going to get to drive it again?
Last edited by N.Masco; 02-20-2004 at 02:52 AM.