When you click on links to various merchants on this site and make a purchase, this can result in this site earning a commission. Affiliate programs and affiliations include, but are not limited to, the eBay Partner Network.
Ok you guys, it's amateur hour in St. Louis again.
Looking for places to relocate windshield washer motor.
I've removed the failed motor from inside of engine bay.
My plan was to fab a bracket for the new motor and tuck it up by the charcoal canister, under the fender where there is still space under the wheel liner.
I have run wiring through the grommet hole to extend harness to that location.
My issue is that the pump runs and won't pull liquid through the system placed that high on the car.
If I lower it to the approximate height of the original placement it works fine.
I switched out an older functional pump from the parts hoard and got the same results.
Tank is 1/3 full and all the other plumbing is still stock. No kinks or strictures seen.
I, unfortunately, slept through physics in college, is this some type of Bernoulli equation that I have violated?!
Has anyone relocated pump that can share locations they have used? Thanks.
Dave! I am right in the middle of refurbishing my washer system too. GREAT IDEA! Yeah, I can see how the pump can't draw enough vacuum to lift a column of water past a certain height. (Don't let that fool you into thinking I have any idea what I'm talking about!) I do like the idea of relocating the pump because it's so difficult to access and is definitely prone to failure.
So, with the caveat that I haven't actually tried it, how about relocating the pump to the strange indentation on the top outside of the washer tank? It could be attached to the fluid tubes there super easily, there's space, and access is easy by removing the fender well liner (well, that's a lot easier than where it is right now). And it is about the same relative height, I think, as the current pump location so Bernoulli will be happy.
Whatever you do please let us know, I may relocate mine as well!!
RIck thanks for following.
That location is a great idea.
It does fit and height is similar.
I could fab a bracket there and tie it in the the existing brace for the tank.
Maybe even put some foam insulation around it so it doesn�t hit the fender.
I don�t know if I read this long ago or made it up but I seem to remember it�s a water pusher more then a pump. Maybe that�s why I hit a wall.
If if that doesn�t work....
Plan B: the morning after washer.
Brace yourself, this is verboten.
I run windshield washer harness to headlight washer motor at bottom of tank.
Then use reducer on headlight washer line and connect into windshield line.
God knows that motor is stronger.
I�m assuming that motor would run continuously with 12v, instead of pulse which I think the headlight washer harness delivers?
Hahaha now THAT is out of the box thinking! So you'd be ok with giving up headlight washers? (That was NOT intended to sound snarky LOL! They haven't worked on my car forever!) I guess the only issue might be exploding all the rubber window washer lines, I bet that pump puts out FAR more than the regular washer pump!
But I'd definitely go with the stock setup, just move the pump and get everything to work properly so you can motor around knowing that you, too, have the POWER to blast your headlights with water at the push of a discreet little button.... :-)
Just buy a used 87 to 95 washer tank and the pump is integrated into the back of the tank - easy peasy.
__________________
Does it have the "Do It Yourself" manual transmission, or the superior "Fully Equipped by Porsche" Automatic Transmission? George Layton March 2014
928 Owners are ".....a secret sect of quietly assured Porsche pragmatists who in near anonymity appreciate the prodigious, easy going prowess of the 928."
Hahaha now THAT is out of the box thinking! So you'd be ok with giving up headlight washers? (That was NOT intended to sound snarky LOL! They haven't worked on my car forever!) I guess the only issue might be exploding all the rubber window washer lines, I bet that pump puts out FAR more than the regular washer pump!
But I'd definitely go with the stock setup, just move the pump and get everything to work properly so you can motor around knowing that you, too, have the POWER to blast your headlights with water at the push of a discreet little button.... :-)
YES!
I used the headlight washers once, by accident. I was like huh, that's how those work.
No, you are right of course. I flew too close to the Sun with that idea. Cannibalizing a system just to see if it would work would be reckless...
but man, how gratifying would that be? 1000 foot pounds of pressure spraying four lanes of highway as I fly down the road. lol.
Let's just hide this whole thread from Dr. Bob. We were never here Rick.
Originally Posted by ROG100
Just buy a used 87 to 95 washer tank and the pump is integrated into the back of the tank - easy peasy.
Sweet Pickles!
Well, that's anti-climatic Rog.
I've been living in S3 land too long. Didn't even know you guys had that! Great idea of course.
Plus whatever electrical connector doodad we'd need.
There's also a later part number for the water tank strap, but it's for 85 on, which leads me to infer (since the later strap works with the earlier tank on 85/86) that the earlier strap like on my '83 will work with the later tanks.
The good news is that the headlight washer pump, its grommet, and the level sender unit/cap/seal are all the same!
Dave -- we'd still need to remove the tank to service the pump, but hey...
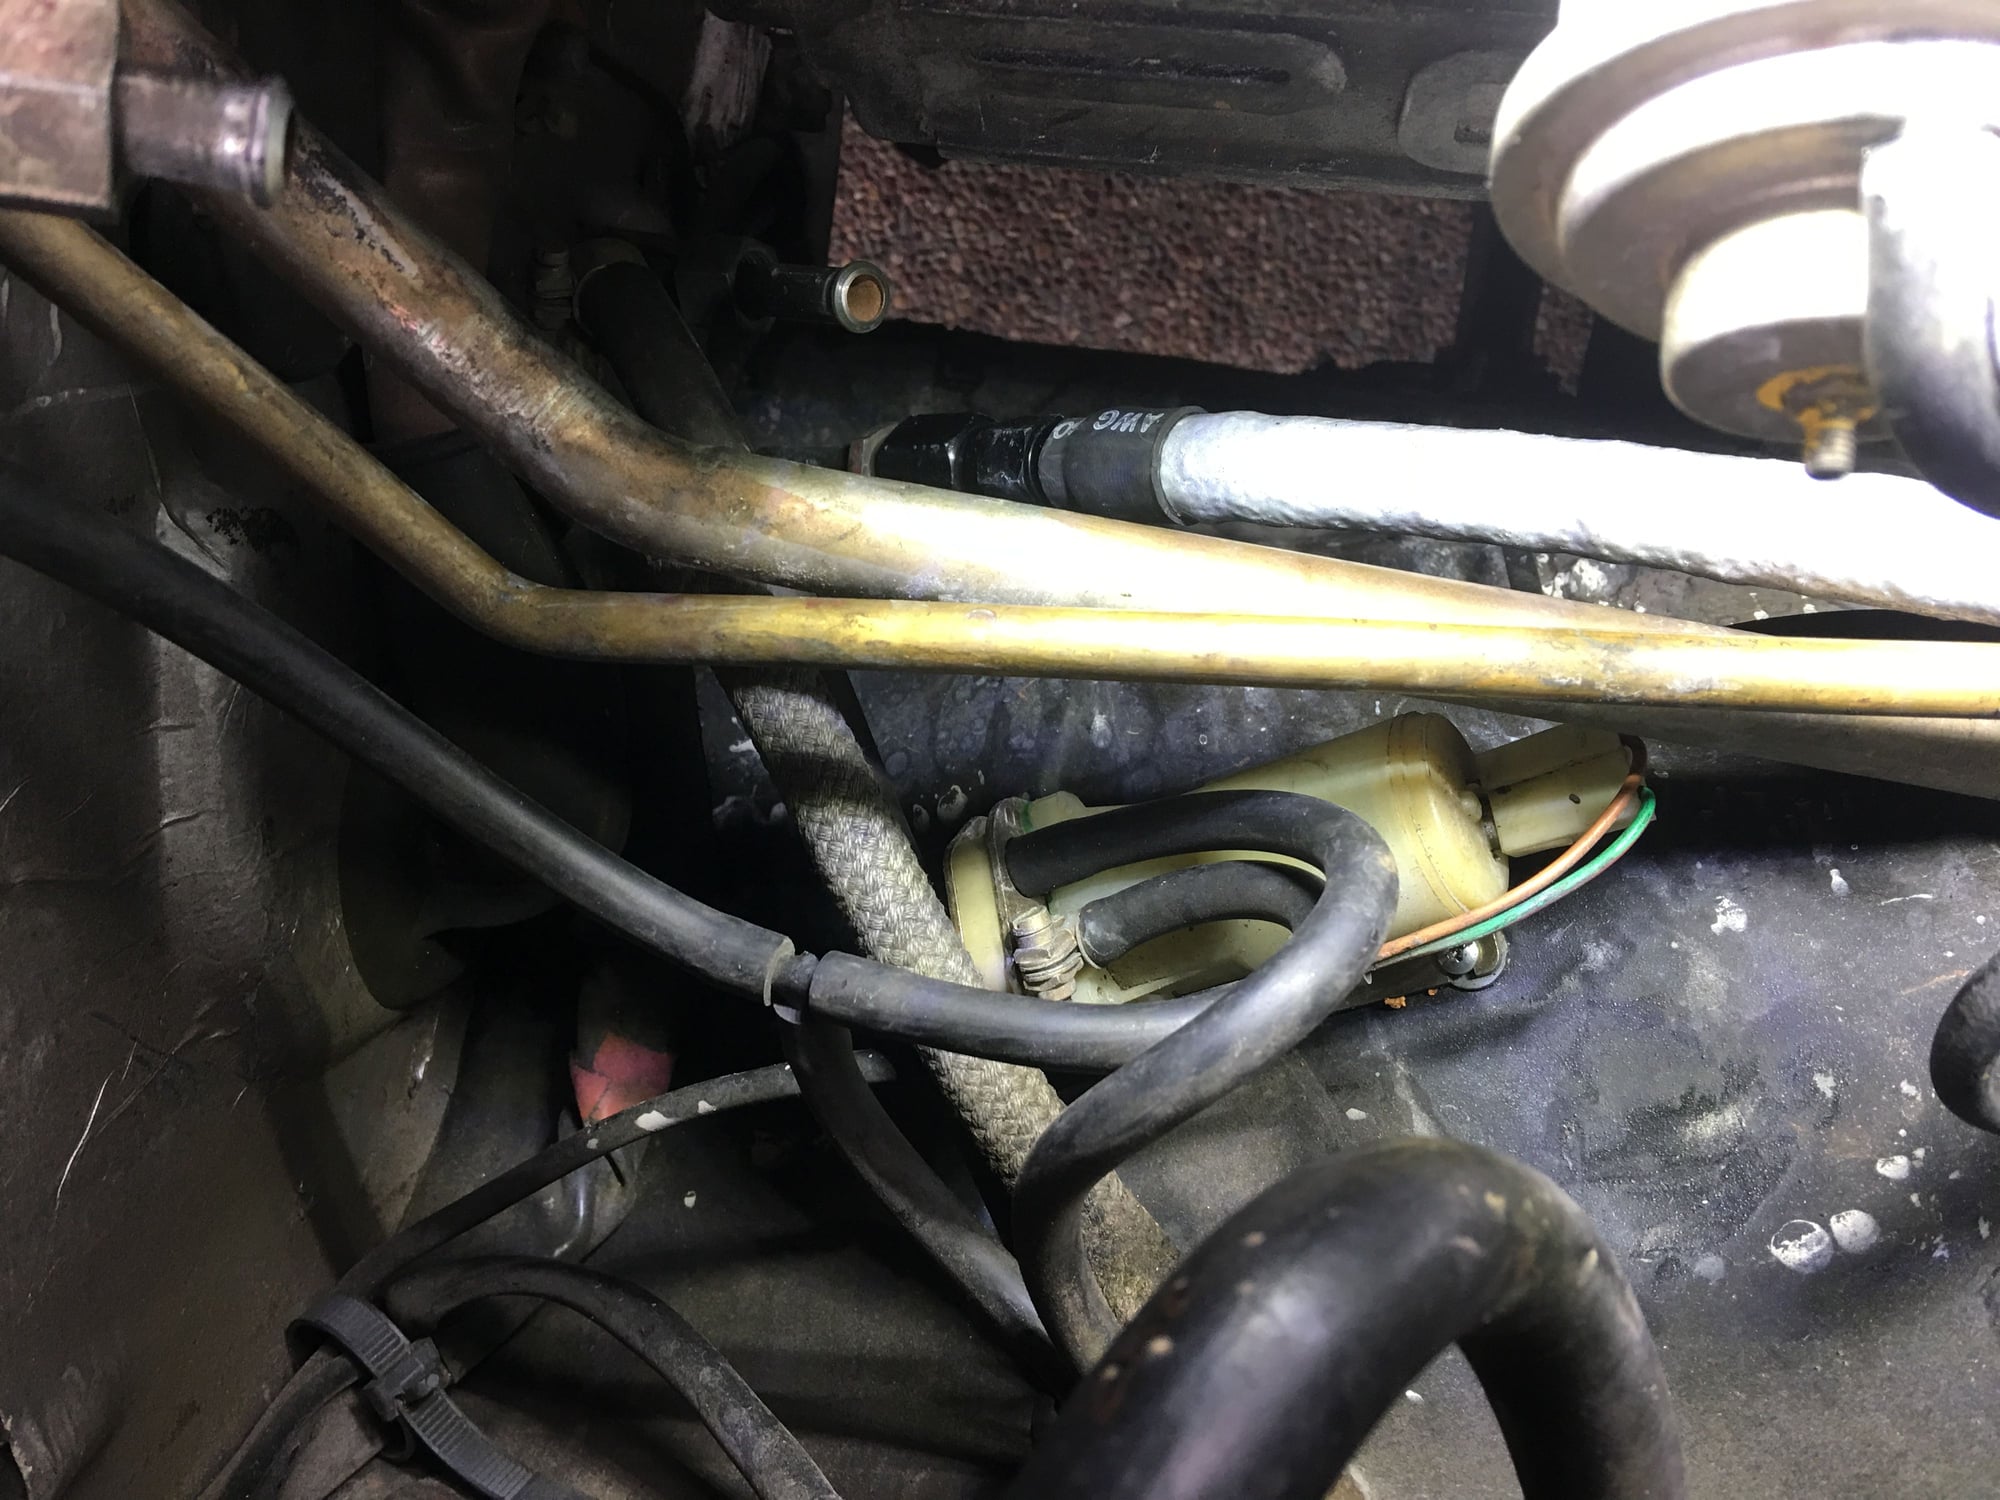
Dave, I dug into my system today and think it would be pretty easy to do the upgrade to the later model. The only issue we need to deal with is the electrical connection. I removed the pump under the expansion tank today, and the connector does have enough slack in it to actually make it through the grommet into the wheel well -- but not enough to make it behind the fender protector.
I think the best way would be to fab a connector that plugs into the stock connector under the expansion tank and runs straight to the pump mounted on the side of the (S4 style) tank. Leaves the existing system intact.
Anybody know (or best, have a picture of) the electrical connector for the pump on the side of the S4 washer tank?
I was THIS CLOSE to putting my system back together with the stock components, especially because I had already laid out the dough for a new washer pump... but when it came time to actually bolt the washer pump back in and it immediately became a hassle to have to reach inside the fender with one arm to install bolts while reaching in the wheel well with the other to install nuts on the backside... well... FORGET IT!! This IS a TOTALLY BAD DESIGN!
So I now have the S4 tank, pump, and rubber grommets on the way.
In the meantime, I figured out that the S4 style pump shares exactly the same type of electrical connector as the prior pump. I decided to start ordering parts to make a stock-looking electric harness that connects to the original connector under the expansion tank, is sheathed with the proper plastic covering, and connects in turn to the pump on the S4 style tank.
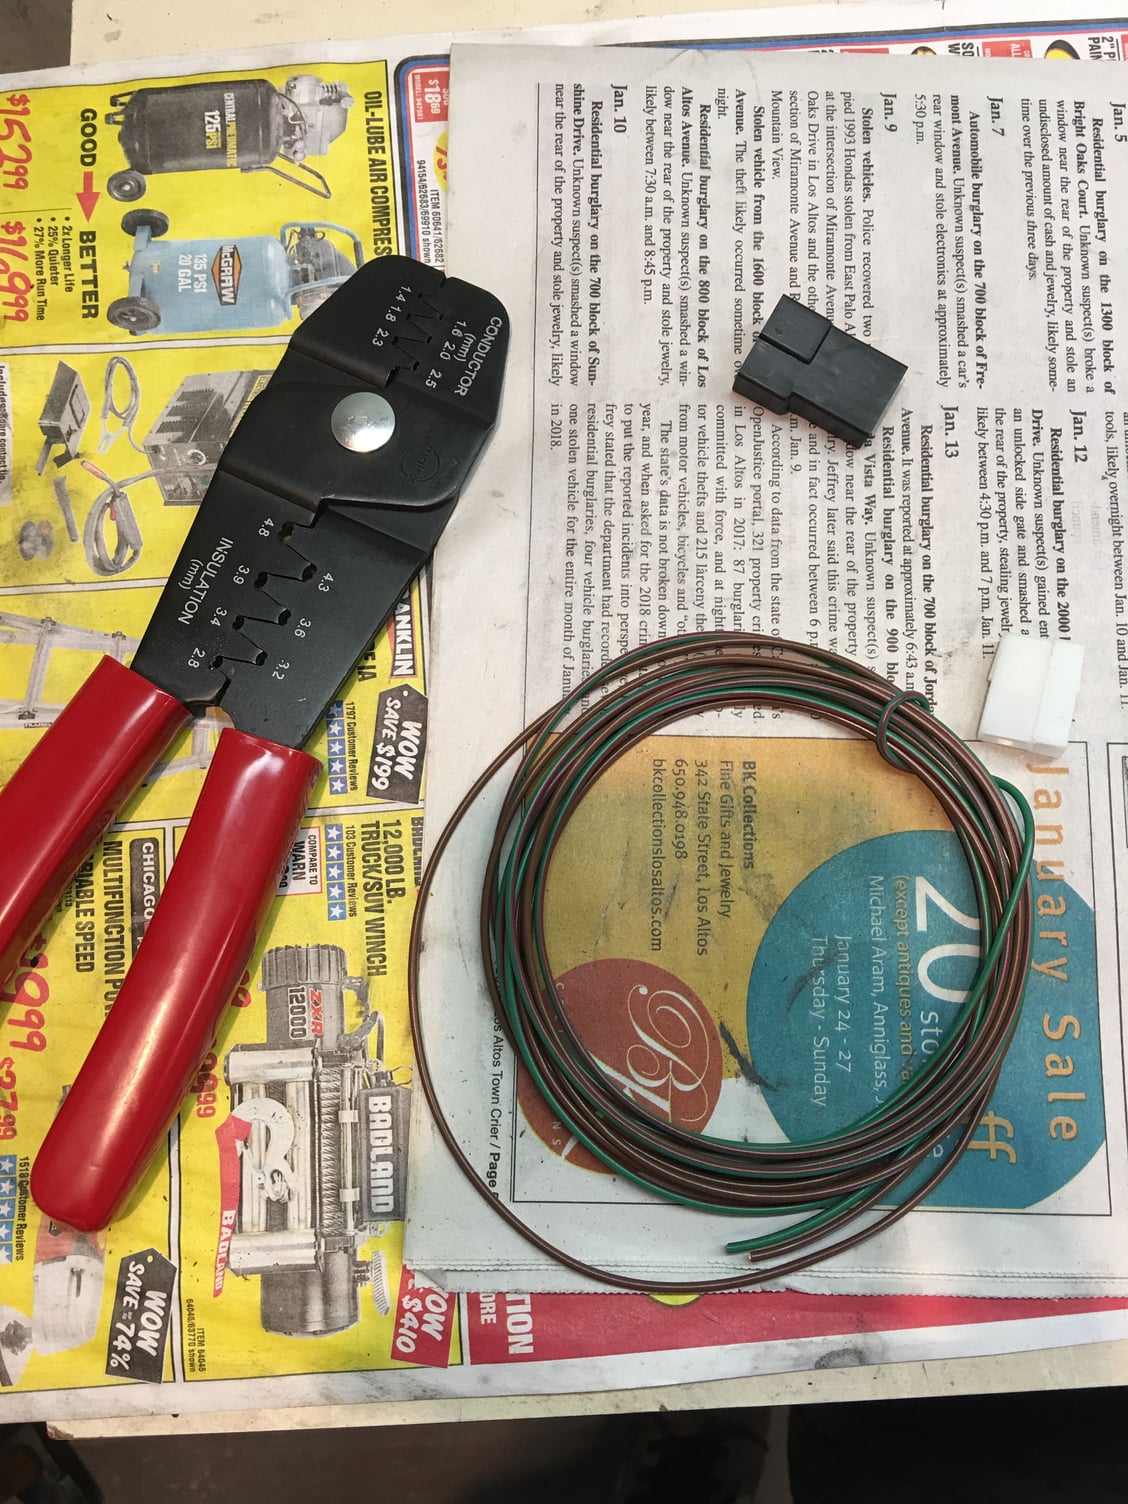
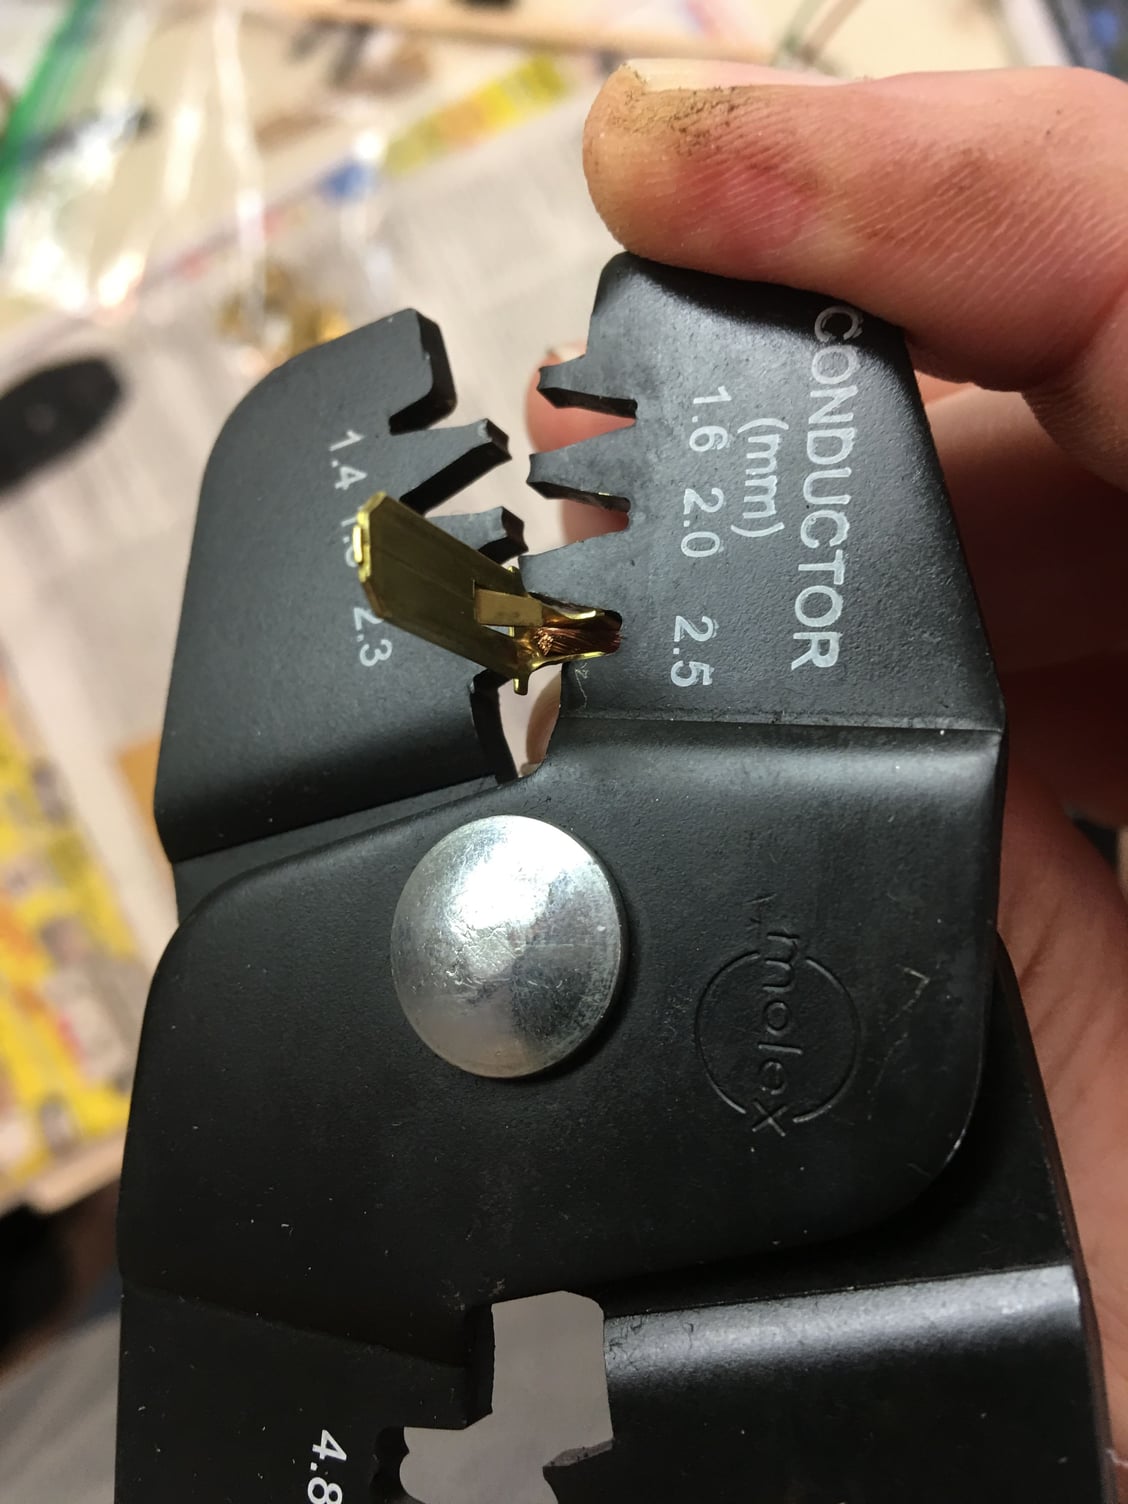
I ordered two original Porsche connectors from Einmalig, they are 999.652.167.40 (female, connects to pump) and 999.652.192.47 (male, connects to the existing female connector under the expansion tank).
And I ordered a 6mm vinyl sheath off Amazon to make it look original:
Hey Rick, that will look good. Glad you were able to carry the torch forward. I ended up putting the stock components back in at the location
we were discussing, Had to button it up and move on to other issues before the weather gets nice.
If you have time, post pics of the finished product.
I will likely circle back to do the S4 tank at a later date.
Cheers.
I'm getting 2 meters each of green/red and brown 1mm2 wire, respectively. I imagine that I'll use more like 1 meter or less of each, but got some extra and it's super cheap at $1.99 per meter. I also picked up the correct 6.3mm/1/4" spade connectors with latches to fit in the connectors I purchased. I'll put the wires in the PVC sheath to make it look stock. This way the extension to the S4-style tank and pump in the fender is reversible and doesn't require any modification (like cutting -- oh the horror) of the original harness!
Now the wait... some parts are on order and it may be a week before I see anything...
However, I have found that the best way to not get frustrated while waiting for parts is to order MORE parts.
BTW: Fun fact: Not only does the color of the wire have meaning (and there are many conventions besides just red for plus and black or brown for ground) but there is actually some method behind the madness of the Bosch numbers which show up everywhere on our vehicles: http://bmwmotorcycletech.info/wires&codes.htm
I hope I don't cause any offence by asking - but did you prime the pumps? A lot of windshield washer pumps will have a VERY hard time pumping the fluid as long as there is air in the lines. Once the air is pushed out and it's just fluid, they operate perfectly fine.
These are generally centrifugal pumps and while I don't understand the exact mechanism for why - any gases make them unable to pump any fluid. When the pumps are placed inside or below the tank, gravity primes them for you but often they are located above or alongside the tank - in which case gravity doesn't work. You can either hold the pump and the tank in such a way that gravity does prime it prior to the install (usually they will have a float valve somewhere in the line that prevents the fluid from returning), or another way that works is to simply suck the fluid through somehow. I've had luck with handheld soap dispenser pumps but they don't always work... Its generally a pretty annoying process but once its done, the pumps are definitely powerful enough for the job and the position no longer matters unless you run them dry.
Edit: Looking at the pictures, I think that might be the exact pump used in my 924S and I've replaced that one. That was a real pain to prime but it does work reasonably well.
Also - found a video that explains what's happening:
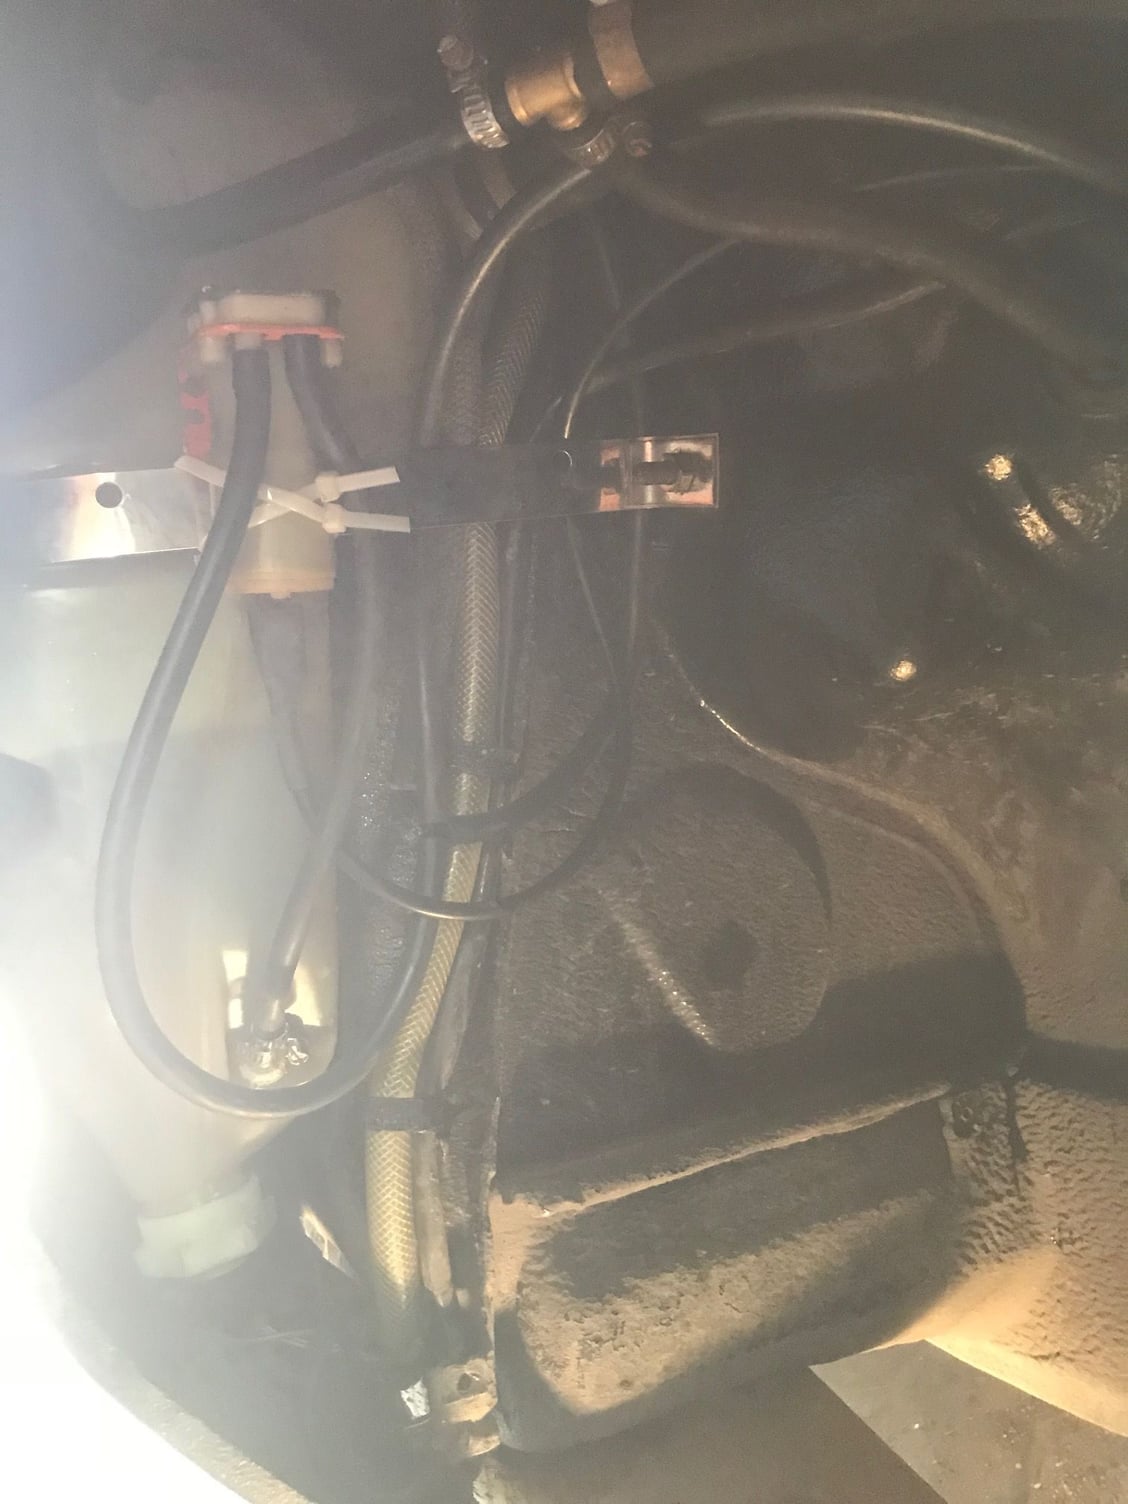
I moved the washer pump to the wheel well on my 86.5 The original bracket is under the washer strap with a couple of tie wraps to secure it (painted orange - just what I had around to cover up the rust).
I made an extension cable from original plug (left in original spot).
Works fine.
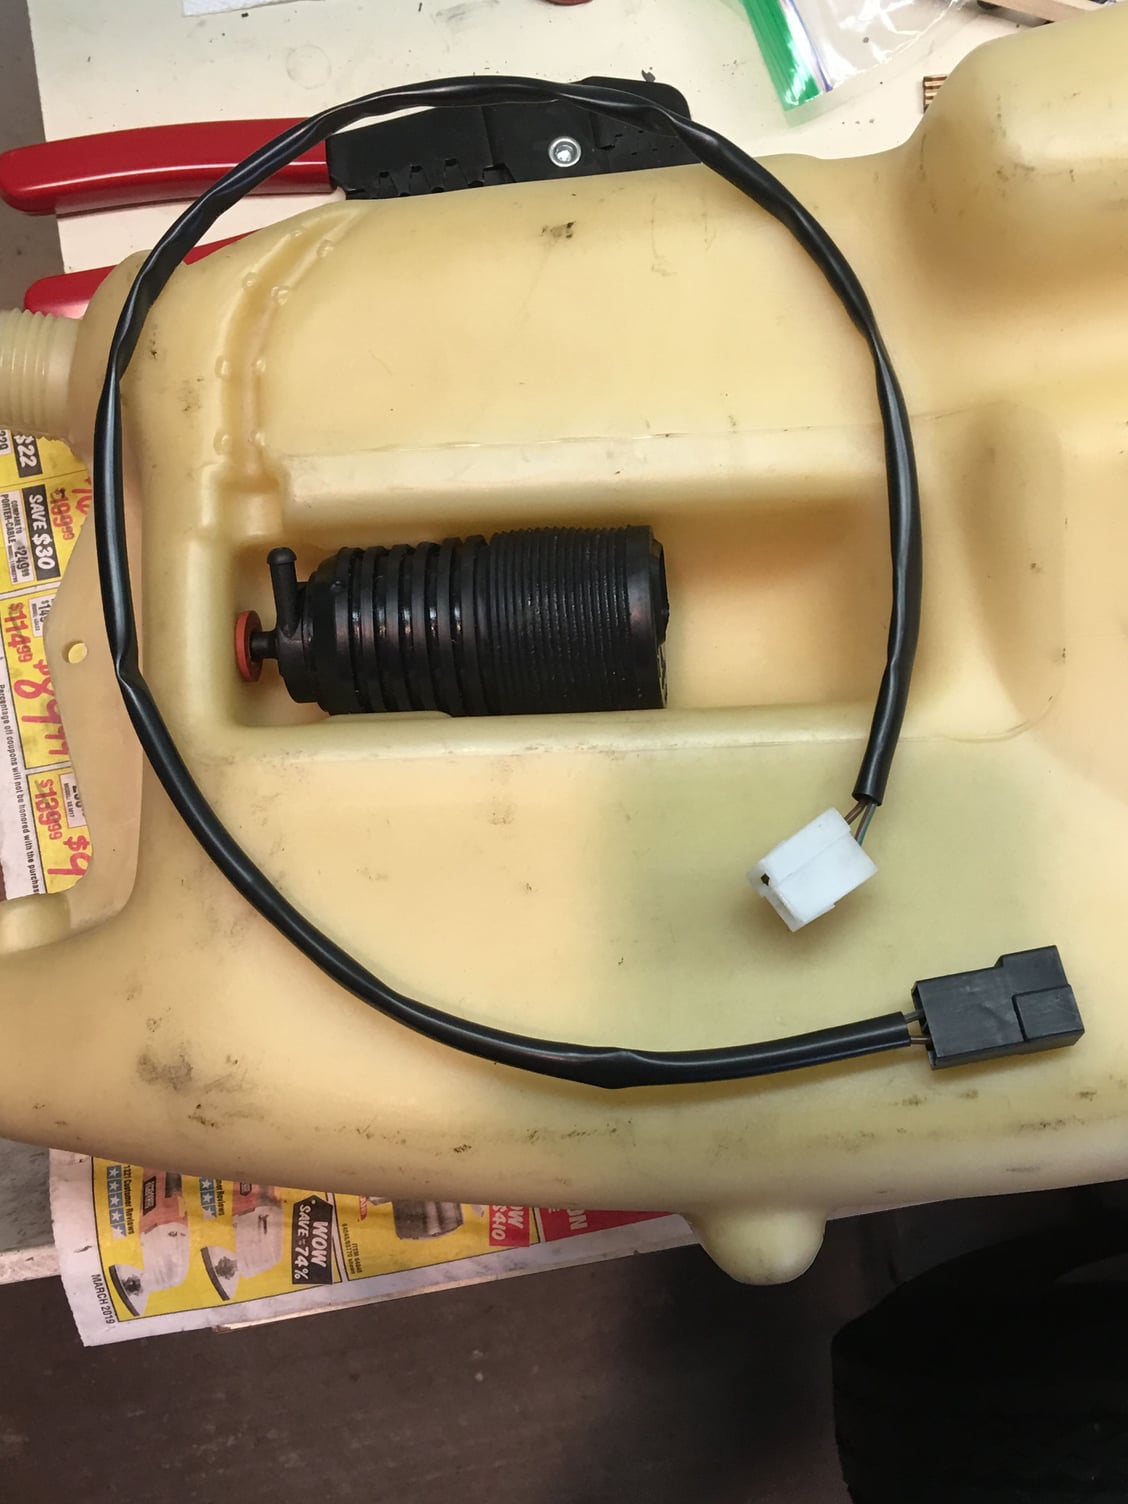
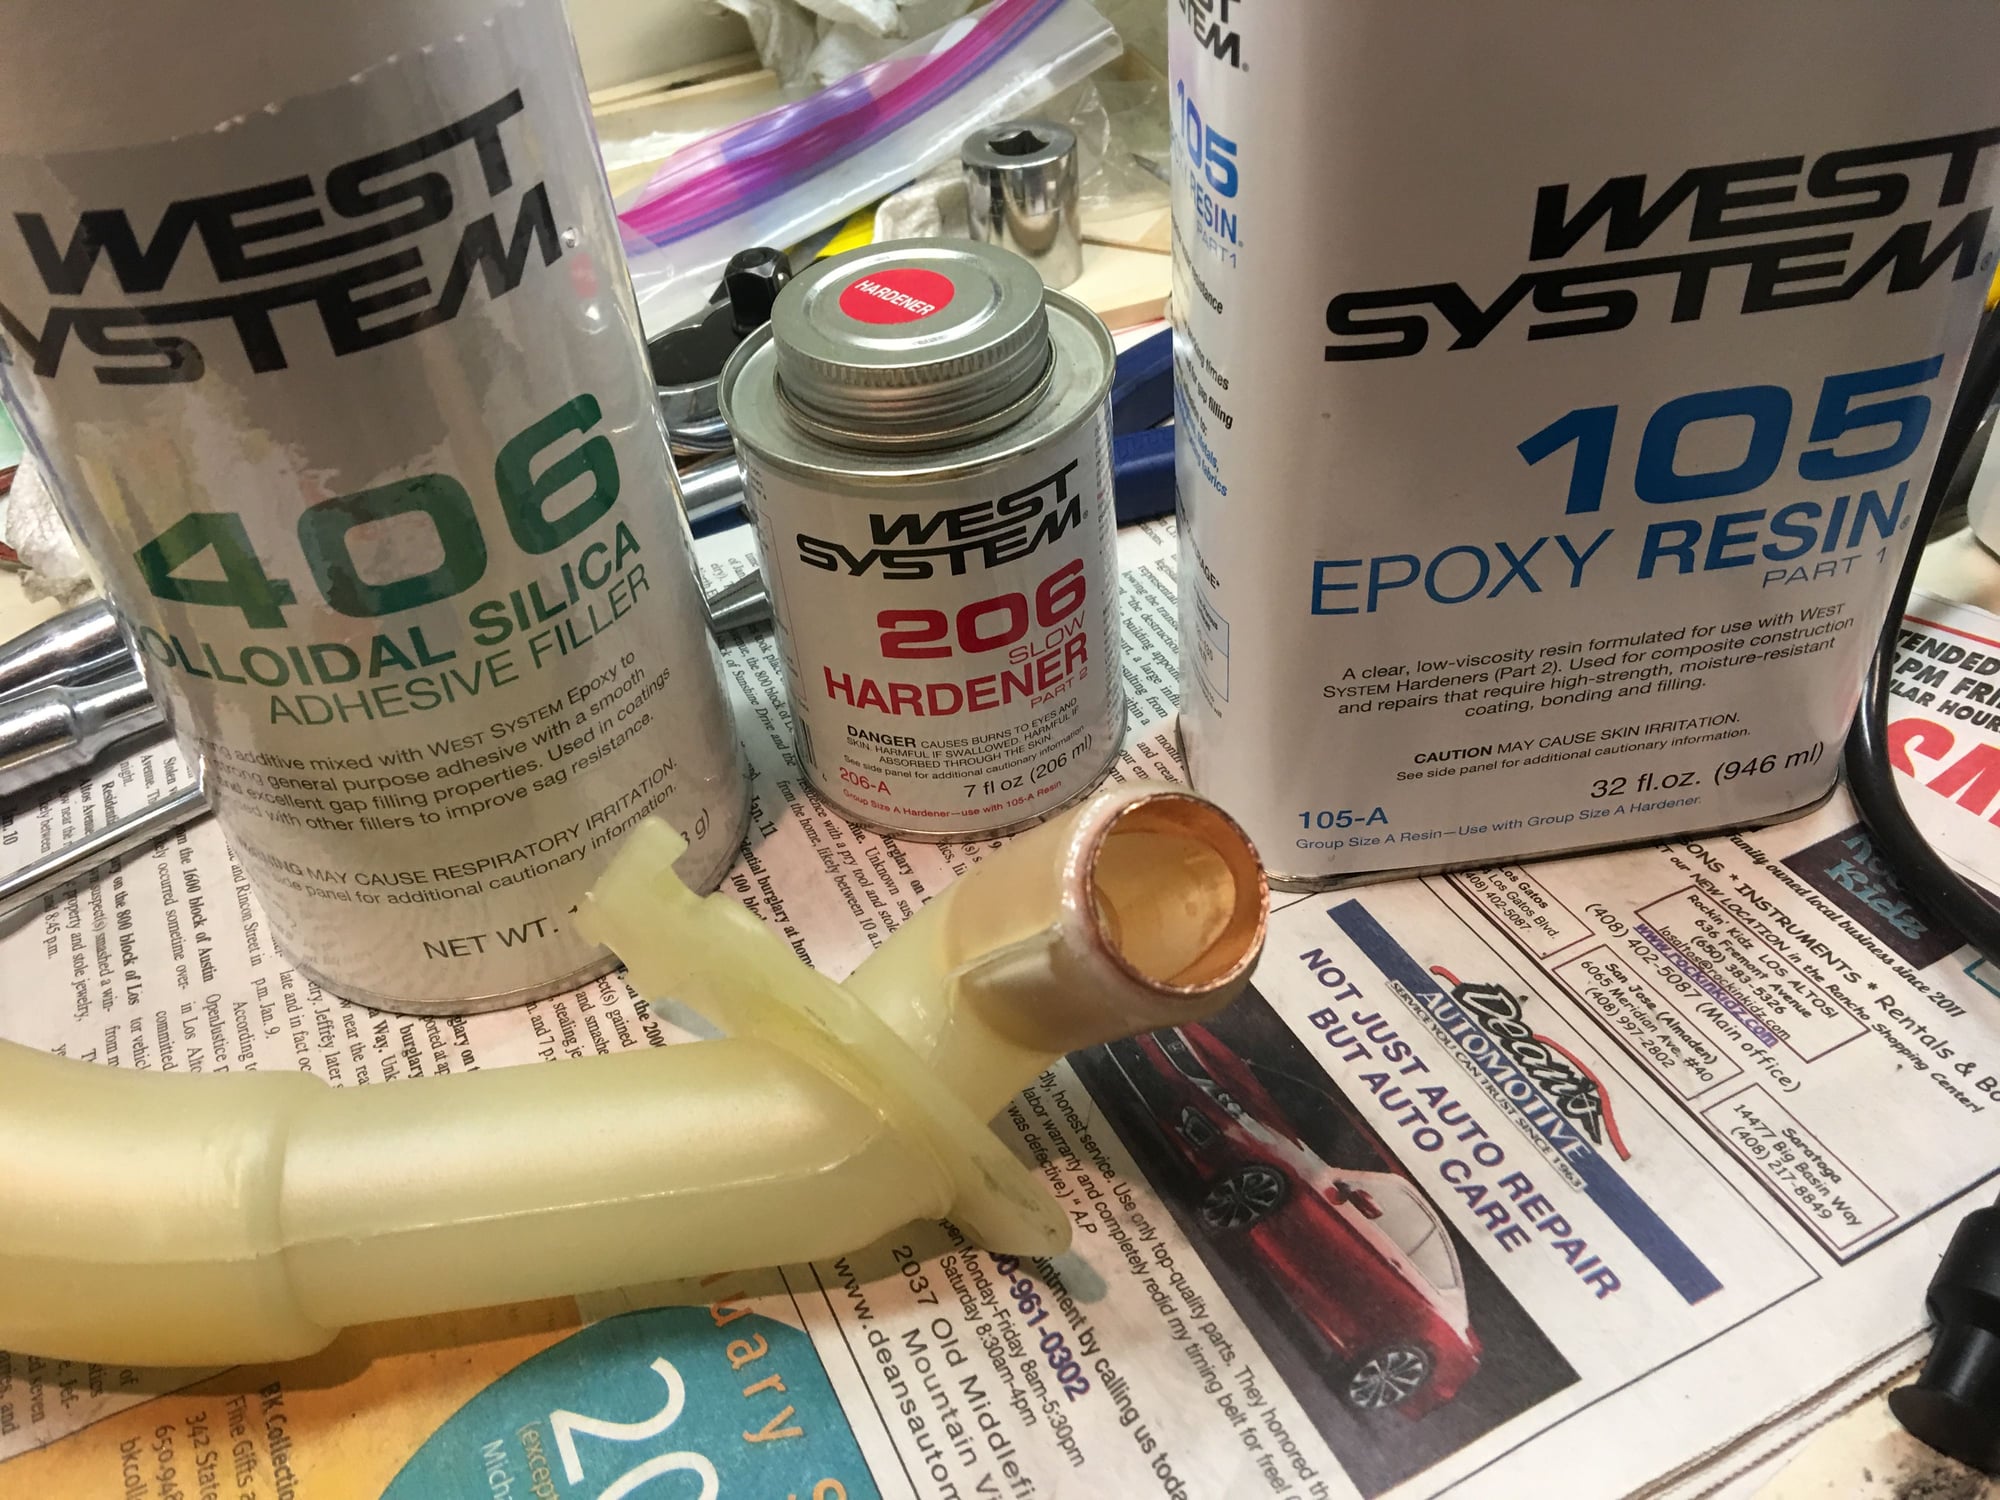
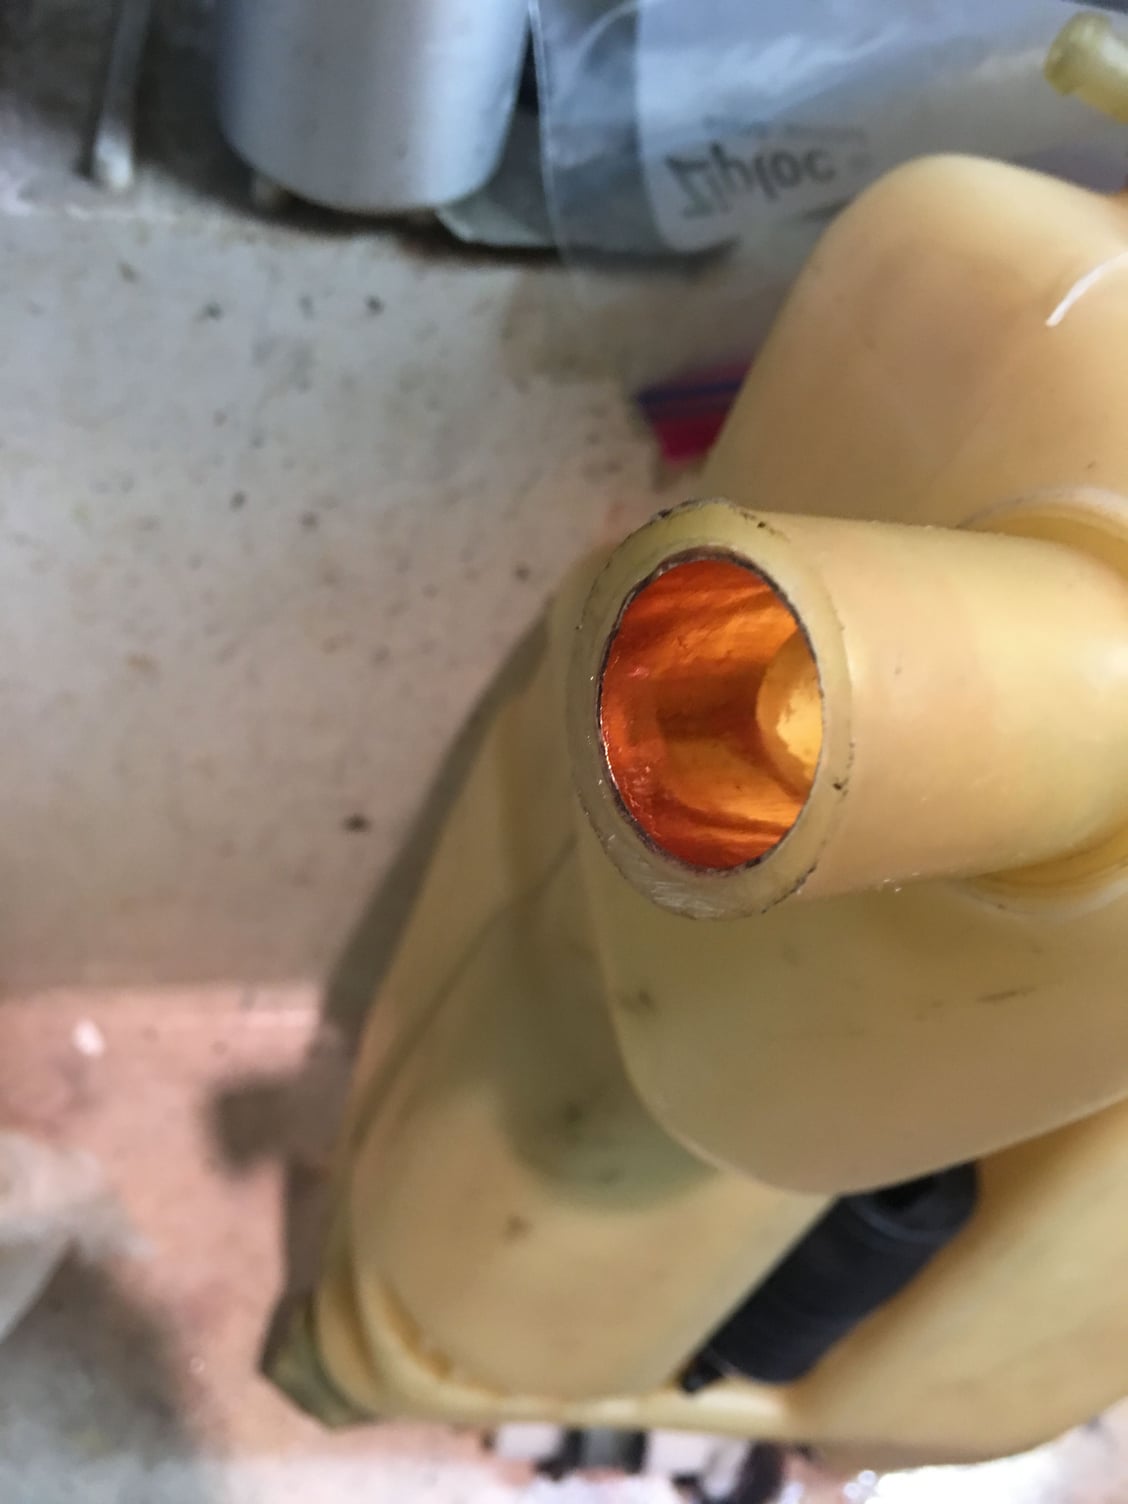
Making some progress! I purchased a new-old-stock S4 tank and a filler neck a while back along with a new S4 style pump and a new headlight squirt pump plus associated grommets and the sleeve holder for the new pump. Also have a new level sender unit. Coated all rubber with Molykote prior to installing, and coated all the rubber boots for the connectors at the tank too. I made a wire harness extension from the existing pump connector under the coolant tank to the new pump at the tank. I also removed the existing tube inserts in the neck and tank by dipping in boiling water for about a minute and replaced with 3/4� copper couplers from Home Depot, a virtually perfect fit. I used resin mixed with colloidal silica to affix the copper tubes which makes the epoxy thicker and much stronger.
The new headlight squirt pump was slightly smaller diameter than the original so I lined the inside of the existing clamp with split open silicone tubing.
When I install the tank - which by the way I confirmed fit perfectly just like the old style tank - the only changes at the tank are the new electrical harness for the pump and plugging in the existing feeder rubber tube that used to run to the bottom of the tank directly to the pump output now. The only other change I�ll make is to go with the S4 style output setup. I�ll eliminate the T connection under the coolant tank - for some reason the output of the original pump fed toa T, one leg of which fed back to the tank. Crazy!! I�ll eliminate the T and the feedback line, and instead join the pump output tube directly to the tube going up to the hood. No new tubing needed, just replace the T with a pass-through.
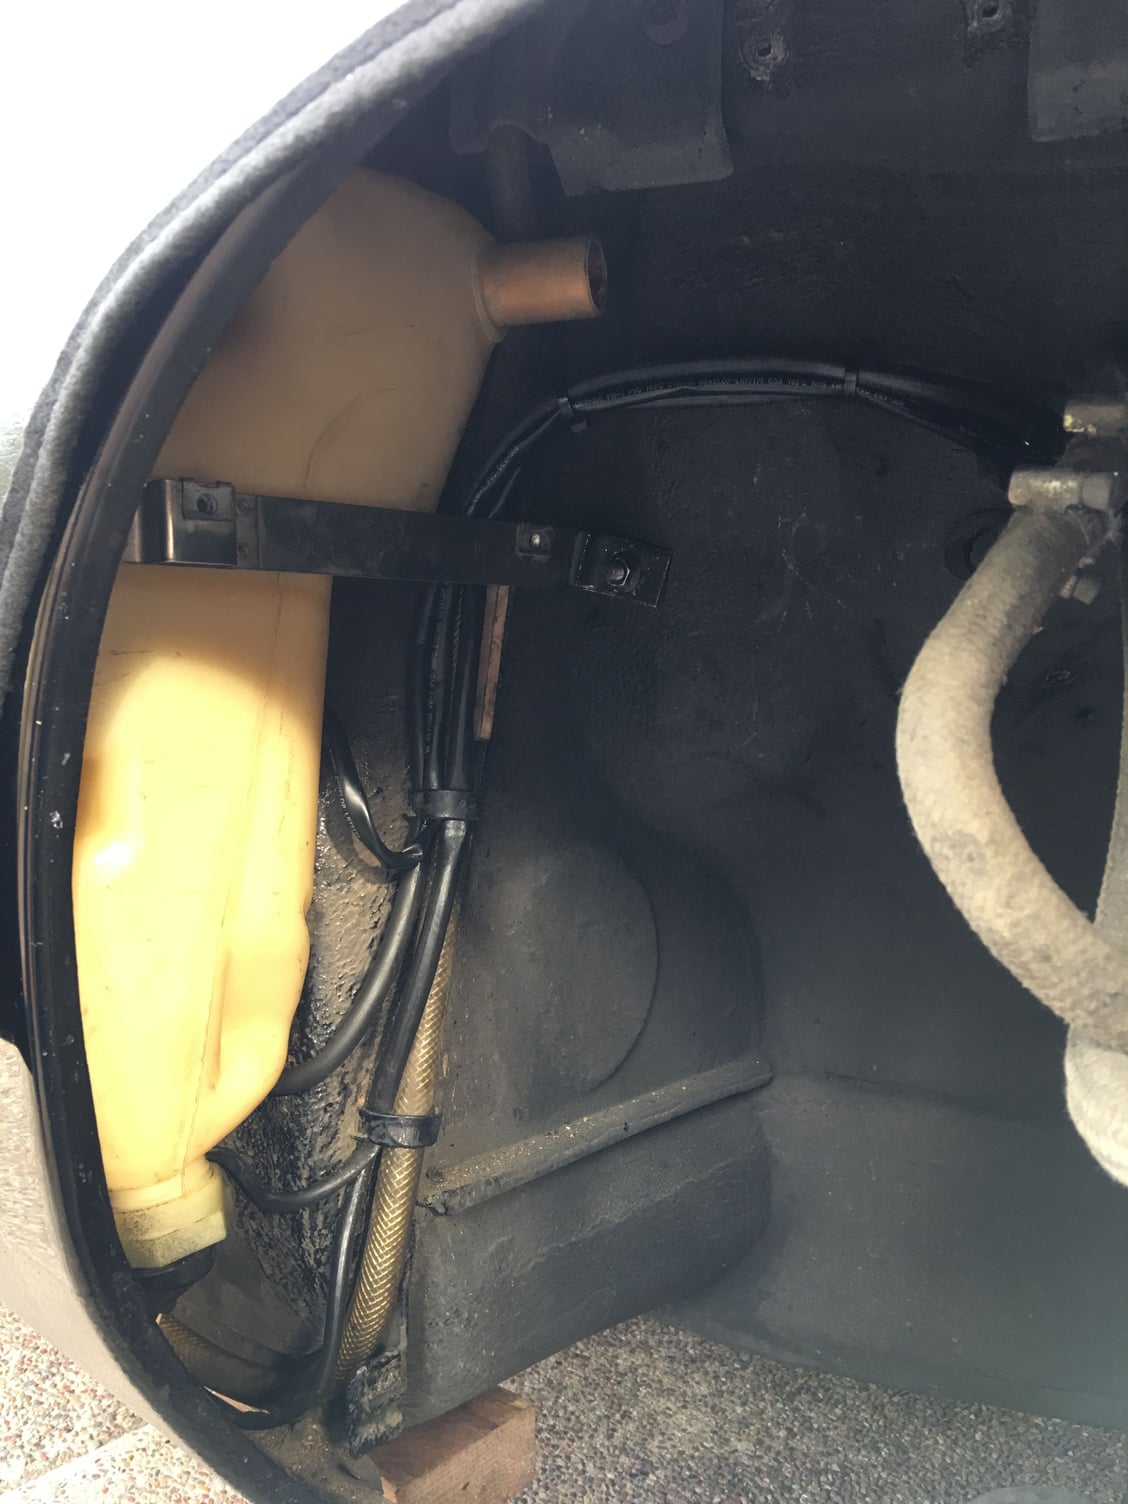
I got everything more or less wrapped up today. I zip-tied here and there to keep things tidy. There is a little channel built into the S4 tank to hold the tube feeding out of the windshield washer pump but I decided to not use it because I felt it would constrict the line. Even re using the original rubber tubing there is still plenty of slack to feed underneath the coolant tank as the original did. I still need to test everything but overall this is a great improvement over the stock pump location!!!
Finished tank install. Still debating on whether I need a line for the overflow. I�ll install the neck and connector tube after I finish some other projects under the hood. You can see the output tube coming from the grommet in the fender and connecting directly to the tube from the hood. Meanwhile the original pump connector now connects to the new harness to the tank mounted pump. I zip tied the connector out of the way so it won�t rub or rattle.

 01-25-2019, 03:30 PM


 George Layton March 2014