When you click on links to various merchants on this site and make a purchase, this can result in this site earning a commission. Affiliate programs and affiliations include, but are not limited to, the eBay Partner Network.
After some years inactive, I have decided to buy membership and use this forum for some advice again!
I have a 1991 S4 I have inherited from my late Father, and have done some good miles in it since. Have done TP/WP, new Bilsteins, kept it serviced, and have enjoyed the car a lot.
I decided this year that I needed to do an intake refresh, as I need to reseal the cam covers and probably powder coat everything while I am in there, plus knock sensors I know need changing and I could change fuel lines while I am in there and clean injectors etc etc.
Well my hand had been forced now as when warming the
car up last week in my garage, a fire started on the driver’s (RHD) side of the engine. I have always had an extinguisher in the car, so it can’t have lasted more than 10 seconds, and as yet I cannot find any damage. The car actually was running while the fire started, and I stopped it when I saw flames.
So I have contacted Roger for an intake refresh “kit” and some new rubber fuel lines. I will get the intake and cam covers redone, and change all of the things he advises.
One question to get us started however, and it is cam chains/tensioners. I have the procedure for changing the tensioner pads, and that seems like a no-brainer while I am in there. Am I unable to change the cam chain without removing the cams? I am just getting into a bigger job, it feels like, if I have to break into the timing belt covers again.
Thoughts please? I feel there’s a right answer and a lazy answer, but I could be wrong!
Sorry about the fire,
glad you got out before it was a total.
Is this a 5 speed or auto?
To replace the cam chains the cams have to come out.
How many miles on the engine.
If its an auto I would inspect the tensioner pads and if you dont see any cracks in the plastic leave them alone same for the chains.
Reason being this type of failure is not common as these V8 engines are not stressed like the 4 cylinder variant with a similar head design.
the auto version is even less stressed
Thanks for getting the ball rolling Sir! See photo after trying to blast away the powder with compressed air, It still isn't apparent where the fuel leak has come from just yet...
c.140,000 Miles and an auto, what are your thoughts? At the risk of digressing, why do the pads seem to survive longer in the V8?
Well, that doesn't look at all bad as far as fires go. The gods dealt you the blow mercifully, and you were lucky! I am happy for any 928 owners that don't loose cars to fires!!
I personally would focus on the mission critical items, the pads don't seem to cause so many problems.
1.) Make sure that the person who does the intake gets it really clean! Otherwise, the motor is toast in a short time.
2.) The fuel system is critical. Are you using the correct technology for the replacement lines? There are a couple choices, and this is a contentious point. (I tend to be ultra-conservative.) And, do you know how to put the fuel system back together correctly? Otherwise, more fires are awaiting.
3.) Change the power steering lines. Again, otherwise, more fires are waiting.
Have some fun along the way remembering the near miss!
The obvious question is why then would you blast inside the intake? Surely they didn’t coat it inside too at the factory?
They certainly did coat the inside. Why they did so is a better question- my take on this is that the magnesium alloy corrodes to a matt black appearance presumably down to the formation of magnesium oxide. Whether or not this is detrimental in any way remains to be seen but I doubt that would be the case- more an appearance issue as once the oxidation has taken place it seemingly passivates further corrosion from taking place but I do not know that for a fact.
When I did my inlet manifold 13 years ago I did so on the external surfaces only as I was certain I could not get the internal surfaces correctly prepared locally. I figured that flakes of coating dropping off would do far less damage than entrapped blast media that can and does trash motors rapidly if not totally removed. Indeed the external surfaces were blasted with media that was too harsh and pock marked the surfaces but that was another issue that concerned me and actually happened- my inlet manifold has an "interesting" appearance. When the surface of this alloy is correctly blasted it needs to be primed immediately especially so if the relative humidity is high.
Hopefully the fire damage is not too severe- something like this happened to my friends 928S4 at the main dealers premises- the fire was quickly dealt with but the list of damaged items was quite extensive- especially so under the manifold. Sadly such events are a sure sign of lack of appropriate proactive maintenance intervention. As has already been stated, change out the power steering hoses and the transmission cooler hoses.
Well, that doesn't look at all bad as far as fires go. The gods dealt you the blow mercifully, and you were lucky! I am happy for any 928 owners that don't loose cars to fires!!
I personally would focus on the mission critical items, the pads don't seem to cause so many problems.
1.) Make sure that the person who does the intake gets it really clean! Otherwise, the motor is toast in a short time.
2.) The fuel system is critical. Are you using the correct technology for the replacement lines? There are a couple choices, and this is a contentious point. (I tend to be ultra-conservative.) And, do you know how to put the fuel system back together correctly? Otherwise, more fires are awaiting.
3.) Change the power steering lines. Again, otherwise, more fires are waiting.
Have some fun along the way remembering the near miss!
Thanks. When it comes to fuel lines, I have read the debate, and I fall on the Greg Brown/Roger Tyson side, so I’ll be going to Roger for the lines.
I have access to a blast cabinet so I should be able to be more meticulous about cleaning it before coating.
Originally Posted by Wisconsin Joe
To clarify a bit about 'getting the intake clean' -
Make absolutely certain that ALL of the blast media is cleaned out of the intake before powder coating. EVERY last little bit.
To do it properly is not a 'one and done' cleaning.
Failure to do so will result in the blast media being run through the motor.
That will destroy the motor.
Is there a thread anywhere with a method of how best to clean it?
The cleaning is necessary because the inside of the intake is usually very oily, which unless very carefully masked, causes blast media to get stuck to the inner surfaces. If not cleaned that media enters the combustion chamber and grinds down the precision parts very quickly, resulting in a destroyed engine block.
There are lots of threads on cleaning the intake but it's not a precision process that has to be followed to the letter. You can use any method you like as long as there is zero blast media inside when you're done. Here's the process I used.
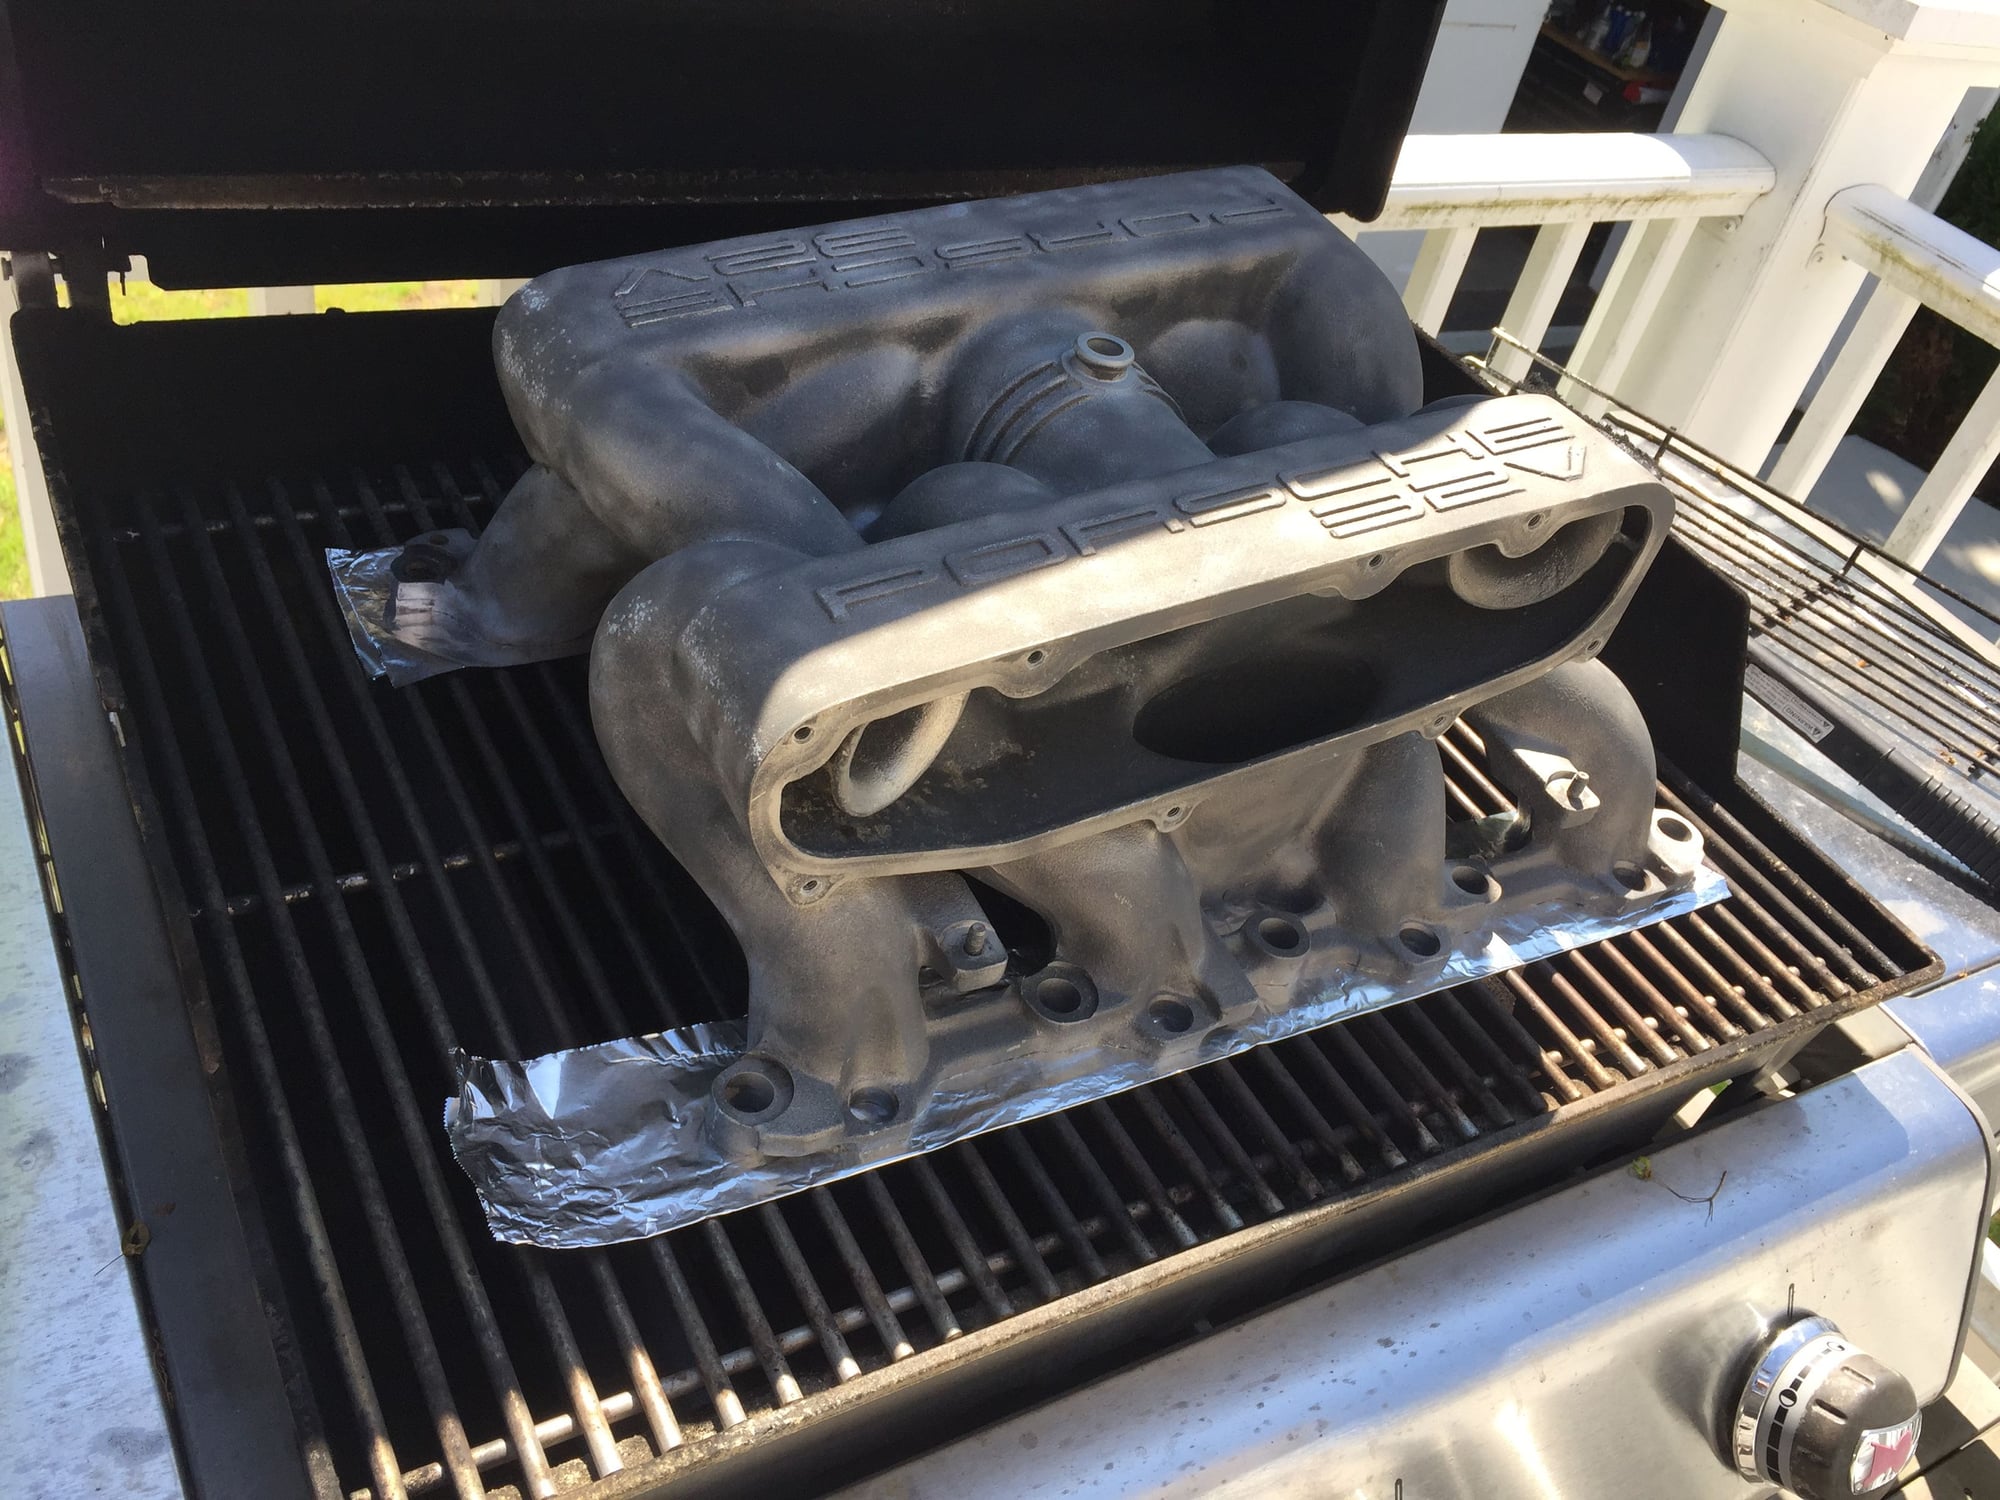
Optional: Bake the entire thing at 200-250F or so for a few hours. The heat is said to draw the oil out of the pores and partially vaporize it, Whether you bake before or after blasting doesn't seem to make much differences. I did it after blasting and used my gas barbecue grill - fit perfectly.
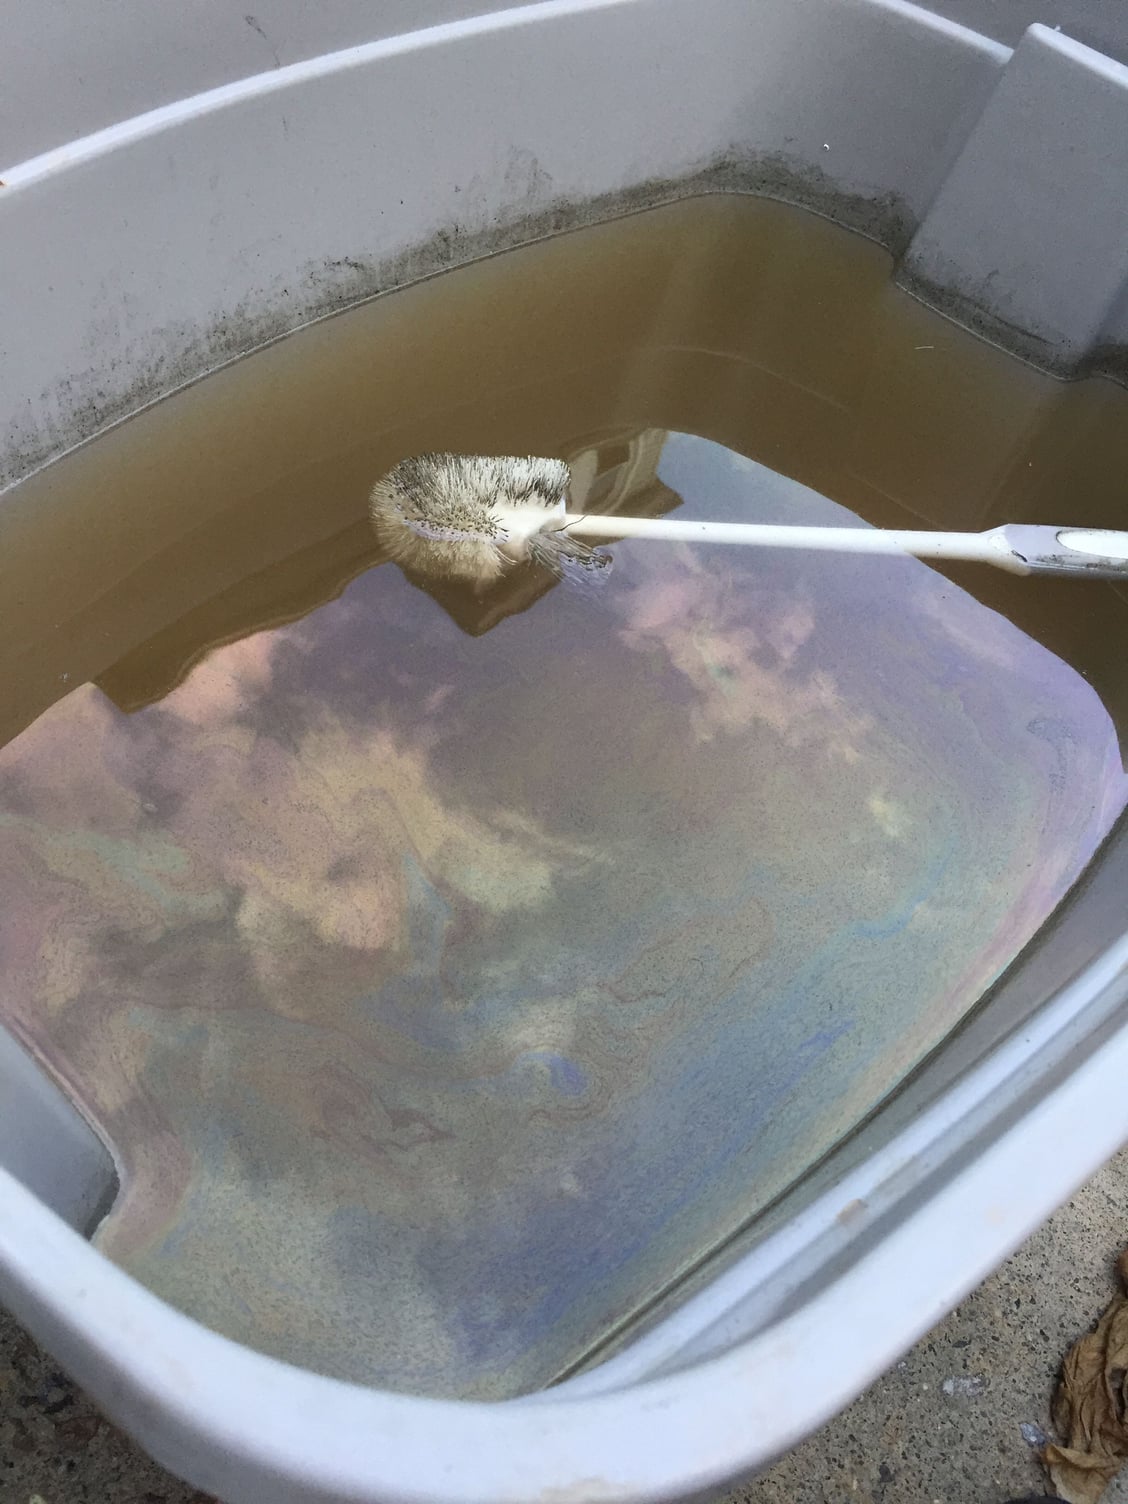
Cleaning is a low-tech, annoying, rinse-and-repeat project like it always is. Get a brush that is a little larger than the tubes, a big tub of water, and lots of degreaser. Scrub all the interior surfaces until the oil film/blast media is gone. Don't forget the insides of the side cover and upper sides of the plenum.
Rob Edwards suggests a toilet brush but I couldn't get it in there. I used several nylon brushes, a dryer vent cleaning brush, and a rotating nylon brush on 18v drill with a flexible shaft. If you have an inspection camera or borescope you can clearly see when the media and oil is gone. Changing the water in your tub will show a diminishing oil film on the surface. It takes way longer than you think it will - about 4 hours for mine. This is how much oil was left on the plenum after baking and 3 rounds of scrubbing/new water.
When you're done, prepare to enter the next controversial Rennlist world of refinishing/painting/powder coating. Good luck!
Hi Rawky, and welcome back to Rennlist. Like moths to the flame we cannot resist. (sorry...)
Good catch on getting the fire out before the whole car was consumed. Know that the powder is corrosive, so before you go much further you'll want to do a very thorough cleaning of the engine bay. You probably wanted to do that anyway, as the refinished intake will make the lesser bits stand out so much you might not be able to close the hood. (!!!)
The mag intake will oxidize as soon as fresh metal is exposed. Unlike aluminum, the magnesium oxide is not a 'self-protecting' material. It will continue to deteriorate until you have an oxide manifold. With that in mind, waste no time or effort in your own blast cabinet unless you are going to paint the manifold yourself. Be prepared to blast, clean thoroughly, and get a protective finish on it immediately. Do a search on alodine coatings, and plan to use something that maintains material compatibility all the way through your finish coats.
I can recommend that you look hard at finding a known-capable powder-coating company to do the work for you. The process of blasting, baking, cleaning, blasting, cleaning, repairing, coating will be a much better use of their time and your money than most folks trying to do it themselves. Know that the castings are less than perfect, so plan in advance to do any repairs needed to get the finish quality you want. Small voids in the finished surfaces are common. The factory supplier used filler in them before they were painted. Expect that media blasting will remove that filler. A good PC'er will take care of this for you if advanced notice is shared.
As others mention, the pads in the V8, especially in the automatic cars, easily outlast the pads in four-cylinder heads. Revs are generally kept much lower in normal driving, so total chain and pad wear will be much less. That said, removing the cams offers a chance to refresh the front cam seals, the end caps, etc. -- stuff that will leak over time as the materials dry out just from age. You'll end up with the front of the engine apart to remove the belt and the gears, so plan on the equivalent of a timing belt refresh, plus re-timing the cams. Even if you don't go all the way to seals and chains, do look carefully at the pads. If they are worn very much, replacement of just the pads is easy and relatively inexpensive while the covers are off.
Replace the injectors with modern 4-hole units. Plenty of advice available on which ones work best. Get the correct o-rings with them, so you don't end up with air leaks. Cleaning injectors is OK I guess, but doesn't make up for the wear that happens. New replacements are a sure thing, good for another 100k or so if you keep good fuel preservative in the tank during long rest periods.
Otherwise, have fun. Plenty of procedural guidance is available from the Saint Dwayne collection, plus there's close-to-realtime support here.
Thanks all for the helpful and comprehensive responses! It will be a while before I get to the fun bit with other things in life taking up my time, but it is good to have this all in my mind ready for when the time comes.
One thought I had is, if blasting and recoating the inside of the intake is so fraught with peril, isn’t there an argument to not touch it and only blast and coat the outside?
Not blasting the inside will also work. You will need masking for all the entry holes since random media will stick to the oil even if you don't blast the inside. You can also use soft and/or flammable materials (soda, water, or plastic media) for blasting.
Why the inside blasting/cleaning: Some like to get rid of all the old inside coating under the assumption that it will peel off and get into the valves. Others didn't give masking instructions to the blaster and needed to clean. Some with a certain pathology just like scrubbing stuff. On mine the inner coatings were in good shape so I left the inside unblasted. Next time I will use one of the above alternatives to avoid the lengthy cleaning.
@DrBob Good advice on the alodine. FYI there are non-toxic and cheaper "conversion coatings" now that are approved for US military and aviation use. I used the one recommended by Brian Olmann @olmann SanChem SafeGard CC-3400 RTU (awesome thread here ). SanChem has a new coating that is specific for magnesium - it's a pale orange vs. the former purple.
It's a PITA, but when it's all done it will look so great you'll forget all about the pain.
Question from "rawky"
Is there a thread anywhere with a method of how best to clean it?
Reply
I recall there being somewhere a quite lengthy thread on best practices. I think. I spend 20 minutes looking and could not find it. The one that stood out was this thread though that I do not remember actually from the time when it was current. https://rennlist.com/forums/928-foru...l-coating.html
Comment "dr bob"
The mag intake will oxidize as soon as fresh metal is exposed. Unlike aluminum, the magnesium oxide is not a 'self-protecting' material. It will continue to deteriorate until you have an oxide manifold. With that in mind, waste no time or effort in your own blast cabinet unless you are going to paint the manifold yourself. Be prepared to blast, clean thoroughly, and get a protective finish on it immediately. Do a search on alodine coatings, and plan to use something that maintains material compatibility all the way through your finish coats.
Reply
dr bob is one of a hand full people here, who force me, every time they write something, to question the underlying assumptions of whatever I am doing/did. I have to spend some materials time thinking about the magnesium oxide. I did not re-finish the inside of intakes under the assumption that there is enough oil in there to prevent any oxidation. Now I just realized that (1) I had made a tacit assumption that the oil would protect it (oil protects all metal...) and (2) after putting on a windage tray and a full-blown GB breather kit on, I am not even sure that there is much oil in there anymore. At least, the first 500 miles of driving sure didn't reveal any oil in the oil/air separator.
PS: Sorry to not use the quote function. Basically between the lazy load (which is completely stupid) and some "other" new functionality, crackpots at IB trying to optimize their ad revenue have made it impossible for me to use this site efficiently anymore. I will not pay my next membership, even though I love you all here...

 01-19-2019, 01:38 PM