When you click on links to various merchants on this site and make a purchase, this can result in this site earning a commission. Affiliate programs and affiliations include, but are not limited to, the eBay Partner Network.
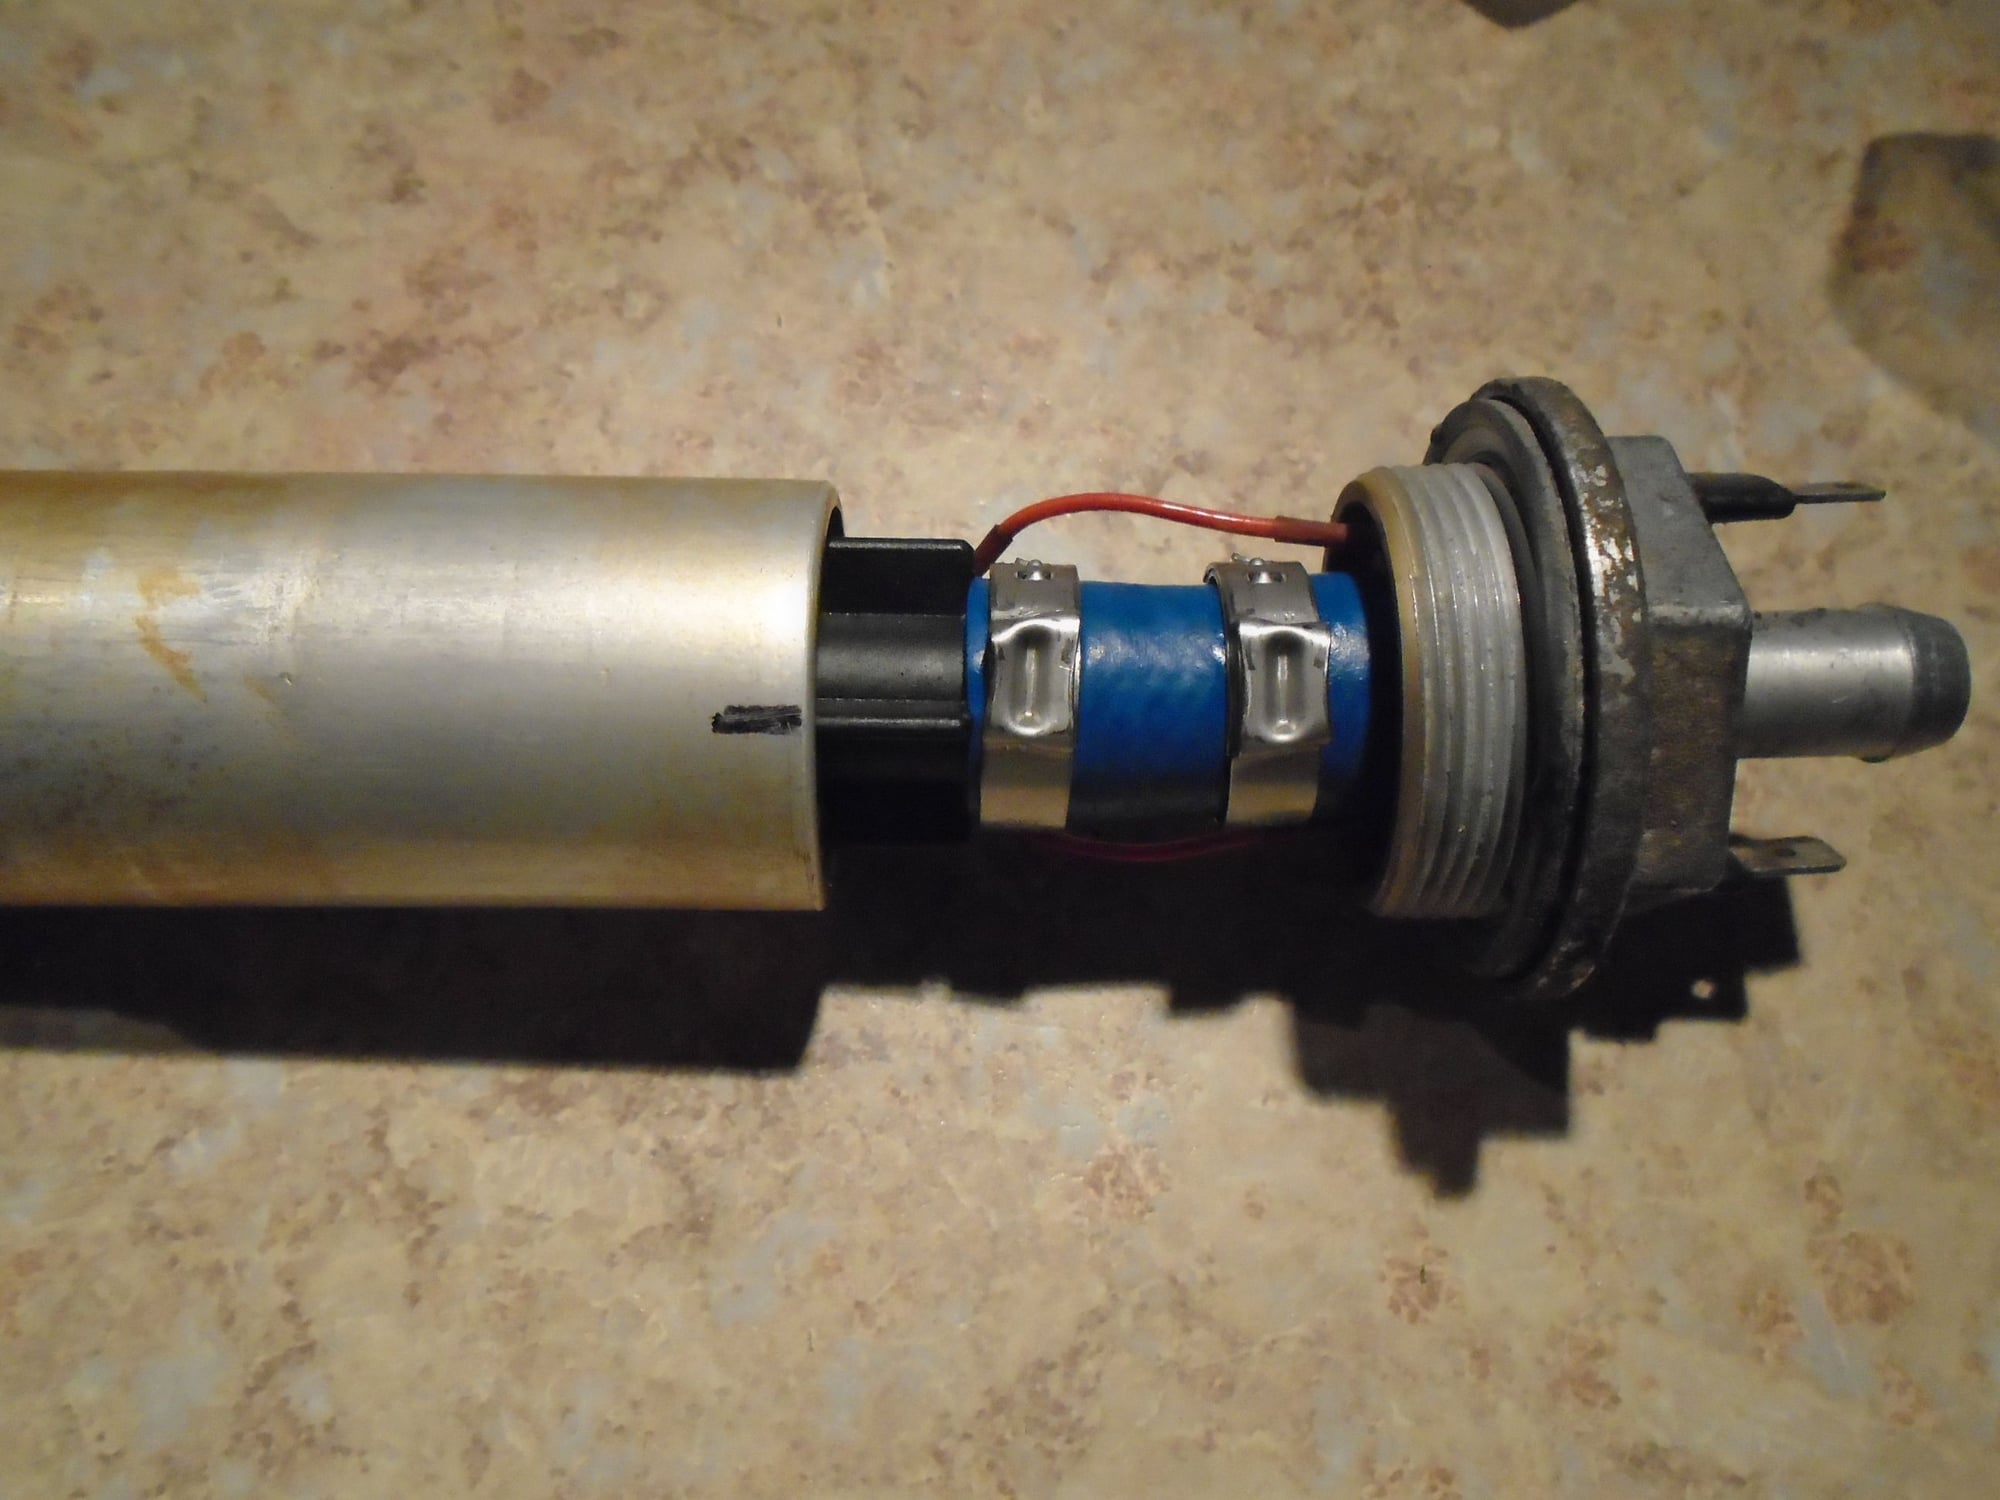
was able to get the hose onto the fittings of the in tank pump with some patience, and a little wiggling.
no broken wires, tested pump again, and all good!
biggest PITA was getting the rear straps into position. would not have been that difficult with an assistant, but working alone,
presented a little bit of a challenge.
car seems to start easier, idle better, and have better throttle response: am I indulging in magical thinking??
will go for a suitable shakedown run tomorrow and see if there is proof in pudding
not sure I got the sending unit sealing ring fully seated. WSM says to soak in very hot
water for 8 minutes. any other ideas or suggestions?
Alternatively, any lubricant that is mostly composed of glycerin is fine for rubber assembly.
Originally Posted by FredR
My post was advising to be very careful with the cables as they break off very easily- the flip side is that they are not too difficult to solder back on if they do inadvertently get disturbed.
Agreed. My concern about 'repair' of the wires is that they are - originally - encased in a coating that is demonstrably impervious to continuous immersion in gasoline. I do not know the composition of that coating nor how to replace/repair it. I wouldn't bet on bare solder having a long life when immersed in gasoline.
On the flip-side realize that I have to worry about warranty return and goodwill for clients and thus I rarely perform experimental repairs or 'non-standard' repairs which I'm not nearly-certain will be as long-lived as a best-practice repair. For my own 928s if confronted with busted red in-tank pump wires I might resolder them with the knowledge that the lifetime of that repair is not known (to me at least.)
was able to get the hose onto the fittings of the in tank pump with some patience, and a little wiggling.
no broken wires, tested pump again, and all good!
Nice. Good job. $1k saved.
car seems to start easier, idle better, and have better throttle response: am I indulging in magical thinking??
Not magical. More likely the effect of having a main pump not trying to pump 'around' debris.
not sure I got the sending unit sealing ring fully seated. WSM says to soak in very hot
water for 8 minutes. any other ideas or suggestions?
Did your nose pick up anything during your fuel system flow/pressure/leak test that you performed before starting the car by bypassing the relay to operate the fuel pump?
Fred said "Yes but note it does not take much to detach the cables. On the other hand they are relatively easy to solder. Cables submersed in petrol are no issue. The bits that spin are made of plastic [non sparking] and the motor is a sealed unit cooled by the flow of fuel around it."
"The bits that spin are plastic" - brushes and commutator are not plastic and can spark in air. Last time I opnened such a pump the working rollers were steel.
Sounds like the (unspecified) problem is now fixed. If the gauge head screw on cap is not fully seated (on a new seal?) you may see some spillage next time you fill the tank, and your nose will certainly detect the spillage.
jp 83 Euro S AT 57k
Fred said "Yes but note it does not take much to detach the cables. On the other hand they are relatively easy to solder. Cables submersed in petrol are no issue. The bits that spin are made of plastic [non sparking] and the motor is a sealed unit cooled by the flow of fuel around
"The bits that spin are plastic" - brushes and commutator are not plastic and can spark in air. Last time I opnened such a pump the working rollers were steel.
Sounds like the (unspecified) problem is now fixed. If the gauge head screw on cap is not fully seated (on a new seal?) you may see some spillage next time you fill the tank, and your nose will certainly detect the spillage.
jp 83 Euro S AT 57k
The in-tank "assembly" has two components- the "pump" and the "motor". As I said, the motor appears to be a sealed unit and unless something has changed that I am not aware of, the brushes, the commutator and the shaft [that the pump part is mounted on] are all part of the "motor". The pump parts that spin [the impellers] are made of plastic as is the stator the impeller spins in thus the parts that are immersed in gasoline and are likely to "come into contact with each other" are "non-sparking". Strangely enough cars from time to time run out of fuel and when they do one has an air and fuel mix- with obvious potential for an explosive mix for the few seconds or whatever it would take for the engine to stop running because of insufficient fuel pressure. Unless Porsche are completely stupid, they would not expose an open motor to such conditions thus why as I can tell the motor is a sealed unit cooled by fuel flow over the casing.
Agreed. My concern about 'repair' of the wires is that they are - originally - encased in a coating that is demonstrably impervious to continuous immersion in gasoline. I do not know the composition of that coating nor how to replace/repair it. I wouldn't bet on bare solder having a long life when immersed in gasoline.
On the flip-side realize that I have to worry about warranty return and goodwill for clients and thus I rarely perform experimental repairs or 'non-standard' repairs which I'm not nearly-certain will be as long-lived as a best-practice repair. For my own 928s if confronted with busted red in-tank pump wires I might resolder them with the knowledge that the lifetime of that repair is not known (to me at least.)
Dave,
As a seasoned professional subject to potential litigation it would be "kamikaze" for you to do anything that Porsche would not sanction and that is why we have forums like this so that fellow enthusiasts can share experiences to give confidence about alternative solutions that may work - or identify ones that may not and/or be dangerous!
Whereas you are correct to say that the wires "have a coating" as I could tell that only applies at the terminal posts [see the photo submitted by Paul]. Whether or not there is anything on the rest of the cables remains to be seen but it sure does not look to be the case. All that aside, whether or not insulation is intact to some extent is academic [or so I would think] as gasoline is non electrolytic [does not conduct electricity] and thus acts as a good insulator. The other surprising thing to many people is that "gasoline does not catch fire"- it is the vapours in equilibrium with the liquid surface that ignite with very low energy and set the job lot off.
In my case I used wiring specifically designed for automobile use which purportedly has good resistance to oil and petrol exposure but how well it stands up to immersion may well be another matter altogether. I used heat shrink sleeves over the terminals in an attempt to replicate what I saw on the thing originally. The unit I worked on has currently been exposed for about two years so I can say it is good for such period irrespective of any other considerations.
Whether or not one has increased the risk element to any significant remains to be seen- obviously I think that is not the case but I intend to pull the pump in the not too distant future to take a look to see how it is performings
Bottom line- anyone who does any work on these things has to accept responsibility for what they decide to do if it is anything short of what Porsche would do and even they do not always get it right. Porsche could not fix my slipping flexplate clamp 19 years ago- I did using Loctite and it is still working to date over two iterations- had I kept with their recommendations my engine would have failed long since- today it is running better than ever- hopefully a reflection of looking after the thing to an appropriate level of acceptability!

 10-12-2018, 08:45 PM