When you click on links to various merchants on this site and make a purchase, this can result in this site earning a commission. Affiliate programs and affiliations include, but are not limited to, the eBay Partner Network.
After we purchased the 1984 S, we had Page Auto in Green Bay do some 'shakedown' work, including a lot of fuses and light bulbs, on it before having it trucked to Denver. The dash illumination didn't work when it arrived so I assumed that was only fixable by removing the instrument panel (which we plan to do when we R&R the dash pod leather.) My son was fiddling with the dial under the dash the other night and discovered that when it was midway through its range it worked SOMEWHAT but when it was at either end it didn't work at all. That doesn't sound right to me and I suspect there is something wrong with the dial. Has anyone experienced this? Is it possible to (easily) fix this without removing the instrument pod? Although my son doesn't do a lot of after-dark driving he sometimes does and with winter approaching it is likely to be more frequent. Being able to see the speedo (and other gauges) is a safety thing.
Another of the things that doesn't work is the rear wiper. When we turn it on we can hear the motor going but the wiper only goes from the vertical position to the horizontal position and that is it. My gut tells me it is a gear problem. Does this sound right? Is it a common problem? I would like to order the correct part before taking everything apart so I can put it all back together as part of the same job.
Dash lights - There is a very basic and rather poorly made rheostat under the dash that does the dimming. What you are experiencing is somewhat typical. It gets dirty over the years.
You can actually get to it without pulling the pod. Easiest thing would be to spray some DeOxit in it. That may clean it up enough that it will work. Another option is to simply bypass it. Two wires with spade connectors attach to it. Hook them together and you will have dash lights at full bright all the time.
Rear wiper - If you open the hatch, you can see where the wiper 'connects'. There's a plate with a hole on the body, and an arm with a **** on the hatch. Those have to 'lock together' properly when the hatch closes for the wiper to work.
Open the hatch and try the wiper. If the plate goes back and forth properly, then likely the wiper motor is ok. Another issue is that the nut that holds the wiper arm on may be loose. Super simple, but often overlooked.
As Joe mentioned, one common cause of dim (and sometimes no) dash lights is a "dirty" rheostat. You can clean it, and/or sometimes it's better to just replace it. Here was my experience:
Does anyone, anyone, ever actually dim their dash lights?
The dash is not that bright at full.
The first 928 I bought I took the time to fix this.
The one I just bought, i’m going to jumper the wires.
Get a male to male or double spade connector rather than cutting the wire ends. Then you can fix or replace later if you change your mind.
If I'm driving out in the country, I prefer the dash to be at minimum so that I can see out as best I can. Meeting Bambi (or Bullwinkle or Yogi, although they are pretty rare around here) on a dark & deserted road is often unpleasant, violent and disabling.
To bridge the two female spade connectors, you can just cut a small piece of sheet metal the width of a male spade, and twice as long. Use that to connect the two.
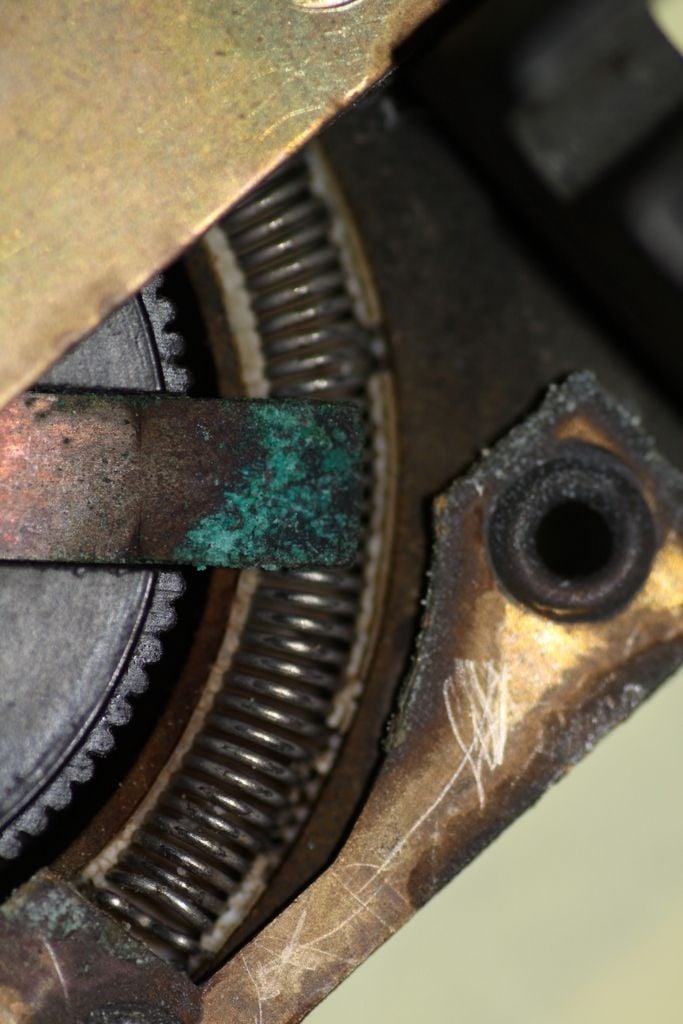
the other failure mode of the rheostat is the brass swages that hold the metal strips to the body of the switch,
these corrode over time then they fail to pass current.
Restaking them can bring them back to life,
before this though use deoxit 100 on the swages so it will dissolve any corrosion,
so the chances will be better to restoring operation.
OR just replace the rheostat
Have you read the New Visitor Thread yet in the Sticky Note Section at the top of the page? It appears that a lot of the questions you may have would be answered there.
Have you read the New Visitor Thread yet in the Sticky Note Section at the top of the page? It appears that a lot of the questions you may have would be answered there.
It was one of the first things I did when I first joined (I have not officially joined yet and I SHOULD and WILL join soon.) When I have a question I use the search function but it doesn't seem to work too well. I type "remove rear quarter panel" and it gives me every post that mentions the word "rear" even though I tried to narrow it down. I should use the Google search function that has been recommended.
AND I should reread the FAQs before posting anything because I am sure EVERY question has been answered.
To switch back to the rheostat issue, I got my fat butt on my back and examined the rheostat. I see one phillips screw that is accessible - assuming I get a short shaft screwdriver. Is that the only one holding it in? I think I need to pull it out to get access to it in order to clean or replace it.
another thing you should get is PET this will give you part breakdown and usually show hardware thats used.
In the case of the rheostat only one screw holds it in ,
you need a short Phillips screwdriver to loosen the screw

 09-16-2018, 04:04 PM