When you click on links to various merchants on this site and make a purchase, this can result in this site earning a commission. Affiliate programs and affiliations include, but are not limited to, the eBay Partner Network.
Brilliant question!!!! I'm testing it with the UP side DOWN on a rubber mat (highest coefficient of friction I can think of). Coffee is almost ready...then back to the garage.
UPDATE: You were correct. Standing the intake on edge and doing the vacuum test the actuator spring returned the flappy to closed quickly and smoothly.
Last edited by Captain_Slow; 03-19-2018 at 06:59 AM.
I've given the valley the first pass cleaning. Is removing knock sensors an area that needs the same caution intake ports? I'm going to assume so and blow out all dirt in the recess around the sensors. Also, in the center of the valley there is a hex head with a threaded hole in the center. What is it?
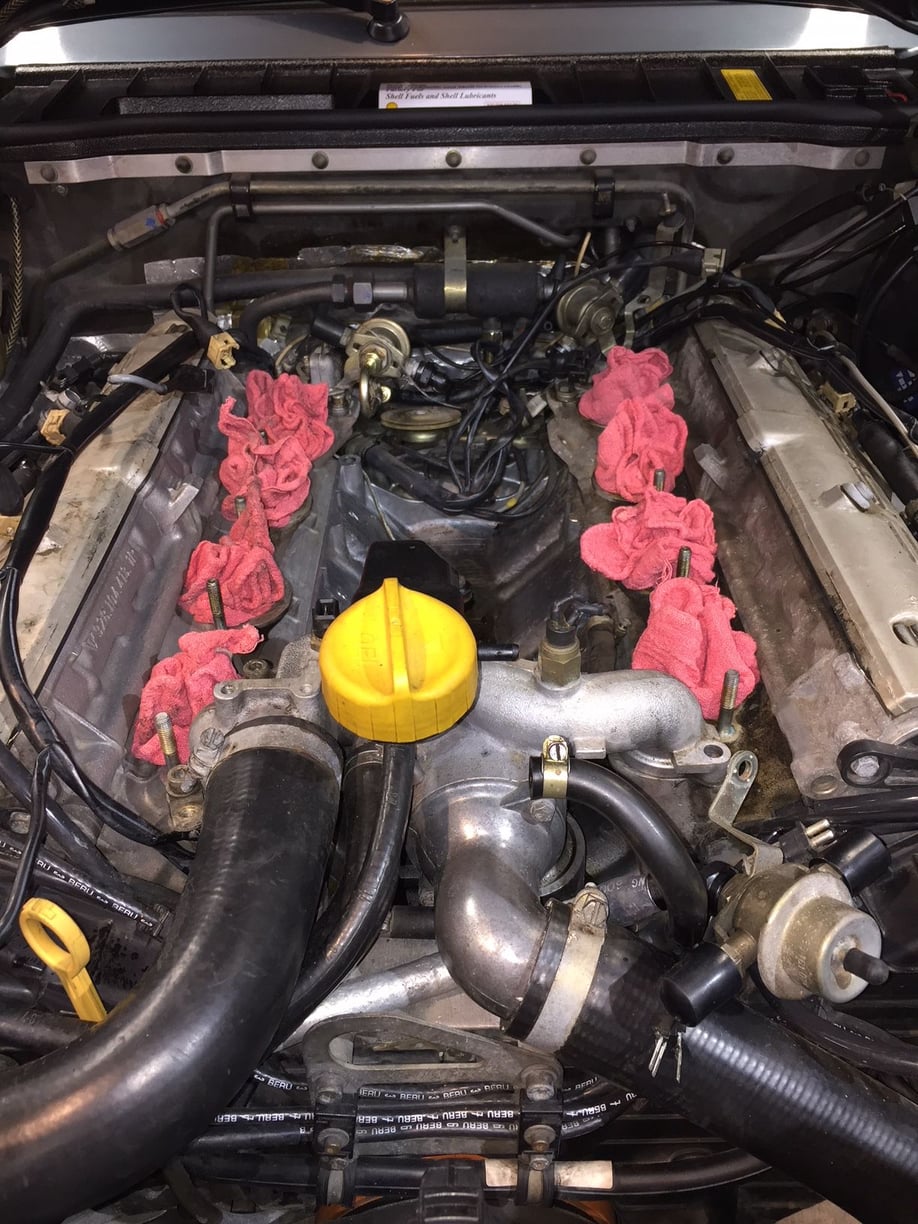
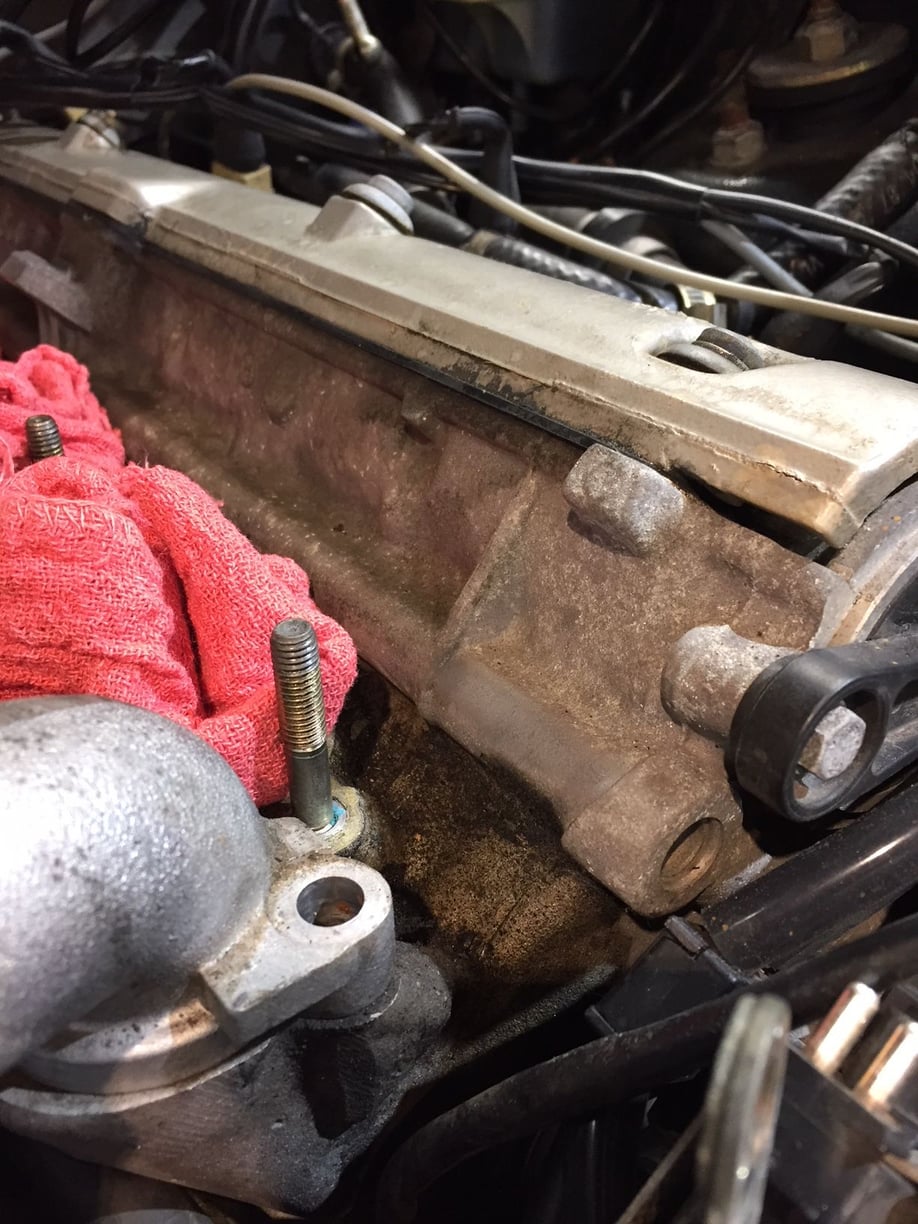
Some cleaning contrast pics. This cleaning thing can be a bit like deciding what to re-plate, or not re-plate. Free of oil and dirty grime seemed fine. I thought I had cleaned the right side pretty well. However, our affable friend Bertrand is a bit of a Ben Franklin. He avoids being too assertive, always deferential in the face of possible controversy...seemingly yielding to the opinions of others. Don't be fooled! He is clever. He says "With a bit of cleaning it will look good as new" - and armed with a Socratic tool Ben didn't have, he posts a picture of his shiny NASA clean engine. I must have looked at the photo half a dozen times...and finally realized what makes his engine so impressive. It's not all the powder coating. It's the HEADS! They look shiny new, too! I realized to achieve a similar result I would need to scrub off the oxidation....and grabbed my wire toothbrush and started a "bit" more scrubbing. Thanks Bertrand...I'm sure I missed a few spots I'll get once the water bridge and oil filler are off...the effort pays off. The left side (right side of 1st photo) hasn't been touched since I removed the intake. Nice contrast.
Last edited by Captain_Slow; 03-16-2018 at 06:50 PM.
Results on detailing an engine, all the car actually, depend mostly on how much time you want to spend there.
It all depends on personal preferences.
Of course, the more the car spends inside the garage, the less it is on the road...
From my side , when I drive it, I like it to be as nice and in good shape as possible. Of course, always (or most of the time ) trying to respect my car budget.
I like spending time in the garage working on the car.
That helps too!
Again, with time and patience, I'm sure you'll get great results!
Once you'll be done, it will look brand new!
So true Bertrand. I'm having a hard time finding the time lately, but I too really enjoy taking the time necessary to do it right. Thanks again for posting the photo of your engine. It's very helpful to see what's possible...and it also challenged me to be patient and take the time to get the results I want to look at when I'm done.
Originally Posted by Bertrand Daoust
Results on detailing an engine, all the car actually, depend mostly on how much time you want to spend there.
It all depends on personal preferences.
Of course, the more the car spends inside the garage, the less it is on the road...
From my side , when I drive it, I like it to be as nice and in good shape as possible. Of course, always (or most of the time ) trying to respect my car budget.
I like spending time in the garage working on the car.
That helps too!
Again, with time and patience, I'm sure you'll get great results!
Once you'll be done, it will look brand new!
You're really sliding now, Jon. Try to avoid contact with Bertrand. But if you can't, Bertrand missed a small item for re-plating so perhaps you can throw it in your bucket for him. Now that I think of it, so did I.
You have three months to complete your mission. Do not disappoint the primordial anorthosite of the Canadian Shield.
I had a feeling you'd be along to keep me from being distracted by squirrels along the way. I'm not doing the plating. I'm doing the powder coating mainly because the intake will look bad touched up with mismatching paint and I worry that the missing and flaky paint in the injector holes will prevent a good seal. This is just the kind of practical rationalization I need to justify making it pretty. The wire toothbrushes are cheap, but maybe I need to put the Dremel to use to speed things up. I'm only scrubbing where I can't reach it once it's back together. This goes for the plating, too....anything I can do after the fact, I will. Anything no one will see without a mirror and a flashlight I don't care about other than a good cleaning. Also...Bertrand gave me some really nice lettering for the intake (like he has on his intake) and I would like to make good on putting them on. In fact, I may ask Bertrand to coach me through it at Frenzy.
I'm falling behind schedule, but I did mail off the injectors for cleaning today. I've located two well-regarded powder coating places in Chantilly. I hope to have the intake pieces and cam covers over to one of the shops in 7-10 days. I have confirmed the cam-cover kit that came with my car is complete. So my parts order for Roger is 98% complete, with just a few decisions to make.
I'm sure the primordial anorthosite has it's hands full with the Unimog.
...Bertrand gave me some really nice lettering for the intake (like he has on his intake) and I would like to make good on putting them on. In fact, I may ask Bertrand to coach me through it at Frenzy...
I'll be happy to help you with the lettering at Frenzy Jon.
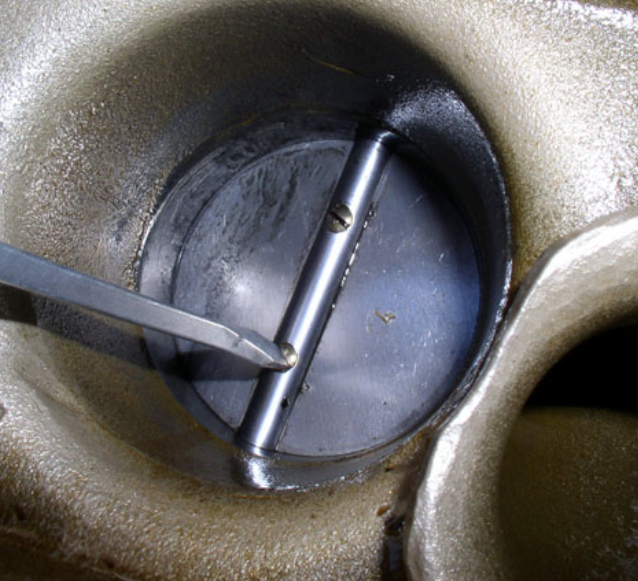
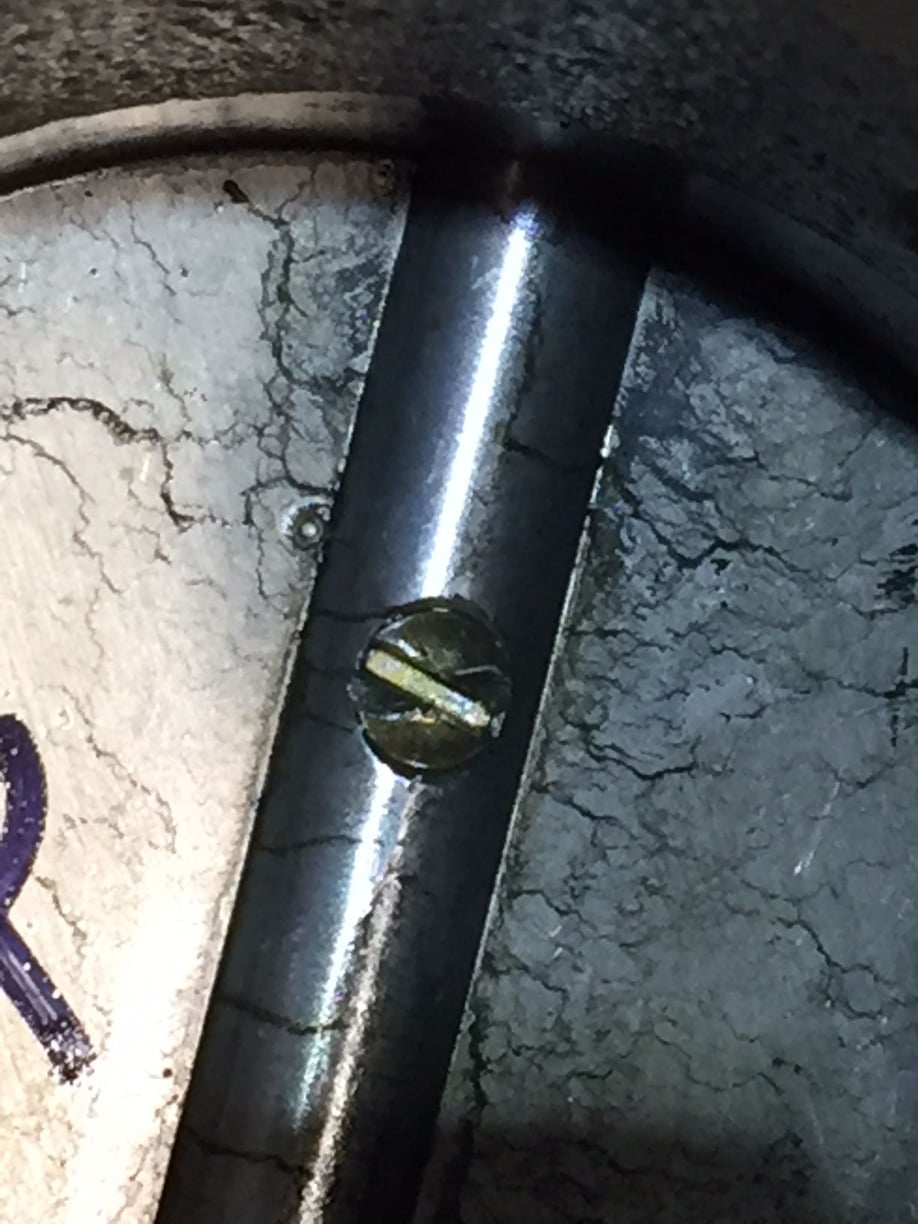
Can't get one of the screws out. Dwayne's description of removing these two small screws contains no evidence of a struggle. I had a brief fight with one, but then "crack" it let go. The other one won't release and I have deformed the slot in the head enough. A careful look on the backside where the threaded ends of the screws emerge reveals they were both struck with something like a chisel. This flared the ends to prevent them from backing out (a great idea to prevent sucking a loose one into a combustion chamber). The remaining screw is flared more than the one I was able to remove. I'm thinking I may have to use my Dremel and trim off the flared tip of the screw, and hope I can get a used replacement. Below is a screen capture from Dwayne's write up, showing the screws holding the flappy valve on it's axel. Any clever ideas out there? Seems others may have encountered this problem.
Last edited by Captain_Slow; 03-17-2018 at 10:36 AM.
I can't remember, but is there enough of the screw showing on the backside to get a pair of needle-nose vice grips on it? If you could clamp onto it, you might be able to get it to spin.
I can't remember, but is there enough of the screw showing on the backside to get a pair of needle-nose vice grips on it? If you could clamp onto it, you might be able to get it to spin.
I do have a small set of needle nose vice grips. Never used. There is a bit of the threaded screw showing. I had thought about squeezing the flare shut a bit. The screws are soft...brass I think. Perhaps there's a bit of bimetallic corrosion involved. I'll try to take a good photo.
I've come a long way....and this little screw may turn me back. It soaked in Blaster overnight. The needle nose vice grips just slipped off. Tried the screw driver again and this this happened. Anyone ever drilled one of these out?
I've come a long way....and this little screw may turn me back. It soaked in Blaster overnight. The needle nose vice grips just slipped off. Tried the screw driver again and this this happened. Anyone ever drilled one of these out?
Drilling the head is going to be vary hard, I would start with an ultra small bit that fits between the screw head groove. Then slowly work your way up in bit sizes.
Or you could drill the back (likely easier since the back of the screw is curved in) once you get a decent hole tap it for a small screw, loctite in a small screw with a hex head, and after it cures back it out (if the hex head is bigger than the whole dremel it off once loose).
Or you could try a small dab of jb weld on the portion of the head that is deformed, and then set a sacrificial flat end in the groove with a light coating of JB weld and let it cure. That might just give you that extra bit of torque to break it loose. Just don't use too much JB weld.
This happened to Speedtoys and others. Might be going to Camp 928 in my truck. I need to stew about this for awhile. I do understand why Porsche uses this soft screw with a dish in the threaded tip - so a punch can mushroom it so it can't come out and get sucked into the engine. New screws would be ideal. Not sure I'd trust Loc-tite for this. I haven't read the entire thread started by Speedtoys...but drill press seems the primary method. I think I'd just make make things worse.
EDIT: After reading the thread above, I'm inclined to seek help from Greg Brown. My favored option is shipping the intake and throttle body to him. We'll see.
Last edited by Captain_Slow; 03-17-2018 at 04:03 PM.


 03-16-2018, 08:56 AM

 He is clever. He says "With a bit of cleaning it will look good as new" - and armed with a Socratic tool Ben didn't have, he posts a picture of his shiny NASA clean engine. I must have looked at the photo half a dozen times...and finally realized what makes his engine so impressive. It's not all the powder coating. It's the HEADS! They look shiny new, too! I realized to achieve a similar result I would need to scrub off the oxidation....and grabbed my wire toothbrush and started a "bit" more scrubbing. Thanks Bertrand...I'm sure I missed a few spots I'll get once the water bridge and oil filler are off...the effort pays off. The left side (right side of 1st photo) hasn't been touched since I removed the intake. Nice contrast.