When you click on links to various merchants on this site and make a purchase, this can result in this site earning a commission. Affiliate programs and affiliations include, but are not limited to, the eBay Partner Network.
Engine removal question - flexplate and pinch bolts enough to remove?
I have the flexplate bolts off.
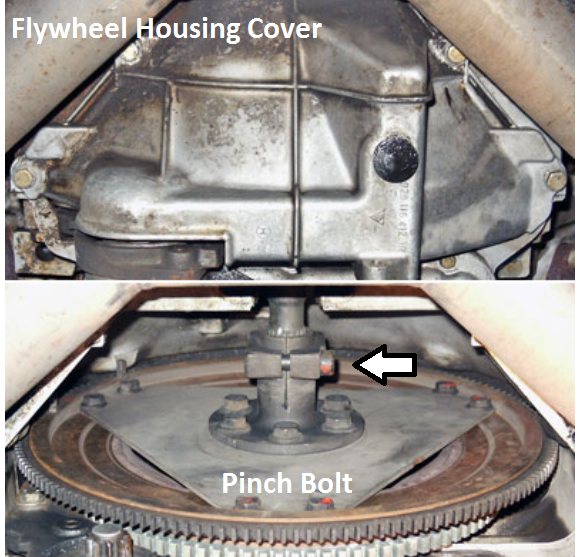
I have factory pinch bolt off
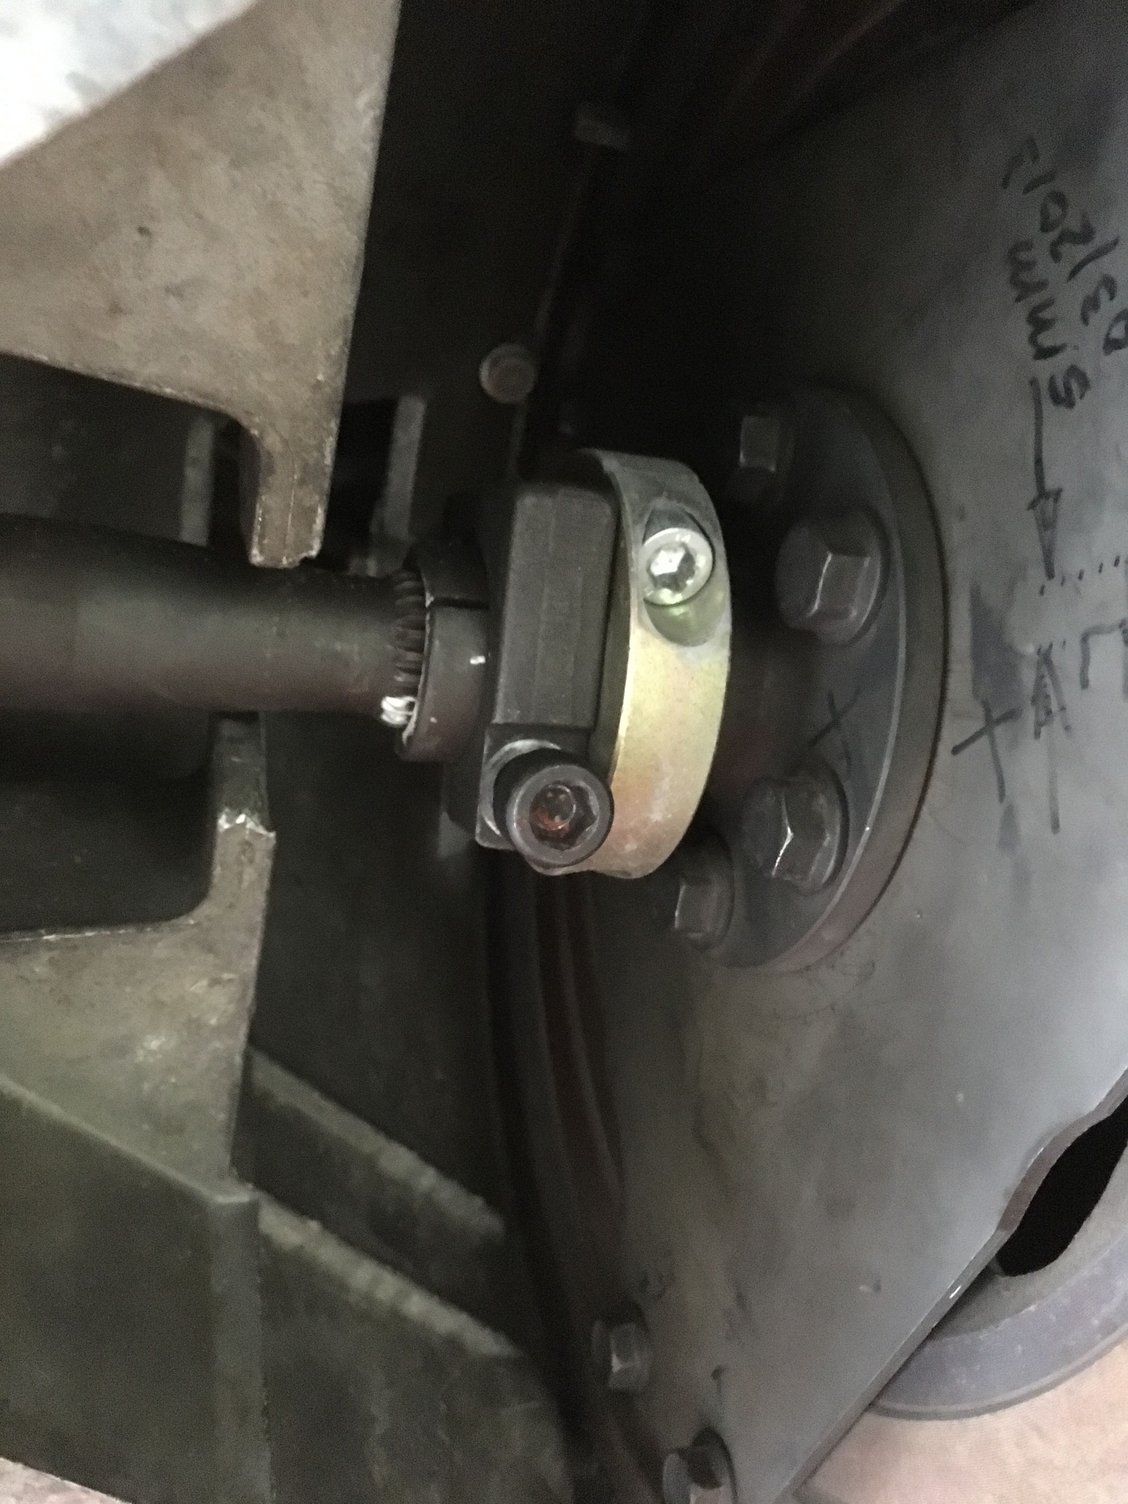
I have another pinch bolt there, looks to be added I am assuming to make sure everything stays in alignment. This has to come off too, right?
Is there anything else here? I think it should disconnect when I carefully pull the engine forward slightly, right?
OR - do I need to remove the 15mm bolts in the center of the shaft as well? Are those center 15mm what holds the starter ring in place? Does the starter ring need to come for too?
Thanks!
Last edited by Socal_Tom; 10-14-2017 at 03:39 PM.
Reason: Clarity
With all those bolts removed (not just loosened...)(six drive plate to flex plate, plus the pinch bolts) the drive plate should slide onto the TT shaft, clear of the flex plate/flywheel/ring gear. You'll still need to remove the bellhousing bolts to the block. Top ones easier after the whole air cleaner housing is off, the rest from the bottom bac. Bolts pass through the bellhousing, thread into the block. The top bolts seem to be most easily accessible with an offset box wrench since they sit slightly behind the plane of the firewall. Once loosened a little, your flex-head GearWrench will be your friend. Else a socket on a flex-head ratchet.
That second pinch collar you mentioned is probably an add-on to help mitigate creep and thrust bearing pressure issues. Install it in your other S4 for added comfort.
You sound somewhat confused if you do not mind me saying so.
The flexplate is held to the flywheel by the 3 sets of two bolts. The pinch bolt clamps the shaft to the flexplate assembly. Undo the pinch bolt and the shaft can traverse through the clamp as happens when removing the drive shaft with the engine in-situ. As you are removing the engine it is probably better to undo the 6 bolts to release the flexplate altogether.
As I am aware there is no such thing as starter ring gear bolts as the ring gear is an interference shrink fit. Once the flex plate is out of the way you can then get at the bolts that hold the flywheel to the crank but no need for that prior to removal of the engine.
Trust the above is accurate. Getting some of the bell housing to engine bolts out is the fun bit or so I understand.
There is no 'extra' pinch bolt in your picture. The pictures are not from your 928?
In any case...
- Remove the six (outer) bolts that fasten the flex plate to the ring gear.
- Remove pinch bolt(s) from shaft clamp(s)
- Slide flex plate and clamp assembly towards rear
You didn't ask, but...
- remove 4 bell housing bolts
- loosen e-brake cable brackets on transaxle/suspension carrier
- remove 2 transaxle mount bolts
- disconnect vacuum line at top front of torque tube
- lever transaxle/tube assembly rearward 1/2" to release pins between engine and bell housing.
correct, the flex plate bolts that attach it to the fly wheel around the outer edge of the flex plate get removed,
so does the Porclamp it has two bolts once the 6 outer edge bolts are removed,
you may be able to turn the driveshaft to see the other side of the small clamp.
NOTE put a small 2x4 block of wood under the TT at the front crossmember chassis brace so it stays more or less in position,
otherwise it will drop down,
this isnt the best as its levering the transaxle and the wire harness could get pinched or the fluid lines could get damaged
We should also mention that you'll want to have your engine support lined up before you pop the engine and bellhousing apart. It won't tilt much on the motor mounts but it will move some. Since you'll be lifting it anyway, get the sling and load balancer on there first to save on surprises.
this isnt the best as its levering the transaxle and the wire harness could get pinched or the fluid lines could get damaged
You have to get the alignment pins for bell housing and block separated before you lift. How else?
And, putting the engine back in, you need to clear the pins, so the bell housing wants to be back.
All right out of the WSM.
Obviously, the transaxle drive mode-selector, lines and harness need to be looked at. If the fluid lines and harness are correctly routed, a 1/2" back won't be an issue.
With the motor mounts disconnected from below (I have the rack out anyway) they can stay connected to the engine and they will lift out with the rest of engine, yes?
I also wanted to ask if it is ok to rest the engine on the oil pan for a couple of days or if I need to find some other way of supporting it.
Thanks for the coaching as I do this or the first time.
I am putting a 5 speed in, don't need it for that, do I?
The need for additional clamping force is only applicable to the automatic models. You may be able to generate a few extra bucks if you sell on the Pklamp that is currently fitted assuming it is not spoken for already.


 10-14-2017, 03:35 PM