When you click on links to various merchants on this site and make a purchase, this can result in this site earning a commission. Affiliate programs and affiliations include, but are not limited to, the eBay Partner Network.
Four cylinders on one bank with low compression invariably suggests a cam timing error.
My S4 consistently hits 185 to 190 psig on all cylinders and I am suspicious of that- one presumes that when doing the compression tests you open the throttle plate to full open.
The throttle position switch should not cause your issue but if the wide open switch does not work the brains will not go to the full load maps and you will lose a little top end. Failure of that contact is common place.
Whether cam timing explains your base problem remains to be seen- you need a set of the 32VR cam timing tool and PK bumpstick to check the cam timing that or cam covers off and in with the dial gauge- the 32VR kit is much easier!
Originally Posted by FredR
Forgot to add the compression test has to be done with a warm motor so that would explain the lowish pressures but not the difference between the banks
Originally Posted by FredR
Arnoud,
The stock fuel maps at full throttle give an AFR around 12.4. If you are only briefly pushing the engine rather than holding it, the AFR may well drop a bit as the system throws in even more fuel during acceleration to prevent a lean out condition occurring.
Regarding your plugs, as I am aware the GTS motors were specified with 3 prong plugs, whether that was a good thing or whether they run better with a conventional single electrode I have no idea. I run the Bosch plugs WD7 or whatever the stock spec is for the S4 motor, I have also tried plugs one and two heat ranges colder but felt for my needs the stock plugs were best. Perhaps Malcolm is advising you what he finds works best for his GTS.
Fred: thanks for your multiple idea's and suggestions and facts. I have the 32VR cam timing tool and PK bumpstick (as I bought for my year 2014 done TB & WP job), and plan to check the cam timings during tomorrow with them and let you know what I find.
Originally Posted by SwayBar
No doubt this explains the lower readings on that bank. That bank of cams are retarded - the intake valve is closing later than the other side.
I don't think this is your stutter problem though.
SwayBar: thanks! Let's see what I will factually find out for the cam timing...
Originally Posted by Mrmerlin
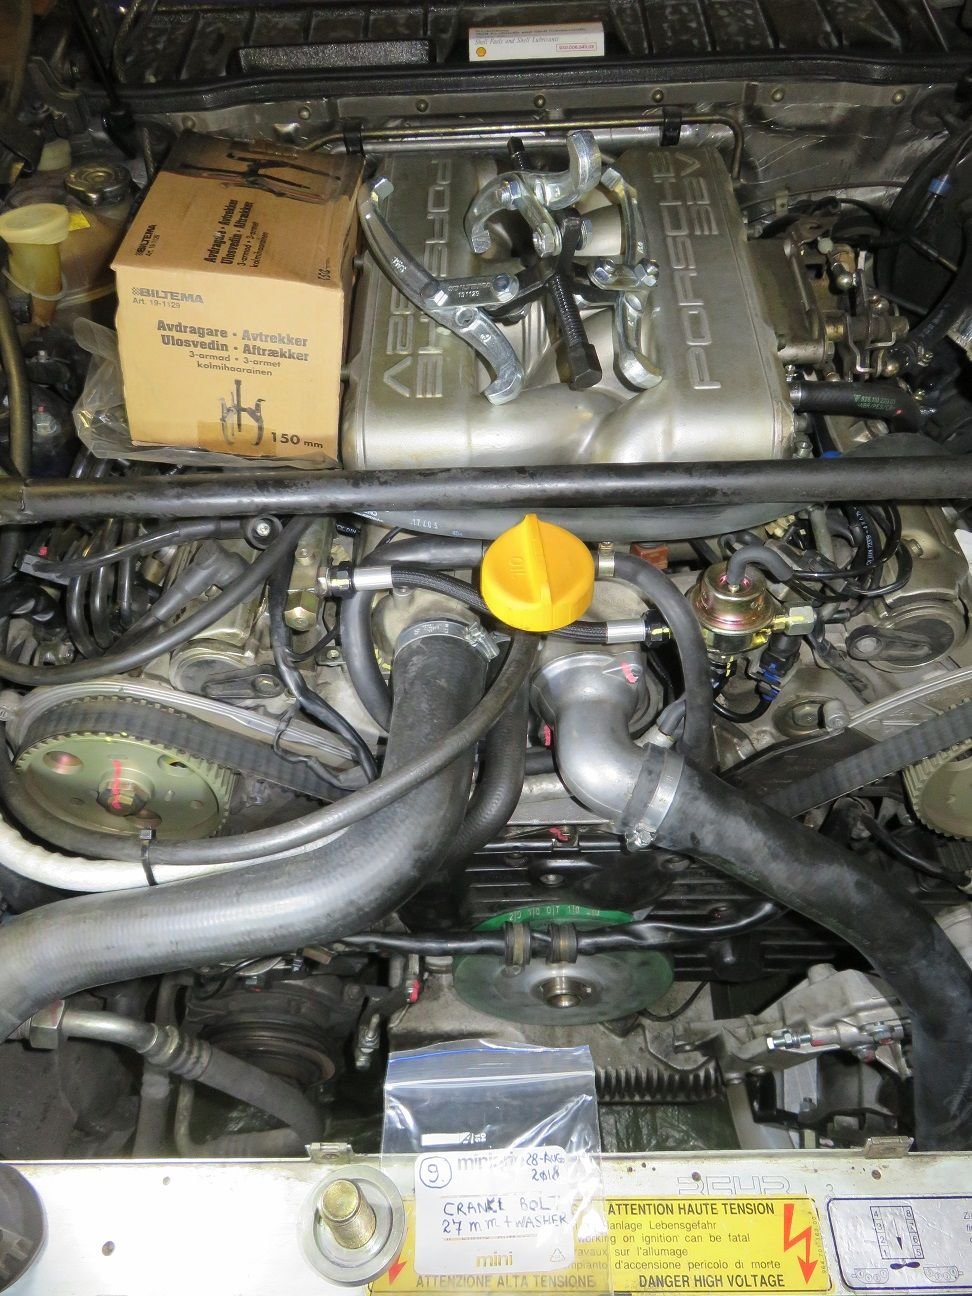
Nice intake refresh.
I have a similar issue with the running, on this 1988 Auto i am working on.
and after replacing everything except the rebuilt LH it turns out the LH is failed.
My guess is that this part was installed prior to doing an intake refresh in the hopes it would restore the running,
but their were too many other things that were wrong like shorting to ground Hall sensor and knocjk sensor pins.
These things then damaged the new LH.
Before swapping in the LH My car will start easily and hold an idle from cold to hot its smooth,
If I try to give it gas it stutters and pops and will get up to about 3400 RPM it will then usually cough and die.
I swapped in a good LH disonnected the battery and then connected it,
and it ran rough for about 30 seconds then returned to stable idle and it will easily rev to redline and it works as it should.
I would suggest to adjust the cam timing first,
then fix the TPS issues then take your LH to another car and see if it causes the same issues.
Goodluck.
Stan: thank you for your compliments about my nice intake refresh. And appreciate you sharing your similar findings on your latest 1988 Auto you are working on, as my previous Rennlist searches did not find any exact similar problem. I will follow your suggested fixing order, and report back here.
Originally Posted by Alan
Arnoud - I'm still thinking oil ingestion. Experimentally you could remove the two connections to the throttle body - so from the pass cam cover and from the oil filler top - rig those to a catch can instead & and plug the feed lines to the throttle body. See what happens then? I think you can do this without major disassembly.
Alan
Alan: thanks for your good idea, I will look into that too.
Originally Posted by siscogts
Arnoud, check cam timing and put Ngk BUR6ET plugs,,triple electrode like porsche recommend for GTS.version.cold engine readings are pretty good Put new tps and check connection in the CEB. I think that tps signal goes from F or G electrical plug, and can give bad and Intermittent misfire.
Francesco: thanks for your info on the NGK BUR6ET spark plugs, as I did not knew (till now) that NGK also does/has triple electrode plugs. I will re-check the TPS electrical wiring path to the CE-panel (because IIRC from the electrical wiring diagram: the TPS idle+ WOT switches appeared to go directly to the LH + EZK cable connectors).
After switching to this ngk plugs engine got better, and starts quicker than before
Stutters/buckels:Was making confusion with odometer... Sorry
My friend solved a similar problem on his 93 gts Auto using this link
http://jenniskens.livedsl.nl/Technical/Tips/B/MyTip1127.htm
After switching to this ngk plugs engine got better, and starts quicker than before
Stutters/buckels:Was making confusion with odometer... Sorry
My friend solved a similar problem on his 93 gts Auto using this link http://jenniskens.livedsl.nl/Technic.../MyTip1127.htm
Maybe it can be useful for you.
Francesco: thank you for having followed up with this additional info, I will add it to my list of items to investigate and report upon here.
In the meantime, time keeps flying and I was only able to do several measurement today instead of last week (life and such...).
1. Checked upon correct timing belt tension at 0 degree TDC, and then checked the belt by rotating it two (2) crank rotations (the Gates belt being absolutely fine everywhere) and re-checking for correct timing belt tension again:
Belt tension gave this same reading twice on my Kemf tool, and looks to be fine to me (last time re-tensioned by me in July 2015, with the Gates timing belt being newly installed by me during April 2014):
2. Next measuring the actual timings settings, and I think you have been all correct - because these does NOT look to be correct to me! During my TB + WP job in April 2014, I had - with a stone cold engine - these set for 0 degree for DS (cylinders 5-8) and -2 degree for PS (cylinders 1-4).
This is what I measured now, DS (cylinders 5-8) is at -2 degree:
And PS (cylinders 1-4) is at -9 (!) degree:
The underlying 3 holes are still about aligned in or very near to the center, see underneath pictures for DS + PS side:
So: how can this all have happened, i.e. what is the underlying root cause?!?
I did had a "timing belt loose" warning during June/July 2015, which I fixed then a.s.a.p. by re-tensioning the timing belt (as it was indeed loose). After that I have driven it 10K+ kilometers during 2016 + 2017, with many WOT and hard driving on the German autobahn, etc. - but no problems at all till July 2017 when "out of the blue" my problem started...
Seems most likely to me that the only explanation is the cam belt has jumped a tooth on the 1/4 sprocket.
Look at the distance between the minus 2 pin and the minus 9 pin and you can visually appreciate that the difference in distance is about the same of the cam tooth pitch. The difference in timing is the real give away- 7 degrees measured- the cam sprocket has 48 teeth divide that into 360 degrees and the result is 7.5 cam degrees.
You had a timing belt tension incident - maybe that was enough? but the chronological timing does not seem to fit your story.
Fred: once again: thanks for your follow up and I agree with you (and had made the same calculation and logical conclusion). Still do not know if the root cause was my timing belt incident from 2015, so in the days to come: of with the middle cover and checking all timing belt related items + re-stringing + re-timing the timing belt and cams. And then I will check the other outstanding items on the list, and report back here.
...and then "suddenly" 6+ months passed before I could re-start work on this again now (again: life and such... ).
I am now focused to get this all sorted during this month of March, so that I can finally drive it again coming April when the Finnish winter will be mostly over (after almost 2 years! Has it really been that long? OMG...).
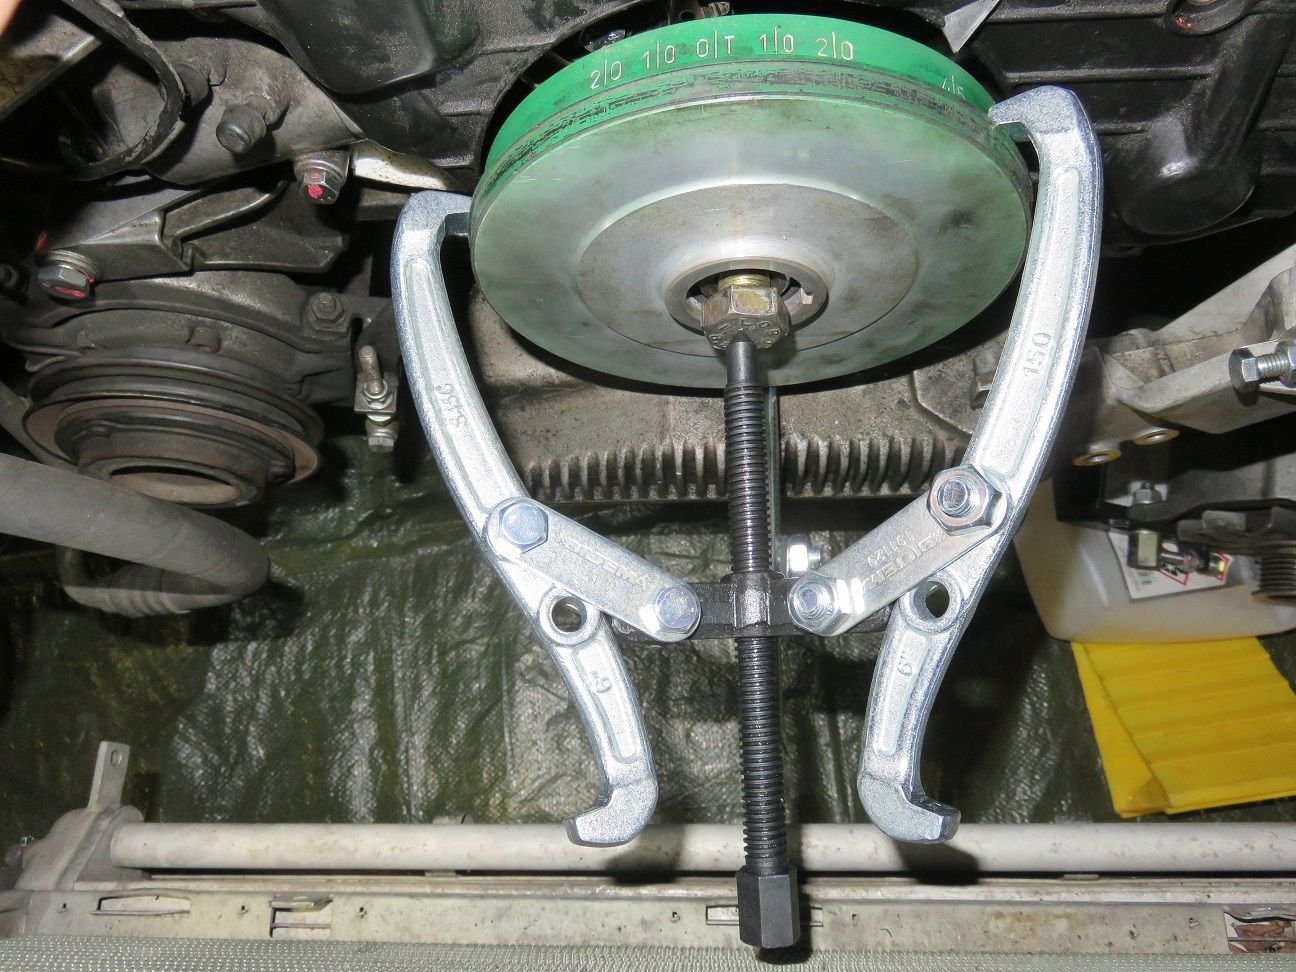
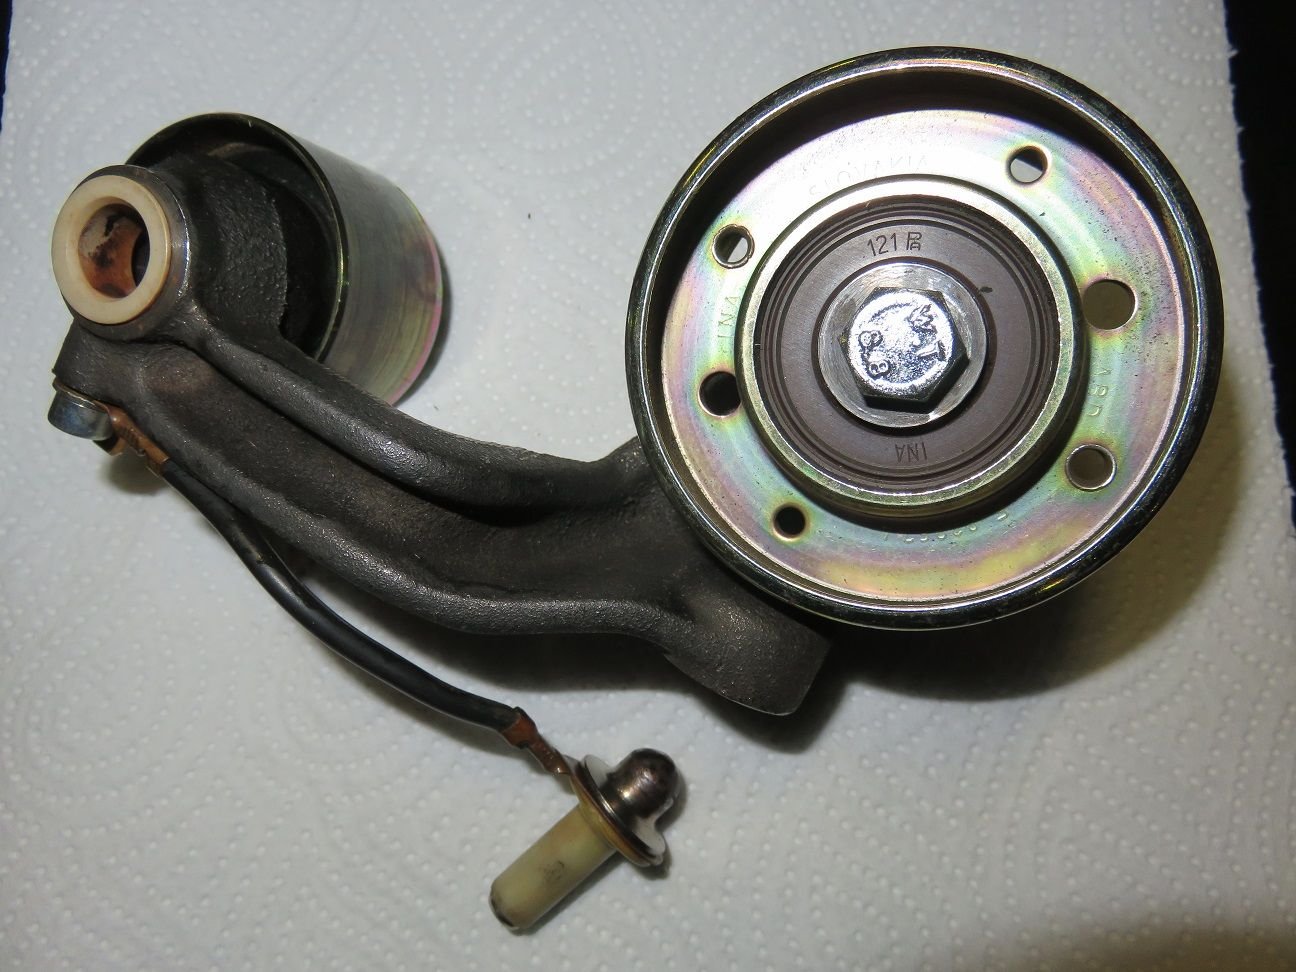
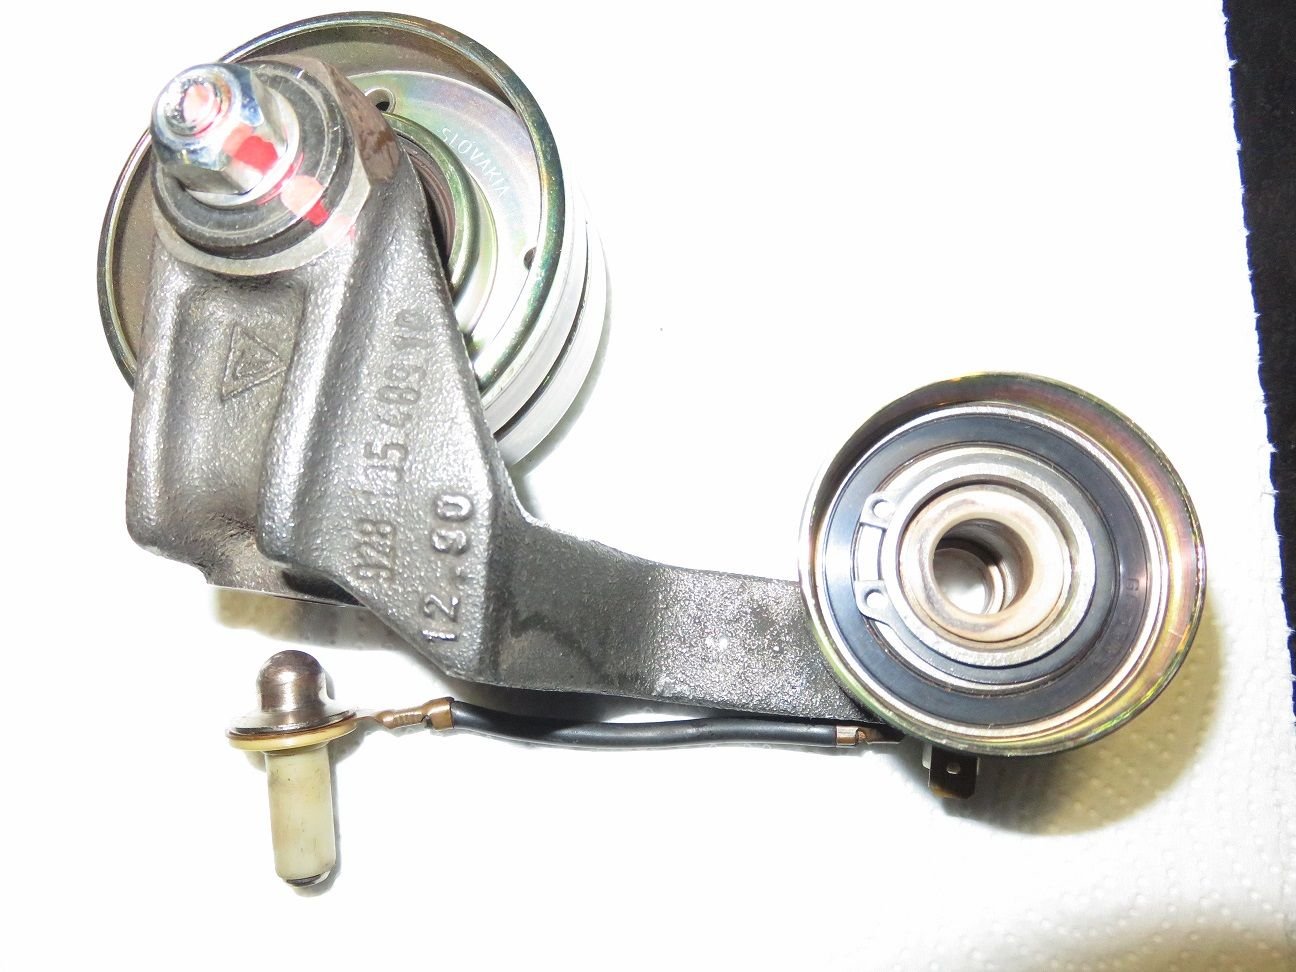
I locked the crank at 45 degrees BTDC. To be able to get the center cover off, I first had to remove the harmonic balancer from the crank shaft. Mine would not come off by hand so I installed the crank bolt and applied an 3-jaw pulley puller (had to buy a 150mm wide one, as a larger 200mm wide one that I already had did not fit in between the limited space of the harmonic balancer and the radiator). After carefully applying the 3-Jaw pulley puller, the harmonic balancer came - luckily - off very easily, after which I finally could remove the center cover too.
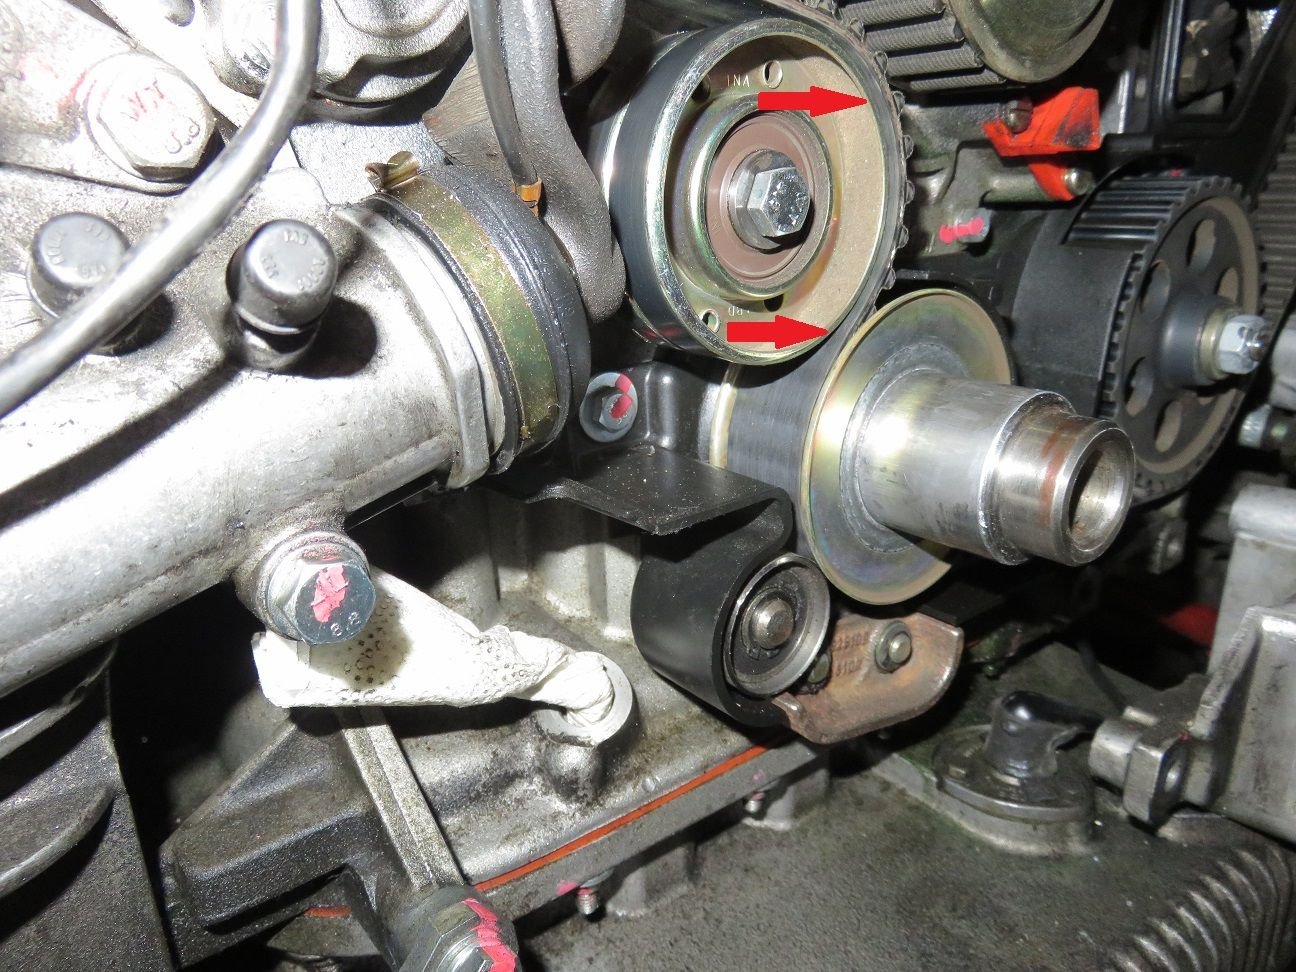
When inspecting all the rollers (which all still run totally smoothly), I noticed the following: the current timing belt (as was newly replaced in April 2014) is running over the tensioner pulley while being off it with about 2mm or so. As a picture is worth a 1000+ words, let me show you what I mean (see the red coloured arrows):
Questions:
- Is there something wrong with how that tensioner pulley sits? I completely rebuilt it during April 2014, and did not noticed anything wrong then...
- I have ordered and received a Gates T196R belt (thanks Roger and Mercedes for the quick service!), as I might as well replace the current timing belt anyway What should the 1-4 and 5-8 timing settings be, when installing such Racing belt: 1-4 0 degree and 5-8 0 degree with the engine colt? Or something else?
Looks to me like the cir-clip is missing on the back of that tensioner roller.
Thanks Sean, for your immediate follow up!
Hereby a view from when it was assembled in April 2014 (I will obviously take it off in the days to come, to have a proper look):
Did I missed the cir-clip then? Post-edit: OK, I can see from the PET-diagram that such can only be concluded by disassembling it (but I most likely did forgot it then...).
What about the recommended timing settings with the engine cold, for the T196R Racing belt?
Last edited by Arnoud; 02-28-2019 at 06:21 PM.
Reason: Added PET-diagram picture, now I see...
Based on your pics the belt is tracking exactly where it should on the various sprockets and showing no signs of distress so the logical conclusion is that it is the tensioner roller that is displaced. It would be prudent to ascertain why such is happening. Doubtless our engine experts can guide you as to the wisdom of using a spacer to correct that displacement if it is of any long term consequence.
Regarding cam timing I would check that with the current belt in situ and correctly tightened as logically it is now in the stretched position. I am not aware of any differences in setting cam timing with the racing belt albeit I often wonder if it will stretch dynamically as the stock belt does but either way I suspect it would not make any discernible difference
Might be a good idea to inspect the tensioner arm,
Thanks Stan, I will do so and report back here.
Originally Posted by FredR
Arnoud ,
Based on your pics the belt is tracking exactly where it should on the various sprockets and showing no signs of distress so the logical conclusion is that it is the tensioner roller that is displaced. It would be prudent to ascertain why such is happening. Doubtless our engine experts can guide you as to the wisdom of using a spacer to correct that displacement if it is of any long term consequence.
Regarding cam timing I would check that with the current belt in situ and correctly tightened as logically it is now in the stretched position. I am not aware of any differences in setting cam timing with the racing belt albeit I often wonder if it will stretch dynamically as the stock belt does but either way I suspect it would not make any discernible difference
Thanks Fred, I agree and will have a further close-up look on tensioner arm + roller & idler - and report back here. In the current position and @ 45 degree BDTC, 1-4 read -8 degree and 5-8 read -2 degree so still (as of course expected, as I have not really changed anything yet) the one tooth off for 1-4.
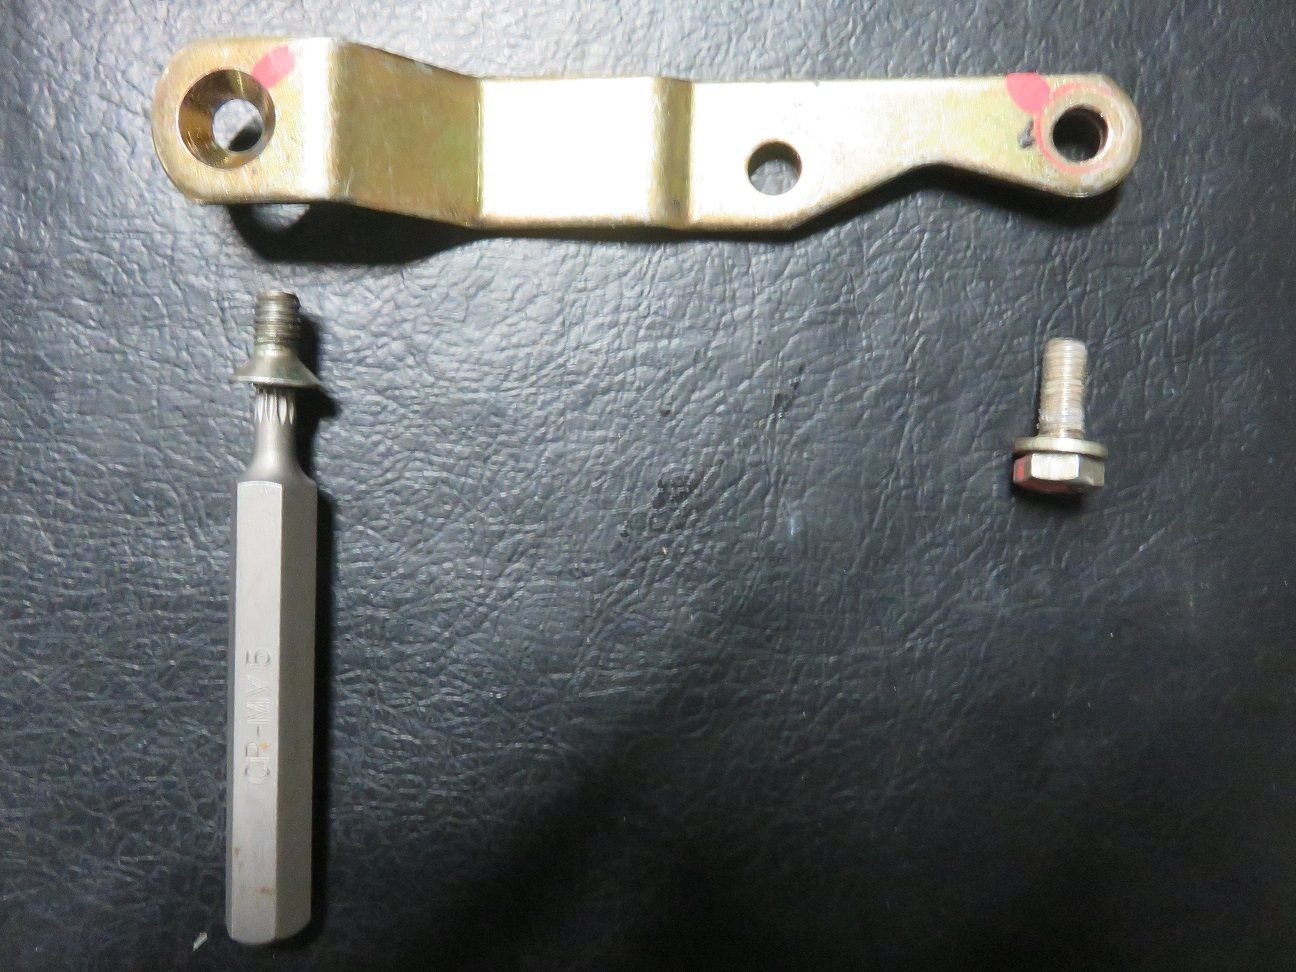
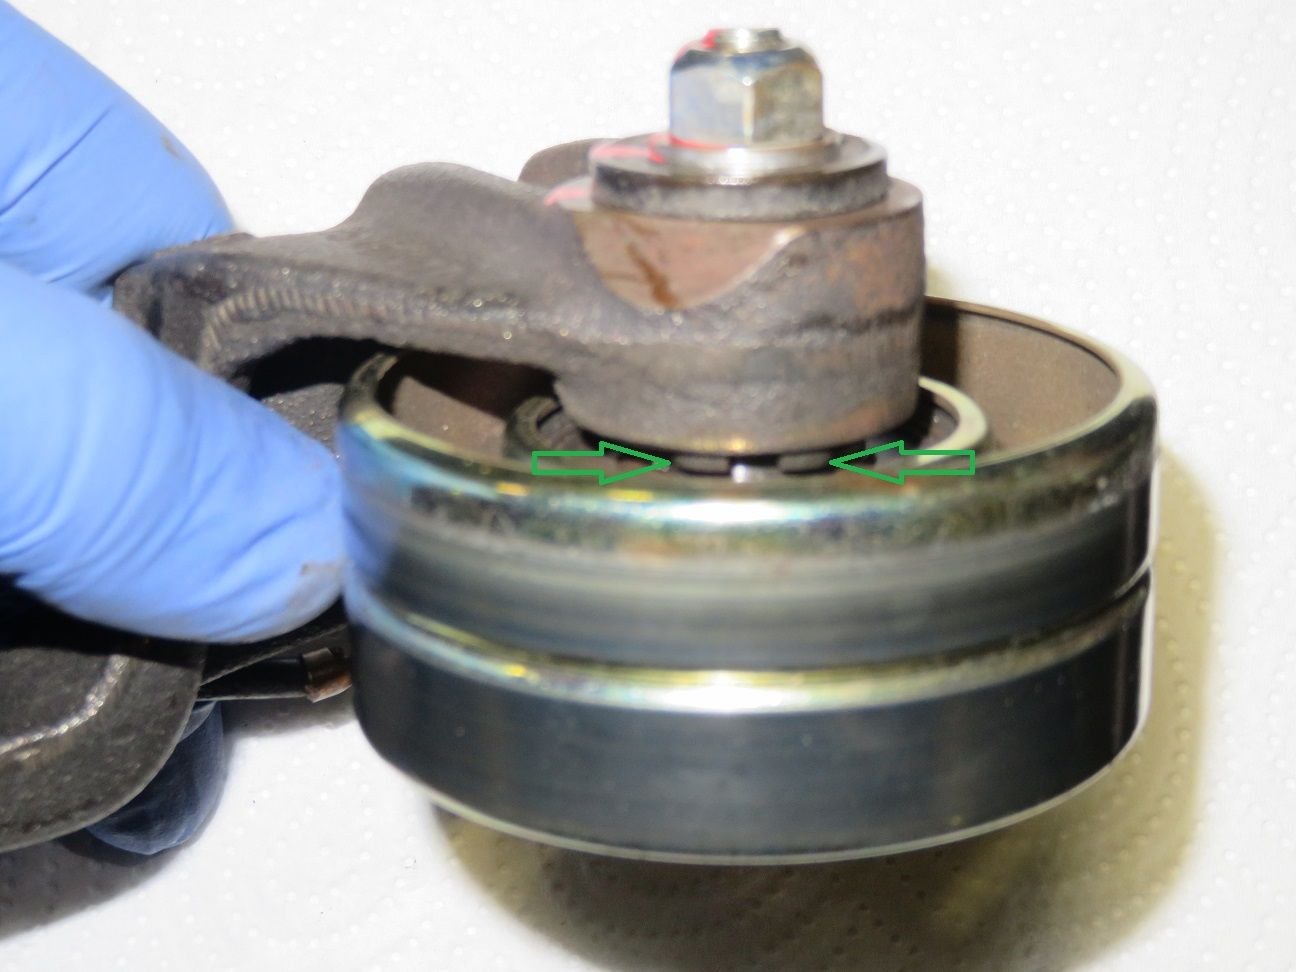
Removed the tensionor arm, and even though I was as careful as possible with the 4mm allen head bolt: that metal was rather soft and it stripped... Was able to remove by using a slightly larger 5mm torx bit (I will need to find a new screw for this, or make a slot in it with my Dremel tool if I do not have a spare/new screw):
All appears to be the same, as when I renewed all during April 2014 (and I set washer #32 away i.e. it is not in this picture - but I have not lost it):
And cir-clip #4 (with size: 20 * 1.75) can be seen as per the green coloured arrows, so it is there (I now remember that I had to buy a minimum set of 20 of those, at my local W�rth dealer at the time):
Now I am wondering if perhaps washer #12 is missing, I will have a look at that during tomorrow morning. Does anybody know the dimensions of that washer #12?
I think you will find that installing washer 12 where they show it will cause the bushing to bind up on the tensioner arm.
I believe its for the earlier tensioner arm not the S4.
type this in and see what Rose passions diagram says it fits
928 105 572 00
That said look at the tensioner arm when its on its shaft,
the center of the pin should sit just proud of the bushing face so the arm can move when the plate is installed.
The only way to move the arm forward on this tensioner arm is to remove the pivot bolt from the water pump and add a washer to the bolt then install it.
Thanks Stan, for your continued follow up: this all helps me a lot (and hopefully in the future other Rennlisters with similar problems).
And I fully agree with you: my idle roller does not have that washer in there as I checked, and if it would then indeed it would seize up when put on the pivot bolt shaft - and that should not happen. I removed it's cir-clip, and as can be seen from underneath photo's it is exactly on the right height (the brown residue on the plastic bushing is some left over from copper grease, as was put on the pivot bolt shaft during my April 2014 TB & WP job then).
Cir-clip put back in it's place:
When test fitting, there is just a part of a millimeter left over, as it should be:
Measurement of the current WP pivot bolt shaft length (by the way: this is a Laso WP as I put in new during April 2014. I checked it's bearing now, and it has no play in it and still feels totally fine. Before that there was an original Porsche WP in it. I still have that stored somewhere, and will find it so to measure that one up too):
Length of the pivot bolt washer:
More to come, as I want to get this all correct and right.
I think you will have to measure from the mounting surface of the pivot bolt on each waterpump and use one of the attachment bolt holes to measure from.


 08-11-2018, 05:14 PM


 ).
).