When you click on links to various merchants on this site and make a purchase, this can result in this site earning a commission. Affiliate programs and affiliations include, but are not limited to, the eBay Partner Network.
I have an '87 S that I've been resurrecting for the last 8 months, but based on your very short to-do list, it looks like yours was in a lot better shape than mine. It seems that every rubber hose or plastic connector I touch disintegrates immediately so I find myself building a new car one hose at a time. My wife is smart enough to have stopped asking how much this "hobby car" has cost us.
How did you paint the inlays in the center caps?
Thank you. The effort and expense is completely lost on my wife and daughter though. They both reacted exactly the same - "So, that goes under the hood and you don't ever see it unless you open the hood?"
My real to-do list is much longer. I'm trying to control my spending by focusing on getting the top 10 most important items done before moving on to the next top 10. I have found that some of the items on my top 10 come with some ancillary expenses. For example, I've just purchased new 968 castor blocks and ecccentric bolts as a 'necessary' upgrade for fitting 18" wheels.
That justification works for me
It may be too late for you now, but I believe I saw a master hose kit for the various 944 models from one of the vendors here recently.
It does appear that the PO took pretty good care of my S with the exception of the paint. It does have lots of touch-ups thoug, so I guess I should be grateful that he drove it and maintained it regularly.
I'm not sure what's more fun - fixing it up or driving it.
I sanded the caps smooth and removed oxidation with 400 grit wet sanding. Then I washed thoroughly with soap and water and dried. I sprayed the whole cap with black rattle can and dried using a hair dryer. I used the 400 grit again to sand off the paint leaving the inlaid paint behind. Next, I progressed to 600, 800, and 1200 until I got the finish I wanted to closely match the wheels. Lastly, I finished with semi-gloss Rustoleum clear coat.
If you keep going to 3000 grit and higher you can get a chrome-like finish on just about any metal.
That is some heavy duty dedication to a small item. At least you don't have to open the hood in order to see them.
Thanks for the know-how.
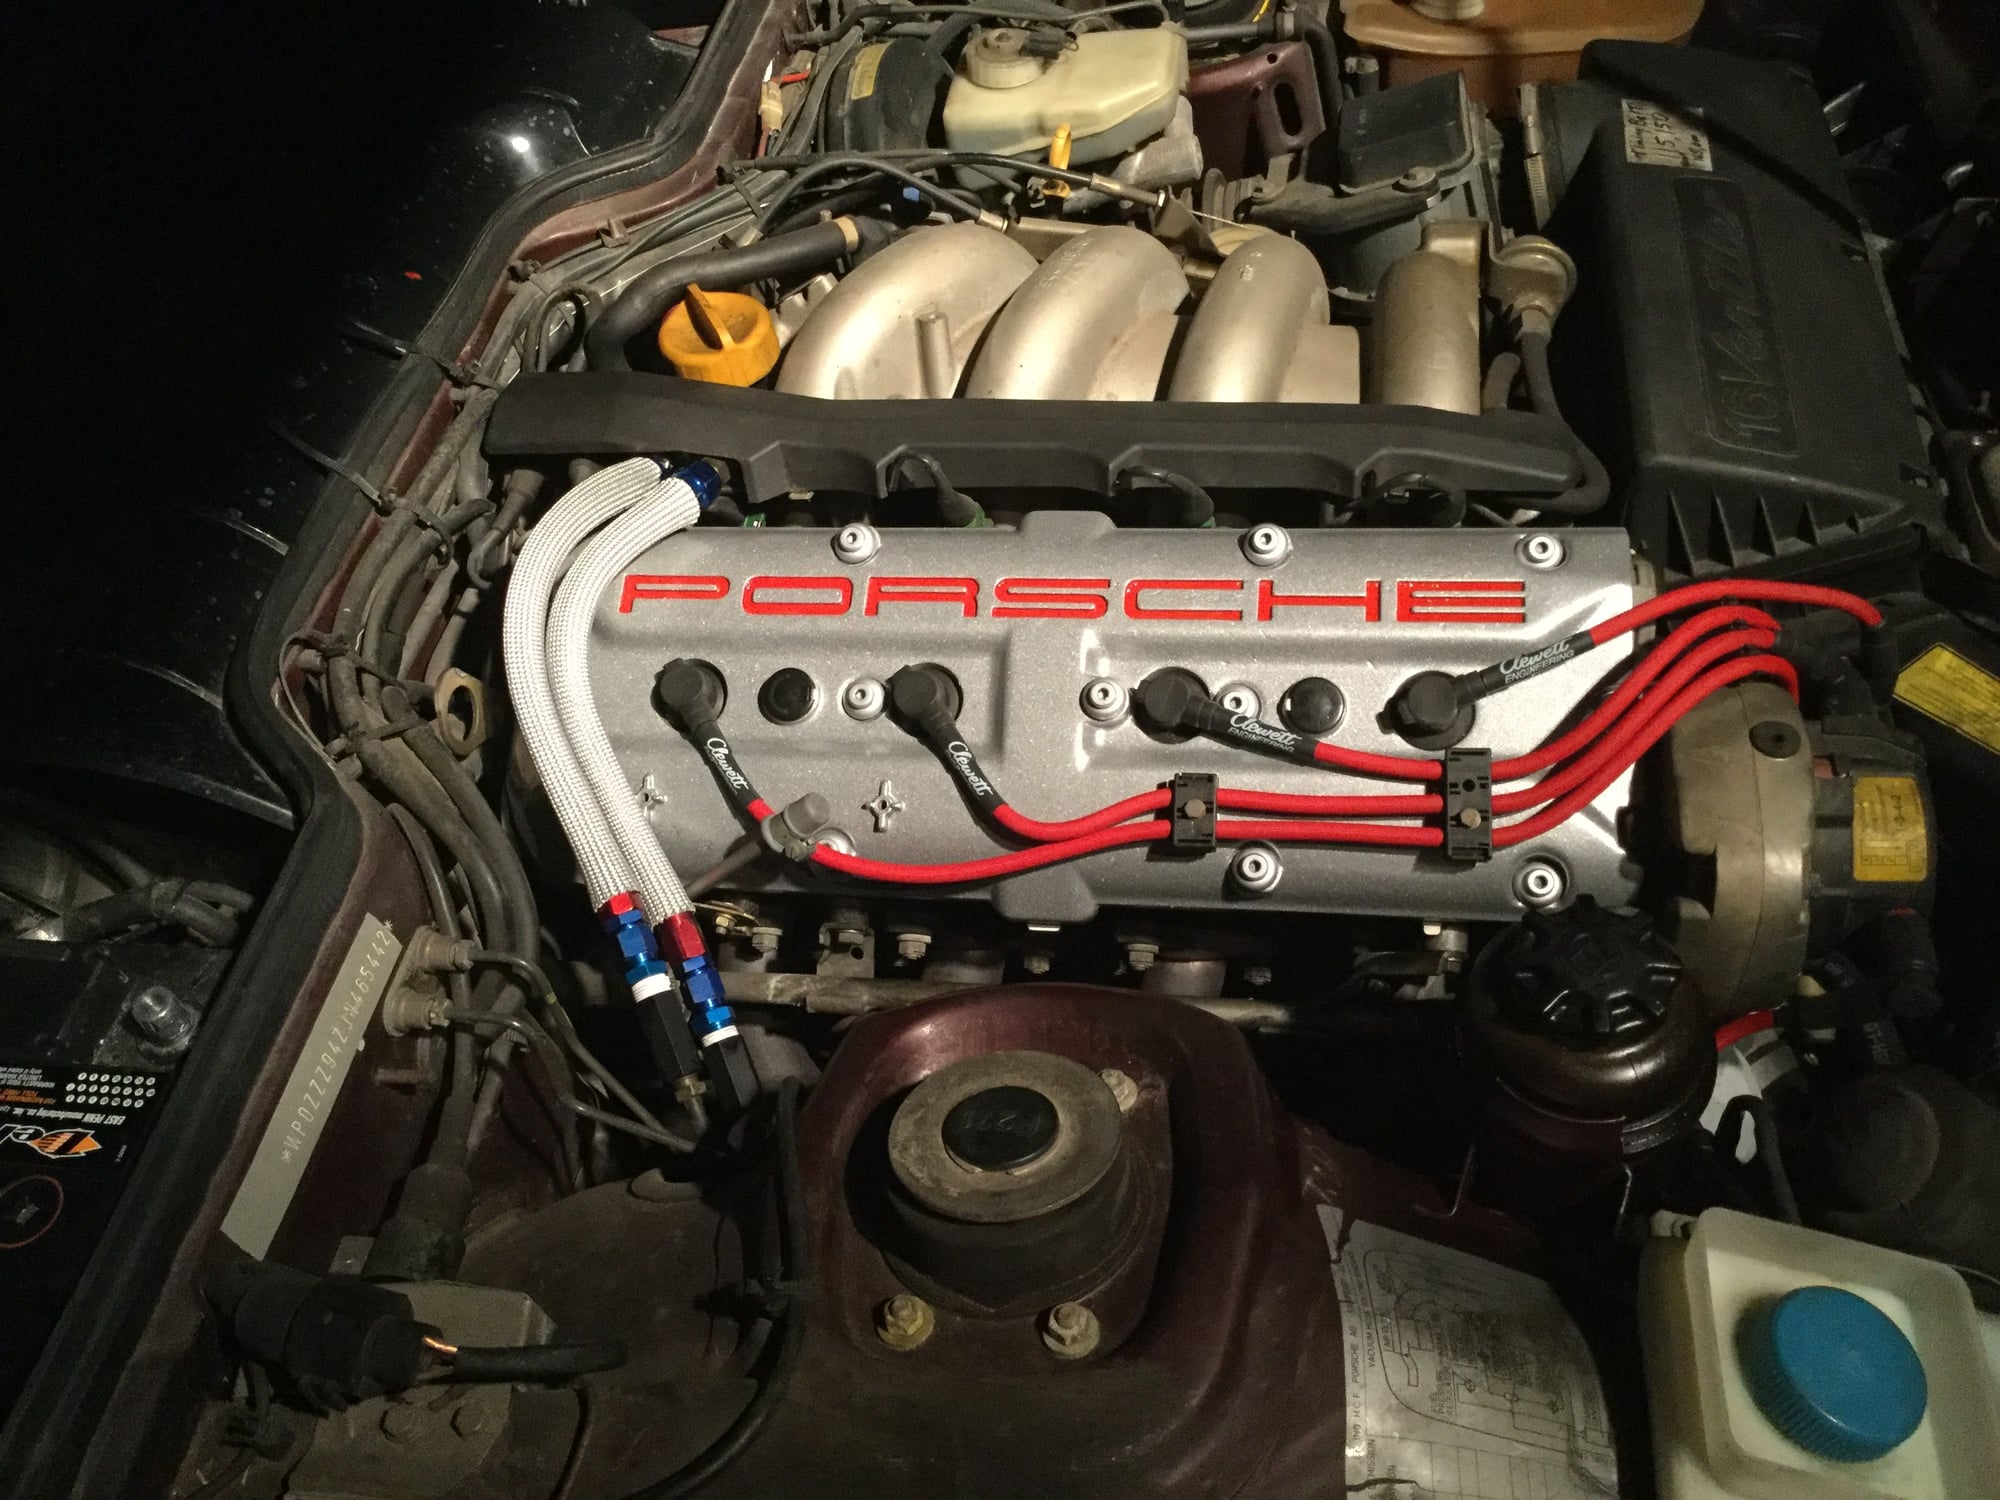
That cam(s) cover looks really good. Did you powder coat the underside too? I have a spare kicking around I should get done.
I was on the track last year with the S2 but I'm getting too old (as in good sense finally at age 66) to think much about going around the track on a bike anymore. I still get my old hopped up Kenny Roberts RZ 350 out a couple of times a year for a thrill or two but mostly poke around on the Wide Glide with the wife like an old geezer.
Hmm that brake fluid looks pretty dark. Time for a change? I would also recommend changing the fuel lines the run over the top to steel braided.
Yes, you're right about the brake fluid. I will add that to the list.
I have new fuel lines but they're too short. I need to send them back to get the right ones. In the meantime, I re-installed the old ones so it's driveable.
Yes, you're right about the brake fluid. I will add that to the list.
I have new fuel lines but they're too short. I need to send them back to get the right ones. In the meantime, I re-installed the old ones so it's driveable.
Those new fuel lines look like the ones I have sitting on my shelf waiting to be installed once I'm done with the intake overhaul.
Are they from Lindsey Racing? If so, let me know how it turns out. Unfortunately for me, going back to the old ones is not an option.
Those new fuel lines look like the ones I have sitting on my shelf waiting to be installed once I'm done with the intake overhaul.
Are they from Lindsey Racing? If so, let me know how it turns out. Unfortunately for me, going back to the old ones is not an option.
Yes, these are the LR fuel lines. The connections are all correct and they're very good quality - just a little too short. I already sent an email to Dave at LR to setup an exchange. I must have received the wrong ones. Maybe these the 8v version.
I'll post here how it turns out.
The picture shows the lines with the insulation sleeves over the steel braid.
I just went out and checked my set, they are about 3" shorter than the originals. I probably have another week before i will need to put those on so I will just wait and see if the replacements Dave sends you are longer.
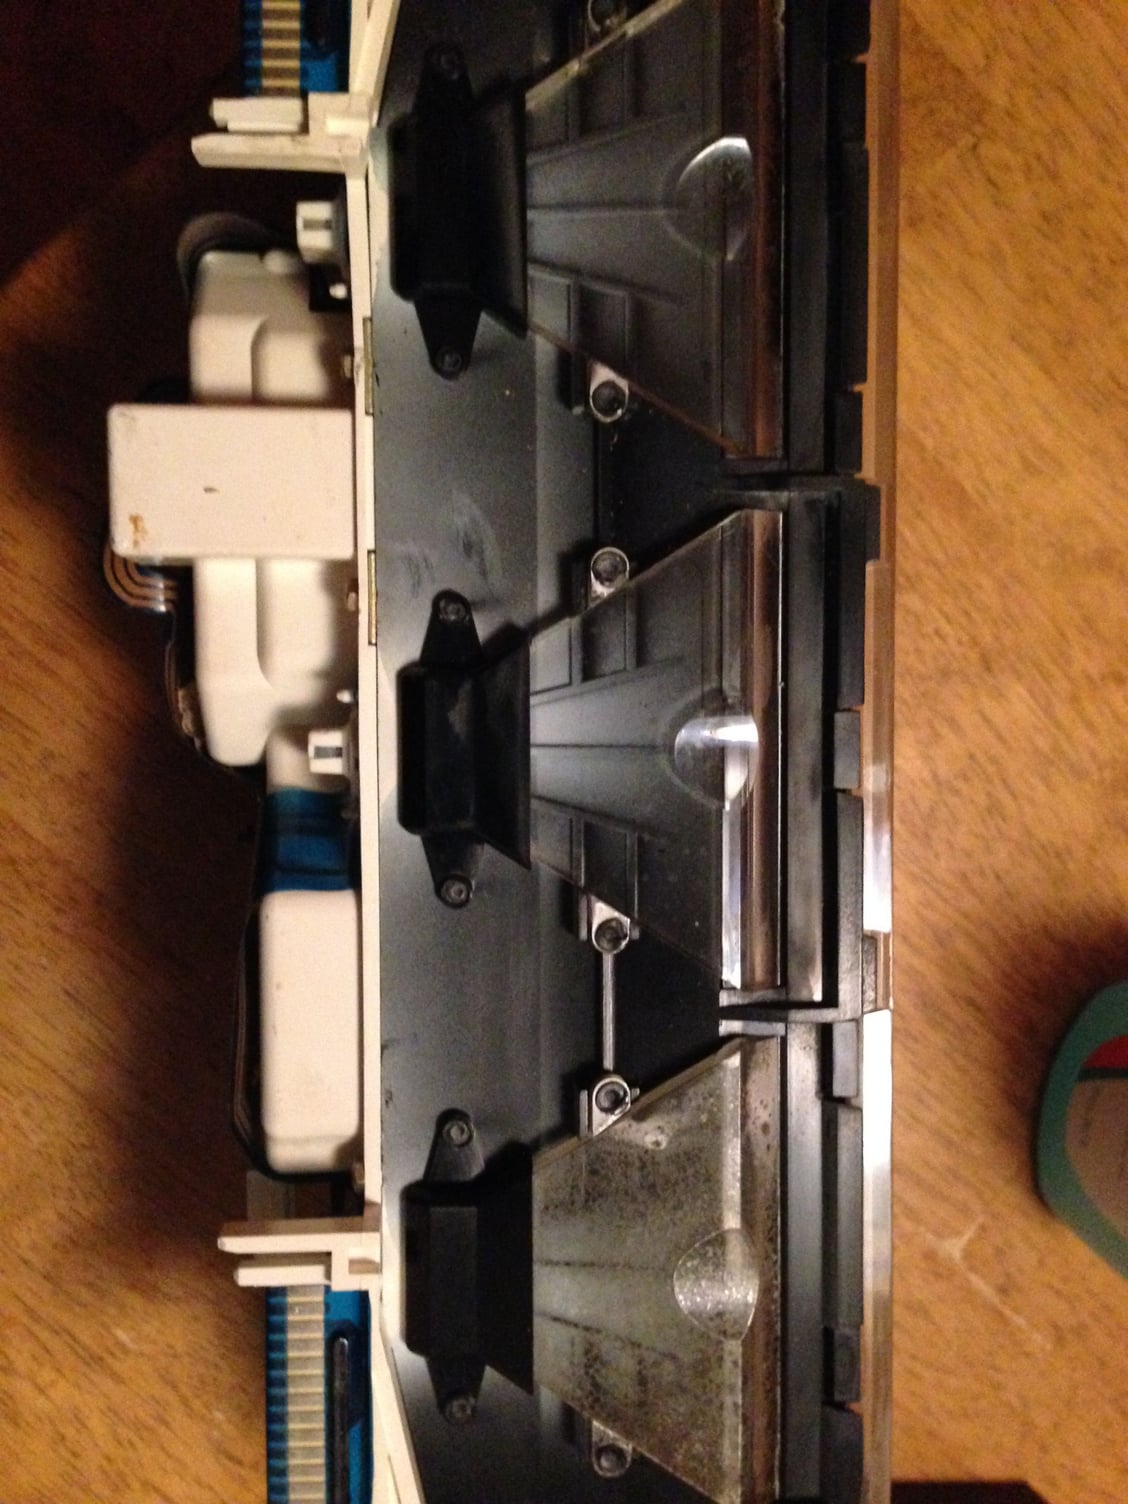
I tackled the dashboard lighting repair today. The hardest part so far was getting the instrument module out of the dash.
Here's a pic of the bottom of the cluster with two of the three bulb housings cleaned up. I used non-acetone nail polish remover to remove the remains of the old reflective coatings.
I installed 1W LEDs in place of the standard bulbs. These should be plug-n-play and work with the stock dimmer. I ran out of time to get everything re-installed today, so I'll need to wait a few days to see how well the dash is illuminated now with the LEDs.
I just went out and checked my set, they are about 3" shorter than the originals. I probably have another week before i will need to put those on so I will just wait and see if the replacements Dave sends you are longer.
I got a response back from David Lindsay this morning. There were a few other pieces in the package he sent me that I assumed were "extras" but were actually required.
He sent a pic and some tips for installing these correctly. I followed the instructions and put everything together tonight when I got home from work. It took maybe 20 minutes and they fit perfectly.
Here are all the fittings required to replace the stock fuel lines.
Here are the tips from David at LR for installing these:
On the black fittings, if you look at both ends of them, you will see one has a smaller hole on one end. That’s the 14mmn fitting for the return line from the fuel regulator. The other is the 16mm feed or pressure line.
If you screw the 3/8” pipe thread to -6 make fitting adapter into the other end of the 14mm fitting, you will see how it screws in a couple of turns by hand. Look at the 16mm fitting, and carefully screw in the 3/8 fitting.
It seems like it might go in one way, but it won’t. The other or correct side should go in that couple of turns like the 14mm one did. I’m saying this so you don’t force it together with the wrong end of the fitting. The threads are very similar but one is tapered, and one is not.
Use a couple wraps of Teflon pipe tape where the 3/8” pipe threads screws into the black fittings above. You don’t use it anywhere else.
A couple of drops of motor oil on the threads of the factory fuel lines from the chassis before you screw into our black fittings is suggested.
 02-08-2017, 09:05 PM