
CCW wheel rebuild in pictures
 04-07-2013 | 09:07 PM
#1

Thread Starter
Rennlist Member
Joined: Oct 2010
Posts: 707
Likes: 21
From: Tennessee
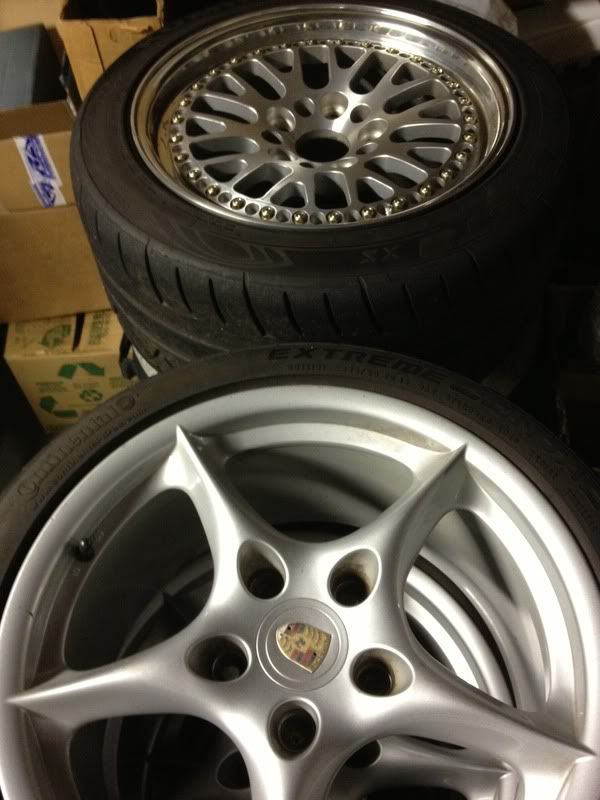
So I acquired a third set of wheels. A nice set of CCW classics. Doing a little bit of detective work, I believe they are this exact set previously owned by another rennlister.
https://rennlist.com/forums/4856624-post18.html
They were in very good condition but I didn't like the light grey shotpeened finish they came with. Plus the polished aluminum barrels were uncoated and would be a pain to keep clean without major elbow grease so I decided to refinish them as a mini project. Here they are as prior to refinishing.
04-07-2013 | 09:12 PM
#2
Thread Starter
Rennlist Member
Joined: Oct 2010
Posts: 707
Likes: 21
From: Tennessee
First step was to break them down. Remember to deflate and remove the valve cores first. Unbolting them while inflated would result in a some damage to any poor soul who tried it. Fortunately, the centers unbolt and pop out easily after removing the 30 bolts around the perimeter. I was initially going to separate the to barrel sections but decided I had no need to. The silicone in between is very secure as long as the tire is kept on.
04-07-2013 | 09:17 PM
#3
Thread Starter
Rennlist Member
Joined: Oct 2010
Posts: 707
Likes: 21
From: Tennessee
The barrels were still nicely polished. I buffed them up slightly but wanted something protective on them for ease of care. I ended up coating them with a product called "Protectaclear". Seems it is very popular with Honda Goldwing owners whose wheels are uncoated aluminum. I preferred this over urethane clear coat or powder coat since it wipes off with some xylene and elbow grease and is easily touched up. Also beacuse it is so thin it applies easily with a brush and will self level and self blend. It means easy repairs rather than having to worry about chips which can be hard to fix if I had used clear urethane.
04-07-2013 | 09:22 PM
#4
Thread Starter
Rennlist Member
Joined: Oct 2010
Posts: 707
Likes: 21
From: Tennessee
The original CCW finish is shotpeened and then type 2 anodized titanium which looked light grey in color. Almost like raw satin finish aluminum. I wanted something tougher and easier to take care of. Fortunately I found a small volume anodizer. I had them type 3 "hard coat" anodized in gunmetal grey. This is a much much harder and resilient finish. Finding an anodizer was tough. Most only do new parts and large volume. The four centers cost me a total of $150 to anodize. They turned out very very nice.
Last edited by s14kev; 04-08-2013 at 12:43 AM.
04-07-2013 | 09:25 PM
#5
Thread Starter
Rennlist Member
Joined: Oct 2010
Posts: 707
Likes: 21
From: Tennessee
Unfortunately, the hard anodizing process involves sulfuric acid. The CCW centers have a steel lug insert to prevent wear. Sulfuric acid, as it turns out, eats away steel very quickly. If you look closely at my "post anodizing" center, you can see the steel insert is missing. I had to press them out because the steel had been damaged.
04-07-2013 | 09:28 PM
#6
Thread Starter
Rennlist Member
Joined: Oct 2010
Posts: 707
Likes: 21
From: Tennessee
Fortunately the service from CCW is excellent. John Purner shipped out a new set of lug inserts. You can see the new lug inserts compared to the ones that are damaged by the acid.
04-07-2013 | 09:31 PM
#7
Thread Starter
Rennlist Member
Joined: Oct 2010
Posts: 707
Likes: 21
From: Tennessee
Pressing them in was a pain. Because Porsche in their wisdom use a ball seat, the inserts are very hard to keep level in a shop press. I ended up using and old hub and some washers with an M14 nut to install them. This worked much better than using a shop press.
Trending Topics
04-07-2013 | 09:34 PM
#8
Thread Starter
Rennlist Member
Joined: Oct 2010
Posts: 707
Likes: 21
From: Tennessee
Finally! Time to put them back together. I purchased a new set of cadmium plated bolts, nuts and washers from CCW also. I had too much time on my hands and arranged them into a nice geometric square so that I could take this picture for you folks.
04-07-2013 | 09:44 PM
#10
Thread Starter
Rennlist Member
Joined: Oct 2010
Posts: 707
Likes: 21
From: Tennessee
Back on the car! The offset and width is about as perfect as you can get. 18 x 9 on the front, 18 x 10 on the rear. They fill the guards perfectly and don't rub at all. Currently have 255/35R18 on the front and 285/30R18 on the rear.
My camera however does not do them any justice. They look much lighter in these photo's than they really are. Also the camera makes my guards red paint look guards orange. My paint really is not faded
So there you have it. Refurbished CCW's with a much easier to care for and much tougher finish. CCW's are somewhat considered high maintenance wheels due to the raw polished barrels and anodized centers. These should be much lower maintenance.
04-07-2013 | 09:46 PM
#11
Thread Starter
Rennlist Member
Joined: Oct 2010
Posts: 707
Likes: 21
From: Tennessee
However! I don't think I really need three sets of wheels. I already have a set of MY02's. Although fun to build, they are taking up space in the garage. Perhaps I will need to put them up for sale.
 04-09-2013 | 01:37 AM
#13
Thread Starter
Rennlist Member
Joined: Oct 2010
Posts: 707
Likes: 21
From: Tennessee
Nice! You have good taste in wheels. Yours look like 17's. I would be more inclined to keep a set of 17's since track tires are much cheaper in 17's. Unfortunately all of my sets of wheels are 18's.