944 motor mounts replacement.
 10-15-2012, 10:48 AM
#1
Rennlist Member
Thread Starter
Hi,
Actually it is an '87 924S... and I am ready to change the mounts. The Haynes Manual says to use an engine hoist but the Clark's Garage procedure only talks about a floor jack under the oil pan. The floor jack would certainly be easier for me, but I am a bit nervous about perhaps breaking the the oil pan. Is it really that solid that there is no need to worry? Comments appreciated.
Actually it is an '87 924S... and I am ready to change the mounts. The Haynes Manual says to use an engine hoist but the Clark's Garage procedure only talks about a floor jack under the oil pan. The floor jack would certainly be easier for me, but I am a bit nervous about perhaps breaking the the oil pan. Is it really that solid that there is no need to worry? Comments appreciated.
 10-15-2012, 10:54 AM
#2
Rennlist Member
Join Date: Feb 2009
Location: Mississippi
Posts: 1,294
Likes: 0
Received 0 Likes
on
0 Posts
Hi,
Actually it is an '87 924S... and I am ready to change the mounts. The Haynes Manual says to use an engine hoist but the Clark's Garage procedure only talks about a floor jack under the oil pan. The floor jack would certainly be easier for me, but I am a bit nervous about perhaps breaking the the oil pan. Is it really that solid that there is no need to worry? Comments appreciated.
Actually it is an '87 924S... and I am ready to change the mounts. The Haynes Manual says to use an engine hoist but the Clark's Garage procedure only talks about a floor jack under the oil pan. The floor jack would certainly be easier for me, but I am a bit nervous about perhaps breaking the the oil pan. Is it really that solid that there is no need to worry? Comments appreciated.
 10-15-2012, 02:42 PM
#4
Rennlist Member
If you have an aluminum pan, use a large piece of wood to distribute the pressure from a floor jack. You'll be fine. Don't lift more than you have to, keep an eye on things top-side as you lift to make sure nothing is being stressed. Done this several times.
10-15-2012, 02:46 PM
#5
Nordschleife Master
If you really want to buy a tool you will probably use twice in your lifetime, you can pickup one of these for about $80 at Harbor Freight (or other cheap tool supply place)
Floor jack with wood under the oil pan works just as well though.
Floor jack with wood under the oil pan works just as well though.
10-15-2012, 03:29 PM
#6
Rennlist Member
I bought the Uro mounts 18 months ago, I figured how bad could they be? Ans.: Worse than you can imagine! At the time the OEM mounts were about $150 each, but now I see the OEM mounts are $225 EACH from Pelican?! Lindsay sells a "Hamburg Technik" mount, all rubber, for $55, anyone have experience with them?
10-15-2012, 03:39 PM
#7
If you use the Harbor Freight lift or jack up from below, what all needs to be disconnected to replace the motor mounts ? Can the mounts actually be changed with just lifting the engine ?
Trending Topics
10-15-2012, 03:52 PM
#8
Rainman
Rennlist Member
Rennlist Member
I have done that on NAs and turbos. Just unbolt and crank up the lift. Doesn't need a whole lot of room. If you want to make things easier you could try removing the mount arms altogether (on an NA)There is a large nut on the underside of the crossmember that holds the mount down and then 2 13mm bolts holding the engine to the mount.
10-18-2012, 11:11 PM
#9
Rennlist Member
Thread Starter
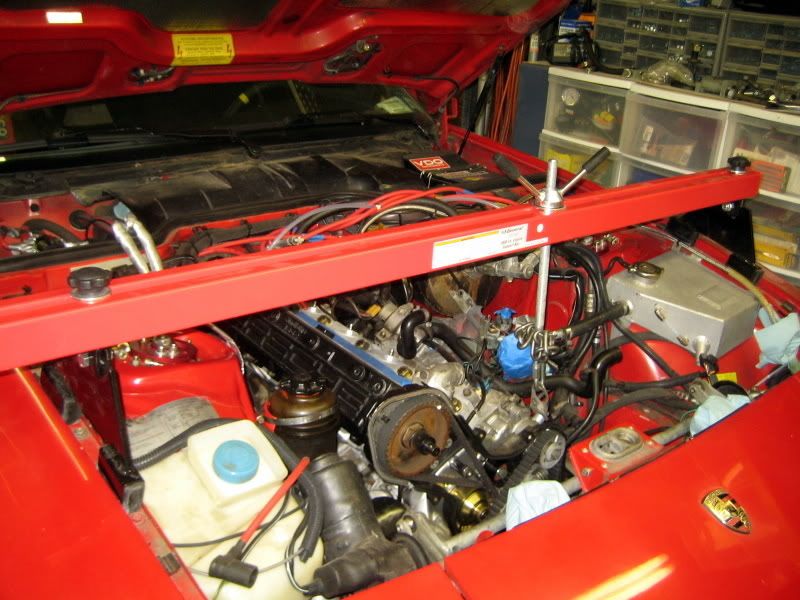
Well that was a PITA!!! But the oil pan seems to have taken the load without a problem… and I jacked it up and down several times…
The new mounts are in and all nuts and bolts on, but not yet torqued, that'll be for tomorrow.
Some observations...
-Before you lower the crossmember pull the rubber brake lines out of the brakets on the suspension struts… they can get strained otherwise.
- I seem to have had the original mounts... the 2 bolts on the top had nuts to hold the mount in place. The new ones have threaded holes so no nuts and shorter bolts... that's why the Clark's garage procedure talks about 38mm and 42mm bolts. If you have these mounts you need TWO 13mm open end wrenches... there is no way I could get a socket on the top of the right mount bolts.
- On the left side it makes it a lot easier if you do as V2Rocket_aka944 suggests and at least loosen the mount arm (that goes from the engine to the engine mount). With the air cleaner off it is real easy to get to the 4 bolts. On the right side I didn’t even try… the exhaust makes access to the mounting bolts a challenge.
- The right side was actually not as bad as I expected (other than doing all the work from underneath and having to wrench the bolt/nuts off with about 1/3 to 1/4 of a revolution per stroke. I was able pry the crossmember down further on the right side to get more clearance then on the left.
- I bought a couple of bolts the same size as the crossmember mounting bolts but an inch longer and screwed one in each side a couple of turns which kept the crossmember about where it should be but allows lowering it an extra inch.
-The biggest problem I had was lining up the bolt holes on the top with the holes in the mounting arms… mostly because the big rubber shoulder on the engine mount fits into a recess in the crossmember and the new mounts were a tight fit. On the left side there is enough room to pry the mount over so the should goes where it should, then with the mounting arm loose you can get the top bolts lined up and threaded. On the right side there is so little room I couldn’t find a way to insert a pry bar. So I got the mount in and installed and tightened the bottom bolt that goes through the crossmember to pull it as vertical as possible, then pulled up the crossmember with its bolts and lowered the jack holding the engine and that compressed the mount and pushed the rubber shoulder part way into its recess, so I repeated the process (raise engine, drop crossmember, look at it, raise crossmember drop engine onto the mount) and it moved some more. I was then able to pry just enough to line up the top bolts and get them threaded… a magical moment!
Once out, the left mount looked OK, almost the same height as the new mounts (I bought the Hamburg Techniks from Pelican), but the right hand one had cracked rubber and was compressed at least � inch. I am going to see if I can make a second heat shield to better protect that side from the exhaust.
Thanks for all your comments and suggestions...
---------------------
'87 924S with new belts AND engine mounts!!
The new mounts are in and all nuts and bolts on, but not yet torqued, that'll be for tomorrow.
Some observations...
-
- I seem to have had the original mounts... the 2 bolts on the top had nuts to hold the mount in place. The new ones have threaded holes so no nuts and shorter bolts... that's why the Clark's garage procedure talks about 38mm and 42mm bolts. If you have these mounts you need TWO 13mm open end wrenches... there is no way I could get a socket on the top of the right mount bolts.
- On the left side it makes it a lot easier if you do as V2Rocket_aka944 suggests and at least loosen the mount arm (that goes from the engine to the engine mount). With the air cleaner off it is real easy to get to the 4 bolts. On the right side I didn’t even try… the exhaust makes access to the mounting bolts a challenge.
- The right side was actually not as bad as I expected (other than doing all the work from underneath and having to wrench the bolt/nuts off with about 1/3 to 1/4 of a revolution per stroke. I was able pry the crossmember down further on the right side to get more clearance then on the left.
- I bought a couple of bolts the same size as the crossmember mounting bolts but an inch longer and screwed one in each side a couple of turns which kept the crossmember about where it should be but allows lowering it an extra inch.
-The biggest problem I had was lining up the bolt holes on the top with the holes in the mounting arms… mostly because the big rubber shoulder on the engine mount fits into a recess in the crossmember and the new mounts were a tight fit. On the left side there is enough room to pry the mount over so the should goes where it should, then with the mounting arm loose you can get the top bolts lined up and threaded. On the right side there is so little room I couldn’t find a way to insert a pry bar. So I got the mount in and installed and tightened the bottom bolt that goes through the crossmember to pull it as vertical as possible, then pulled up the crossmember with its bolts and lowered the jack holding the engine and that compressed the mount and pushed the rubber shoulder part way into its recess, so I repeated the process (raise engine, drop crossmember, look at it, raise crossmember drop engine onto the mount) and it moved some more. I was then able to pry just enough to line up the top bolts and get them threaded… a magical moment!
Once out, the left mount looked OK, almost the same height as the new mounts (I bought the Hamburg Techniks from Pelican), but the right hand one had cracked rubber and was compressed at least � inch. I am going to see if I can make a second heat shield to better protect that side from the exhaust.
Thanks for all your comments and suggestions...
---------------------
'87 924S with new belts AND engine mounts!!
Last edited by elgy; 01-19-2018 at 10:02 AM. Reason: Correction
10-20-2012, 08:54 AM
#11
Rennlist Member
Thread Starter
") 10-20-2012, 04:40 PM
10-20-2012, 04:40 PM
#12
Rennlist Member
12-14-2013, 12:24 PM
#13
Intermediate

Join Date: Dec 2013
Posts: 45
Likes: 0
Received 0 Likes
on
0 Posts
I tried this last night, with no success.
I ended up taking all 4 bolts off the crossmember, and dropping it down. It seemed to drop down maybe an inch and a half. I jacked the engine up maybe an inch. I tried to get the drivers side mount off.
After trying for an hour or two, I gave up. It seemed like an impossible puzzle!
One issue is that the lower stud on the mount goes through a small hole. This seems to limit how much you can "tilt" the engine mount to get it off. It seems like you have to lift it straight out, but that stud is quite long and it seems like between dropping the crossmember and lifting the engine, you still can't come close to clearing that stud.
How high can you jack the engine? I read something about causing damage if doing more than an inch, so I didn't go more than that.
Is the passenger side easier? Any other tips? In particular, how is the mount pulled out? Do you need to get things open enough so that you can lift it up to clear the bottom stud out? Or is it maneuvered so that the top comes out first?
12-15-2013, 03:44 AM
#15
Burning Brakes
Join Date: Mar 2004
Location: Calif
Posts: 1,151
Likes: 0
Received 0 Likes
on
0 Posts
you need to take the top side out first, then the bottom. sometimes unbolting the bracket that attaches to the engine is necessary, but I've never had trouble on the driver's side, only on the pass side where things are much tighter and there is a lot less room to work