944 Electric Water Pump
 08-29-2012, 02:47 PM
#1
Instructor
Thread Starter
To start off, this is my first post. However I have used these forms quite a lot for research and looking for info. I am grateful for it, and in return I would like to post the build process of turning my 944 N/A Mechanical water pump to an Electrical Water pump.
Before I do my write up, there was more than one reason I decided on doing this.
1. Improve MPG
2. Free up horsepower
3. Redesign the timing belt to make it more reliable.
Also In the process of doing the conversion I also deleted my balance shafts. So with that all said here goes.
Ok so I will try to do this in multiple posts. This took me 4 days to do. I had been working non stop on my car, wake up go out side and work (7am) then called it quits at around (10pm) I made a few mistakes or didn't figure things out when I had a problem right away. haha but it is all for the fun of it.
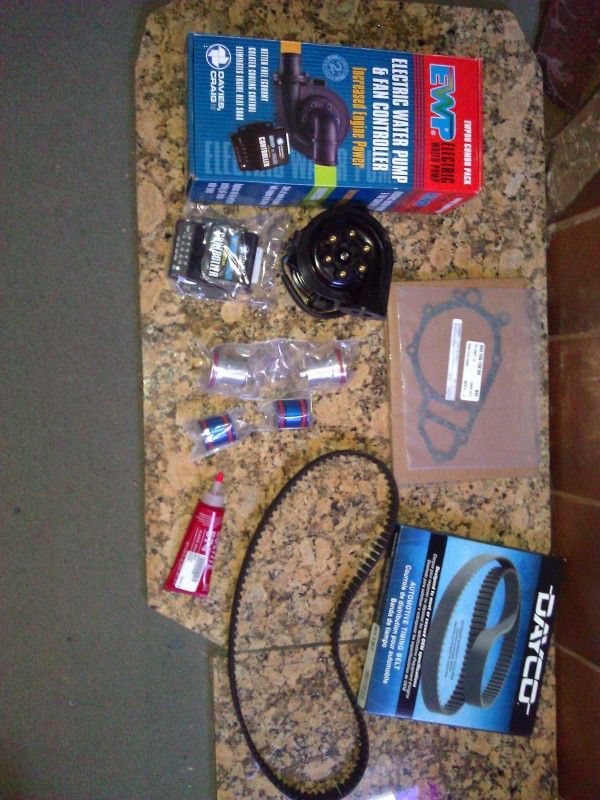
So the first thing to post is all the supplies or at least the main ones I remembered to take pictures of. We have the Davies Craig Electric Water Pump (EWP), the Honda Accord 113 tooth timing belt, The water pump gasket, the balance shaft delete kits. Other things I had to get during my project that I may not have taken a picture of were; Alternator/AC belt, Power Steering Belt, Radiator hoses lower and top (2 tops), distributor cap and rotor, Coolant, gasket sealer, Spark plug wires (I will explain later....)
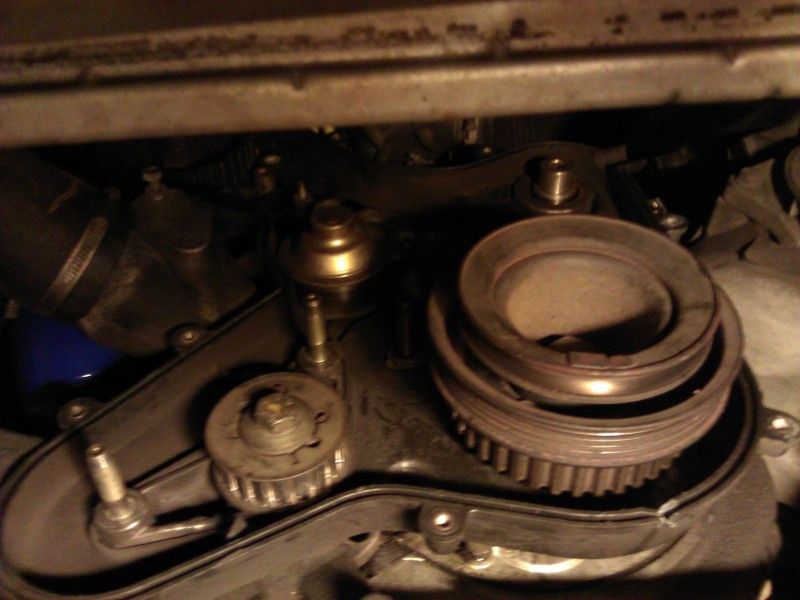
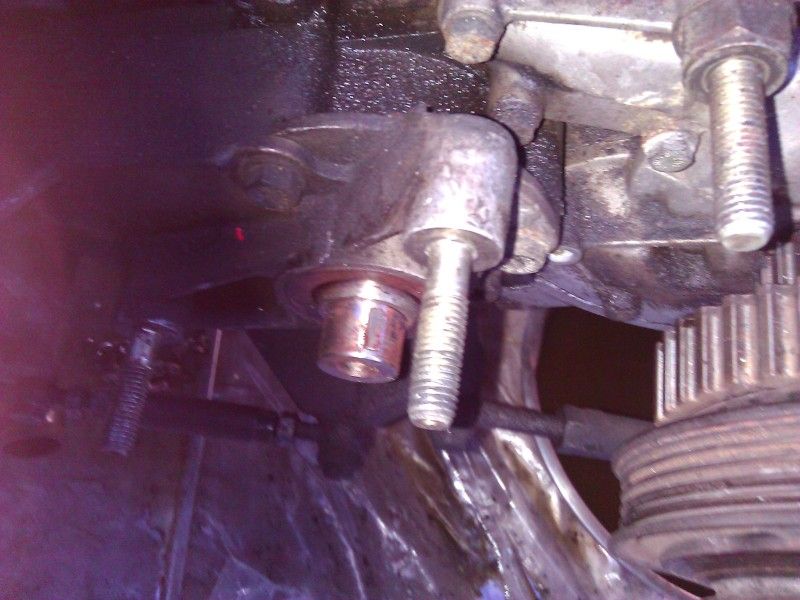
So the first day didn't start till Thursday evening. My goal was to disassemble the front end, belts rollers, cover. Pretty much to get to the water pump and take it off. Well to do so as you can see in some of the pictures, The radiator fan had to come out, along with the two serpentine belts. The front cover was pretty straight forward to remove to gain access to the two timing belts. The first timing belt is for the Balance shafts. A questionable upgrade for Porsche 944 owners they are to reduce vibrations and such. To me I see them as an extra rotational mass being wasted to spin. The second timing belt is what connects the Crank to the Water pump and Cam. That night I was not able to get the water pump off or even get to it for that matter because there is/was a rear cover for the timing belts and I couldn't figure out how to get it off and I didn't want to take the crank pulleys off seeing as I didn't have a flywheel lock. I also could not get the lower balance shaft pulley off (needed to remove the balance shafts) and called it a night.

Before I do my write up, there was more than one reason I decided on doing this.
1. Improve MPG
2. Free up horsepower
3. Redesign the timing belt to make it more reliable.
Also In the process of doing the conversion I also deleted my balance shafts. So with that all said here goes.
Ok so I will try to do this in multiple posts. This took me 4 days to do. I had been working non stop on my car, wake up go out side and work (7am) then called it quits at around (10pm) I made a few mistakes or didn't figure things out when I had a problem right away. haha but it is all for the fun of it.
So the first thing to post is all the supplies or at least the main ones I remembered to take pictures of. We have the Davies Craig Electric Water Pump (EWP), the Honda Accord 113 tooth timing belt, The water pump gasket, the balance shaft delete kits. Other things I had to get during my project that I may not have taken a picture of were; Alternator/AC belt, Power Steering Belt, Radiator hoses lower and top (2 tops), distributor cap and rotor, Coolant, gasket sealer, Spark plug wires (I will explain later....)
So the first day didn't start till Thursday evening. My goal was to disassemble the front end, belts rollers, cover. Pretty much to get to the water pump and take it off. Well to do so as you can see in some of the pictures, The radiator fan had to come out, along with the two serpentine belts. The front cover was pretty straight forward to remove to gain access to the two timing belts. The first timing belt is for the Balance shafts. A questionable upgrade for Porsche 944 owners they are to reduce vibrations and such. To me I see them as an extra rotational mass being wasted to spin. The second timing belt is what connects the Crank to the Water pump and Cam. That night I was not able to get the water pump off or even get to it for that matter because there is/was a rear cover for the timing belts and I couldn't figure out how to get it off and I didn't want to take the crank pulleys off seeing as I didn't have a flywheel lock. I also could not get the lower balance shaft pulley off (needed to remove the balance shafts) and called it a night.
 08-29-2012, 02:49 PM
#2
Instructor
Thread Starter
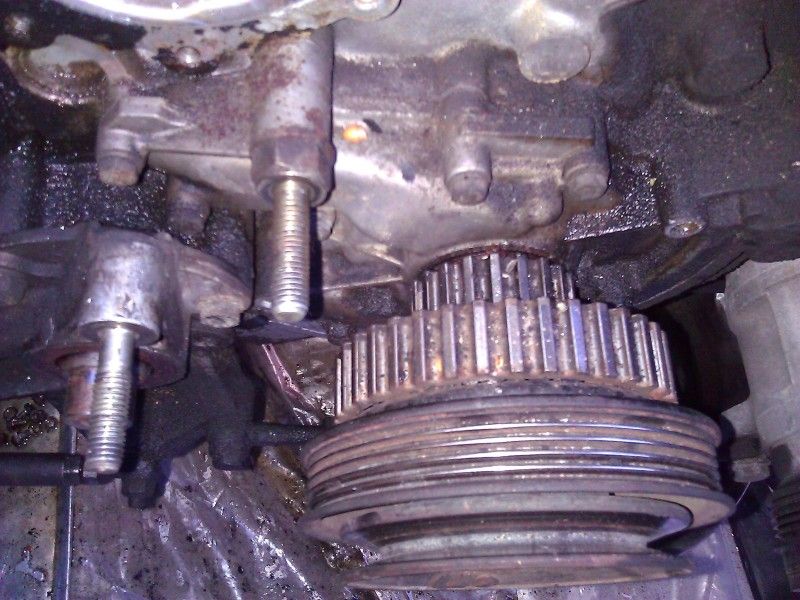
Day two Started off bright and early. Woke up at 6 ate got read and went out to my project. I had an idea over the night. The thought was I am not going to use the covers so lets just rip them off. And So fourth I proceed to do so  which then allowed me to get to the water pump and remove it. That took about 30 mins. I also had an idea of using some big pliers (monkey wrench design) to grab the pulley of the balance shaft I could not take off. So while holding it with these huge pliers I then with all my might used a Ratchet to remove the bolt and the pulley came right off. Started today off great!
So the reason I was so urgent to get said water pump off the car was I needed it to take to my fabricator On Friday which is when all this is happening. So happy with what I did I changed and went to work till around 12pm. Getting home I rush over and and tell Tim (fabricator) what I need done one the water pump. I got the pulley pressed out welded shut and the weep hole welded. then two of the stems used for a guard for the timing belt grounded off. Anyhow I dropped it off and he said he would have it for me either by the end of day or early morning. So I went back home to get some more work on the car done....
which then allowed me to get to the water pump and remove it. That took about 30 mins. I also had an idea of using some big pliers (monkey wrench design) to grab the pulley of the balance shaft I could not take off. So while holding it with these huge pliers I then with all my might used a Ratchet to remove the bolt and the pulley came right off. Started today off great! So the reason I was so urgent to get said water pump off the car was I needed it to take to my fabricator On Friday which is when all this is happening. So happy with what I did I changed and went to work till around 12pm. Getting home I rush over and and tell Tim (fabricator) what I need done one the water pump. I got the pulley pressed out welded shut and the weep hole welded. then two of the stems used for a guard for the timing belt grounded off. Anyhow I dropped it off and he said he would have it for me either by the end of day or early morning. So I went back home to get some more work on the car done....
08-29-2012, 02:50 PM
#3
Instructor
Thread Starter
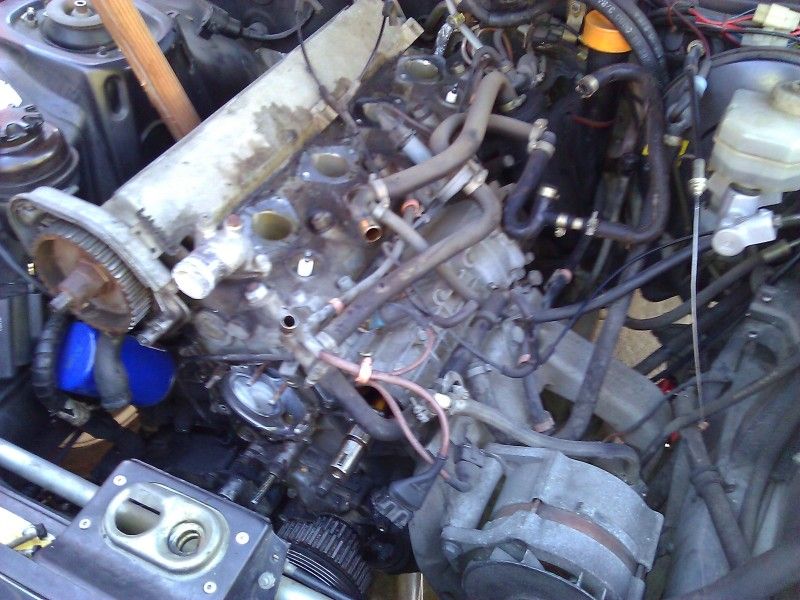
Continuing with the second Day (Friday) I decided I was going to dive in and get the upper balance shaft delete kit installed. The fun part... To get to it I had to remove my fuel rail (took a special trick) and intake manifold. One of the stupidest things I did was spend an hour trying to take the manifold off... I was even using a crowbar and it would not budge. Then I noticed something it would swivel but not come up so I went to the other side of the car and oh and behold I forgot to remove one of the intake manifold screws holding it in place.... Guess sometimes when you have tunnel vision and you miss stuff. haha Anyways here we go engine with the top half removed. Along with showing how the delete kits fit in the balance shafts place. Yes I forgot to take a picture of the balance shafts :'(
08-29-2012, 02:50 PM
#4
Instructor
Thread Starter
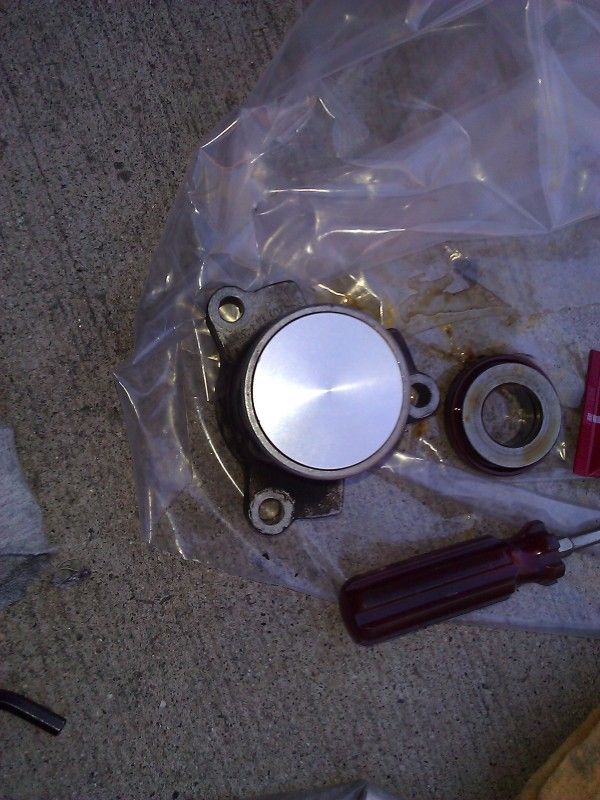
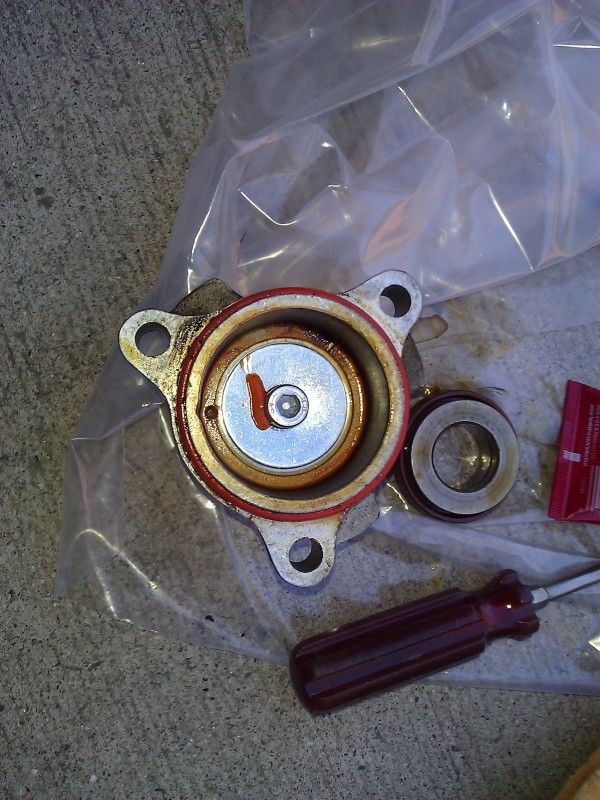
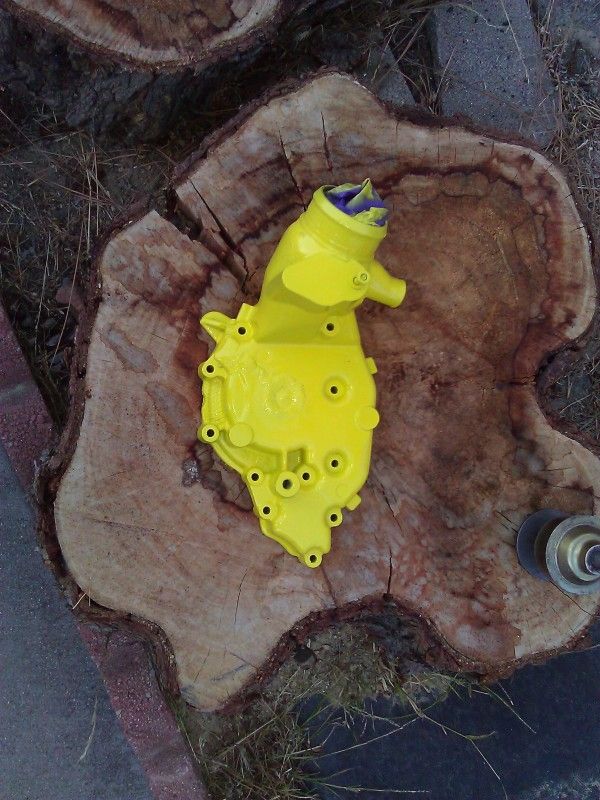
Also did anyone notice how dirty the front of the engine is? Anyways... So I get a call at 4pm that my water pump is ready. yay rush hour traffic. So I get home around 6pm after picking it up and decided to have a little fun with it. Here is what it looks like after (I figured most of us know what a normal water pump looks like so I decided to not take the before picture. plus you can always look it up.) And yes next to it is the fan blade and pulley that used to be in it. I am very happy with the results of it. So killing some time and wanting to take a little break from turning a wrench I also decided to paint the water pump housing.... and what color you ask, Yellow!

The rest of that night was doing the reverse of what I did before and putting on and taking off the intake manifold a couple times because I forgot to connect a hose here or there.... Oh I almost forgot something important. So when I was taking off the intake manifold, I had to take off the ignition wires and when I was trying to squeeze my hands between in the intake runners and pull the second cylinder wire up I didn't grab it in the right place and ripped the boot off the connector and destroyed the wire.... I tried fixing it but I will explain what happened later...
The rest of that night was doing the reverse of what I did before and putting on and taking off the intake manifold a couple times because I forgot to connect a hose here or there.... Oh I almost forgot something important. So when I was taking off the intake manifold, I had to take off the ignition wires and when I was trying to squeeze my hands between in the intake runners and pull the second cylinder wire up I didn't grab it in the right place and ripped the boot off the connector and destroyed the wire.... I tried fixing it but I will explain what happened later...
08-29-2012, 02:52 PM
#5
Instructor
Thread Starter
Day three! The big day It is Saturday and I get to spend all of it at the car no more picking up parts or anything! I get out there at 7am and decided to start from what I was reading about the painful lower balance shaft. So I have to remove the Power steering pump and the face bracket of the balance shaft. I crawl under the car and undo all the bolts of the balance shaft and try wiggling it out. And by try I mean I spend an hour trying any way I can to get the thing to come out because I do not want to have to remove the engine mount. Yeah stubbornness we have all been there before haha. So finally I decide to give in and at first looking at the bolts it looks like I am going to have to take the header off the car to get to the engine mount. So I try to take the header bolts off.... nope not budging one bit.... hmmm lets rethink how I should do this. I ended up using a straight wrench (no curves in it) and a cheater pipe to access the motor mount bolts. After I get the four bolts off the lower balance shaft was a piece of cake. Too bad that overall to remove and re-install it took me 4 hours.....
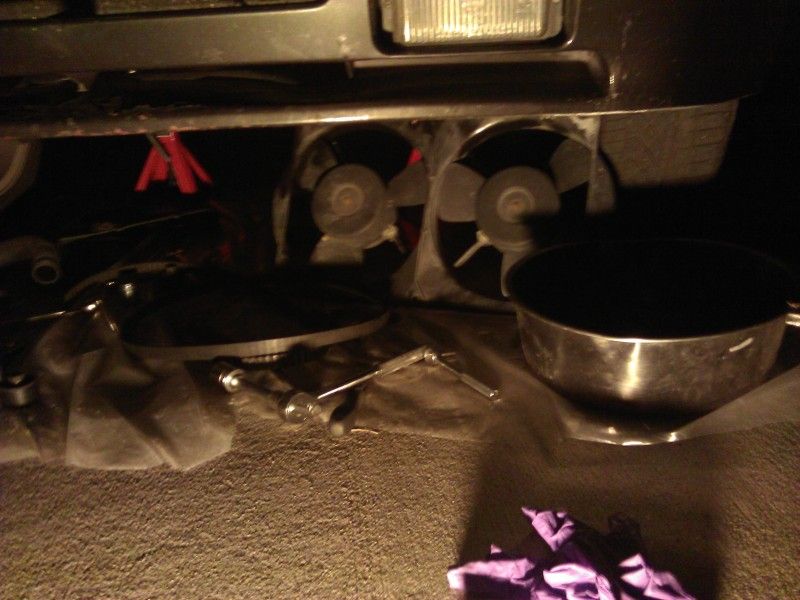
Also this day I didn't take pictures till the end of day when I remembered because I was so into the little work that pictures were not on my mind.
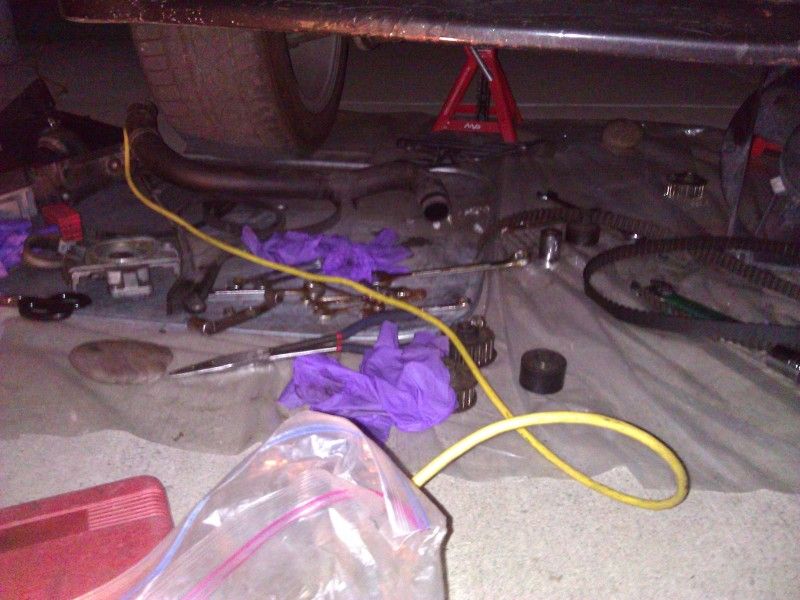
Under the car I really notice how dirty it is and that I found my leak... from the power steering hose. So I fix that, and spend two hours cleaning the front and bottom of the car. spent an hour removing the old gasket that was left on the engine block and water pump housing.
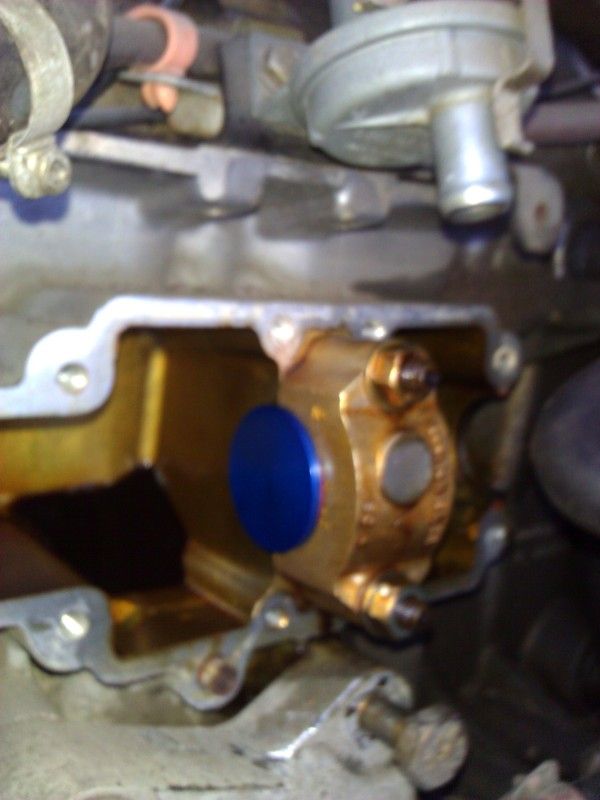
Finally I am putting stuff together and it feels like I am getting somewhere. I install the water pump housing and the timing belt Keep in mind this though. Somehow my engine was 180 degrees off. Not that big of a deal but when you only have one timing mark on the crank and you want to be sure you are at top dead center it kinda is. I spent about 2 hours going crazy and almost giving up because I could not for the live of me find the timing mark. (I didn't know it was on the other side of the crank) so I took out all the spark plugs and was looking inside to see when the number one cylinder was at the top. So when it was I checked the crank and no mark.... ok I put the timing belt on and turned it over 180 degrees and sure enough there it was... now how do I get both the crank and cam to TDC without bending a valve? I left the timing belt on and rotated the crank 90 degrees then took the timing belt off and slowly turned it to TDC while at the same time turning the Cam to TDC. yay problem solved.
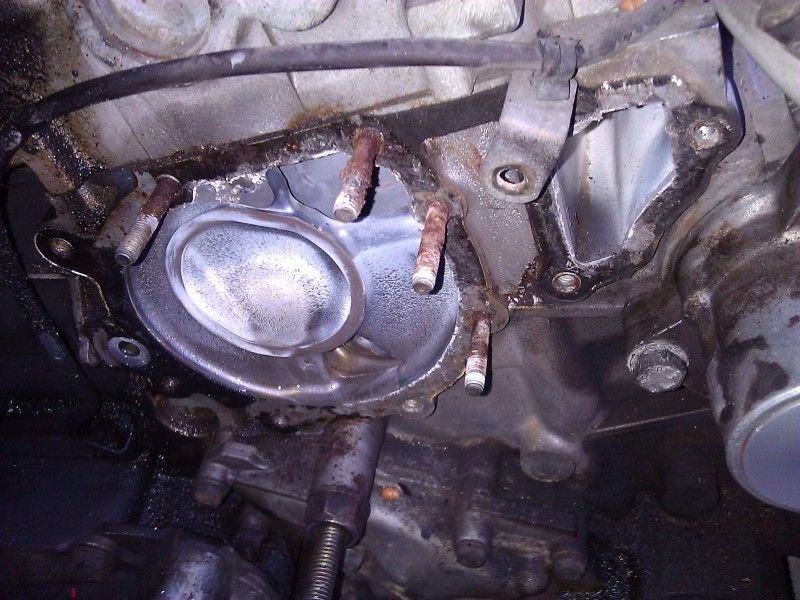
So finally the housing and belt are installed and here are the pictures
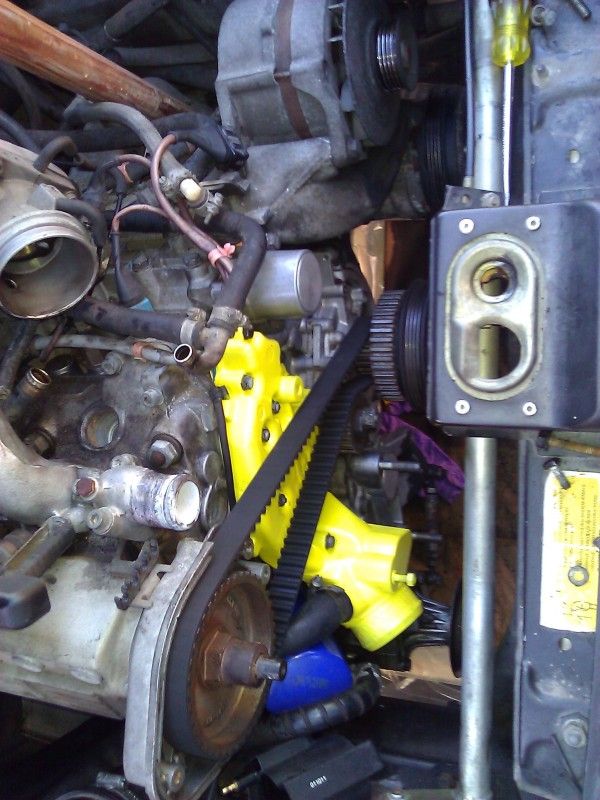
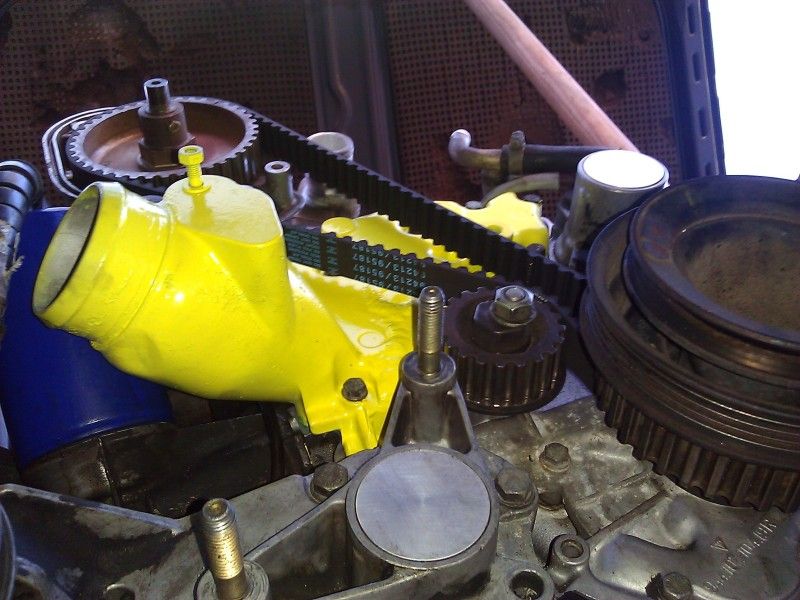
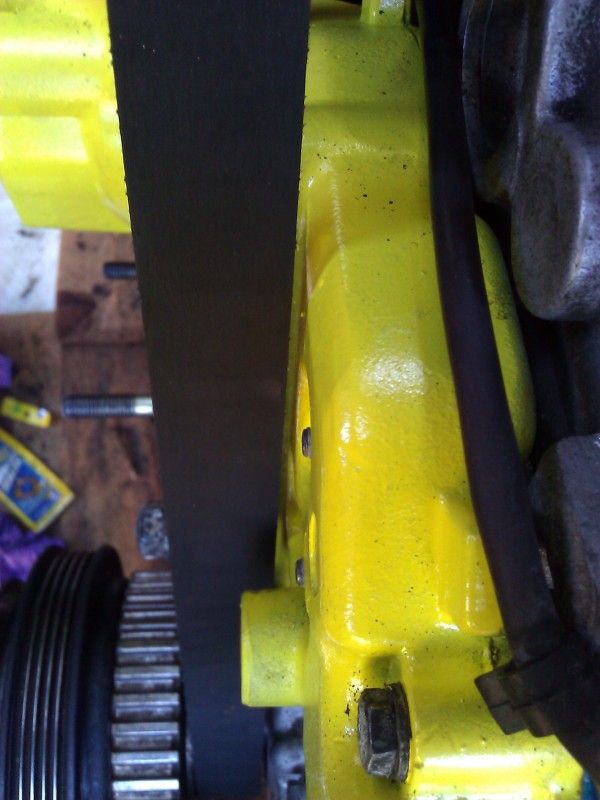
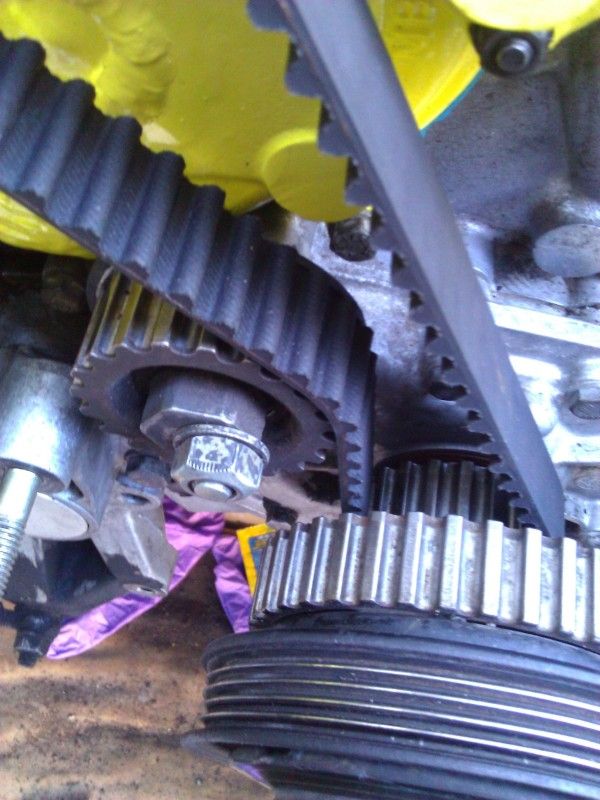
Also notice how everything just clears it was like the car was designed like this or something haha. That and it is so nice to have it all cleaned up
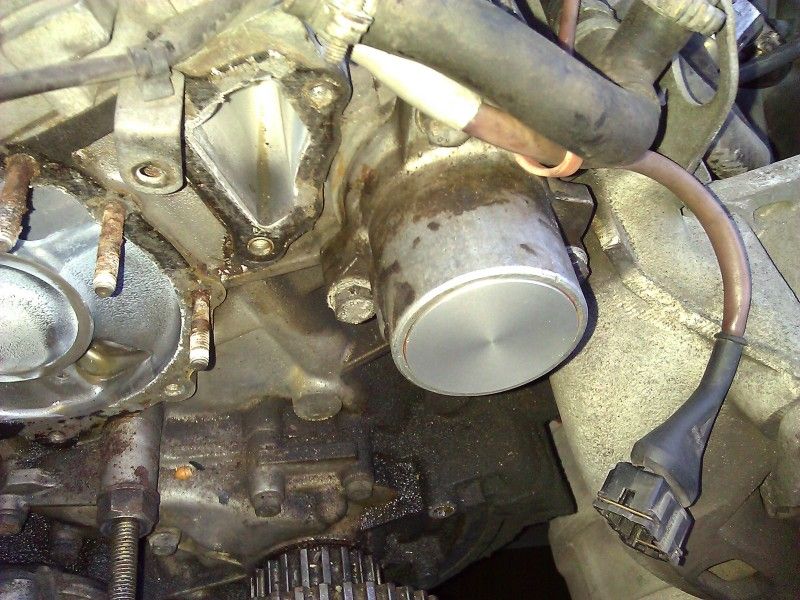
oh you think I finished with just that on Saturday... nope I kept working hard even through the night. Finally I was working with the EWP and here it is put together. I like how it looks like a turbo hahaha.
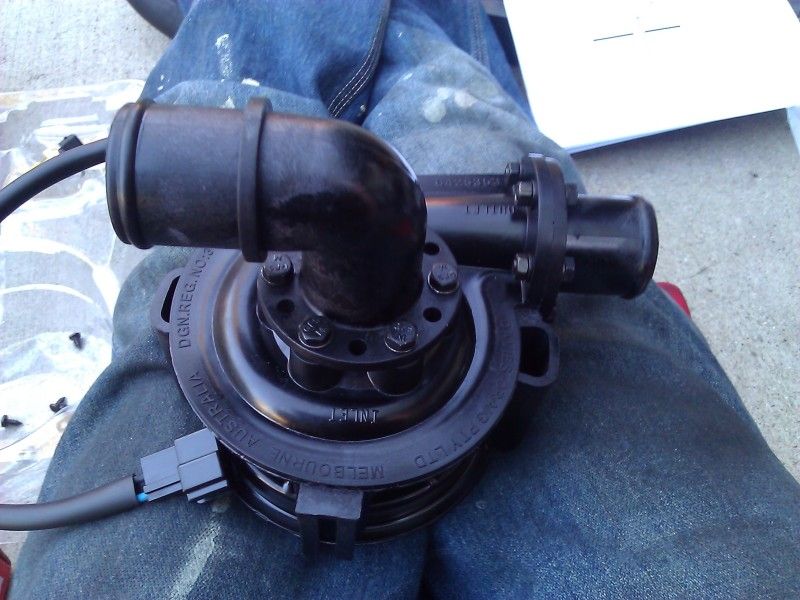
Also this day I didn't take pictures till the end of day when I remembered because I was so into the little work that pictures were not on my mind.
Under the car I really notice how dirty it is and that I found my leak... from the power steering hose. So I fix that, and spend two hours cleaning the front and bottom of the car. spent an hour removing the old gasket that was left on the engine block and water pump housing.
Finally I am putting stuff together and it feels like I am getting somewhere. I install the water pump housing and the timing belt
Keep in mind this though. Somehow my engine was 180 degrees off. Not that big of a deal but when you only have one timing mark on the crank and you want to be sure you are at top dead center it kinda is. I spent about 2 hours going crazy and almost giving up because I could not for the live of me find the timing mark. (I didn't know it was on the other side of the crank) so I took out all the spark plugs and was looking inside to see when the number one cylinder was at the top. So when it was I checked the crank and no mark.... ok I put the timing belt on and turned it over 180 degrees and sure enough there it was... now how do I get both the crank and cam to TDC without bending a valve? I left the timing belt on and rotated the crank 90 degrees then took the timing belt off and slowly turned it to TDC while at the same time turning the Cam to TDC. yay problem solved.So finally the housing and belt are installed and here are the pictures
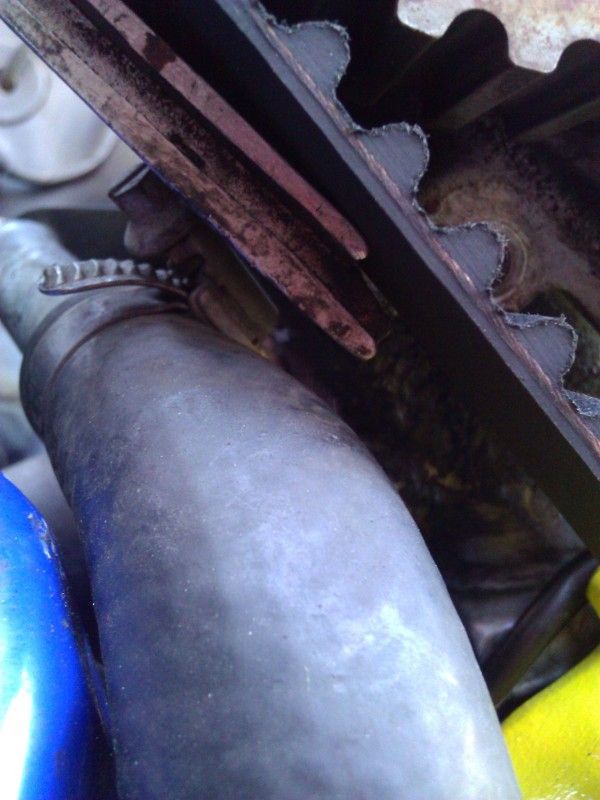
Also notice how everything just clears
it was like the car was designed like this or something haha. That and it is so nice to have it all cleaned up oh you think I finished with just that on Saturday... nope I kept working hard even through the night. Finally I was working with the EWP and here it is put together. I like how it looks like a turbo hahaha.
08-29-2012, 02:53 PM
#6
Instructor
Thread Starter
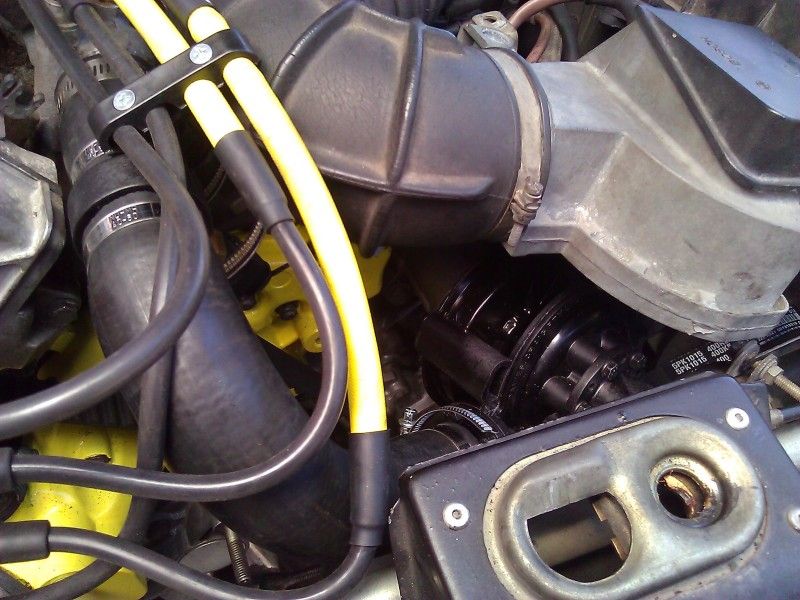
Continuing on. I used the old Radiator hose to make a mock up with how I was going to mount this bad boy. Took me about an hour to come up with something I liked. Then with the new hoses took twice as long since everything was super tight and hard to squeeze into. (yes, we are all thinking it.... that's what she said. glad we got that out) Instead of mounting it toward the bottom I decided to mount it at the top. I want people to see this thing! I even got an extra temp sensor in there so I can have an alarm go off in case the car is overheating. I called it a night and decided to do the wiring in the morning. I like to be able to fully see what I am doing. plus I figured it gave more time for the sealant to bond and cure. The night picture I didn't like too much with the shop lighting. so first thing I did in the morning was take a picture of what I did the night before
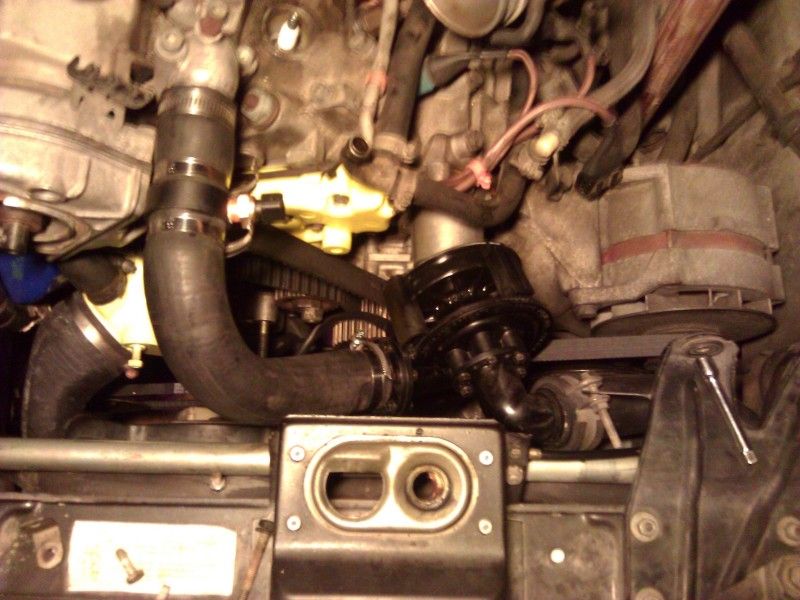
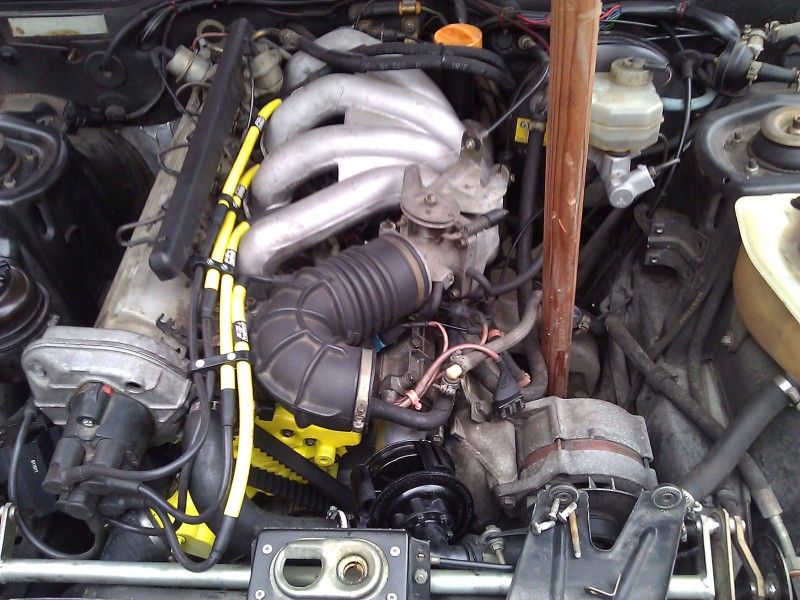
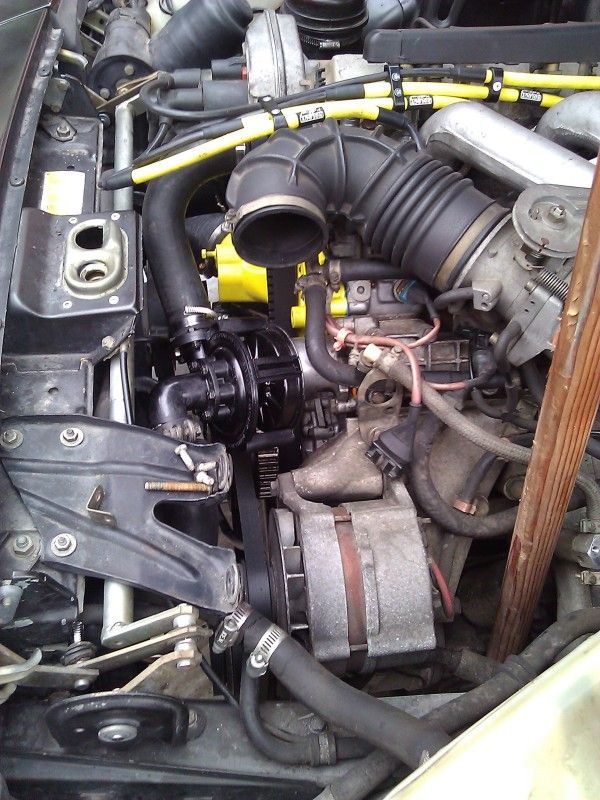
And yes even with all the money I spent in this system I still haven't replaced the hood struts so that is why there is a wooded stick holding it open :P
And yes even with all the money I spent in this system I still haven't replaced the hood struts so that is why there is a wooded stick holding it open :P
08-29-2012, 02:54 PM
#7
Instructor
Thread Starter
Now Sunday! yay fourth day on this car everything is almost done, what could possibly go wrong right?
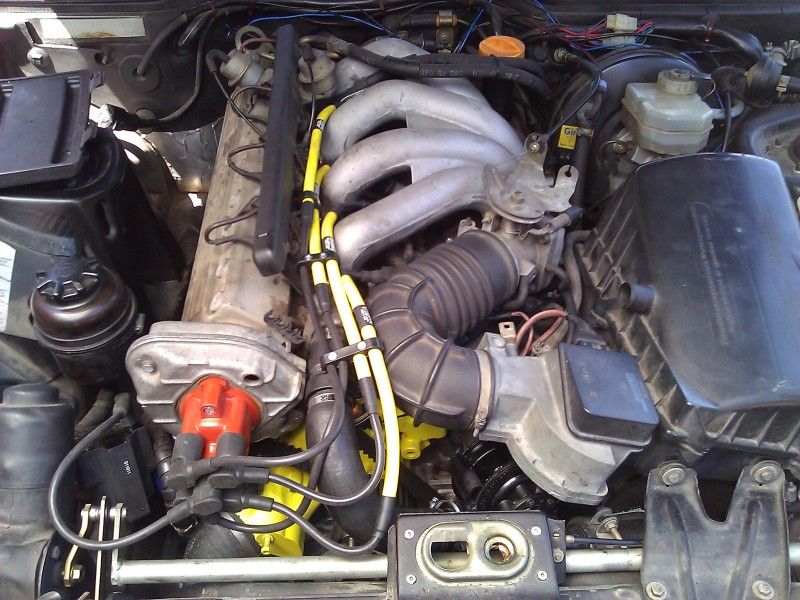
So I start off with taking apart my glove box that is where I will put the controller for my radiator fans and EWP. Yay drilling. I never really like power tools as an FYI. So I do the pilot holes and gradually get bigger through the firewall and the battery wall to make a hole big enough for the connector to fit through (about an inch big for the final result). I didn't have a drill bit big enough.... so off to harbor freight and finally made it hole big enough did the routing for the wires and then was stumped for the longest time with where was I going to find an ignition source to splice into to tell my controller that my car is on... I tried looking it up and found nothing. and it finally dawned on me, the seat belt harness light! I do not need my car to tell me when I am not wearing a seat belt. So I used that wire (no not the wire if I do not have my seat belt in although that would be funny to explain. "Yes officer you see I was not wearing a seat belt because I was cooling my engine down  ) fun stuff. I then put my intake box on with the Air flow box (I plan on replacing with a MAF sensor) I go to turn on the ignition and nothing lights up..... What did I do wrong.... I checked the ignition wire, the fuse, the power, finally checked the ground. Turned out I attached the ground wire to something that wasn't grounded.... lets retry that ok all fixed lets try again... nothing.... double check everything and this time.... the fuse... Of course I do not have any small 10A fuse's hanging around, lets go to the store. Finally back and it works! everything turned on with the EWP yay. Ok time to start the engine.... Moment of truth and it starts! but why is it running really rough like miss firing and then shutting off.... hmmm hey dad come start the car while I figure out whats wrong. Sounds like the second cylinder is miss firing. I guess my fix it job on the wire didn't work let me try pushing it on and ZAP! I literally flew across my drive way. 40,000 volts or so my coil says, really is a rush. heh, heh.
So I go to every auto store Napa, Autozone, Oriley, Carquest, etc.... and for a new set of wires it cost anywhere from 140-200 dollars and takes 3 days to order... FML. Why must everything be special order for my car... even the common parts. So I ordered a new set of Nology wires. And there silver plugs to test those out. I have been using "halo plugs" and noticed a little improvement on gas. Anyways though, the guy from Nology calls to go over your order and I am going to tell him what happened with the set I had and hopefully something good happens, if not I do not mind paying $200 for aftermarket wires for my mess up. Plus I like the benefits I got over the OE wires. So untill I get the wires here is where I am at in my Electric water pump conversion on my Porsche 944 Some more pictures with everything put together and the mock up spark plug wires.
So I start off with taking apart my glove box that is where I will put the controller for my radiator fans and EWP. Yay drilling. I never really like power tools as an FYI. So I do the pilot holes and gradually get bigger through the firewall and the battery wall to make a hole big enough for the connector to fit through (about an inch big for the final result). I didn't have a drill bit big enough.... so off to harbor freight and finally made it hole big enough
did the routing for the wires and then was stumped for the longest time with where was I going to find an ignition source to splice into to tell my controller that my car is on... I tried looking it up and found nothing. and it finally dawned on me, the seat belt harness light! I do not need my car to tell me when I am not wearing a seat belt. So I used that wire (no not the wire if I do not have my seat belt in although that would be funny to explain. "Yes officer you see I was not wearing a seat belt because I was cooling my engine down ) fun stuff. I then put my intake box on with the Air flow box (I plan on replacing with a MAF sensor) I go to turn on the ignition and nothing lights up..... What did I do wrong.... I checked the ignition wire, the fuse, the power, finally checked the ground. Turned out I attached the ground wire to something that wasn't grounded.... lets retry that ok all fixed lets try again... nothing.... double check everything and this time.... the fuse... Of course I do not have any small 10A fuse's hanging around, lets go to the store. Finally back and it works! everything turned on with the EWP yay. Ok time to start the engine.... Moment of truth and it starts! but why is it running really rough like miss firing and then shutting off.... hmmm hey dad come start the car while I figure out whats wrong. Sounds like the second cylinder is miss firing. I guess my fix it job on the wire didn't work let me try pushing it on and ZAP! I literally flew across my drive way. 40,000 volts or so my coil says, really is a rush. heh, heh. So I go to every auto store Napa, Autozone, Oriley, Carquest, etc.... and for a new set of wires it cost anywhere from 140-200 dollars and takes 3 days to order... FML. Why must everything be special order for my car... even the common parts. So I ordered a new set of Nology wires. And there silver plugs to test those out. I have been using "halo plugs" and noticed a little improvement on gas. Anyways though, the guy from Nology calls to go over your order and I am going to tell him what happened with the set I had and hopefully something good happens, if not I do not mind paying $200 for aftermarket wires for my mess up. Plus I like the benefits I got over the OE wires. So untill I get the wires here is where I am at in my Electric water pump conversion on my Porsche 944
Some more pictures with everything put together and the mock up spark plug wires.
Trending Topics
08-29-2012, 03:00 PM
#8
Instructor
Thread Starter
I got the car running fine a day later. I installed the new plug wires and was still having some sort of idle surge. So I took everything apart cleaned all the sensors and noticed the vacuum hose that goes to the idle control valve was cracked all the way through. So I replaced that and all my intake manifold gaskets. Runs perfect now, except I have to adjust the throttle position sensor seems I turned it slightly when I re installed it and the car now idles at 1,500 rpm. I fixed that and drove it nice and gentle for the first 500 miles and I will say even putting around I felt a little more torque down low. Now during those 500 miles I had to redo a couple things. Such as moving the temp sensor for the EWP to the lower radiator hose to get a proper reading. Along with grinding the cam housing to make a little room for the belt so it was not killing itself on it. That and getting the air bubble out seemed to be one of the hardest parts. But my car runs between 1/4 and 1/2 mark. And I love the extra power it now has. But my favorite part is how when I turn my car off to reduce heat soak the water pump and fans run until one of two things happen, 2 mins has passed or the temp drops below 75 degrees C. Which ever comes first.
Hope you guys enjoyed reading this and I have to Give thanks to JNS for being my mentor through this project. Thanks John. If you have any questions I will try my best to respond in the best way possible.
Hope you guys enjoyed reading this and I have to Give thanks to JNS for being my mentor through this project. Thanks John. If you have any questions I will try my best to respond in the best way possible.
 08-29-2012, 03:44 PM
#10
Rainman
Rennlist Member
Rennlist Member
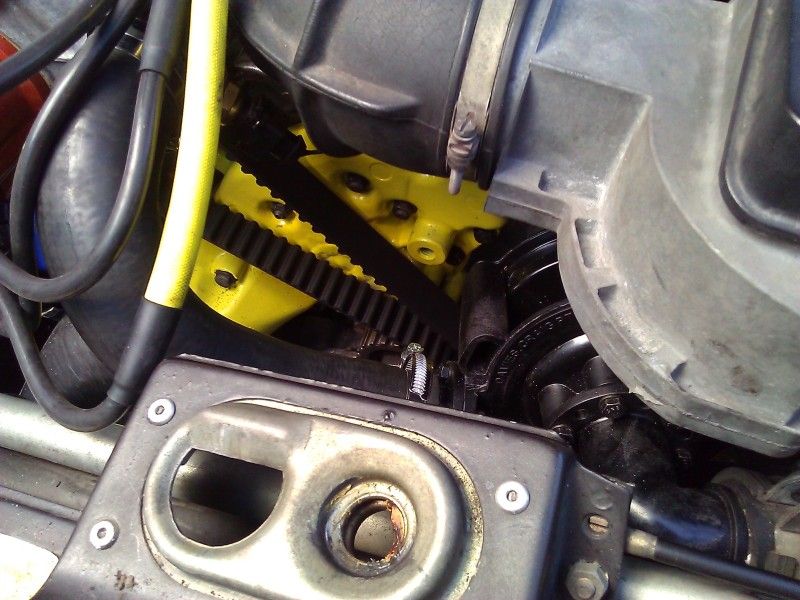
That timing belt tensioner gear is going to eat your timing belt in short time. You need to find a smooth-back eccentric, perhaps the balance shaft idler.
Cool project, I like your DIY spirit. But please replace that pulley.
I have a MAF you could try on your car that is pretty gerry-rigged up but should work alright. Someone years back found that the stock DME can more or less talk to the MAF off a Ford Contour. I have the plug made up and it's ugly, but you could have it for $35 shipped.
08-29-2012, 04:21 PM
#11
Instructor
Thread Starter
I am sure you do not have to delete the balance shafts. You would then mount the water pump on the lower radiator hose. Also space might be slightly tighter.
I haven't had issues with the pulley eating it away. Although I was thinking about the smooth tensioner from the balance shaft. The thing I like about the current tensioner is that it has a gaurd to prevent it from touching the old water pump housing. Funny you mention a MAF that is something I was thinking about doing. And before I were to agree with yours I would like to see pictures of it. So PM me with more info
The cost of the Water pump with controller was $396 shipped, the belt was $17, the hoses were around $70ish. I bought two upper radiator ones to get it to line up right. The price of coolant $16-$20. And then my balance shaft delete kit I got from lindsey racing. which was around $240 with shipping and loctite. But even though it is pricey the way I see it, after I pass 30,000 miles from the installation I just saved money. I shouldn't have to change the timing belt now till 60,000 miles.
08-29-2012, 04:24 PM
#12
Drifting
Agreed. That was the question I had too. How do you find the vibrations without balance shafts?
08-29-2012, 04:28 PM
#13
Instructor
Thread Starter
Surprisingly I felt the car being a little smoother. I was wondering if it is because I also removed the mechanical water pump. My engine mounts are shot too... But it idles and drives quiet nice.
08-29-2012, 05:15 PM
#14
Rennlist Member
You are without a doubt a hard worker.
I feel like unless you are trying to win a race you need balance shafts.
I would like to suggest that you reinforce your fuel rail if you have not already.
I feel like unless you are trying to win a race you need balance shafts.
I would like to suggest that you reinforce your fuel rail if you have not already.
08-29-2012, 05:17 PM
#15
Three Wheelin'
Join Date: Aug 2007
Location: Upton, Massachusetts
Posts: 1,417
Likes: 0
Received 0 Likes
on
0 Posts