Rear suspension pics of how to lower?
 01-28-2011, 07:57 AM
#1
Three Wheelin'
Thread Starter
Join Date: Jan 2010
Location: Durham Region/GTA East, Canada
Posts: 1,380
Likes: 0
Received 1 Like
on
1 Post
I've searched and found a great diagram and some instructions on how to lower the car's rear suspension, but looking at the diagram, there are a lot of bolts and adjustment points.
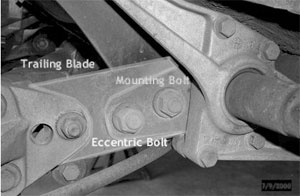
Does anyone have a pic of what that part of the suspension looks like? The drawing is a closeup of the bolt/nut locations, and I can't get a sense of what I'm looking at, and the car is hibernating under a cover for now.
FYI my front suspension is a bit lower than the rear after checking all the alignment after installing front struts/ and Bilstiens in the rear. I'd like to even it it out by dropping it approximately 1/2 inch. I have all the tools except the 36mm socket..maybe the 24 as well, but I can get those.
Thanks,
 01-28-2011, 08:32 AM
#2
Nordschleife Master
You should be able to get 1/2 inch on the ecentric alone.. I recently raised the rear of my N/A this way..
only have to loosen 2 nut/bolts on each side, one is the ecentric (the sway bar is attached to the other end of it... loosen the 2, turn the eccentric and tighten everything back up!
http://www.924.org/techsection/Suspe...reparation.htm
also
http://www.clarks-garage.com/shop-manual/susp-06.htm
And this one has on car pictures...
https://www.paragon-products.com/kb_results.asp?ID=56
01-28-2011, 09:12 AM
#4
Three Wheelin'
Thread Starter
Join Date: Jan 2010
Location: Durham Region/GTA East, Canada
Posts: 1,380
Likes: 0
Received 1 Like
on
1 Post
Thanks! The first link is where I got the instructions from, and that is also the diagram I had found. The pics where spot on. I checked the second link as well. Now I have an idea of what I'm looking at. I hope mine is just indexed high so I have room to lower it!! 
01-28-2011, 10:24 AM
#5
Nordschleife Master
Good luck!
01-28-2011, 08:42 PM
#6
I did this adjustment a couple years ago.I got almost 3/4" out of it. But I have to say, the bolts you have to loosen for ride height adjustment are "extremely" tight. I tried electric impact wrench, heat, long breaker bar. Nothing would loosen them. I had to Dremel a split in the nuts, then replace them with new ones. Make sure you get both sides set at the same height.
Trending Topics
10-15-2011, 05:34 PM
#9
Track Day
Join Date: Jul 2011
Location: Bradenton, FL
Posts: 16
Likes: 0
Received 0 Likes
on
0 Posts
Okay, having some problems here.....
I raised the car and have loosened both the pivot and eccentric 24mm nuts. The trailing arm immediately dropped (good). But trying to turn the eccentric nut is not working. I can barely turn it maybe 10-20 degrees. But the trailing arm doesn't go up or down any further. I tried jacking up the wheel and maybe releasing the pressure on it but that didn't do anything either. What exactly does turning the eccentric nut do? It doesn't seem to be mounted to anything. I can tighten everything up in the current configuration and the nut lies flat against the trailing arm in the back. But I'm loathe to lower the car yet.
I raised the car and have loosened both the pivot and eccentric 24mm nuts. The trailing arm immediately dropped (good). But trying to turn the eccentric nut is not working. I can barely turn it maybe 10-20 degrees. But the trailing arm doesn't go up or down any further. I tried jacking up the wheel and maybe releasing the pressure on it but that didn't do anything either. What exactly does turning the eccentric nut do? It doesn't seem to be mounted to anything. I can tighten everything up in the current configuration and the nut lies flat against the trailing arm in the back. But I'm loathe to lower the car yet.
10-15-2011, 06:02 PM
#10
Nordschleife Master
I normally take that eccentric nut/bolt completely off. Once it's off you can see exactly what it does. Set it back in with the "beefy" part on the top or bottom depending if you want to raise or lower. It's one of those things that when you see it removed you will have an ah-ah moment.
10-15-2011, 06:22 PM
#11
If my eccentric bolt is rusted to the blade how would you go about getting it off? Cut and grind and replace it with a new one?
To measure I learned that you can but a level on the door sill
To measure I learned that you can but a level on the door sill
10-15-2011, 06:26 PM
#12
Track Day
Join Date: Jul 2011
Location: Bradenton, FL
Posts: 16
Likes: 0
Received 0 Likes
on
0 Posts
Magk944: I'm trying to sen picture but no luck here. The bolt is "pinched" between the two plates. I tried to use the floor jack to raise the pivot plate but there's not enough purchase and it slips off. I can tighten the bolt as is but I don't know if that puts undue stress on the bolt. But forget about turning it while its pinched.
10-15-2011, 06:43 PM
#13
Nordschleife Master
Take the nut off completely, support the wheel with a jack or some blocks and hit that nut from the threaded end with a soft faced hammer. If it doesn't come out hit it with a bigger hammer.
Once the eccentric bolt is off you can raise or lower the plate position using a jack on your wheel, find where you want your height to be and re-insert the eccentric. It's a fiddle but it does go in, clean it up and grease it before you try.
Once the eccentric bolt is off you can raise or lower the plate position using a jack on your wheel, find where you want your height to be and re-insert the eccentric. It's a fiddle but it does go in, clean it up and grease it before you try.
10-15-2011, 06:52 PM
#14
Track Day
Join Date: Jul 2011
Location: Bradenton, FL
Posts: 16
Likes: 0
Received 0 Likes
on
0 Posts
The wheel is not supported now and looks like the wheel needs to go down actually to relieve the pinch. Despite what the instructions said, should I be disconnecting the sway bar and/or rear shock mount? The rubber mallet trick already failed.