rear wing/spoiler remove? questions
 12-06-2008, 09:54 AM
#1
Rennlist Member
Thread Starter
Hey guys,
well, yesterday, i started to remove the rear wing...
id like to know if there is any special tool to remove the little "spacers" that hold the bolts of the side trim...
i used a flat screwdriver and an hammer, its hard and you have no room... your tricks?
also, i stripped the 2 left side Countersunk-head screw where you have the lock pins
this part: 999.219.011.07
Countersunk-head screw (New, 4 recommended)
i started to drill but its getting worse lollll
any help would be appreciated,
also do you replace them with the same ones or i can put another type, ....
thx
 12-06-2008, 10:05 AM
#2
Addic
Rennlist Member
Rennlist Member
if im thinking of the same spacers, im pretty sure i just pry'd them. i also stripped the CS screws and had to drill them, i would still get another CS screw, but only spend .40 at the hardware store to match up the threads
without a pic i cant be 100% im thinking of the same thing. But i took it apart with minmal tools when i "parted out" my hatch when i bought a replacement. so i didnt re-assemble
without a pic i cant be 100% im thinking of the same thing. But i took it apart with minmal tools when i "parted out" my hatch when i bought a replacement. so i didnt re-assemble
12-06-2008, 10:11 AM
#3
Rennlist Member
Thread Starter
im going with a 968 wing, so i assume i dont need these little spacers anymore...
you just pry them??? with a flat screwdriver?
the 2 cs screw hold the lock pins peace.... thats the one i stripped
you just pry them??? with a flat screwdriver?
the 2 cs screw hold the lock pins peace.... thats the one i stripped
12-06-2008, 10:25 AM
#6
Addic
Rennlist Member
Rennlist Member
ok, i misunderstood you.
but heres the tools, i picked up mine at autozone or about the same price
http://www.wescotools.com/p-2632-tri...-set-4-pc.aspx
but heres the tools, i picked up mine at autozone or about the same price
http://www.wescotools.com/p-2632-tri...-set-4-pc.aspx
12-06-2008, 10:56 AM
#7
Addict
Rennlist Member
Rennlist Member
Join Date: Apr 2002
Location: St. Louis
Posts: 1,176
Likes: 0
Received 0 Likes
on
0 Posts
I had to drill out about 4 of the CS screws. A time consuming job. I also had to make a screwdriver with the center cut out to take off the screws on the sides.
Trending Topics
12-06-2008, 11:07 AM
#8
When you install the side covers for 968/late S2 wing you need a special tool to tighten the special screws Porsche used. The tool is the modified screwdriver, 2. from left:
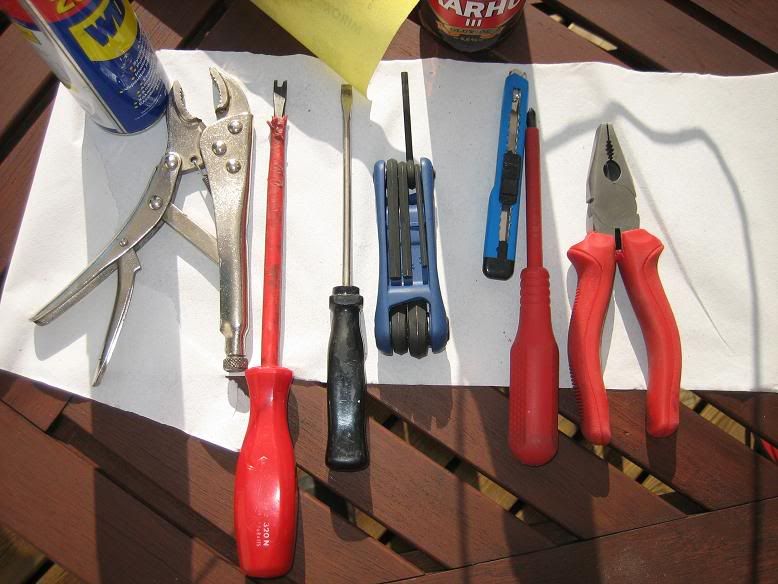
(Other vital accessories can be seen partly in the top of the picture)...
(Other vital accessories can be seen partly in the top of the picture)...
12-06-2008, 11:20 AM
#9
Rennlist Member
Thread Starter
can you buy this modified tool, or i better make one myself?
so far i was about to remove half of the special screws, but damn all around the screws it looks really bad
so far i was about to remove half of the special screws, but damn all around the screws it looks really bad
12-06-2008, 11:35 AM
#10
Rainman
Rennlist Member
Rennlist Member
that should be a easy tool to make, get a spare screwdriver (probably #2), use a sharpie to mark how far apart the holes are, and get a grinder in between. shouldnt take more than 15 minutes in all.
if by 'looks really bad around the screws' you mean lots of scratches from prying, just paint it
if by 'looks really bad around the screws' you mean lots of scratches from prying, just paint it
12-06-2008, 11:40 AM
#11
Rennlist Member
Thread Starter
that should be a easy tool to make, get a spare screwdriver (probably #2), use a sharpie to mark how far apart the holes are, and get a grinder in between. shouldnt take more than 15 minutes in all.
if by 'looks really bad around the screws' you mean lots of scratches from prying, just paint it
if by 'looks really bad around the screws' you mean lots of scratches from prying, just paint it
I will give some paint touches
yes i will make one!!!
12-06-2008, 11:51 AM
#13
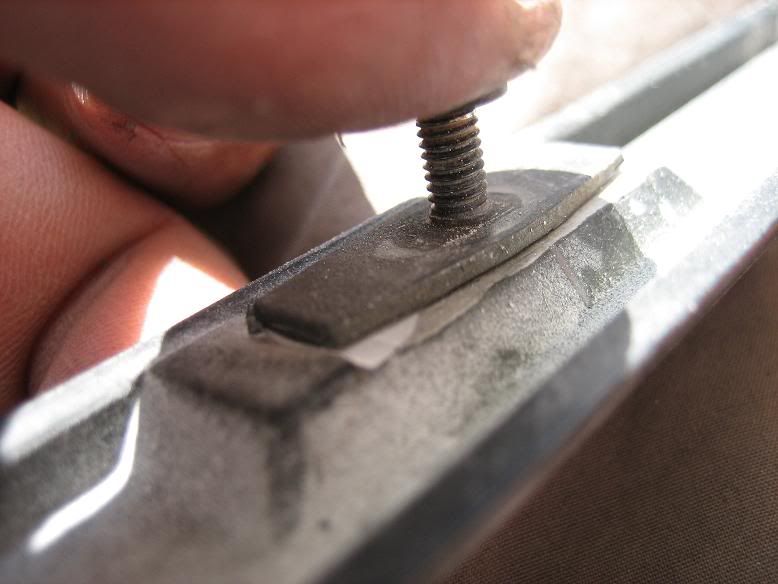
All right, just remember that the original mounting of the holders for the 'special screws' is a bit twisted... Even with the glue and all there is a gap and that is where they break loose:
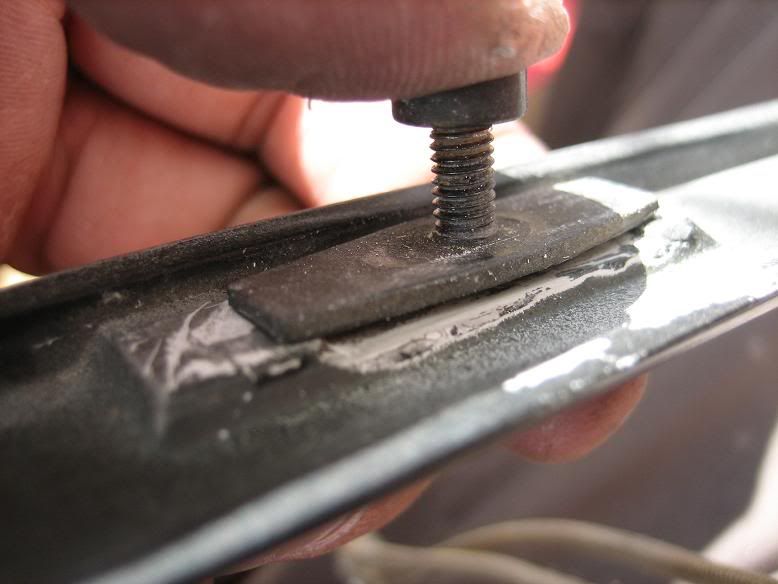
This is fixed by sanding out the edges so there is full surface for the glue when you mount them back:
I knew it was good idea to photograph the work when I did that for my red...
TIP:Paint the wing with Guards Red (your color, I suppose?) - it looks stunning compared to the black one (which also is much better than the ugly rubber one..)