how the frick.... ball joint clip removal
 03-11-2008, 09:32 PM
#1
Drifting
Thread Starter
Join Date: Jul 2002
Location: kenosha WI
Posts: 3,227
Likes: 0
Received 0 Likes
on
0 Posts
I cant seem to figure out how to remove the C clip that holds the ball join in the control arm. Last time i tried to do this i ended up destroying the arm completely. so now i have nice new ones and i dont want to do it again.
 03-11-2008, 09:53 PM
#2
Track Day

Join Date: Jan 2007
Location: Pensacola, FL
Posts: 23
Likes: 0
Received 0 Likes
on
0 Posts
You can look here http://www.rennbay.com/info_pages.php?pages_id=13 Rennbay has a detailed instruction. I use a mechanic pick and a small screwdriver. Clamp the A arm into a vice to hod it because it does take some pressure. Wedge the pick behind one end of the clip and compress the clip far enough to get the small screwdriver behind the clip. Start working the screwdriver to further compress the clip and use the pick to pull the end of the clip above the clip groove. it is like taking out any normal c-clip. Just take your time.
03-11-2008, 10:13 PM
#3
Nordschleife Master
Ive rebuilt four sets and tried a few different methods. I tried compressing the plate with two sockets as standoffs in a vice and working it out with a pick. Takes a long time to do it this way, hit or miss really..usually its miss. The other method was using a dremel to cut the clip in half. You need to be careful you do not damage the pocket however. Risky, but worked well.
The last two times, i drilled one very small hole in the aluminum surrounding the clip and used a pick to pull it out. Most simple method ive done so far. After putting the joint back together, i fill the hole i drilled with a small patch of JBWeld.
The last two times, i drilled one very small hole in the aluminum surrounding the clip and used a pick to pull it out. Most simple method ive done so far. After putting the joint back together, i fill the hole i drilled with a small patch of JBWeld.
03-11-2008, 10:17 PM
#4
Drifting
Thread Starter
Join Date: Jul 2002
Location: kenosha WI
Posts: 3,227
Likes: 0
Received 0 Likes
on
0 Posts
your last idea is sort of what i was thinking of trying. the rennbay instructions mention it also.
im just going to make a small hole above the ring that i can stick a screwdriver in and pry it out.
im just going to make a small hole above the ring that i can stick a screwdriver in and pry it out.
03-11-2008, 11:17 PM
#7
Track Day
Join Date: Jan 2007
Location: Pensacola, FL
Posts: 23
Likes: 0
Received 0 Likes
on
0 Posts
The steel cover plate is spring loaded against the clip. Like was already mentioned you need to hold the arm in a vice. If you use a socked against the steel cover plate in a vice you can compress the spring slightly and give yourself a little extra room to use the pick and screwdriver. once you master the first one, the second one will take about 25% of the time. After having done several it takes about 15 minutes to rebuild the entire ball joint. The first one took me a couple hours and i did shed blood from the pick.
Good luck
Good luck
Trending Topics
03-12-2008, 12:56 AM
#11
Racer
I tried for about 15 mins with a pick and screwdriver, gave up and cut a small dent in the pocket with a dremel.
With the new hole, it only took 10 seconds to get the clip out.
With the new hole, it only took 10 seconds to get the clip out.
03-12-2008, 01:46 AM
#12
Burning Brakes
Join Date: Apr 2007
Location: NYC
Posts: 784
Likes: 0
Received 0 Likes
on
0 Posts
I just did this, first ball joint I got pissed and cut a groove beside the clip, second time I just compressed it with a balljoint clamp from Autozone, came out sooo easily.
03-12-2008, 02:04 AM
#13
Drifting
Thread Starter
Join Date: Jul 2002
Location: kenosha WI
Posts: 3,227
Likes: 0
Received 0 Likes
on
0 Posts
yep, after making a little hole next to the clip i got them out in about 10 seconds. super easy. and now i have one of them completely back toeather nice and tight.
but now i have run into a problem. when i took the second arm apart... i noticed that a couple things were different. the bushings on the inside were not similar at all.... I dont knwo how i missed this but someone actually drilled and tapped a new zerk fitting on the outside of the ball joint housing. heres a pic
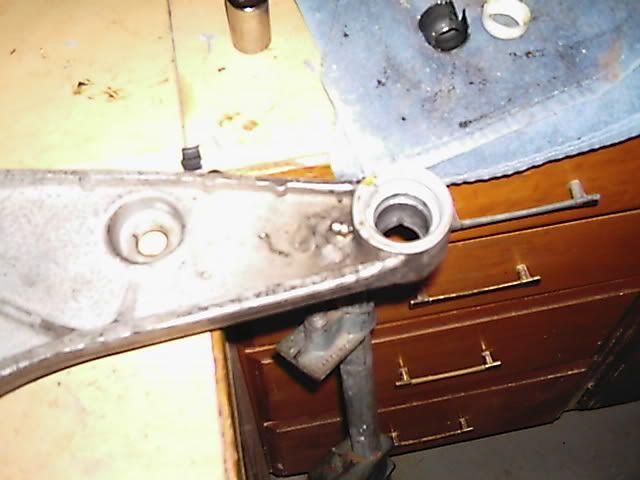
on top of that, there is a metal sleeve pressed into the pocket that can not be removed and the bushings that i have do not fit inside that metal sleeve... So yeah im not sure what im going to do. but im pretty sure i cant use this control arm.
I might need to buy yet ANOTHER one..
but now i have run into a problem. when i took the second arm apart... i noticed that a couple things were different. the bushings on the inside were not similar at all.... I dont knwo how i missed this but someone actually drilled and tapped a new zerk fitting on the outside of the ball joint housing. heres a pic
on top of that, there is a metal sleeve pressed into the pocket that can not be removed and the bushings that i have do not fit inside that metal sleeve... So yeah im not sure what im going to do. but im pretty sure i cant use this control arm.
I might need to buy yet ANOTHER one..
03-12-2008, 10:53 AM
#14
Nordschleife Master
I came across one like that also and was not able to rebuild it.. i was able to get the metal sleeve out, though the pocket was bored out to accept it.
03-12-2008, 11:19 AM
#15
Site Sponsor
Lifetime Rennlist
Member
Lifetime Rennlist
Member
Join Date: Aug 2002
Location: A great big building in the woods, FL.
Posts: 6,527
Likes: 0
Received 4 Likes
on
3 Posts
Someone, once upon a time, was rebuilding arms using the ball joints from the early steel arms. It would require that a metal sleeve be pushed up into the aluminum to take up the extra room. I have run into that once before. Sometimes they are machined a little to accept the sleeve and others just had it pressed in. I would suggest taking it out and then looking at the pocket. You may be able to save her yet.