944Online / KLA fiberglass 968 replica spoiler mounted


 10-11-2007, 08:10 AM
#17
Race Director
(I'll answer from my experience with the same product)
1. Closing the hatch is no different than before, all you do is press on the glass to close it in the center above the bridge spoiler. That's the same place I always pushed anyway, I never pressed down on the old rubber spoiler.
2. The factory key key still works just fine with the trim pieces in place. In fact, that's the only way I have to get my hatch open as I deleted the power release hardware long ago, and then deleted the 968CS style manual release I had in it after that when I determined that I never used it.
10-11-2007, 08:34 AM
#18
Nordschleife Master
Thread Starter
Just as Tifo said, you can close the hatch anyway you want. The spoiler is very sturdy. My friend has the same exact fiberglass spoiler on his car which we are currently working on..and the car had no hatch shocks on it for a few months. We routinely raised and lowered the hatch holding just the spoiler..no problems at all. I use the same method i always did, i lower the hatch until the pins touch the carriers, then i press down with both hands right over the hatch pins. I cringe when i see people close there hatch with one hand on the side of the spoiler..seeing the hatch frame flex, especially with new (stronger) hatch shocks probably contributes to the delaminating glass problems.
The key fits fine with the trim piece. My only complaint is the center trim piece has provisions for the screws to mount to, but i am guessing they glassed right over the clips. I am going to carefully drill out each hole and hopefully i 'find' the clips to screw into. Otherwise this is going to get the double sided trim tape treatment . The electric release in my car works but the hatch hardly every releases correctly. I usually end up having to use the key anyhow...or have someone lightly pull up on the hatch as i hit the release. A pain in the neck when i have something in the back i need to get, car is running and i cant open the hatch. Its either climb through the roll bar or shut off the car!
If i get home early enough tomorrow and the weather isnt horrible i am going to try and get the trim pieces mounted. I will take plenty of pictures of everything once its together.
Now i just need to find a adjustable 968 Turbo S spoiler for the 951...
The key fits fine with the trim piece. My only complaint is the center trim piece has provisions for the screws to mount to, but i am guessing they glassed right over the clips. I am going to carefully drill out each hole and hopefully i 'find' the clips to screw into. Otherwise this is going to get the double sided trim tape treatment
. The electric release in my car works but the hatch hardly every releases correctly. I usually end up having to use the key anyhow...or have someone lightly pull up on the hatch as i hit the release. A pain in the neck when i have something in the back i need to get, car is running and i cant open the hatch. Its either climb through the roll bar or shut off the car!If i get home early enough tomorrow and the weather isnt horrible i am going to try and get the trim pieces mounted. I will take plenty of pictures of everything once its together.
Now i just need to find a adjustable 968 Turbo S spoiler for the 951...
10-11-2007, 08:50 AM
#19
Race Director
Here, for future reference, are the original installation instructions (pics are long gone though).
http://web.archive.org/web/200402050...structions.asp
http://web.archive.org/web/200402160...tructions.html
944 Racing Sport Wing Installation Instructions
Preface
Congratulations on your purchase of the 944 Racing Sport Wing. The Sport Wing is designed to look and install like a factory part. However, the factory never made this style of wing to fit the older 944 based cars. Our 944 Racing Sport Wing is designed to be used on all 924/931/924S/944/944S/S2/Turbo models that were equipped with a factory wing. Earlier 924 models need to source a used later style hatch with the mounting holes. The installation can be completed without the removal of the hatch assembly.
The Sport Wing comes with a grey lacquer primer finish that must be painted. With all painted surfaces, some amount of preparation is necessary. We do not recommend a type of paint or a particular procedure. It is up to you or your selected paint professional to establish the best method and type of finish to use. I use a professional paint shop.
It is necessary to have two people install the wing. Pick your helper carefully. You may loose a friend or spouse if he/she drops your new wing. The main wing is too cumbersome for one person to install. Also, the main wing is installed under some tension by the fasteners. It takes an average of two to three hours for installation by trained professionals. It may take longer depending on your tools and skill level. It took me four.
Hardware
The included corrosion resistant hardware is as follows:
(4) Flat washers
(2) Tapered head machine fasteners 4M-25-0.7
(2) Pan head machine fasteners 4M-25-0.7
(4) Hex nuts 0.7
(4) Lock washers
(5) Phillips screw 10 x ?
(2) Pop rivets ?
(12) Split nuts 0.7
1. The existing rear spoiler must be removed prior to installation of the new wing. The rubber 944 style spoiler that is shown is the most common style. All other styles of spoilers should mount in the same way. There are 12 split nuts that must be removed which hold the trim pieces to the hatch frame on both sides. The split nuts must be removed from the bottom of the hatch frame with a split nut spanner. (Keep the split nuts. They will be reused in the new Wing) There are two Phillips head machine screws that also need to be removed from the hatch trim pieces. The hatch trim can now be removed from the frame. The 2 latch posts must be removed from the hatch frame by removing the 4 12-point fasteners from their respective mounts. After removal of the mounting posts, all 7 of the Phillips head machine screws that attach the main wing should be visible from the bottom of the hatch frame. Removal of the 7 Phillips head machine screws can be difficult due to corrosion of the fasteners. It may be necessary to drill some of the screws out. The old fasteners will not be re-used to install the new Sport Wing. The old main wing can now be removed. At this time, clean the hatch glass of dirt and debris from under the old wing.
2. Have your carefully selected assistant hold the new main wing assembly in place while you install the first two fasteners. Insert the tapered head machine fasteners (item B), through the front mounting holes located on each side of the main wing, and attach them to the hatch frame with the hex nuts (item D). The supplied flat washer (item A) must be installed on the tapered head side of the fastener, not the nut side. The nut must be located on the bottom of the hatch frame to clear the trim molding that will be installed later. Do not tighten the nuts at this time. It may take some pressure on the main wing to align the fasteners with the mounting holes in the hatch frame. It will take two people. This is normal. The tension will help with the rigidity of the assembly once it has been tightened to the hatch frame.
3. Insert the 2 pan head machine fasteners (item C) through the hatch assembly into the rear holes on the main wing assembly. The washer (item A) is placed on the nut end of the fastener with the pan head end through the hatch frame. The hex nut (item D) is installed through the opening in the side of the main wing assembly. This is best done using needle nose pliers as shown in the illustration.
Tighten all four of the machine fasteners that hold the main wing assembly to the hatch frame. Start with the front two, then tighten the rear two. Stop for a short break while admiring the hard work that you have accomplished.
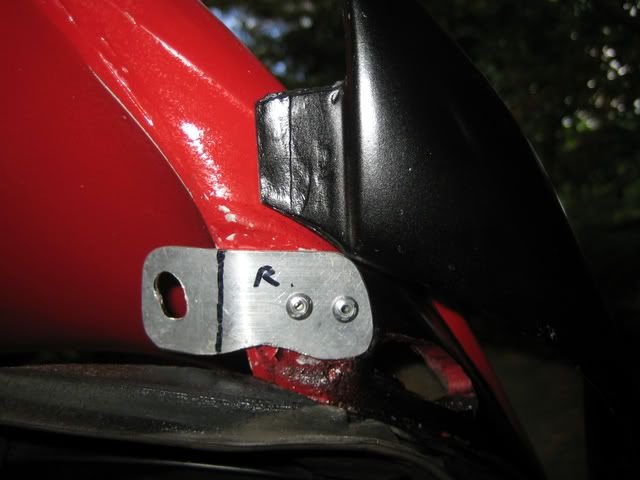
4. Install the side trim molding to the hatch frame. The 4mm studs that are attached to the side trim molding should align with and will be inserted through the mounting holes in the hatch frame. The rear tab of the side trim molding should align with the metal bracket that is attached to the under side of the main wing assembly. Install the 6 split nuts (item H) starting with the front of the hatch working towards the rear of the hatch. Do not over tighten the split nuts. Over tightening of the split nuts can cause the studs to detach from the side trim molding. The process is the same for the right or left side.
5. It is common to have a ?? to ?? gap between the side trim molding and the main wing where they meet. The factory wing has a similar gap. Once the side trim molding is aligned to your satisfaction, it is now necessary to locate and drill the hole for the pop-rivet mount. This is where the side trim molding meets the metal bracket on the underside of the main wing assembly. The hole in the metal bracket is slotted to allow some adjustment. Mark your location and drill a suitable size hole to accept a ?? pop-rivet. Be careful not to damage the finish of the wing while drilling. Insert the supplied pop-rivet (item G) into the freshly drilled hole and through the metal bracket. Use a pop-rivet tool to tighten the rivet. Repeat the process for both the right & left sides.
6. It is now time to locate and drill the mounting holes for the center trim panel under the main wing assembly. The center trim panel slides over and covers the tabs that you riveted in section 5. Have your assistant hold the center trim panel in place while you mark the location of the mounting holes with a scribe or a drill bit. Once all five mounting holes have been marked, remove the center trim panel and take it to a safe place to drill the holes. Use a 1/8? drill bit to drill a ?? deep hole through the spots that you have marked. There are metal tabs inside of the screw mounts that you must drill through. Be careful not to drill completely through the trim assembly. At this time, you can re-use your factory rubber gasket that was previously removed from your old factory wing assembly. If you decide to use the gasket, we recommend the use of some RTV or spray adhesive to hold the gasket in place until you finish attaching the center trim panel. After you have completed the drilling, install the center trim panel in its proper location. Use the supplied (5) Phillips screws (item F) and tighten the center trim assembly. Do not over tighten the screws.
7. Now, wipe the fingerprints off of your now completed project and pat yourself and your assistant on the back. You can admire the improved beauty of your most cherished possession every day. (Your spouse / significant other is not a possession, so they will not be jealous)
10-11-2007, 08:57 AM
#20
Nordschleife Master
Thread Starter
I still dont really get where those metal brackets go. Happen to have any pictures of that Tifo?
"3. Insert the 2 pan head machine fasteners (item C) through the hatch assembly into the rear holes on the main wing assembly. The washer (item A) is placed on the nut end of the fastener with the pan head end through the hatch frame. The hex nut (item D) is installed through the opening in the side of the main wing assembly. This is best done using needle nose pliers as shown in the illustration."
This part was a major pain in the butt. I cant tell you how many times i dropped the nut and it fell into the black hole of the inside of the spoiler...i thought i was clever using a magnetic pickup tool to fish it out..to my dismay i realized the nuts were stainless steel and non magnetic.......
10-11-2007, 09:10 AM
#22
Nordschleife Master
Thread Starter
There are two metal brackets that came with the wings hardware baggie. Funny because i have two of these replica spoilers kits. One came with the brackets and one did not. I think i am supposed to rivet them to the underside of the wing so it holds the side trim pieces close. Im not 100% sure though. Ill figure it out this weekend.
10-11-2007, 09:14 AM
#23
Race Director
There are two metal brackets that came with the wings hardware baggie. Funny because i have two of these replica spoilers kits. One came with the brackets and one did not. I think i am supposed to rivet them to the underside of the wing so it holds the side trim pieces close. Im not 100% sure though. Ill figure it out this weekend.
OHHHHHHHHHHHHHHHHHHHHHHHHHHHH.
I remember now. That's correct. They are gold-colored and they sort of have a slight twist-bend to them, right? These are the brackets that the trim piece slides over and then you drill thru the trim piece and the bracket to fit it and bolt the trim piece to the bracket. I think they came already attached to my wing.
10-11-2007, 09:16 AM
#24
Race Director
It's described in #4:
"The rear tab of the side trim molding should align with the metal bracket that is attached to the under side of the main wing assembly. "
And you can just make it out in this small photo:

"The rear tab of the side trim molding should align with the metal bracket that is attached to the under side of the main wing assembly. "
And you can just make it out in this small photo:
10-11-2007, 10:46 AM
#25
Nordschleife Master
Thread Starter
It makes sense now, the brackets werent pre-bent or anything so i had no idea where they went. Looks like i am going to have to buy a rivet gun now.
As usual, thanks for the info Jeremy!
As usual, thanks for the info Jeremy!
10-14-2007, 08:59 PM
#26
Nordschleife Master
Thread Starter
I spent about three hours today and finished fitting the trim pieces. It was easier than expected. I did mount the center trim piece but was unable to use the 5 provided screws. as the raised portions molded onto the trim did not line up perfectly with the holes in the hatch. I tried heavy duty double sided tape to secure it but was still not satisfied with studyness. I mean it was very secure when i pulled it off, but something about a very hard obtain trim piece flying off my car on the expressway.... Tomorrow i am going to try and redrill the holes in the trim and if necessary relocate the raised portions to fit better and hopefully use atleast two of the screws to secure it. As long as its screwed in on both sides i have no qualms about securing the rest with the trim tape.
There are the two brackets i was previously unsure of there location. They require a bit of tweaking to fit the shape of the wing and trim pieces.
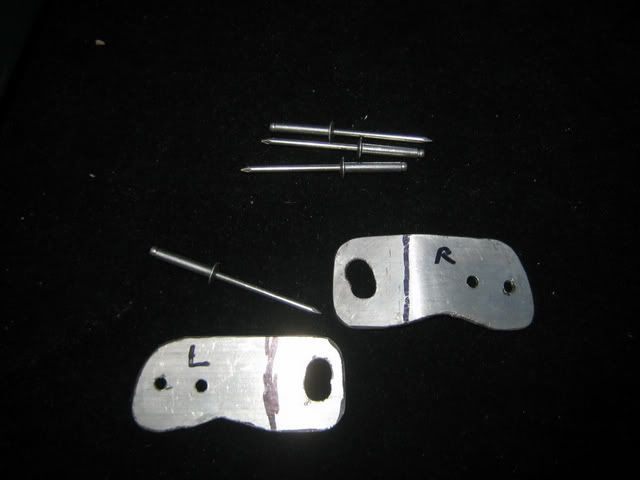
I used rivets to secure the brackets to the spoiler..amazingly i found my fathers old rivet gun in the basement two nights ago . This was my first time ever using pop rivets and gotta say i really like them. I am going to have to find things on my car to rivet now..
You can see the brackets need to be bent very slightly, maybe 30-40 degrees in order to fit the contour of the trim piece.
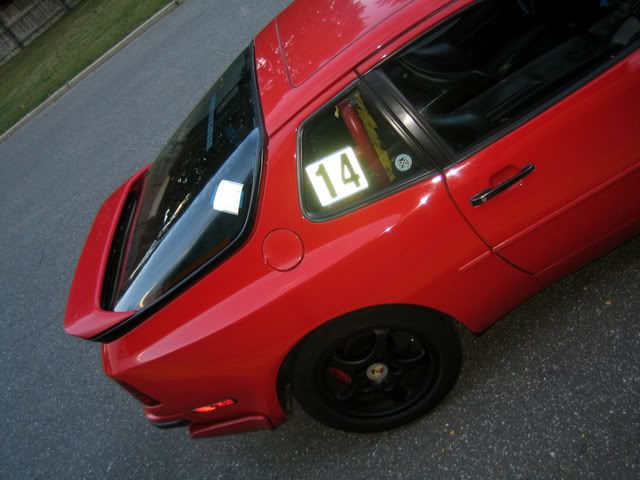
Anyways, the fit is good, not perfect but i guess thats to be expected with fiberglass parts. The worse 'fit' area is where the trim pieces cover the actual wing. There is a bit of a gap but from what i see on factory 968 wings they have this same gap. Just not as big. Its not a huge eyesore and infact you wouldnt even really notice it unless bending over and at eye level staring straight on.
The hardest part of the project was by far mounting the actual spoiler portion. The trim pieces i thought were going to be the toughest and require the most time, but they were infact very easy to do.
Here are some finished product pictures..
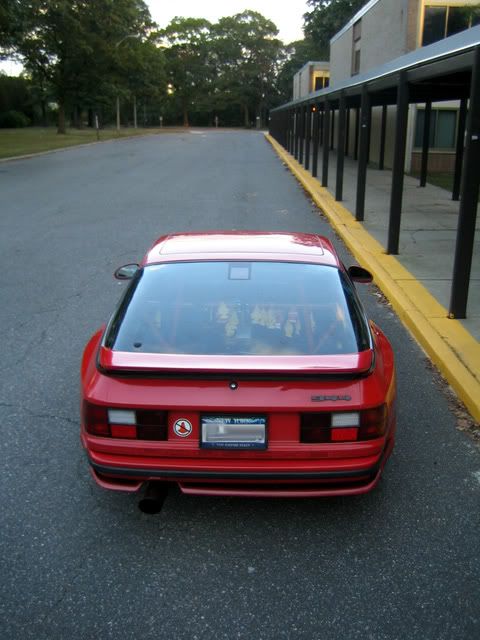

I took this picture of my car back in March of 2006..

Here is my car now a year and a half later..

There are the two brackets i was previously unsure of there location. They require a bit of tweaking to fit the shape of the wing and trim pieces.
I used rivets to secure the brackets to the spoiler..amazingly i found my fathers old rivet gun in the basement two nights ago
. This was my first time ever using pop rivets and gotta say i really like them. I am going to have to find things on my car to rivet now.. You can see the brackets need to be bent very slightly, maybe 30-40 degrees in order to fit the contour of the trim piece.
Anyways, the fit is good, not perfect but i guess thats to be expected with fiberglass parts. The worse 'fit' area is where the trim pieces cover the actual wing. There is a bit of a gap but from what i see on factory 968 wings they have this same gap. Just not as big. Its not a huge eyesore and infact you wouldnt even really notice it unless bending over and at eye level staring straight on.
The hardest part of the project was by far mounting the actual spoiler portion. The trim pieces i thought were going to be the toughest and require the most time, but they were infact very easy to do.
Here are some finished product pictures..
I took this picture of my car back in March of 2006..
Here is my car now a year and a half later..
10-15-2007, 01:28 AM
#29
Nordschleife Master
Thread Starter
The wheels are C2 5-spokes. The set on the car are 16x7 and 16x8. Tires are nothing special, Falken ZE512 all seasons. The older picture from a year ago ive got a bald set of Yokohama A008P's on.
Ive got another set for track use, all are 16x8's with v710's.
Ive got another set for track use, all are 16x8's with v710's.
10-15-2007, 01:32 AM
#30
Pro
Join Date: Apr 2005
Location: Toronto, Ontario
Posts: 683
Likes: 0
Received 0 Likes
on
0 Posts
I like them in both black and gold in your car, and was considering both for mine... either those or gold 17" sport classics from the boxster (I think) but I'm not sure I want 17s.
What tyre size?
What tyre size?