
Belts, water pump, and front seals on an 85.5 944

 05-07-2007, 10:02 PM
#17
Three Wheelin'
Thread Starter
Today's update. Actually, iits yesterday's. Today I re-sealed my throttle body.
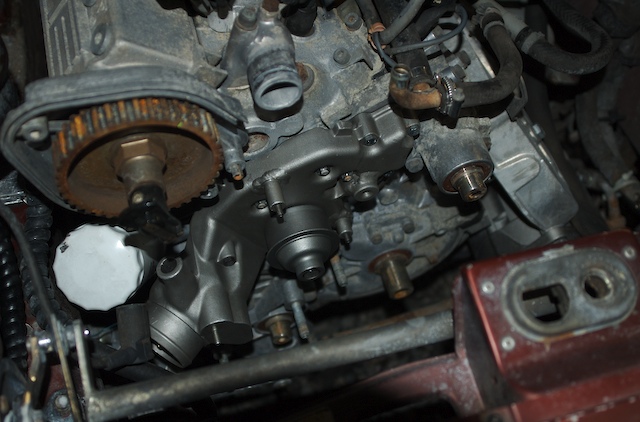
So, here we go...things are relatively clean, and I put on the new waterpump with some shiny new bolts. Wow...6 ft.lbs isn't much. I guess that's why there so many freaking bolts. Anyway, clark to the rescue again on this one. Good procedure write-up: http://www.clarks-garage.com/shop-manual/cool-07.htm
Back belt cover back on again:

Now I've put on the timing belt rollers and the upper balance shaft roller. The timing belt went on as in the procedure at Clark's (http://www.clarks-garage.com/shop-manual/eng-06.htm). It's a little tough to get it on, but once you figure out how it slips in, it's easy. Yet another one of those jobs that's so much easier after the first time.

And here's the 9020x attached. I thought I was leaking power steering fluid but it's turned out OK, its just blood.

When I first tried to use the 920X with the calibration bar the bottom of the tool was hitting the rear belt cover. Turns out that's because I had the belt way too loose. Then I tried it looser and it worked. Great. Made my calculations and the tool bottomed out to the top before I got it where it was supposed to be. So now I started in the middle, and it worked great. Another "much easier next time" thing. I took off the tool and the safety bar and roller to try the "twist method" and that seemed to confirm that I'm at least somewhere close on tension. I guess I'll find out soon enough.
I still need to figure out if I am missing something behind the cam drive gear on the crankshaft (see post #14) before I go any further. If someone can help out, great. If not, I'm just going to tear it back down and see what's back there and put some more pictures up.
That's it for now.
So, here we go...things are relatively clean, and I put on the new waterpump with some shiny new bolts. Wow...6 ft.lbs isn't much. I guess that's why there so many freaking bolts. Anyway, clark to the rescue again on this one. Good procedure write-up: http://www.clarks-garage.com/shop-manual/cool-07.htm
Back belt cover back on again:
Now I've put on the timing belt rollers and the upper balance shaft roller. The timing belt went on as in the procedure at Clark's (http://www.clarks-garage.com/shop-manual/eng-06.htm). It's a little tough to get it on, but once you figure out how it slips in, it's easy. Yet another one of those jobs that's so much easier after the first time.
And here's the 9020x attached. I thought I was leaking power steering fluid but it's turned out OK, its just blood.
When I first tried to use the 920X with the calibration bar the bottom of the tool was hitting the rear belt cover. Turns out that's because I had the belt way too loose. Then I tried it looser and it worked. Great. Made my calculations and the tool bottomed out to the top before I got it where it was supposed to be. So now I started in the middle, and it worked great. Another "much easier next time" thing. I took off the tool and the safety bar and roller to try the "twist method" and that seemed to confirm that I'm at least somewhere close on tension. I guess I'll find out soon enough.
I still need to figure out if I am missing something behind the cam drive gear on the crankshaft (see post #14) before I go any further. If someone can help out, great. If not, I'm just going to tear it back down and see what's back there and put some more pictures up.
That's it for now.
05-08-2007, 09:00 AM
#19
Three Wheelin'
Thread Starter
Originally Posted by hpservertech
Is that an early style pump?
05-08-2007, 05:54 PM
#20
Rennlist Member
Daryl, good thread for us newbies  Thanks for posting up! I started doing this Sunday afternoon, decided to stop (ran out of time after getting stuck on a bolt) and will try again this weekend. You're right, it'll definitely go faster next time around.
I found that rather than following Clark's procedure exactly, it'll be easier next time around to remove the airbox first, pull the distributor cap, remove the fans, and then set TDC. And rather than removing some wire in the AFM, I just removed the bottom of the airbox, left the top in the car (removed the J boot and other hose)
In the first pic, you can see the bolts (outlined in yellow) sticking out that the separator bar fits on - that's how you can tell it's a new style water pump:
Thanks for posting up! I started doing this Sunday afternoon, decided to stop (ran out of time after getting stuck on a bolt) and will try again this weekend. You're right, it'll definitely go faster next time around. I found that rather than following Clark's procedure exactly, it'll be easier next time around to remove the airbox first, pull the distributor cap, remove the fans, and then set TDC. And rather than removing some wire in the AFM, I just removed the bottom of the airbox, left the top in the car (removed the J boot and other hose)
Originally Posted by hpservertech
Is that an early style pump?
05-08-2007, 08:05 PM
#21
Three Wheelin'
Thread Starter
Originally Posted by alordofchaos
Daryl, good thread for us newbies
...rather than removing some wire in the AFM, I just removed the bottom of the airbox, left the top in the car...
05-08-2007, 09:14 PM
#23
Three Wheelin'
Thread Starter
If Clark or anyone who has access to update the site is on here, feel free to use them. Credit goes to "Puddles, the power steering fluid leaking 944".
05-11-2007, 04:58 PM
#24
Three Wheelin'
Thread Starter
Proper update with pictures coming soon, but I'm done with the job now, and all appears to be well.
Too nice of a day to not be out driving.
Too nice of a day to not be out driving.
12-30-2008, 11:29 PM
#25
Rennlist Member
Join Date: Jul 2001
Location: Brisbane, Australia (Formerly: Sunnyvale, CA)
Posts: 2,120
Likes: 0
Received 4 Likes
on
4 Posts
-Continuing on, I go through Clark's on how to remove the belts: http://www.clarks-garage.com/shop-manual/eng-05.htm
OK...so here's where we talk about #9. Remove the crank shaft bolt. Sound easy, right? Sure.
So anyway...back to that bolt DON'T TRY IT WITH A 12-POINT SOCKET. IT'S A STUPID THING TO DO. REMEMBER:
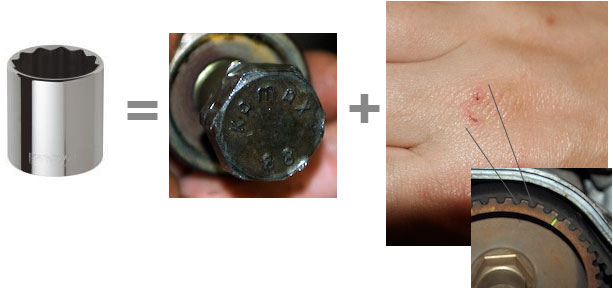
OK...so here's where we talk about #9. Remove the crank shaft bolt. Sound easy, right? Sure.
So anyway...back to that bolt DON'T TRY IT WITH A 12-POINT SOCKET. IT'S A STUPID THING TO DO. REMEMBER:
12-31-2008, 10:06 AM
#27
Drifting
Join Date: Jan 2008
Location: Suburban DC
Posts: 2,641
Likes: 0
Received 0 Likes
on
0 Posts
I'm glad to see the second bloody picture. The first one was truly disappointing. I get bloodier than that when I torque my wheel bolts!
Kudos on the effort. I don't have the courage to tackle something like that. I can't wait for someone to start posting actual videos of these procedures. The pics and the text are great, but they don't replace actually seeing the job in progress.
Last question- how much of the front end (if any) do you remove? In the Audi world, the cars are made so that the whole nose comes off pretty easily so you end up with the front of the engine fully exposed.
12-31-2008, 10:07 AM
#28
Three Wheelin'
Thread Starter
12-31-2008, 10:08 AM
#29
Three Wheelin'
Thread Starter
12-31-2008, 10:08 AM
#30
Three Wheelin'
Thread Starter
I did just fine and had plenty of clearance with the fans and radiator out. Nothing else seemed necessary.