Headlight alignment troubles. (lots of pictures)
 12-11-2005, 02:19 PM
#1
Nordschleife Master
Thread Starter
Well i had some time to work on my car yesterday morning, we were able to straighten out the radiator support and get all the sheet metal straigtened out. We ran out of time (alot of other work needed to get done at the shop) and decided to get back to this on a day when we have more time. My friends father put the car on the frame machine, no damage at all happily.. He told me it was a Christmas present and didnt charge me anything  .
.
To my suprise the headlights still work fine, no binding or anything. However the alignment of the headlight when it retracts is off, no suprise considering thats where all the damage went to. Heres a barrage of questions i have...
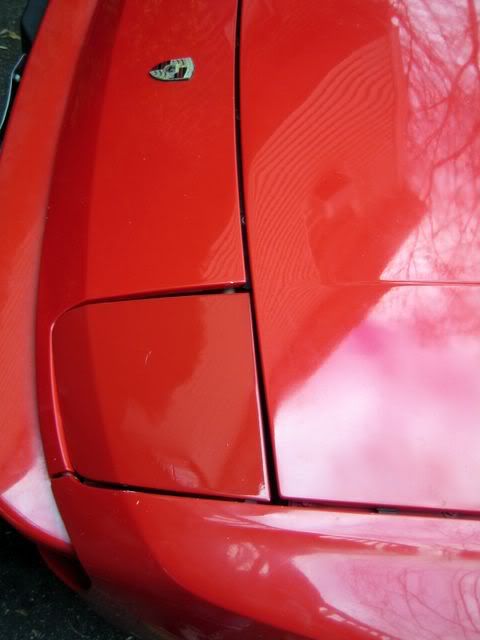
1. Can anyone see if the bracket which holds the drivers side of the headlight linkage (its black and is held onto the frame via two bolts) looks similar in alignment to my drivers side? The bolts on this side sit right in the center of the bracket, however on the passenger side they sit flush against the front of the bracket. Hard to explain, please refer to the pictures below. It may not be the same for both cars...but i was thinking if i moved the drivers side bracket all the way back, that might fix the gap issues with the headlight cover possibly...
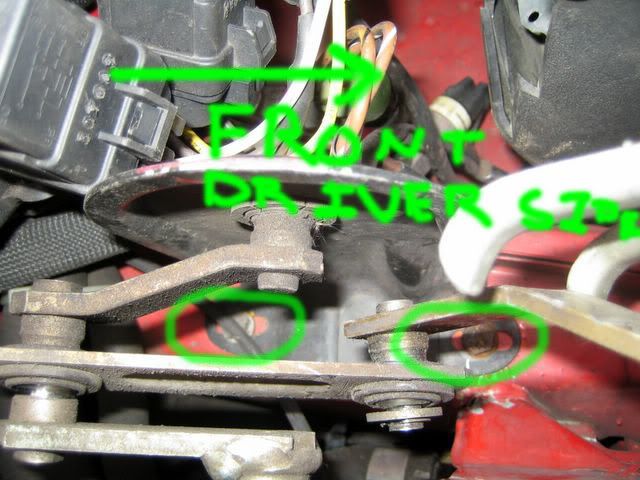

2. Also, how do you go about aligning the headlight assembly, are these the three bolts on each side that you need to loosen? Do these bolts only allow for side to side adjustment, or do you get front to back adjustment with these also? And i assume you can only reach half of these from inside the fender?
---
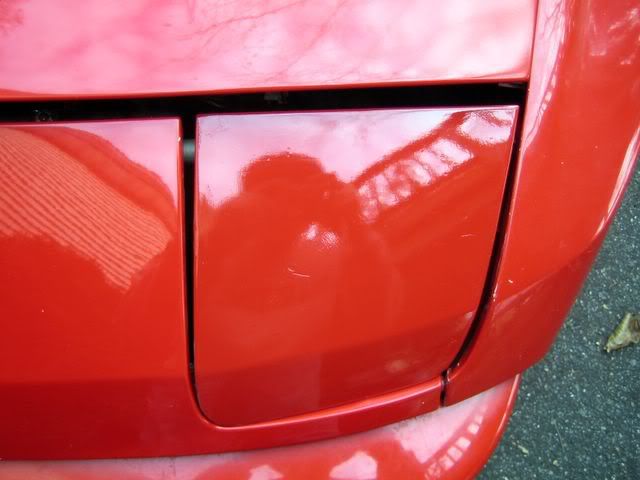
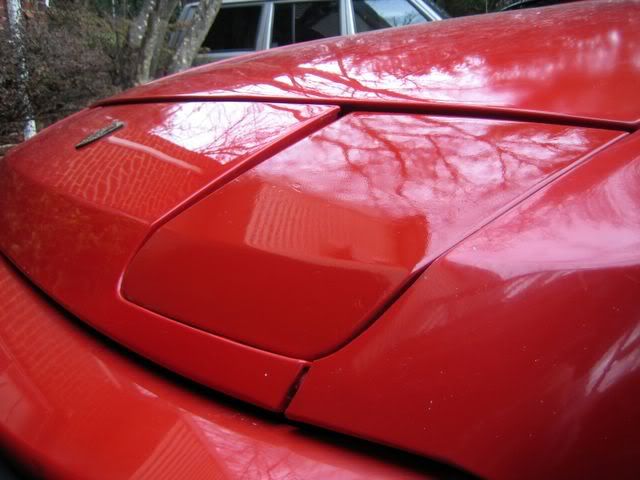
Here are a few pictures of what everything looks like with the nose job. As you can see the main issues i need to work on are the header panel sitting a bit lower on the passenger side and the gaps of the drivers side headlight assembly does not line up with everything else. Disregard the shoddy paintwork on the drivers headlight cover, that was done quickly by spraying over the old paint with a can of Krylon and some clear coat. I plan to drop off the headlight covers and the other 924 Turbo vented nose i have all at the same time for paint sometime in the next few weeks.
. To my suprise the headlights still work fine, no binding or anything. However the alignment of the headlight when it retracts is off, no suprise considering thats where all the damage went to. Heres a barrage of questions i have...
1. Can anyone see if the bracket which holds the drivers side of the headlight linkage (its black and is held onto the frame via two bolts) looks similar in alignment to my drivers side? The bolts on this side sit right in the center of the bracket, however on the passenger side they sit flush against the front of the bracket. Hard to explain, please refer to the pictures below. It may not be the same for both cars...but i was thinking if i moved the drivers side bracket all the way back, that might fix the gap issues with the headlight cover possibly...
2. Also, how do you go about aligning the headlight assembly, are these the three bolts on each side that you need to loosen? Do these bolts only allow for side to side adjustment, or do you get front to back adjustment with these also? And i assume you can only reach half of these from inside the fender?
---
Here are a few pictures of what everything looks like with the nose job. As you can see the main issues i need to work on are the header panel sitting a bit lower on the passenger side and the gaps of the drivers side headlight assembly does not line up with everything else. Disregard the shoddy paintwork on the drivers headlight cover, that was done quickly by spraying over the old paint with a can of Krylon and some clear coat. I plan to drop off the headlight covers and the other 924 Turbo vented nose i have all at the same time for paint sometime in the next few weeks.
 12-11-2005, 10:37 PM
#2
RL Community Team
Rennlist Member
Rennlist Member
BUMP
Sorry Jon, I'm not of much help here, but I will be watching this with interest as I will have to reassemble mine eventually.
Here's what little I do know:
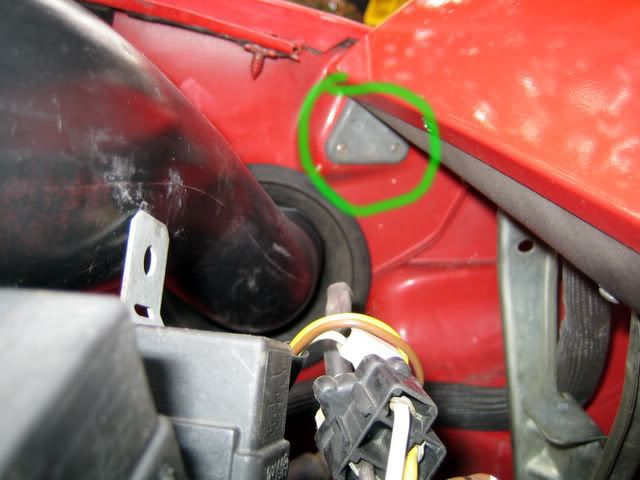
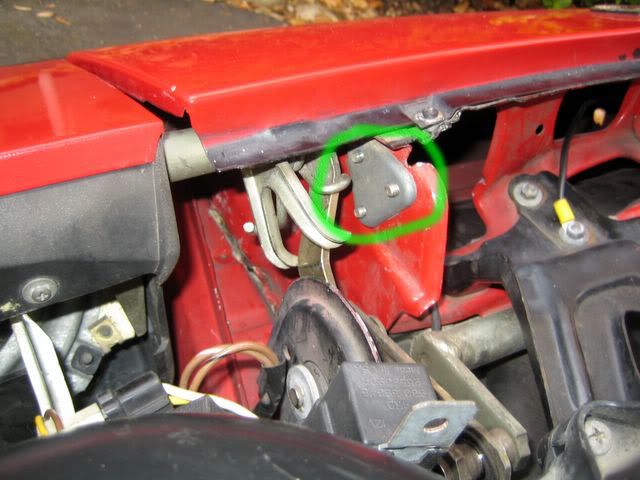
1) Those pivot brackets (3rd and 4th pic) have a lot of adjustment in them. I believe this will be the main area of adjustment.
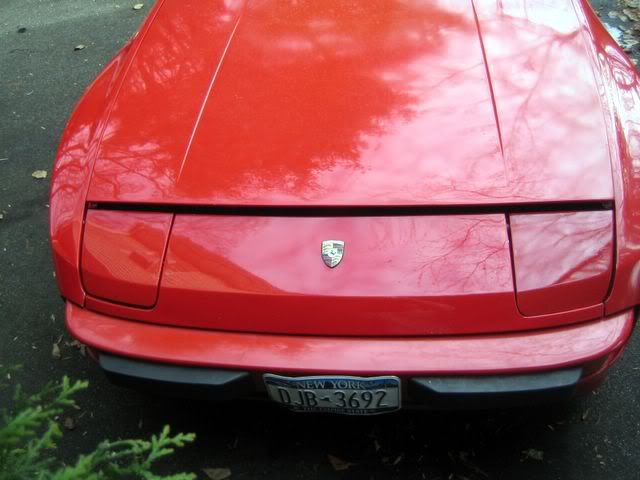
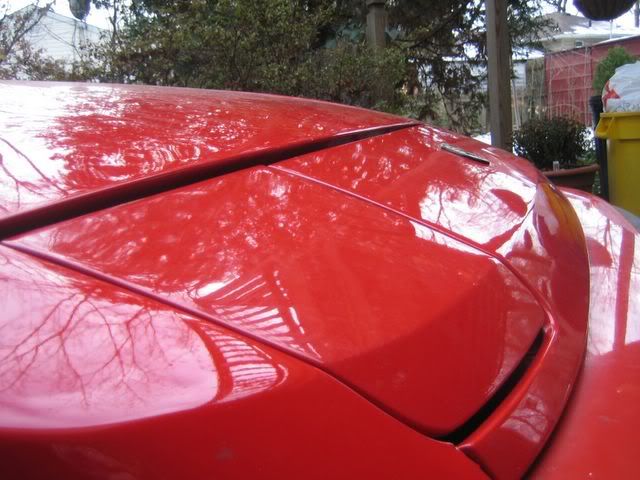
2) It looks like the hood is a little high all the way across. Is this due to the latch being tweaked?
3) In picture 6, there looks to be almost no room between the side of the hood and the fender. Is this just an optical illusion created by the hood being raised up?
I wish I could be more help, but I will watch this thread, and keep thinking. Also, if you need any more detail pics of how the sheet metal is set up on my car, just let me know.
Thanks
Sorry Jon, I'm not of much help here, but I will be watching this with interest as I will have to reassemble mine eventually.
Here's what little I do know:
1) Those pivot brackets (3rd and 4th pic) have a lot of adjustment in them. I believe this will be the main area of adjustment.
2) It looks like the hood is a little high all the way across. Is this due to the latch being tweaked?
3) In picture 6, there looks to be almost no room between the side of the hood and the fender. Is this just an optical illusion created by the hood being raised up?
I wish I could be more help, but I will watch this thread, and keep thinking. Also, if you need any more detail pics of how the sheet metal is set up on my car, just let me know.
Thanks
12-11-2005, 11:25 PM
#3
Addict
Rennlist Member
Rennlist Member

The bolt positioning on your driver's side looks like the positioning on the passenger side of my car. On my driver's side, the bracket is pushed almost all the way forward.
Just my random thoughts, but I would tend to think the bracket adjustment would alter the 'tilt' of the headlights in the down position.
Just my random thoughts, but I would tend to think the bracket adjustment would alter the 'tilt' of the headlights in the down position.
12-12-2005, 12:14 AM
#4
Nordschleife Master
Thread Starter
Austin, i figured the same thing now that i looked at the linkage a little bit more indepth. Thanks for letting me know however.
Allan, the hood height appears to be slightly to high on the passenger side in relation to the passenger side headlight. It was like this even before the accident, as i have a feeling this car was involved in front end collision prior to my ownership as i have seen evidence of fiberglass repair on the front valance. But the height of the hood seems a little bit more off than before. The clearance with the fender is just an illusion, i had the hood popped in that picture. The header panel defenetley sits to high up on the drivers side, ill have to figure out how to perhaps push the radiator support down a bit or something.
Looks like ill have to keep fiddling with those headlight pivot bolts, hopefully i can get enough extensions and universal flex heads to reach those without having to take the fender liner out...
12-12-2005, 11:34 AM
#5
Resistance is Futile
Lifetime Rennlist
Member
Lifetime Rennlist
Member
Hey Duck, when you fix yours come fix mine as well. Mine lines up fine but won't F!@#(*G open all the way. I have lots of spare parts for this setup if you need any PM me and I will see what's around. Also, it could be a shot pivot bushing on the driver's side outer... see PET diagram for location...
75ohm.
75ohm.
12-12-2005, 12:22 PM
#6
Burning Brakes
Join Date: Nov 2003
Location: The Colony, TX
Posts: 1,059
Likes: 0
Received 0 Likes
on
0 Posts
75ohm, not to get OT here but there is an adjustment bolt on the silver triangular piece on the rear of the bucket. It has a rubber piece on the end of it and comes in contact with the front of the car.
Techno duck, on both my 951 and my NA car they have shims in between the triangulat bracket and the mounting point. It looks like that is how you addjust side to side and getting it square in the hole, if that makes since? It also looks like you have the IceShark light kit installed. You might want to screw the relays to the fender well somewhere to keep them out of the way of your headlight bucket and from just bouncing around.
Techno duck, on both my 951 and my NA car they have shims in between the triangulat bracket and the mounting point. It looks like that is how you addjust side to side and getting it square in the hole, if that makes since? It also looks like you have the IceShark light kit installed. You might want to screw the relays to the fender well somewhere to keep them out of the way of your headlight bucket and from just bouncing around.
Trending Topics
12-12-2005, 01:48 PM
#8
Nordschleife Master
Thread Starter
75ohm, i hate body work and hope to never have to deal with this stuff again! I dont think i would do this again if someone paid me!
35th, can you take a picture of those shims or perhaps point them out in the pictures i have? When staring at the headlight bucket head on, i think all i need to do is just move the headlight's right side back while keeping the left side where it is. I think that should fix the gaps and everything. Im just not to sure how to go about doing that. I will be taking the car down on thursday probably to my fathers place again. Its to damn cold to work out in the driveway. I read a few older threads, a few people mentioned those pivot points with the three bolts adjust the fore and aft movement, however they arent really specfic...they just sorta 'hint' at it.
And now that i looked at the hood lines briefly last night, i dont think the height of the header panel is off, i actually just think the hood sits to high on the passenger side.
And indeed i do have Iceshark's headlights on my car. I cant find a decent play to secure those relays really, the airbox snorkle takes up a ton of space. Ive had them sorta sticking up inbetween there for the last 20k miles and havent had any issues...ill probably just leave them like that.
Body work is the devil! Especially these damn headlights!
35th, can you take a picture of those shims or perhaps point them out in the pictures i have? When staring at the headlight bucket head on, i think all i need to do is just move the headlight's right side back while keeping the left side where it is. I think that should fix the gaps and everything. Im just not to sure how to go about doing that. I will be taking the car down on thursday probably to my fathers place again. Its to damn cold to work out in the driveway. I read a few older threads, a few people mentioned those pivot points with the three bolts adjust the fore and aft movement, however they arent really specfic...they just sorta 'hint' at it.
And now that i looked at the hood lines briefly last night, i dont think the height of the header panel is off, i actually just think the hood sits to high on the passenger side.
And indeed i do have Iceshark's headlights on my car. I cant find a decent play to secure those relays really, the airbox snorkle takes up a ton of space. Ive had them sorta sticking up inbetween there for the last 20k miles and havent had any issues...ill probably just leave them like that
.Body work is the devil! Especially these damn headlights!
Last edited by Techno Duck; 12-12-2005 at 02:03 PM.
12-12-2005, 03:47 PM
#9
RL Community Team
Rennlist Member
Rennlist Member
Jon,
I have a picture from when I removed my headlight pictures. Three shims (roughly triangular shaped, with two open ended slots) are shown here, as well as the pivot bushing (black plastic plug) which sits in the end of the headlight bracket and rides on the pivot pin.
Hope this helps a little.
BTW, the shims were all but invisible until I removed the assembly.
05-26-2011, 05:50 PM
#10
Nordschleife Master
I dug up this thread from the RL of ancient times!!
I'm going through this right now. Aligning the headlight linkage is a PITFA!!!
The problem I am having is that I can pull up the lights about 1/2 way, without any resistance. I can't figure out if the spring is clocked wrong, or if I have the linkage in wrong.
Any ideas?
I'm going through this right now. Aligning the headlight linkage is a PITFA!!!
The problem I am having is that I can pull up the lights about 1/2 way, without any resistance. I can't figure out if the spring is clocked wrong, or if I have the linkage in wrong.
Any ideas?
Last edited by m73m95; 05-26-2011 at 07:07 PM.
05-26-2011, 11:39 PM
#11
Rennlist Member
05-27-2011, 12:08 AM
#12
Nordschleife Master
Ahh, I missed that pic! Good catch.
Just one headlight at a time moves. There is no spring tension (or even contact) on the the headlight "fork" when my lights are down. I'll have to study more closely!
Just one headlight at a time moves. There is no spring tension (or even contact) on the the headlight "fork" when my lights are down. I'll have to study more closely!
05-27-2011, 08:52 PM
#13
Rennlist Member

Someone nailed it above.... order up a dozen or so of the shims from Porsche. Most cars left the factory with some sort of shims. The hood/headlight/fender/front panel alignment on these cars require a ton of time and patience.