
How to Wire the Airbag to get rid of the Light?
 03-28-2005, 10:10 PM
#31
Advanced

Join Date: Oct 2004
Location: Naples, Florida U.S.A.
Posts: 95
Likes: 0
Received 0 Likes
on
0 Posts
Okay 9fitty1 and Robby: Here is a good pic (courtesy of eBay) of where the horn contact mounts to the multi function switch. I'm ordering the horn contact from AutoAtlanta tonight and will solve this; once and for all when I get the part in to work with; I hope?! 

 03-29-2005, 02:10 AM
#32
Rocket Scientist
Rennlist Member
Rennlist Member
Thread Starter
Yes! Thank you. That is the piece I bought. But it does not fit into my multi function switch because mine is an 87. So I need to buy an late or early model one. Great pic though. I also had to modify my black trim piece to make that fit, lol. But its all good now. Thanks
03-29-2005, 10:05 AM
#33
Addict
Rennlist Member
Rennlist Member

Join Date: Jun 2001
Posts: 3,953
Likes: 0
Received 0 Likes
on
0 Posts
Can one just drill a hole there to FIT that piece into? I have the same piece.... It's just that this pic does not show the hour-glass shaped hole that it fits into, b/c it is actually mounted into it.... can a new hole be drilled, or, does it need to connect to something in the hole... also, that surprises me that na 87 does not have the hole... the 88 turbo S does not either,.... maybe it's 89's & up that do....? Anyway, thanks for all the help here guys.... glad this thread was posted.... I feel I'm a tiny bit closer to having a working horn again....
03-29-2005, 03:16 PM
#34
Rocket Scientist
Rennlist Member
Rennlist Member
Thread Starter
Yes it is 89 + i have heard. But someone here on this thread or on some write up said they drilled a hole, I am not comfortable with my drilling skills enough to do that, lol.
03-29-2005, 11:16 PM
#35
Addict
Rennlist Member
Rennlist Member
Join Date: Jun 2001
Posts: 3,953
Likes: 0
Received 0 Likes
on
0 Posts
Originally Posted by 9fitty1
Yes it is 89 + i have heard. But someone here on this thread or on some write up said they drilled a hole, I am not comfortable with my drilling skills enough to do that, lol.
 I SWEAR this is WAY too much effort for what should be such a simple thing....
 03-30-2005, 04:12 PM
#36
Advanced
Join Date: Oct 2004
Location: Naples, Florida U.S.A.
Posts: 95
Likes: 0
Received 0 Likes
on
0 Posts
I believe that the 'hourglass' opening is at 1 o' clock in relation to the steering column; please review the following pic; although I think that the opening is actually shaped like this: =O= so Robby, your part would fit correctly.
Now, your 'brass' pin would take up residence in the multifunction switch wiring connector as explained as follows: (courtesy 944S2.com)
"...On the non airbag setup the horn wire harness terminates at pin 71 at the back of the multi-function switch. The new horn contact has this new pin (your 'brass' pin Robby) and the existing connector has the provision for it... you just need to find a method to splice in the existing horn wire. I was able to purchase the proper female crimp socket at my local Porsche dealer from their stock of miscellaneous electrical parts. I cut the existing horn wire at the "car side" of the horn connector in the rotary contact harness, and terminated it in this socket, which then clipped into the existing connector holder."
Then, just make certain that your pin seats into this socket and the horn; properly grounded; should work. Hope this helps
Last edited by runnin' on empty; 03-30-2005 at 11:24 PM. Reason: correct language
03-30-2005, 11:24 PM
#37
Addict
Rennlist Member
Rennlist Member
Join Date: Jun 2001
Posts: 3,953
Likes: 0
Received 0 Likes
on
0 Posts
Allright, I'm almost there- who's picture is this? I had one that looked VERY similar a year or two ago that came from Tom IIRC- is this your car, or, did you get that picture elsewhere? I remember Tom sending me one that showed the hour glass cut-out, but, it was kind of bright, so, I couldn't really see it- this is why I'm wondering....
I'm really lost when we start talking about sockets & splicing- the "existing horn wire" etc.... I'm wondering why the rotary is still in here in this photo to begin with- mine is in my closet.... so, IF you get your's working in the near future Troy, would you take a pic or two while your'e in there? I'm afraid to pull anything else in my car apart now- I've got the glove box out & at this point, it looks like it'll be a year or so before I get it back together- the passenger AB was more of a PITA than I thought & I'm more confused now than before, so I hate to pull the wheel- I HAVE to have it in to drive the damn thing- the other prob is the spacer configuration I now have- the extra 5mm spacer w/the Momo 15mm is a PITFA b/c of the short bolts that came w/the 15mm one.... removing & reinstalling that thing is too much to do too many times IMO...
Oh yeah... MY prob is that my car does not have that hole, so, I'm wondering if drilling a new one would work.....?
thanks a lot for all your help thus far.... IF my meachanic werent such an *******, I'd take it to him & just pay him to do it....
03-30-2005, 11:46 PM
#38
Advanced
Join Date: Oct 2004
Location: Naples, Florida U.S.A.
Posts: 95
Likes: 0
Received 0 Likes
on
0 Posts
Yes, you will have to drill a hole in the multifunction switch at the 1 o'clock position. When I do the install I will write down measurements (i.e. hole size [drill bit to use], size of 'slots' at sides of hole, and position of hole [x & y coordinates with the starting point being the center of the steering column]. I will try to get some digital pics to post as well.
I just 'borrowed' the best pic I found to show the position of the hole and its shape.
Hopefully this weekend will see the successful completion of his saga...Troy
I just 'borrowed' the best pic I found to show the position of the hole and its shape.
Hopefully this weekend will see the successful completion of his saga...Troy
04-05-2005, 04:09 PM
#40
Advanced
Join Date: Oct 2004
Location: Naples, Florida U.S.A.
Posts: 95
Likes: 0
Received 0 Likes
on
0 Posts
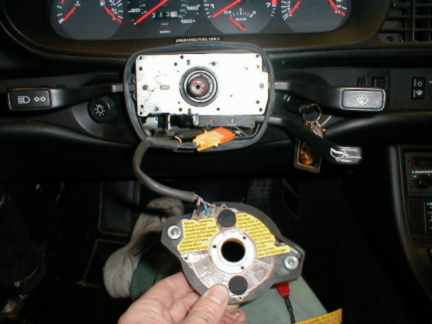
Okay this picture shows the =O= 'horn contact hole' located at the 1 o' clock position in relation to the steering column.

This picture is of the =O= 'horn contact hole' with the following dimensions:
the hole "O" is 1/4" or approx. 7 mm in diameter (use a 1/4" drill), the slot "=" on each side of the hole are 2 mm by 2 mm; lastly using the center of the steering column as a starting point: the center of the 'horn contact hole' is located 20 mm to the right and 10 mm down from the top of the metal plate that is the front of the multifunction switch. This is also 50 mm left of the right edge of the metal plate that is the front of the multifunction switch.

Lastly, this is a picture of the 'horn contact' (p/n 964.652.104.00) in place on the multifunction switch; it just presses and locks into place. The 'brass pin' fits into socket number 71 as described earlier in this thread.
On my car, I had to have the multifunction switch adjusted nearly all the way towards the dash so that it made contact, but does not flatten the horn contact as warned about earlier in this thread. Glad this is done

This picture is of the =O= 'horn contact hole' with the following dimensions:
the hole "O" is 1/4" or approx. 7 mm in diameter (use a 1/4" drill), the slot "=" on each side of the hole are 2 mm by 2 mm; lastly using the center of the steering column as a starting point: the center of the 'horn contact hole' is located 20 mm to the right and 10 mm down from the top of the metal plate that is the front of the multifunction switch. This is also 50 mm left of the right edge of the metal plate that is the front of the multifunction switch.
Lastly, this is a picture of the 'horn contact' (p/n 964.652.104.00) in place on the multifunction switch; it just presses and locks into place. The 'brass pin' fits into socket number 71 as described earlier in this thread.
On my car, I had to have the multifunction switch adjusted nearly all the way towards the dash so that it made contact, but does not flatten the horn contact as warned about earlier in this thread. Glad this is done
Last edited by runnin' on empty; 04-05-2005 at 04:57 PM. Reason: add text without timing out
05-29-2005, 12:54 AM
#44
Burning Brakes
Join Date: Sep 2002
Location: Encinitas, CA "Surf Capital of the World"
Posts: 950
Likes: 0
Received 0 Likes
on
0 Posts
In my conversion the same part was used. Ordered exactly what 944S2.com speced from a local Porsche dealer. It's a common part as it's also used in other models. Took two days to get. and $7.56.
05-30-2005, 04:01 AM
#45
Pro

Join Date: Mar 2005
Location: Fort Worth, TX
Posts: 639
Likes: 0
Received 0 Likes
on
0 Posts
I pulled my switch plate and drilled through from the back at the hole for pin 71. I cut off the little clips on the back of the 928 part stuck the pin in and glued it in place since the hole I drilled didn't have the side slots. Got a 22 guage plug connector from Radio Shack and bent it in a little to fit and now I have a working horn. Next project is fixing the self cancel on the turn signals, PO jacked that up too.
Thanks everyone for posting pics and advice, I never would have figured this out otherwise.
Thanks everyone for posting pics and advice, I never would have figured this out otherwise.