When you click on links to various merchants on this site and make a purchase, this can result in this site earning a commission. Affiliate programs and affiliations include, but are not limited to, the eBay Partner Network.
Hi guys... another issue on my car I need to tick off the list.
I have read a lot about the rear glass hatch delaminating from the frame, which mine seems quite ok - no water leaks and even tried to shine light through to see any pinholes
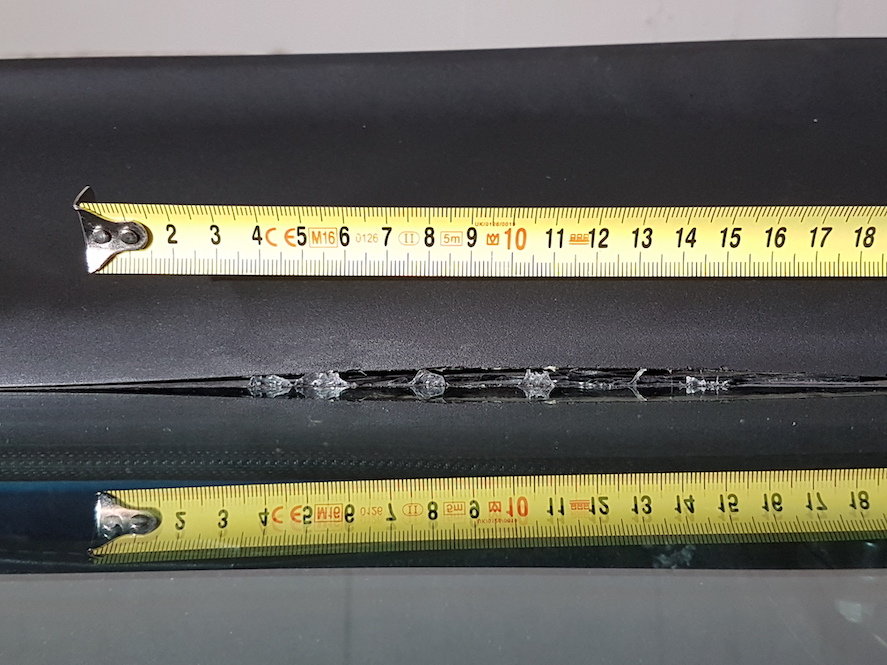
But that is not my concern. Actually I have not found anywhere on the forums information about the 944S2 or similar rear black rubber spoiler lifting off the glass... mine is doing it in one spot only, approx 3mm max gap, 160mm long. It has not lifted completely off where you can see through it, but annoyingly just creates a hole that catches leaves and crap, and water after a wash. In the Summer I tried to clean inside it and glue it down again with a lot of weight, but it just popped up again. Is there any other fix out there before I replace the whole spoiler? (time and cost I am trying to avoid). The only other idea I have had is to clean it out again and fill it with black sikaflex.
Is this the place which one has placed their hand on when closing the hatch glass ?
Maybe not you, but previous owner(s) ?
My suggestion would be to replace it with another good used rear spoiler. They are out there and I have bought several as spares from wrecked cars for as little as 20 bucks.
Then when closing, place both hands directly over the locking pins and press lightly till you hear them click. If properly aligned and fitting correctly, it takes nothing to close and latch with no need for slamming, and possibly separating this from the hatch. My guess is the attaching fasteners have been broken
No, the gap oddly enough is more towards the centre, and not above the locking pins. It could still however be that the previous owner was pressing down more in the centre, but I can't see that any fasteners have broken, as the gap is only at the front of the spoiler where it touches the glass, and the spoiler is still firmly attached at the back along the frame.
I guess I will need to look into a replacement spoiler. Not easy to find though in Sweden... and because of the size, postage from other parts of the EU can become quite costly (more than the spoiler itself).
It seems unlikely to me that the spoiler itself is deformed but more likely that there is debris lodged between it and the glass. I suggest removing (not easy) the spoiler from the hatch first in order to clean the area. Removal should start with soaking the latch pin and phillips head screw attachments with a good penetrant. Good luck.
It seems unlikely to me that the spoiler itself is deformed but more likely that there is debris lodged between it and the glass. I suggest removing (not easy) the spoiler from the hatch first in order to clean the area. Removal should start with soaking the latch pin and phillips head screw attachments with a good penetrant. Good luck.
When I took delivery of the car, and saw this, I used high pressure water to blast out anything that was caught in there. Quite a bit of crap came out, but nothing more that I can see or get out. So for me it appears more like a deformity due to temperatures or something.
ok, so I have to remove the latch pins to remove the spoiler? That would be a pain... currently the pins line up perfectly with the holes and catches, so I really don't want to ruin this :/ Just a question... how do I soak the screws with a good penetrant when it is on the car??? :P
Unfortunately, the design leaves a cavity between the spoiler and glass that can not be completely cleaned without removal of the spoiler. A pressure washer while blasting some stuff out, is likely to blast some stuff in as well. I approach the removal of the spoilers in phases. Step 1, with a hand impact driver and a new #2 bit, strike each screw head while holding the driver in "neutral" position, then strike with the driver in counterclockwise direction. Step 2, apply penetrant to the screws that didn't come loose, both from the bottom at the countersunk head and from the glass side. A thin plastic wedge placed near each screw can open enough space for a spray straw. I use Fluid film for this but any non petroleum based penetrant can do the work without damaging the rubber. Repeat step one. Any screws that strip get heads carefully drilled off. The photo of the underside form of the spoiler should help to illustrate what the conditions are where it meets the glass.
Unfortunately, the design leaves a cavity between the spoiler and glass that can not be completely cleaned without removal of the spoiler. A pressure washer while blasting some stuff out, is likely to blast some stuff in as well. I approach the removal of the spoilers in phases. Step 1, with a hand impact driver and a new #2 bit, strike each screw head while holding the driver in "neutral" position, then strike with the driver in counterclockwise direction. Step 2, apply penetrant to the screws that didn't come loose, both from the bottom at the countersunk head and from the glass side. A thin plastic wedge placed near each screw can open enough space for a spray straw. I use Fluid film for this but any non petroleum based penetrant can do the work without damaging the rubber. Repeat step one. Any screws that strip get heads carefully drilled off. The photo of the underside form of the spoiler should help to illustrate what the conditions are where it meets the glass.
I had no idea the underside looked like that... thanks! and now I see your point. Looking at the screw positions, it appears there is not a screw behind the hatch locking pins, so I don't have to remove them. I am guessing the spoiler is just then held on by the screws and no glue? I am guessing that once the spoiler is removed, I could heat it while being clamped between two pieces of wood, and try to get it back into shape again.
I've looked on-line since I live in Sweden, and the only place I can buy another used spoiler is either from the UK (at great cost) or US (cheap but expensive postage).
You do need to remove the pins as the base gasket conceals two of the spoiler screws. Only the pin length is variable on the hatch side, keep good track of the jamb nut position to be able to return the pins to the current length when re installing. Correct, there are no adhesives or sealants used in the installation. I am still confident you will find a foreign object/s forcing the spoiler out of shape and that it will return to its original shape when allowed.
When I took delivery of the car, and saw this, I used high pressure water to blast out anything that was caught in there. Quite a bit of crap came out, but nothing more that I can see or get out. So for me it appears more like a deformity due to temperatures or something.
ok, so I have to remove the latch pins to remove the spoiler? That would be a pain... currently the pins line up perfectly with the holes and catches, so I really don't want to ruin this :/ Just a question... how do I soak the screws with a good penetrant when it is on the car??? :P
You do have to remove the mounting assembly that the latch pins thread into but the latch pins themselves can remain in that assembly. In fact it may be really hard to get them to move much less come out. Mine were corroded at the top of the rubber coated nut that they screw into. It requires a 6mm triple square bit to remove the mounting assemblies. I recently took my spoiler off to clean out the 29 years of gunk that had built up. While I had everything off I replaced a gasket back there, 944 512 463 00.
Here is the assembly that's held on by the 6mm triple square bolts.
Ok... Cool. I have managed to get all the philips screws loose bar one on far side away from spoiler gap... So maybe I don't have to remove that one to get enough clearance to clean under the spoiler (if it flexes which I assume it does.).
Problem now though is the triple square screws for the pin mount assemblies simply will not turn... Well one turns approx 1/16 rotation and stops dead, & the other will not turn at all I could put more force on it but don't want to break it.
Any ideas?
Have you tried putting the triple sq bit in the screw and then giving it a tap with a hammer?
Have you tried putting the triple sq bit in the screw and then giving it a tap with a hammer?
Tried that today... managed to get one free and it turns, albeit slowly. The other however remains firmly stuck. I don't want to tap it with a hammer any more, otherwise I am afraid of 'shocking' the glass hatch. So short of removing the whole glass hatch to turn upside-down and soak the screw in penetrant, I tried some more force but started to round-off the bolt head

 02-07-2019, 12:25 PM


 I could put more force on it but don't want to break it.