When you click on links to various merchants on this site and make a purchase, this can result in this site earning a commission. Affiliate programs and affiliations include, but are not limited to, the eBay Partner Network.
I've recently completed a timing/balance belt replacement on my '89 S2 and the car is shaking a lot on the test start.
I have two sets of instructions for setting up the balance belt on this car. One says:
a) align the upper balance belt sprocket so the "0" is at roughly the 11 o'clock position.
b) align the lower balance belt sprocket so the "0" is in roughly the 5 o'clock position.
-- I followed the above instructions.
The second set of instructions, from Clark's Garage, says:
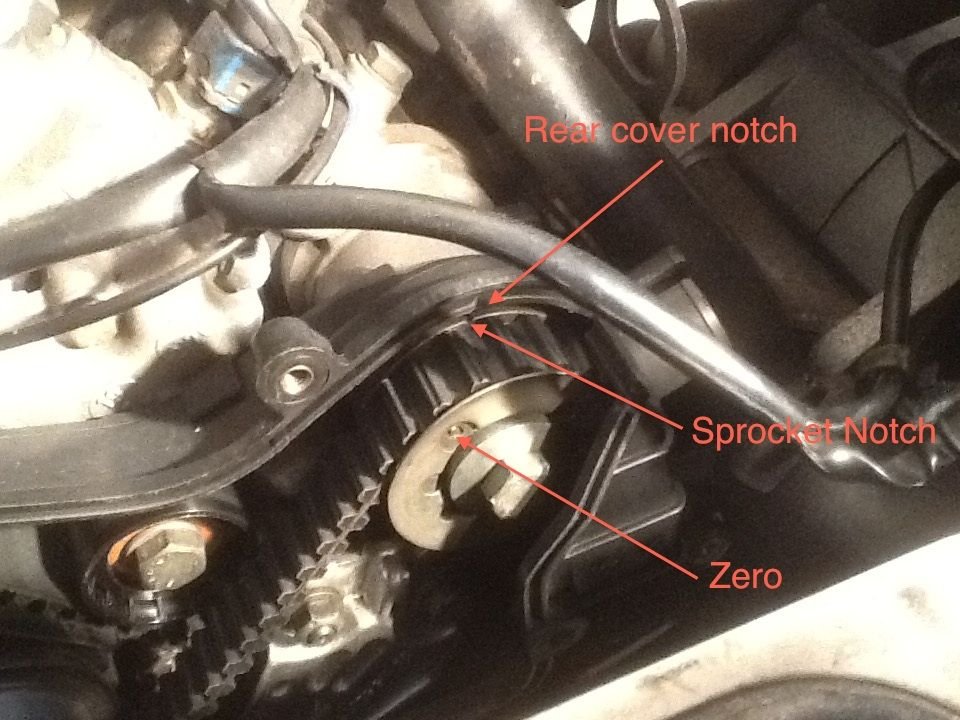
a) Align the upper balance shaft so that the notch on the edge of the sprocket aligns with the notch in the rear timing cover. It is located at approximately the 1 o'clock position.
b) Align the lower balance shaft so that the notch on the edge of the sprocket aligns with the raised tab which is molded into the rear timing cover. It is located at approximately the 7 o'clock position.
-- I didn't use this one.
Note: I was unable to locate any "raised tab" or "notch" on the rear timing cover, other than the notch for the cam belt.
Furthermore, I'm getting a very mild backfire.
Any clarifications would be welcome; first or second alignment procedure for the S2? Backfire? Possible causes?
Thanks,
Scott.
Last edited by Otto Mechanic; 04-29-2018 at 10:34 PM.
After removing the starter, rotating the engine back to TDC and removing the outer (front) belt covers, I was able to find the upper notch in the upper balance belt sprocket along with the notch in the rear cover. They line up within half a tooth with the cam belt at TDC, and in approximately the 11 o'clock position.
So I don't know. The cam seems aligned, the balance belt seems aligned, I have no idea why I'm getting an engine that revs freely to 8000, but the whole chassis vibrates. And I get the occasional cabbage fart from the exhaust. What did I do wrong?
Last edited by Otto Mechanic; 04-25-2018 at 11:04 PM.
the upper 0 should be visible thru a round hole in the front washer. The lower 0 should be visible through a narrow slot in its washer. I bet you have the lower one flipped over. The bs gears have two woodruff slots
the upper 0 should be visible thru a round hole in the front washer. The lower 0 should be visible through a narrow slot in its washer. I bet you have the lower one flipped over. The bs gears have two woodruff slots
I'll check that right away, just need to hoist it up. I can see the top sprocket alignment with the car on the ground but couldn't verify the lower alignment.
I'll check that right away, just need to hoist it up. I can see the top sprocket alignment with the car on the ground but couldn't verify the lower alignment.
Thanks,
Scott.
In case you didn't understand V2, your sprocket could show alignment but the outer sprocket washer needs to be assembled with the sprocket where the circular window shows nothing (as opposed to the top balanced sprocket which will show an "O").
Ober shows "o", not ober (lower) shows nothing or alternatively, the "o" is covered by the washer slit.
I doubt this covers your backfiring problem though.
You won't find what I'm about to say altogether helpful now... but maybe it pays off in the future.
Next time, don't take anything apart until you have first studied and made sure you understand *for yourself* how it all goes together and is supposed to be aligned.
Hell, make your own paint marks and/or take pictures if you need to.
Reading and trying to comprehend someone else's interpretation of how things are supposed to be is a lot more meaningful when you can see the example firsthand.
Do that before you destroy the best evidence you had.
LOL, I used to be able to place 12-15 1/4" checkballs into valve bodies and automatic transmission cases just from memory (was my main trad for 30 years).
The older you get, the longer you stand there trying to remember....LOL again.
I was a 20 year old General Motors Transmission prodigy back in the day and even with that acclaim, I find that I am so much more thorough now than I was when I was young.
When you support a house and family, as a self employed entity, you learn real quick that you don't have time to fail.
Anyways, documenting and taking pics is fine but having the correct manuals goes a long ways.
That said, some people have have all the documentation in the world and stare at text and illustrations and could never explain in their own words how a 4 cycle engine works.
To the OP - the marking is really an "o" (not a zero).
This helps in understanding what the manual means.
The visible "o" stands for the word "ober" which translates to "upper".
This way, you will always remember, the visible "o" goes at the upper balance sprocket.
The "o" is covered by the washer at the bottom which symbolizes the lower balance shaft by "not ober".
T
When the sprockets were removed they were put in separate bags marked "upper" and "lower" to make sure they didn't get confused. In another thread ("Guess the age of this timing belt") the subject is discussed and there are some pictures available. There's a lengthy exchange on the condition of the lower sprocket, which has some mild burring on the outside belt retainer along with some tooth wear. From the photos we concluded the part was re-usable after some polishing, which is good since it's NLA.
It is very interesting to know there's a functional difference between the upper and lower parts, along with knowing the lower is somehow NLA while the upper can still be ordered, since they have the same part number. Very strange.
So I don't think there's been any confusion in the part use. For what it's worth, the subject was carefully researched in advance, all the parts were marked as they were disassembled, and many, many photos were taken.
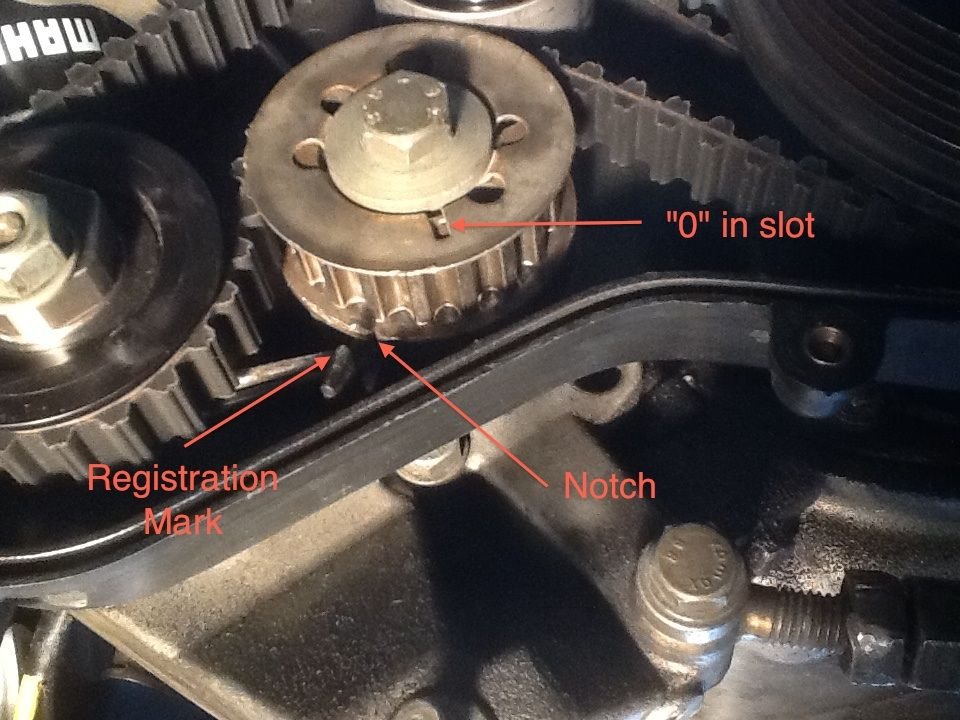
It still shakes like a dog. The only confusion at present concerns the difference between Spencer's orientation guide and Clark's. As I mentioned, I chose to use Spencer's and, in retrospect, that appears to be correct since it agrees (see above photo) with the factory registration marks.
PS: To the best of my ability I've been unable to locate any registration marks on the lower sprocket cover. Regardless, I'm attempting to remove the lower sprocket to look for a registration mark on it (it's impossible to see while mounted to the engine).
Unfortunately I can't get the damned thing off the spindle. It came right off the first time but now it's jammed. Typical.
Well, after soaking in a little PB Blaster overnight the lower sprocket did come off.
It had been aligned as suggested, with the "O" or "0" (hard to tell the difference) in the 5 o'clock position as described by Spencer's guide, however the "O" appeared through a opening in the belt retainer, not the slot. On re-assembly I reversed the location of the registration pin, eclipsing the "O". I can't see how that would make a difference, but it seems to have.
After re-assembly and retensioning the balance belt, I had some trouble starting the car. I hadn't re-connected the coil to the distributor. So I fixed that.
The car was still difficult to start. It caught twice and died. I gave it some throttle, it caught, burped some smoke out the exhaust, ran with a little pedal, then died when I took my foot off. Re-started it with pedal, ran it up to 3000 (a bit more smoke), held it there for a few seconds then slowly brought it down to idle. Took off my foot and it held idle.
Still shook like a dog at idle. Ran it up to 1000, shaking stopped. Smooth all the way to 7000, took the foot off and it returned to idle by itself with no coaxing. Shook like a dog.
I'm declaring it fixed. I don't know why it's idling rough but it isn't farting anymore. It may be time for new coil, distributor and plug wires. Has new plugs. All I can think of at the moment.
For the record, I did finally find the factory registration marks on the lower balance belt sprocket (see attached photo). Once you find them, they're easy to see but they don't stand out by themselves. Sort of like trying to find a chameleon; once you see him, he stands out like a sore thumb.
PS: I suppose it would be good for us to band together and figure out how to change the instructions on Clark's. We should do our best to preserve his legacy I think.
the lower BS lines up with a "finger" cast into the belt cover rather than a notch, see below (left)
Thanks Spencer, of course I can see it now. Your message was about 45 minutes late
Even knowing where it is, it took a few seconds to find it in the picture above just because it's sideways from the way it sits on the car. I'd stick a red arrow on it, but I'm not sure how to do that.

 04-25-2018, 06:11 PM