
Tips on lowering rear end
 04-19-2006, 12:54 PM
#1
Race Car
Thread Starter
The front end of my 86 911 is now complete.
Thank you for your input.
Now to tackle the rear.
Any little tips before I mark everything and remove the torsion bar caps?
Thanks in advance.
Rod
Thank you for your input.
Now to tackle the rear.
Any little tips before I mark everything and remove the torsion bar caps?
Thanks in advance.
Rod
 04-20-2006, 05:26 PM
#3
Addict
Rennlist Member
Rennlist Member
I assume you have read the various posts etc?
Mark the springplate angle on the body in pencil to give you a rough start.
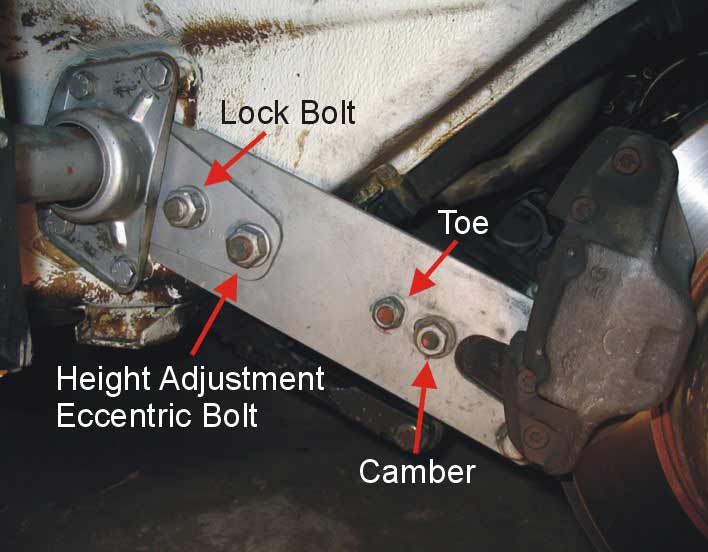
Mark the toe & camber bolts.
Make sure you have the big Allen wrench to fit these before you start.
The bolts to the trailing arm are under tension so you have to be inventive with the jack to remove these.
The torque on the lock bolt on the springplate is a huge 181 ft-lbs so you'll need a 'real man's' torque wrench. But if it's not really, really tight, your suspension will sag.
Be prepared to have to do it all twice.
Are you replacing the bushings?
Ian
Mark the springplate angle on the body in pencil to give you a rough start.
Mark the toe & camber bolts.
Make sure you have the big Allen wrench to fit these before you start.
The bolts to the trailing arm are under tension so you have to be inventive with the jack to remove these.
The torque on the lock bolt on the springplate is a huge 181 ft-lbs so you'll need a 'real man's' torque wrench. But if it's not really, really tight, your suspension will sag.
Be prepared to have to do it all twice.
Are you replacing the bushings?
Ian
04-20-2006, 05:52 PM
#4
Race Car
Thread Starter
Thanks Ian,
As usual your opinion is helpful.
Yes this whole project is because of the ER bushing I'm about to install.
I replaced the rear "banana arms" last year, so I know what I'm getting into.
I've read many posts, 101, Bentley, etc.
I am a firm believer in doing as much reseach as possible.
2 brains are better than one.
The bolt you are mentioning is the first or second one, the other being minimal height adjustment?
I don't remember torquing it that much. Can do though. I'll check Bentley.
It looks to be as simple as ...
Mark all of the settings.
Remove (jack) pressure from shock (remove bolt).
Remove torsion cover plate.
The other 4 setting bolts.
Re-index
Re-assemble
Do it as many times as it takes
Do you know what angle I should shoot for with Euro setting?
04-20-2006, 06:07 PM
#5
Addict
Rennlist Member
Rennlist Member
The order:
Jack & remove shock bolt & let it drop.
Reposition jack with it's edge just on the springplate at the springplate/trailing arm junction.
Remove toe & camber cams.
Remove 2 bolts at trailing arm end of springplate (the under-tension ones). Be careful - the springplate can whack down violently once these bolts are out so ease down slowly with your jack.
Remove 4 cover screws.
Now you're cooking . . .
Ian
 04-21-2006, 10:30 AM
#7
Race Car
Thread Starter
Thanks for the confirmation Ian.
I've found specs on Euro height.
The angle is the difference between the door sill and the plate.
It does not tell me if this is while the car is under load or not.
Does anyone have a link to this info?
Thanks
Rod
I've found specs on Euro height.
The angle is the difference between the door sill and the plate.
It does not tell me if this is while the car is under load or not.
Does anyone have a link to this info?
Thanks
Rod
Trending Topics
04-21-2006, 01:49 PM
#8
Rennlist Member
Rod, I use my floor jack to lift the trailing arm, brake, etc. I use a second jack on the spring plate to ensure it does not pop down unexpectedly. The one I have is a small telescoping jack that is easily adjusted. It never hurts to be safety conscious. Good luck and let us know how it turns out.
04-22-2006, 01:23 PM
#9
Advanced

Join Date: May 2003
Location: San Mateo, California
Posts: 71
Likes: 0
Received 0 Likes
on
0 Posts