When you click on links to various merchants on this site and make a purchase, this can result in this site earning a commission. Affiliate programs and affiliations include, but are not limited to, the eBay Partner Network.
Yessiree, gents, side mirror is fixed! The threads do screw into the mirror "flag" part from underneath the base. So after one removes the base via the little allen screw, it's all pretty clear with the all the bits in your hand.
The one bummer is, however, there is no way that I can see to tighten that screw without undoing the wires (as in cutting then resoldering them back together) since (as Brian had mentioned) the wires pass through this hollow bolt. That bolt head is not exposed but recessed into the base so no way to grab the head whatsoever. So I had to snip em all, then screw the bolt to the flag body via 9mm allen wrench (which isn't the right fit since it's some kind of "star" head in there but the 9mm allen wrench fit "just" well enough to tighten it well). Final result is the mirror is solid again, and likely will stay that way as far as I can tell. Gotta love this place with you folks and your collective wisdom! Big thanks, guys!!!
so what you needed was an off set wrench with a slot cut in it for the wires..
easy
think o2 wrench
not quite. The O2 wrench fits on the OD of a 6 pointed hex. The mirror requires the wrench to fit into the ID of the bolt like an Allen wrench.
For future reference the correct way would have been to de-pin the wires from the plug. Then you can pull the wires out of the bolt, tighten the bolt, push the wires back through and insert back into the plug housing. This way the wires aren't cut and you don't introduce any additional potential failure points.
Hey Simon,
I totally get what you're saying here. What you describe is, of course, the most proper course, but I wasn't interested in going in further/deeper. It was simply too easy (and I wasn't in the mood to spend more time ) to cut the wires and bolt the mirror back onto its base. But curious: from which side does one unpin the wires? From within the door, or within the mirror?
not quite. The O2 wrench fits on the OD of a 6 pointed hex. The mirror requires the wrench to fit into the ID of the bolt like an Allen wrench.
For future reference the correct way would have been to de-pin the wires from the plug. Then you can pull the wires out of the bolt, tighten the bolt, push the wires back through and insert back into the plug housing. This way the wires aren't cut and you don't introduce any additional potential failure points.
oh then essentially an extended nut that will fit in with a slot in it for wires ? then use a wrench to turn the nut ??
There is a round plug located behind the mirror adjustment plate. you would pop the mirror out of the flag (held in by 3 friction fit posts on early cars and by a plastic lock ring on the later cars). To remove the mirror you just carefully pry the glass forward to release the pins, or use a small flat blade screw drive to turn the **** ring on the 87+ cars and lift the glass out. There will be 2 wires that plug onto the back of the glass for the heating element. there are just round pins and the polarity doesn't matter, so just unplug these and the glass is free. there are then three 8mm headed bolts that hold the mirror adjusting plate to the housing. Once you remove these 3 bolts that adjustment mechanism lifts out and has a round plug connecting the wiring. this is the plug that you need to de-pin to remove in order to extract the wiring. You can buy
or any number of suppliers that will help in the removal of the pins from the plug. once you de-pin the connector you can pull the wires out of the housing and reassemble the bolted connection. then just push the wires back through and insert them back into the connector body and reassemble the mirror.
Originally Posted by theiceman
oh then essentially an extended nut that will fit in with a slot in it for wires ? then use a wrench to turn the nut ??
as you can tell i like making tools
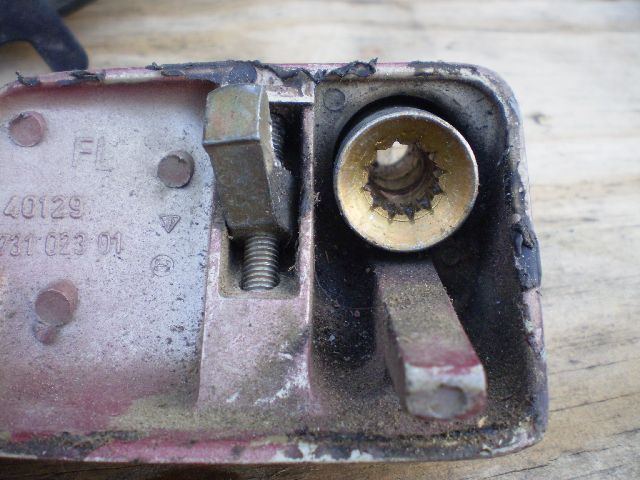
Here is what the bolt looks like without the wires passing through it (pulled from another rennlist post on mirrors). I think I used an allen wrench when I disassembled/reassembled mine after paint, but it may technically be a triple square or 12 point.
Great write up, Simon ...thanks for that! Good to know if the other side gets loose which, of course, I hope won't!
FWIW, a 9mm allen wrench works to tighten it. It fits with a bit of slop into that "triple square" (hmmm, never heard of that before!) but it works nevertheless.
For reference triple square tools are also known as XZN wrenches/sockets.
I do have a set, so that may be what I used to reassemble my mirrors I just don't remember.


 04-16-2022, 11:50 PM


 ) to cut the wires and bolt the mirror back onto its base. But curious: from which side does one unpin the wires? From within the door, or within the mirror?