When you click on links to various merchants on this site and make a purchase, this can result in this site earning a commission. Affiliate programs and affiliations include, but are not limited to, the eBay Partner Network.
damn, the manthey stuff is ridiculously expensive!
anybidy have an idea how expensive are the CF parts from DB carbon? (Such as the NACA ducts, front fender vents)
I spoke with Roger Jobs (former owner of Porsche Bellingham dealership) last Saturday and he mentioned that Manthey gets their CF parts from Bellingham, WA. So I guess if you don't need the Porsche/MR stamps, you can get the items a bit cheaper. May be the same as with the battery tenders that are basically badged CTEK tenders.
I like those Manthey fender louvers with the triple slats over the DBcarbon offering(OEM with a CF finish) even though they are a lot more expensive. Let us know how the install goes on those bad boys from a time/effort standpoint.
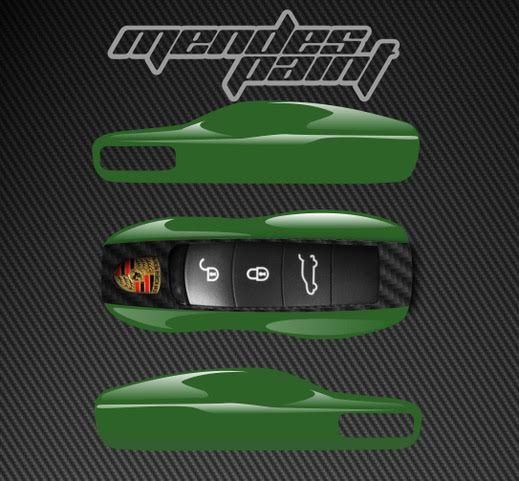
@custom_porsche_keys on Instagram. It is about 200EUR plus shipping for two keys. He does paint them and coats them. So it is painted and not ABS like the Chinese or Rennline items. But you can get it in any PTS color. I do have one CF, a light green, a yellow and a Gulf themed one for our other Porsches (mostly Chinese, one Rennline) and they indeed hold up great. @skafia has ordered his in his gorgeous blue PTS color already, so he can provide more insight into the actual quality.
Based on your recommendation I contacted him to order a key for my Underberg green SRS - thanks! I love the option to add the CF middle piece to represent WP. This is the draft he sent me and he will send me a picture of the final in a couple days. So far very easy to communicate with!
Based on your recommendation I contacted him to order a key for my Underberg green SRS - thanks! I love the option to add the CF middle piece to represent WP. This is the draft he sent me and he will send me a picture of the final in a couple days. So far very easy to communicate with!
Cool! I still have to put in my order. Let us know how it looks when you get it!
This is the thread I was referring too. Would you mind copy and pasting your thoughts the magnetic shifters and the installation process to this thread, from the other thread?
It seems like RL no longer lets us edit our own older posts?
Anyway, I now have a fourth cosmetic mod planned . Personally I prefer classic red taillights over the smoked out ones. So I’m going to swap out the factory taillights with red tailights that come on standard 718s. Available at suncoast.
This is the thread I was referring too. Would you mind copy and pasting your thoughts the magnetic shifters and the installation process to this thread, from the other thread?
I installed the JQ Werks shifters which are available on many online platforms, and I decided to buy them from the guys at UroTuning.
I recommend skipping the black or the gunmetal variants (available at extra charge) and just going with the carbon fiber ones. I ordered the other two in addition so I could compare all three, and the black and grey, which are smaller in size, just didn�t represent the kind of look or sensation suited to upgraded paddle shifters.
The instructions are definitely not sufficient � they are extremely short. I will be here to help. I would like others to avoid any pitfalls and gain from my experience with this installation.
You can do this yourself after watching a YouTube video of 718 steering wheel removal, but it takes experience in trim removal to best do this job along with knowing what catastrophes can happen during this particular job. I had a super expert trim removal guy do this with me, and due to some issues we were having, I had to make several round trips of taking the steering on and off � and now I�m the freaking expert. I have good experience removing and replacing trim, but since I don�t do it for a living like this fellow does, I am not even close to being perfect the way he is when attempting a disassembly and assembly job that I�ve never done before.
The instructions don�t tell you:
1) How much care you need to take when inserting the new paddle shifters into place � the integrated female connector (on the new paddle shifter) which receives the steering wheel�s male connector is glued on with glorified spit and can pop off VERY easily. It is imperative that contact not be made between the connector and the steering wheel receptacle, which is just about impossible to achieve because you have to slide the paddle sifter down into place, and there�s about enough space for a piece of paper between the edge of the connector and the steering wheel trim, and the connector�s edge wants to graze the trim as it slides down. It can be done, but perhaps not without screwing one up first; and I hope others will be able to avoid the hassle I suffered in this regard. I attribute the problem to the mediocre adhesive used in manufacturing � it ought to be epoxied on there with very strong stuff. If the connector on the paddle shifter pops off its seat, it�s game over. Re-gluing it down won�t work. Don�t let any of this dissuade you, because the quality of the piece is excellent and the thing functions flawlessly. We are dealing with tight quarters during fitment.
2) How to perform the very delicate process of removal and replacement of the 718 steering wheel
a) There is a good YouTube video out there on 718 steering wheel removal
b) Disconnecting the negative lead to the battery on 718 RS requires learning how to CAREFULLY remove those rubber boots atop the plastic cover under the front decklid (these adorn the brake cooling orifices on either side); my guy needed to show me three times how to do remove those, and I�m a pro at it now but it takes some effort to learn how to remove those rubber pieces. They can tear easily; I managed to not allow myself to make a mistake and tear these.
Tips for removing/replacing airbag and steering wheel:
1) Buy pin punch tool set from Harbor Freight � using anything but a pin punch (with a flat end) in a steering wheel airbag release hole is a waste of time
2) Turn the steering wheel when using the pin punch tool to get the angle you need! No need to keep the steering wheel at 12 o�clock � you won�t have a good angle at 12 o�clock due to the stalks on either side of the steering wheel. I didn�t think to do this until I struggled for minutes on end. Either side punch should be done with the steering wheel turned away from that side.
3) Buy blue thread locker from Home Depot
4) M12 XYZ Triple Square Bit is a necessary tool � the YouTube video is wrong and you CANNOT use a star-shaped bit. https://www.jbtools.com/titan-tools-...t-set-4-piece/
(The M10 will come in handy for doing your engine oil change � see my reference guides thread and accompanying engine oil change attachment for explanation.)
5) Breaker bar of significant length (24� 1/2� drive recommended) to unlock the steering wheel lock nut � short handle ratchets are not recommended for loosening
6) Ratchet with decent length for preliminary tightening and post-unlock loosening of the steering wheel lock but
7) Bar driver adapters (appropriately sized) and appropriate socket to adapt the breaker bar/torque wrench drive to the M12 bit
8) Good quality torque wrench that can do the smaller torque specification of 22 ft-lbs
9) Thanks to a Rennlist thread somewhere where the relevant service manual page was posted, the specified fastening torque of the steering wheel lock nut for 718 is 22 ft-lbs, and then one full 1/4-turn beyond that, which *can* be done alone but it�s better to have a second person of decent strength holding the steering wheel. (I did not have a new lock nut on hand and did not choose to buy one; the thread locker along with proper tightening is more than sufficient).
10) Once airbag has popped out, pull it just out just a bit and then rotate it 180 degrees as it sits on your microfiber towel; now you�ll be ready to remove the connectors. Be SUPER careful removing the connectors from behind the airbag and removing the steering wheel. It�s best to have a second person watching to make sure everything is disconnected and nothing is yanked on. It�s easier than you think to make a mistake.
11) It�s fairly easy to line up the lines so steering wheel is aligned like it was before; take pictures.
12) Use lots of painters tape and also use a microfiber towel when removing the airbag � follow the taping example set by the YouTube guy
13) Do not fail to disconnect negative lead to battery, ensure it cannot make contact, and wait ten minutes before job start.
14) One-touch window function will not work upon recharge � simply perform the window reset procedure
15) If all connections are made correctly, and if battery was disconnected, then there will be no airbag warning light.
It should be fairly easy to get this entire job right the first time. If not getting it right, you risk:
i) Scratching or damaging the steering wheel, airbag, trim on and around the steering wheel, any leather involved (mine remain perfect, and yours can too)
ii) Having an airbag warning light which can only be cleared with a Porsche scan tool
iii) Breaking any of the three connectors behind the airbag once airbag is popped off or during reassembly, which would be a nightmare for many reasons
iv) Snapping off the connector on the new paddle shifter, which is game over for that piece and which would reset the entire job
v) Tearing the rubber boots atop the brake cooling orifices
Knowing what I know now, I am glad I didn�t have a shop install this; I would trust only myself � there is too much care to be taken to blindly allow someone whose work I don�t know to do this job.
The camera is your friend, and so are the watchful eyes of a second person.
I am still looking for a way to get my painted air vent slats. I know it is available as CXX option, but since that's the only CXX option I wanted (besides acid green stitching which would have been USD$58k, so I said no thanks) and the price - while twice as much as it was on my GT4 - was not enough to get to the minimal required CXX limit, i couldn't order.
I did painted air vent slats on my 981 GT4 at the factory and love them. I am told that good PPF shops can get it done for you with a good outcome. I have a GT4 RS on order and I may consider doing it aftermarket, too.
I just installed these and love them. I thought the magnetic click might be little too much listening to online vids but during driving it's just right. The install is super easy as long as you release the electrical connectors properly. Between the vid and instruction above I think you're covered. Mine came with protective inserts in the connectors which you have to pop out. Installing the new paddle assemblies is a little weird at first because the assembly wants to go into the spoke unless you feed the pins into the holes at just the right angle. Also adjust the paddles before you put the wheel back on. Took me an hour and I am not at all mechanically inclined and I'm generally paranoid of any electrical connections.

 01-29-2024, 11:04 PM