When you click on links to various merchants on this site and make a purchase, this can result in this site earning a commission. Affiliate programs and affiliations include, but are not limited to, the eBay Partner Network.
This post is going to walk though how I changed the seatbelt webbing in my GT4 to a color that closely matches my Shark Blue paint. I made an ordering mistake and got Miami Blue belts since Shark Blue wasn't available at the time and the result was a bad clash. Doh. The factory Shark Blue parts number still doesn't show up anywhere so I decided not to wait and to save several hundred dollars and just get them rewebbed. When it becomes available, the factory Shark Blue belt assembly number should be this according to my local Porsche parts guy: 981-803-033-03-d5c
PLEASE READ ALL of the first two posts here first before doing anything to make sure you have the right tools on hand and fully understand where this is going.
DISCLAIMER: I am NOT a professional mechanic and given that seatbelts are an important safety item, I want it to be clear that this is how I chose to change my own seatbelts. For maximum safety you should have this done by a professional mechanic. Proceed at your own risk.
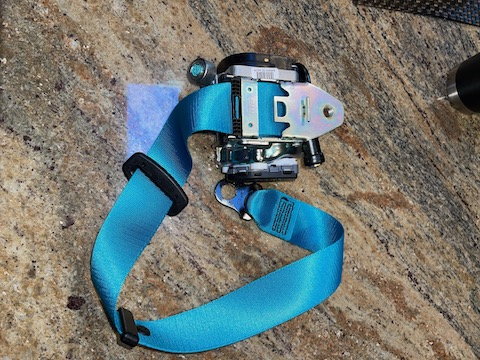
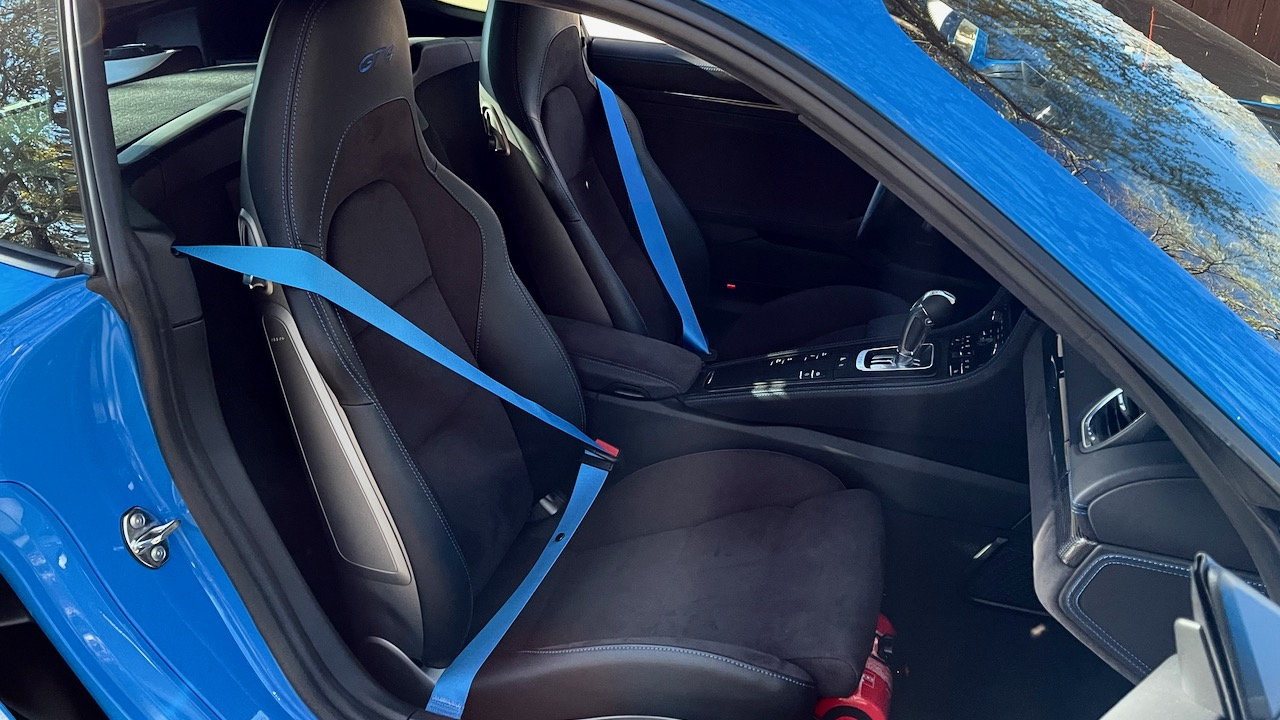
Let me start with the bottom line: In this procedure you remove the entire seatbelt assembly, send it to a rewebbing service, and then install the rewebbed assembly back into the car. Most of the work is just removing trim to get to the seatbelt reel assembly. It looks like this once removed:
STEP 1
Move the seats all of the way forward to ease access to the belts area and open both side doors. This allows both door windows to index downward before the car loses power. Failing to do so could leave the window glass fully up and could break something when opening or closing the doors once the power is off. You can also just open the windows fully first, but since the car will sit for several days while the belts are rewebbed you'll get less dust in the car with them mostly closed.
STEP 2
Open the hood and BE SURE to put a towel or something over the hood latch receiver at the bottom so you can't accidentally close the hood and have trouble reopening it with no power.
STEP 3 IMPORTANT: Loosen and remove the negative battery terminal to power down the car. Place an insulator (thick cloth etc) between the clamp and the battery post so they won't accidentally move and touch. The seatbelt reels contain a charge that ignites to tighten the reels in case of an accident and you don't want to risk setting those off.
STEP 4
I started with the passenger side first, just in case I made a mistake I figured it was the best side to mess up first.
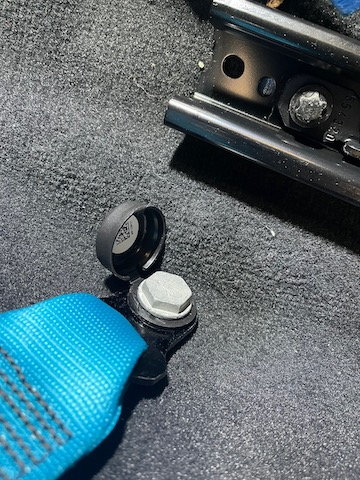
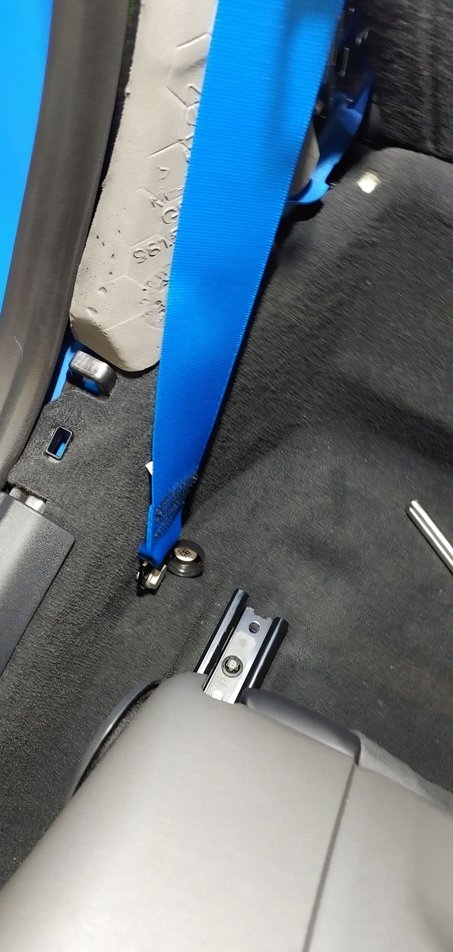
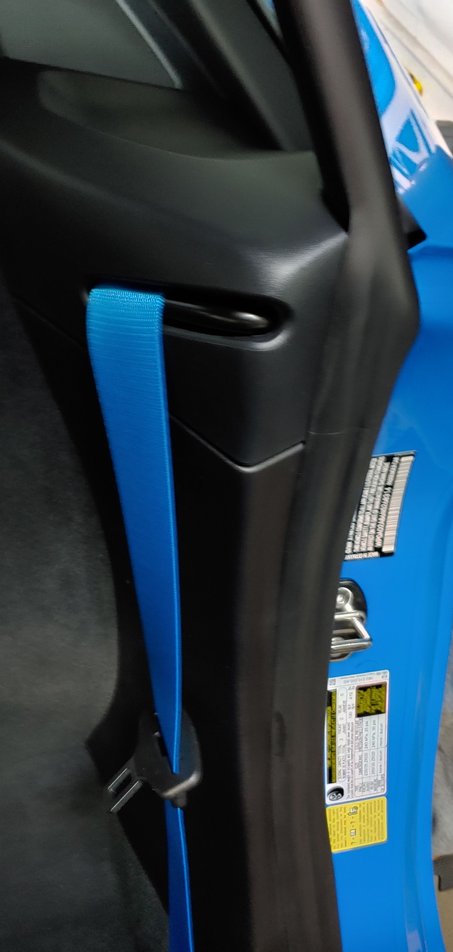
Inside the cabin you will now remove the more exposed end of the belt where it anchors to the side of the floor. Pop up the plastic cap covering the 17mm bolt using a trim tool or thin screwdriver, then use a 17mm socket to remove this bolt. It requires less effort than you may first expect. Pay attention to how the parts are stacked.
STEP 5
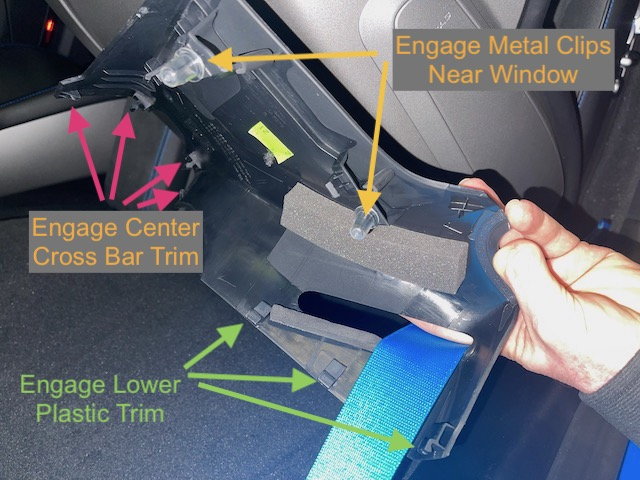
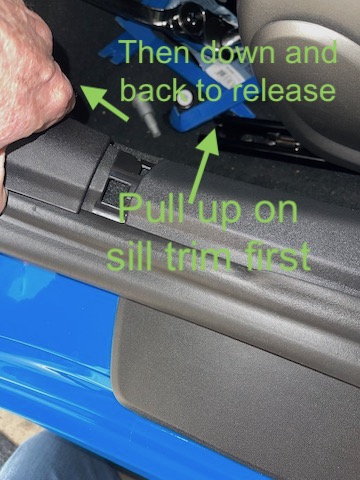
Now you need to uncover the seatbelt reel. The trim piece that the belt passes through needs to be removed first. NOTE: This section has been corrected based upon observations from AdamIsAdam with the discussion starting in post 9 below.
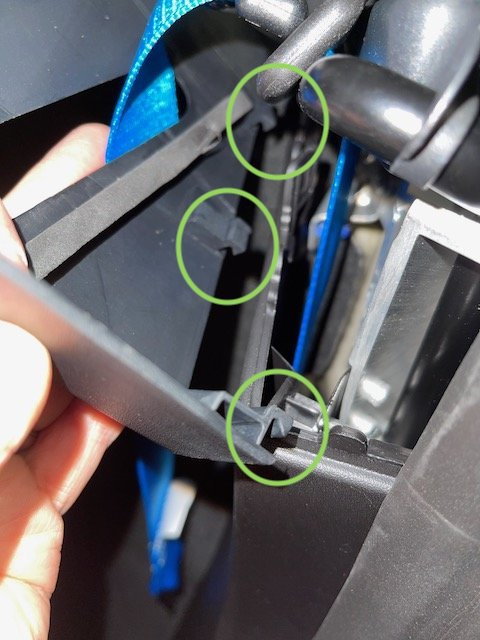
It first helps to understand where all of the clips are on this upper trim piece. Here is an annotated photo:
To remove this piece without a danger of breaking the clips that engage the lower plastic trim, the trim needs to be removed in an upward movement. (Thanks to the note from AdamIsAdam below!)
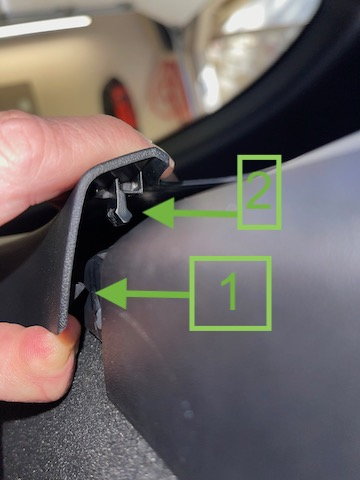
First you need to release the part of that trim on top on the side nearer the center of the car along the crossbar. In the photo below, item 1 shows one of the two clips that have to be pulled outwards... the other is on the back side in the same location. You can slightly see the notch it fits in under the tip of the arrow. Once that clip is released on both the front and back, the piece can be pulled up just enough to release the tab shown in the photo as item 2.
STEP 6
One those clips are released, you can pull straight up on the whole trim piece by hooking your fingers under the back of the trim and from a front edge. Be sure to pull straight up to release the three tabs that snap into the three metal clips, as seen in the photo below. Another AdamIsAdam suggestion is to make sure that the metal clips stayed installed in their slots as they may at times stay stuck on the tabs. If you see a metal clip on the tab after removal, pull it off and snap it back in its slot.
STEP 7
Once all of the clips are released, you can feed the belt through the slot and put the top trim piece aside.
STEP 8
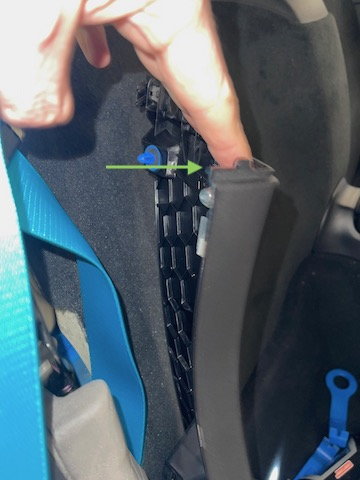
There is a small plastic guide that keeps the belt from retracting back though the upper metal loop. That simply pulls straight up to release. You can also opt to wait a little longer to remove it if you want to keep the belt from pulling though. it doesn't matter much right now.
STEP 9
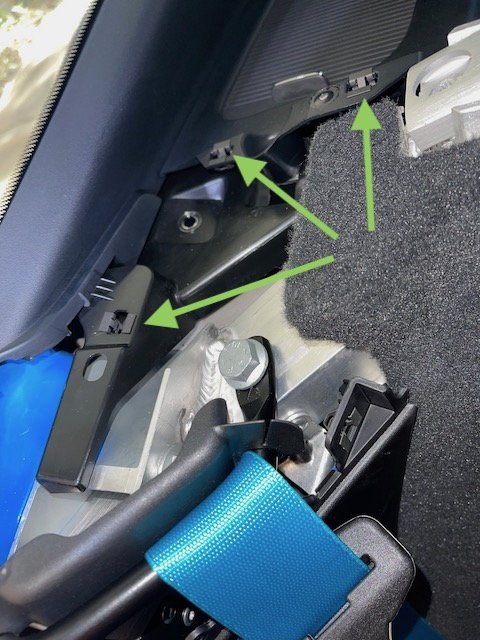
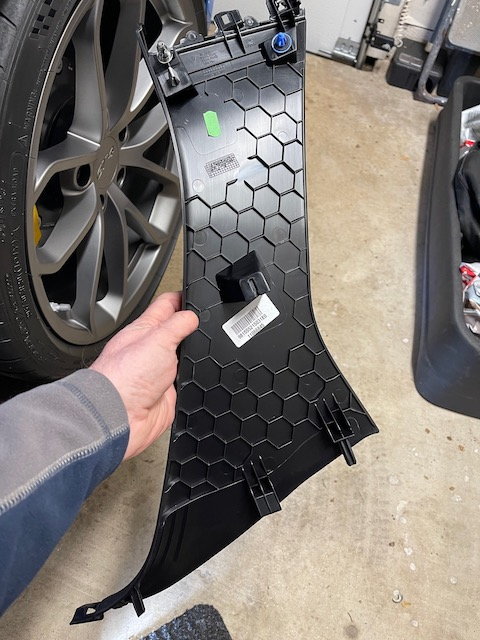
The lower trim piece removes from the top first, then pivots up from the back with the forward-most edge removing last.
Pull the top of the trim towards the center of the car to release the upper tabs. Then lifting up with the rear leading a little, you will release the tabs at the bottom. You will need to lift the rearward edge of the door sill trim to disconnect the forward piece of the trim.
Here's a photo of the back side of that trim piece as viewed on the drivers side (it will be reversed on the side I'm currently showing). This gives you an idea of where the clips are and how they are oriented.
STEP 10
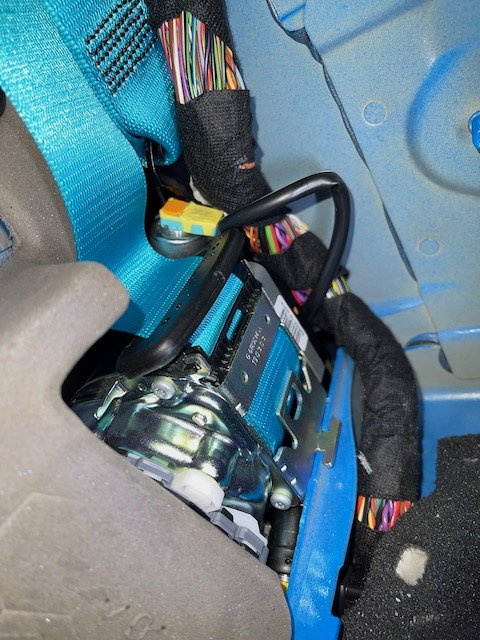
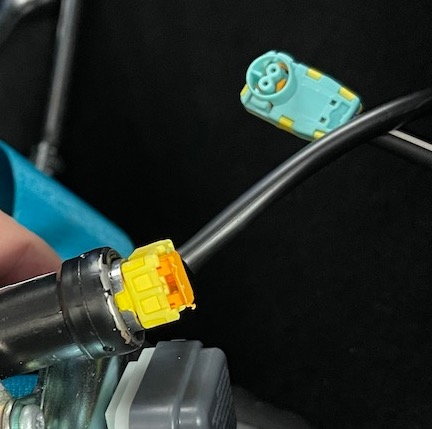
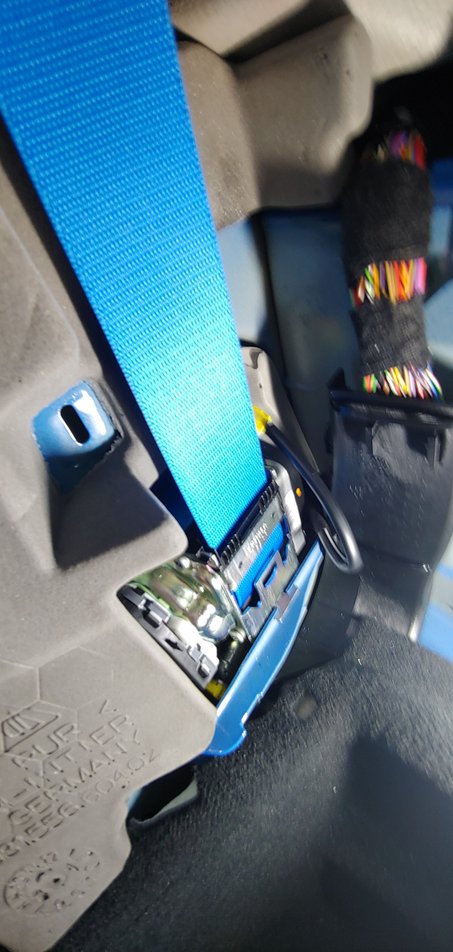
Now the seatbelt reel mechanism is exposed. There are two electrical connections, one for sensing the belt position and one for igniting the charge. You cannot disconnect both of these until the seatbelt reel is unbolted. AGAIN, make sure you disconnected the battery as mentioned in the first steps.
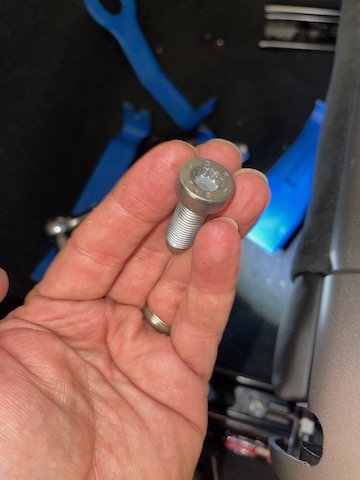
The bolt in this step has a special head so be sure that you have the correct head to remove it before you start. It is a triple-square 10mm bit. I got mine from Amazon here:
NOTE: Before removing the bolt you might want to take a small rag and stuff it in the gap and the corner of the carpet... but not so large as to be in the way of the wrench. If you drop the bolt in can drop in this gap and then you have to fish it back out with a magnetic rod or such - like I did.
On the passenger side, the wire harness makes accessing the bolt head a little difficult but you can nudge it up out of the way. I also decided not to fully remove the rear carpet and padding or the side foam piece and chose to just push them out of the way enough to get access to what I needed. The side foam piece is somewhat fragile so be gentle.
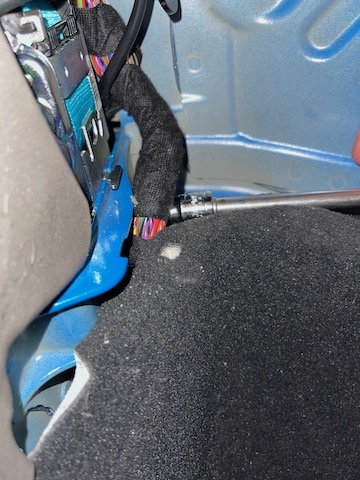
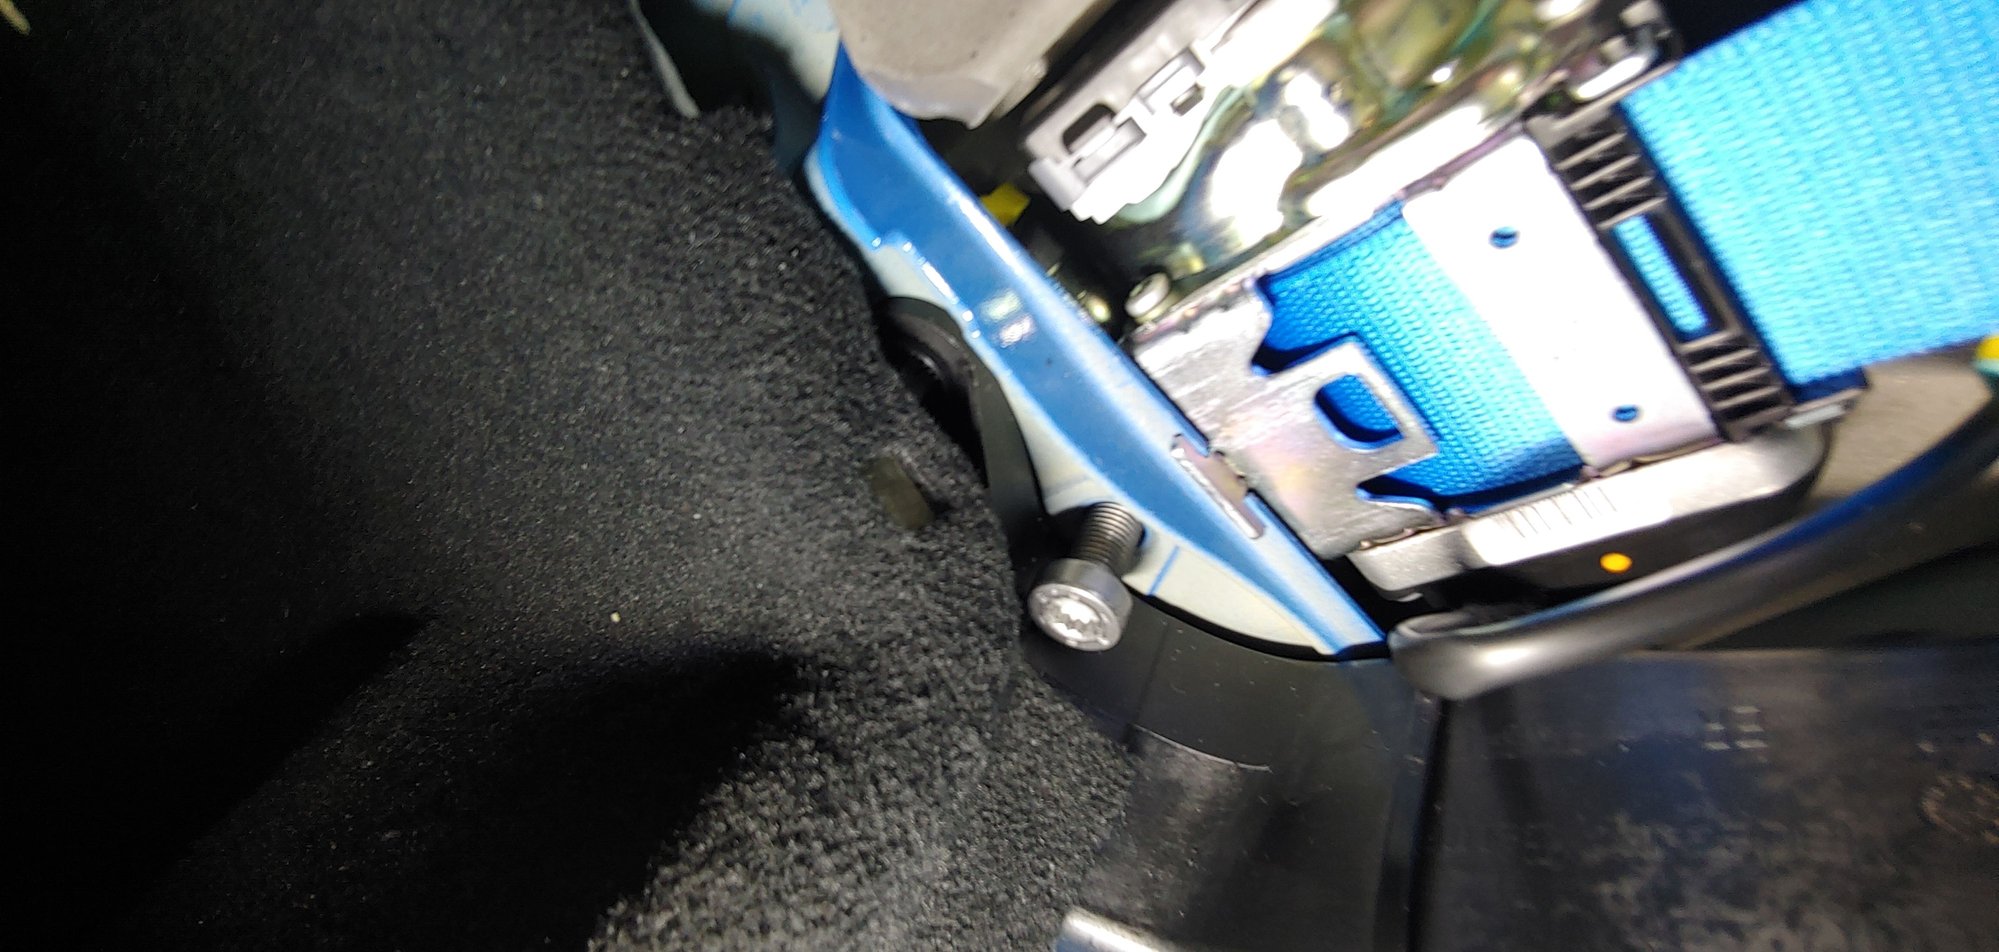
Remove the bolt (normal threading), then the reel will easily lift up. Be gentle since wires are still attached to be removed in the next step.
Here's photos on what you'll see. Notice the tab on the seatbelt fits into a notch in the frame. The bolt head is directly below that hidden by the harness. I used an extension and got to it as shown in the second photo below.
STEP 11
While it was possible on this belt to remove one of the wire connectors before removal, I'm just going to show removing those here. On the driver's side I couldn't remove either until the belt reel was released if I recall correctly.
To remove the connector, you have to release the orange latch first by pulling straight up on it. It will pop up about an eighth of an inch, then the connect will pull out firmly put easily. I used the tip of a small screwdriver to get under the edge to pull it up. DO NOT pull too hard and break it... I'd hate to have to replace it. Remove both connects and remove the seatbelt assembly.
Here is a photo of one of the connectors removed and the other with the release popped up in the release position before it is removed (this was a driver-side photo since I forget to take one on the passenger side).
IMPORTANT: Use a permanent marker or at least some hard-to-remove tape and mark which side the belt reel comes from. I put a P and a D using a permanent marker on both of mine, then also added a piece of masking tape to the metal housing saying passenger and driver which I removed during reinstallation.
REMAINING STEPS
The procedure is nearly identical on the driver's side except that the wiring harness wasn't so much in the way and the connectors face a little differently.
REWEBBING
I used SeatbeltPlanet.com for my rewebbing. They did excellent work and did a great job of communicating with me at all steps. I would certainly use them again. The cost was reasonably and can vary a little depending upon the webbing you select.
Before doing anything else, I had them seem me a free swatch of the color I thought I wanted - Laguna Blue in my case - color 43.
REINSTALLATION
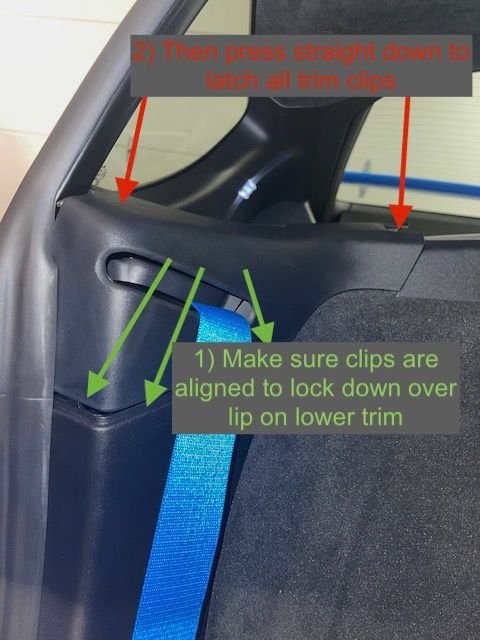
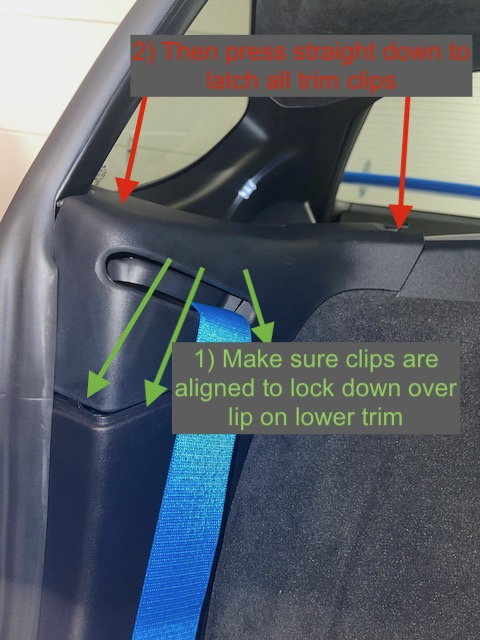
Reinstallation goes the reverse of the removal, but here is a tip for the upper trim piece. You can place the trim piece in place just above all of the clips it needs to engage pretty easily. Make sure the lower three clips that engage the lower trim are correctly in place so that they'll slide down into the right position as you press the upper trim straight down. Once everything looks to be nicely aligned, like shown in this photo, then just snap it all straight down. MAKE SURE you didn't forget to put that little plastic clip on the metal bar the belt slides over back in place first.
REINSTALLATION PHOTO
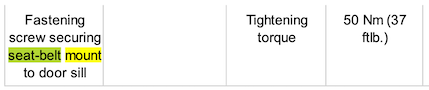
Here are the torque values cut and pasted from the 718 shop manual. Please feel free to verify these yourself since they are important.
Here are a few tips, a couple learned the hard way.
1) The little plastic clip that holds the belt in place on the upper metal bar should go back on before reinstalling the trim - even the lower trim, making sure the buckle tab and stop is on the outside. If you don't, the belt may retract and pull back behind the side plastic trim after you've already put in on.
2) Repeating earlier advice: There is a gap in the carpet padding in the corner just under where the seatbelt reel bolt comes out. Stuff a little piece of rag in that gap so that if you drop the bolt it won't drop down behind the carpet. I had to rescue my bolt using a magnetic rod after I dropped it down there. IMPORTANT: You should remove the rag after the bolt starts to engage to make sure it doesn't interfere with the bolt head seating properly against the metal frame.
3) IMPORTANT: Make sure to plug the two electrical connectors in and fully reseat the orange locking tab once they are fully engaged. You cannot risk these coming unplugged.
4) Be sure to place the tab on the reel assembly into the slot in the frame when reinstalling. If that is set properly the bolt holes will just line up - which helps since you are inserting the reel bolts just by touch.
5) Once you reconnect power you will need to reset the indexing on your windows. To do this, close the doors, turn on the car, and pull up on the window switch to seat the window fully. Then release and pull up on the window switch three times, then lower the window fully. Verify that the window indexes down correctly when you pull on the door strap/handle. If it doesn't, check your official user manual and/or try again.
FINAL RESULTS
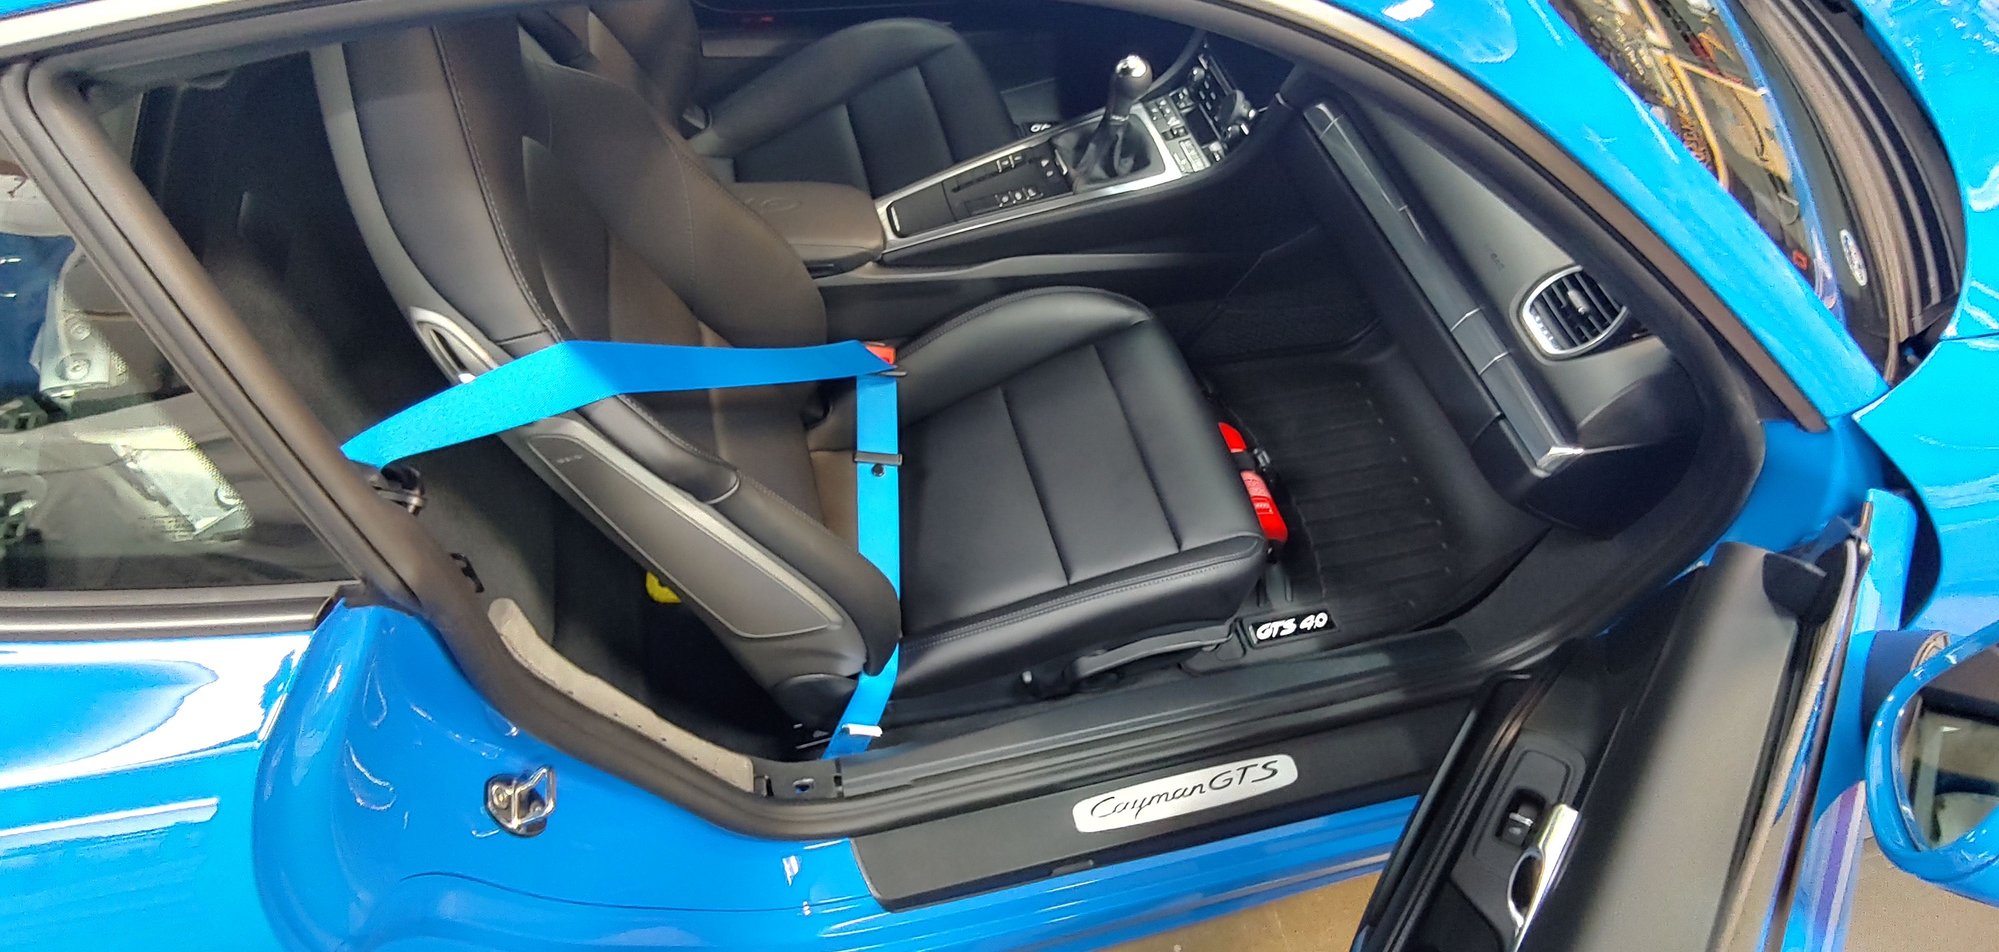
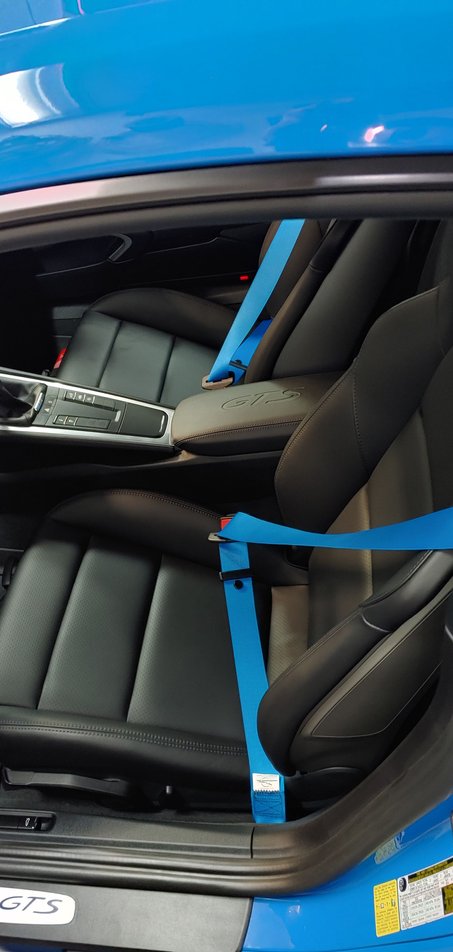
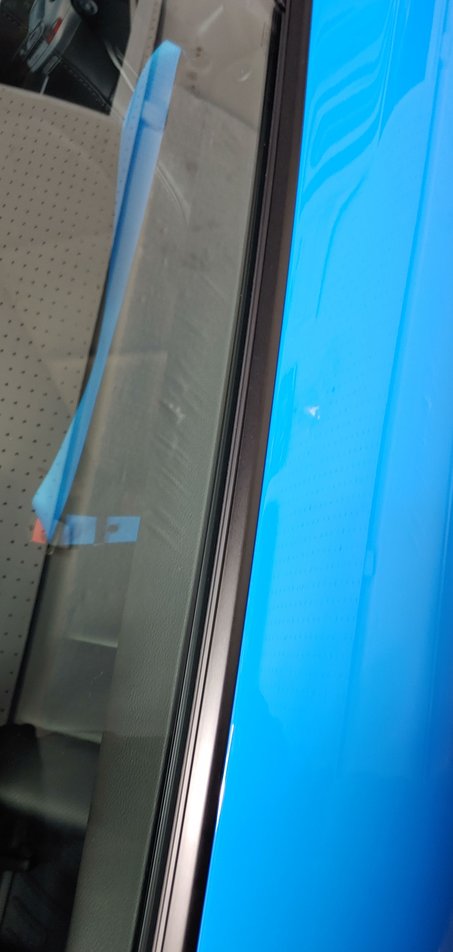
The whole process gave me this as a final result:
OPTIONAL CONSIDERATION
So this step is the least necessary but something I did anyway. If you look at the photo immediately above, you will notice that there is no white tag sewed into the belt right at the edge of the seat adjacent to the lower attachment point. But in this next photo you can see there is a tag. Unfortunately you cannot simply attach it the other way since that would cause a twist. I don't think the vendor would recommend this since the tag is put there for traceability purposes. But I really didn't like that white tag sticking up there.
So VERY painstakingly and carefully, I used a super sharp Exacto knife and tweezers to cut away the white tag WITHOUT cutting any of the seatbelt or its stitching. It is quite a nitpick and if you aren't 100% sure you can do this without cutting the belt or its stitching DO NOT DO THIS. And do not start doing it if you aren't sure you will go all of the way though with it. I almost changed my mind but once I had it partly done you don't really want to stop with it partially removed. You need good eyes, a very steady hand, and a willingness to go very slow with just a little bit cut away at a time.
I originally ordered Shark Blue belts for my Nov `21 build but they were on back order until Dec so I had to go with black belts. After seeing your car, I think I need to do this. Even the misses agrees!
How long were you without the seat belts while they were installing the new ones?
FYI, I bought this set of sockets for the job rather than a single one. I like tools.
I originally ordered Shark Blue belts for my Nov `21 build but they were on back order until Dec so I had to go with black belts. After seeing your car, I think I need to do this. Even the misses agrees!
How long were you without the seat belts while they were installing the new ones?
You have to contact them first and they'll let you know when they can slot in the time. I checked with them on a Wednesday morning and they said they had a slot the next Monday. I'm in Texas and they are our Oklahoma neighbor, so I just used UPS ground and the package arrived there on Friday. They did the work as promised on Monday and had them back to me that next Wednesday.
They'll send you a free sample if you want to eyeball the material yourself first.
Tools are good! I have many that I only need once every few years, but I am really glad when I have what I need on hand.
Thanks for the DIY! I plan on doing this here shortly while it's winter. had a bunch of sample sent to me and still deciding which color is closest to Sapphire blue
Last edited by lsturbointeg; 01-20-2022 at 08:12 PM.
You need to reverse steps 5 & 6. When I pulled this apart previously, I was told to start at the top when removing the seatbelt covers which worked. This time I started at the bottom as described and that cracks off a tab on the bottom. I'll crazy glue them. I wanted to give others a heads up.
Also, be sure the metal clip on the center of the vertical tab comes out with the plastic. One of mine didn't initially. No big deal.
Looking at a picture I didn't include earlier I see those same tabs you are mentioning and see how pulling straight out could break them. I guess I got lucky and pulled up enough before out.
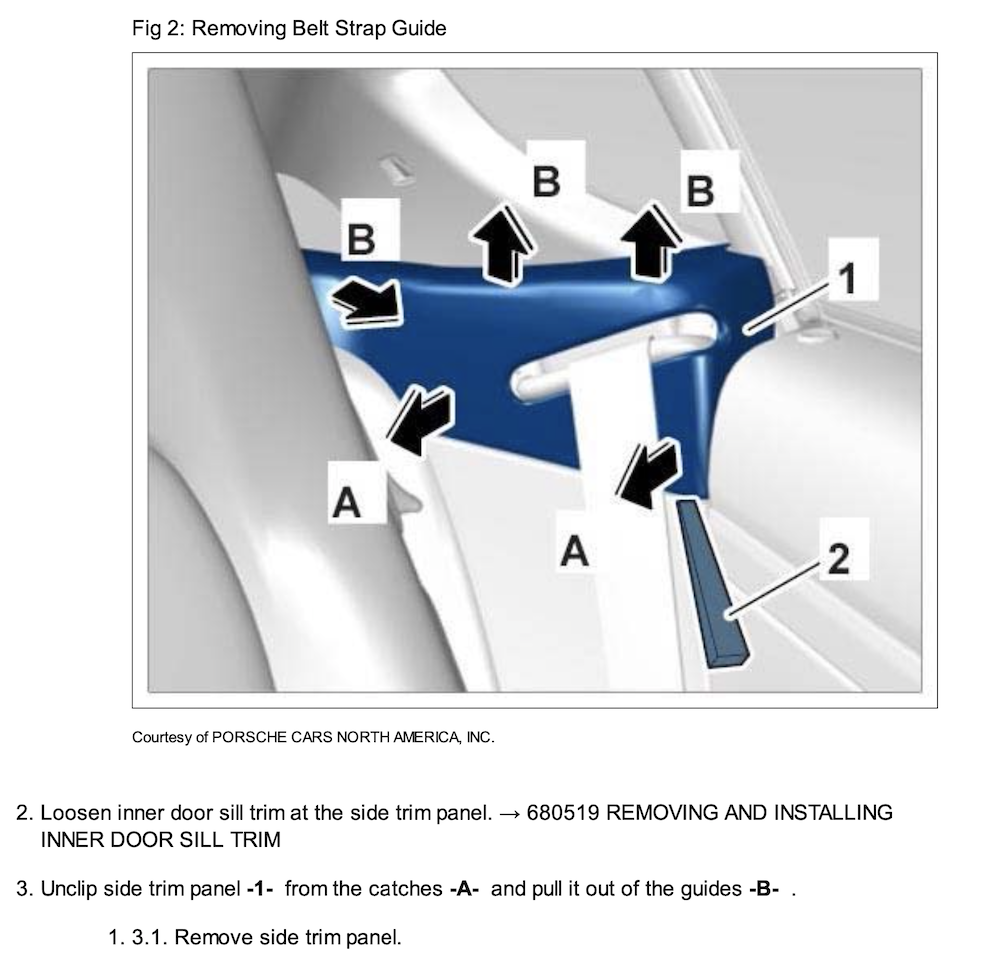
Originally I was referring to this picture from page 2467. procedure WM 707519, of the 981 (not 982) manual showing A movement first and B second, but I think that is misleading. Maybe the trim was tweaked for the 982 but I don't have that manual. I'll have to see if I can go get the newer one.Here's the images below.
I'll add a clarification tomorrow and a warning about the clips. Thanks for the assist and for being understanding Adam!
No worries. But I think one should start at B on top. In fairness, I started underneath but on the lower inboard edge rather than outside by the door. Maybe that's my error
No worries. But I think one should start at B on top. In fairness, I started underneath but on the lower inboard edge rather than outside by the door. Maybe that's my error
Okay, I went out this morning and took that trim piece back off to fully understand what was happening and to get some more photos. Right you are! I've done some significant rewriting of those two steps based upon your feedback plus I added another note in the reinstallation section in the second post.
DONE! And... well... THAT WAS EASY! If anyone is considering changing their belts, do not be afraid of this. The hardest parts are: 1) removing interior trim, which is easy with the right tools and info, and 2) being without your seat belts for a week, which was also easy being that this must have been the messiest, snowiest, saltiest January's in recent memory! Installation of both belts took about 1/2 hour total. Everything went together smoothly and easily. Even the crazy glue held on my one tab since it's just an alignment tab, and not a snap-in tab or stressed part.
I'll add a few pics, just in case they help anyone else.
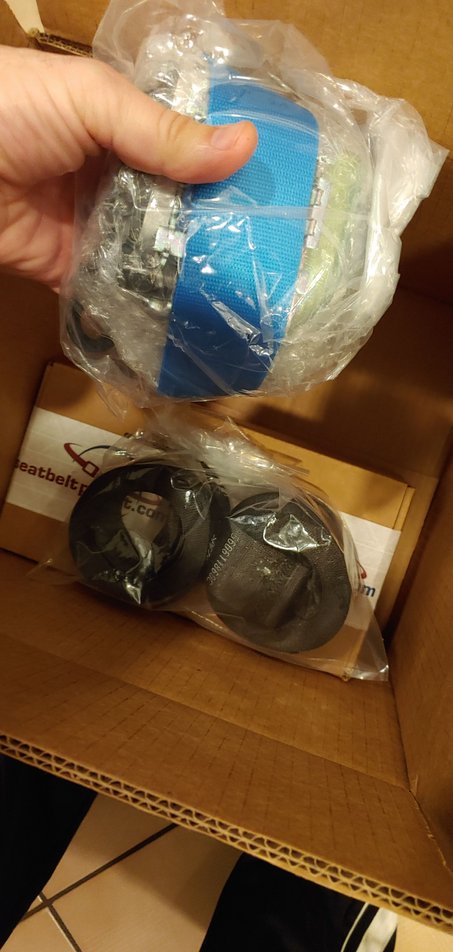
Packaged nicely. Note the return of the OEM black belts. I believe they are cut to remove, but nice to have anyway.
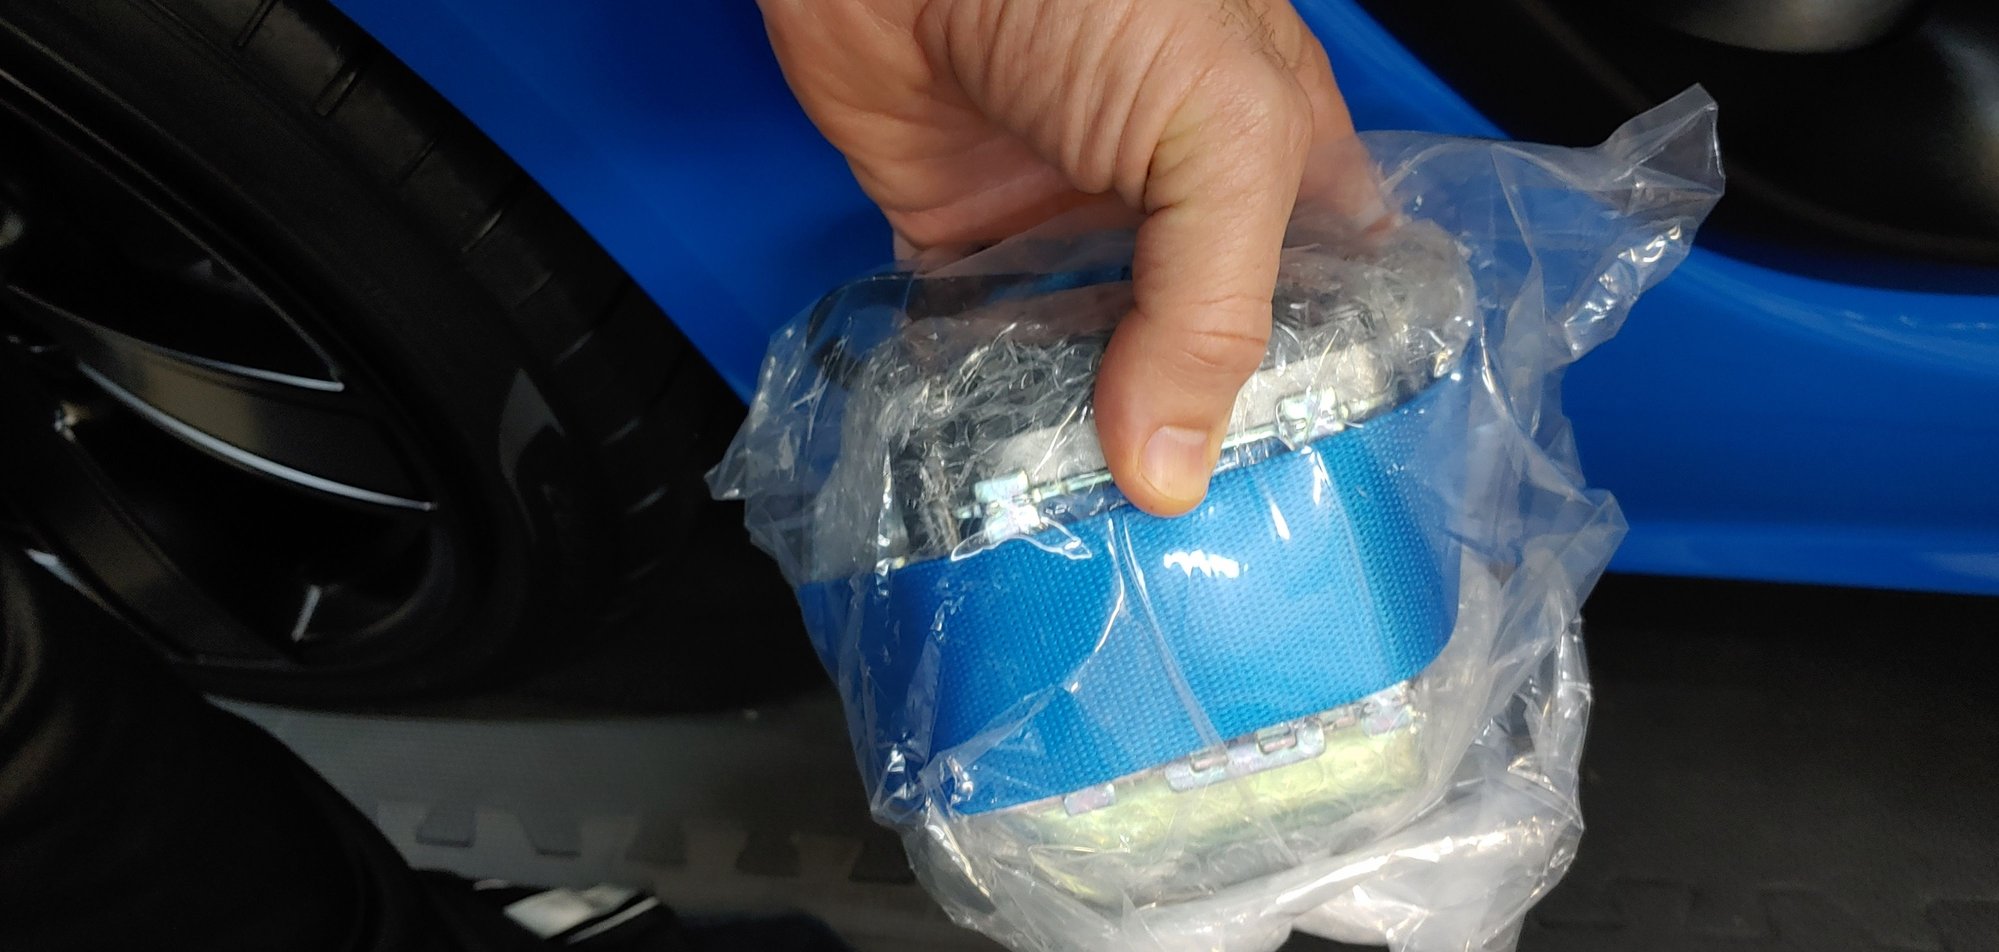
Color match looks even better in person.
Ready to go.
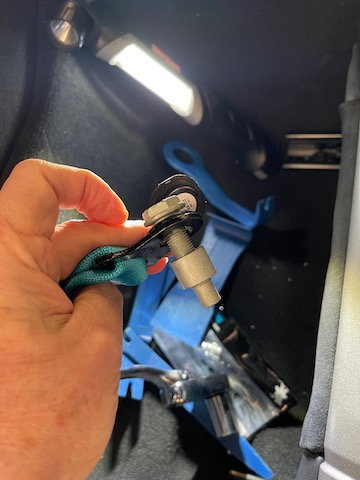
Another view of the mounting tab and wires.
Another view of the mounting tab and wires.
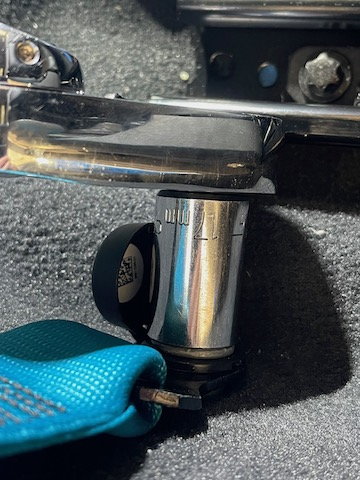
Clear shot showing the one bolt that holds the mechanism in place.
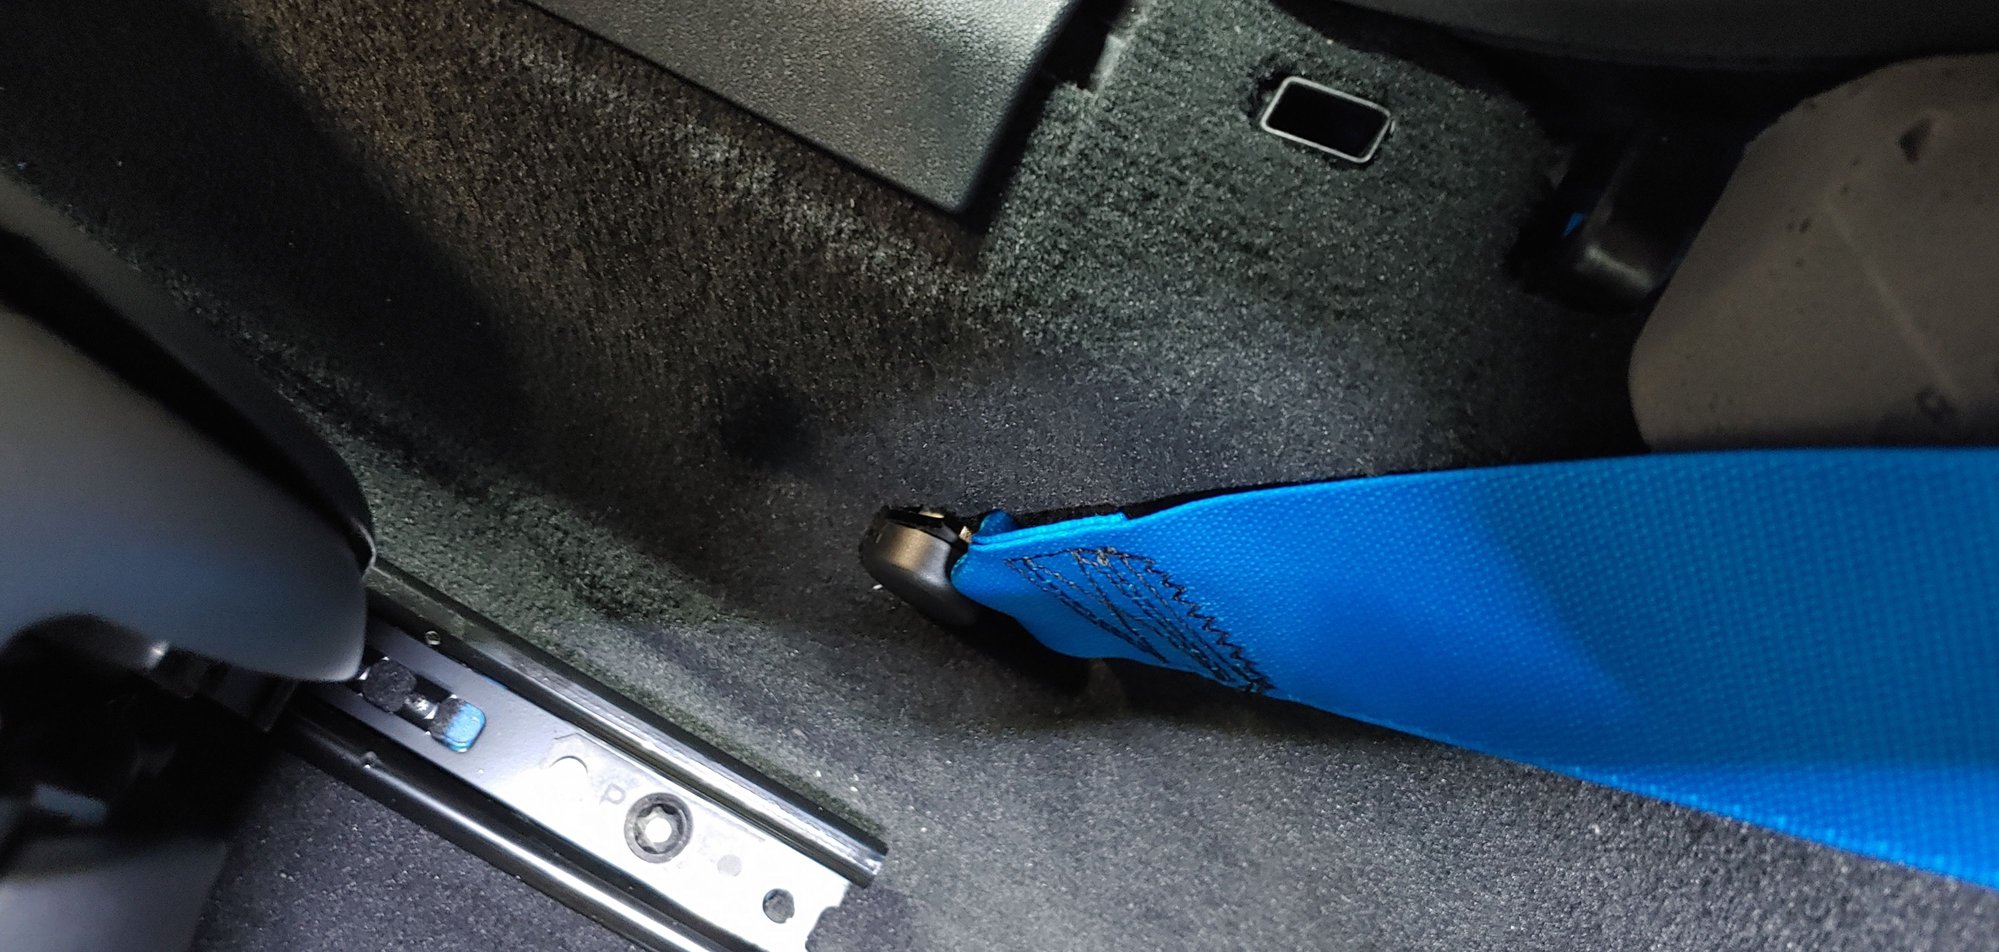
Almost there. BTW, DON'T FORGET to feed the belt through the trim before bolting it to the floor. Ask me how I know
The white label is not visible when belt is in retracted position.
White label is visible in this view, but if someone is belted in, the door is generally closed. So I decided not to remove the tag.
All in.
BAM! Looking good! Again, the white label is visible in this view, but if someone is belted in, the door is generally closed. So I decided not to remove the tag.


 01-16-2022 | 12:14 PM