
Electrical Problem(?)

Thread Starter
Rennlist Member

Joined: Oct 2005
Posts: 13,463
Likes: 768
Doesn't appear that the search function is working today. Hopefully, someone could chime in with diagnosis.
Initially thought I had a problem with the air conditioner/HVAC/CCU. With fan speed on "1" and temp set to low, AC seemed to run fine. However, adjusting either one resulted in fan cycling every couple seconds and no cool air from vents while under way. Heard some clicking sounds coming from what seemed to be the central dashboard area as the fan cycled. While stopped at idle, everything seemed to work OK. Two or three of warning lights plus the (!) light flashed on for too brief of a time to read them while driving (maybe a second), but they were the warning lights on the left left side of the cluster of warning lights. Pulled into garage and noticed that there was some flickering in the headlights and the digital readout at idle and at higher engine revs. Headlights were somewhat dimmer at idle. Voltmeter showed 13.85v at idle and 13.40v immediately after engine shut down. Restarted engine and tried lights again, but didn't seem to have the same flickering again, but I didn't drive it again to see of other problems persisted. Idle seemed a little rough, too.
Not sure if related but, earlier in the day, had an episode where engine died quickly after starting a couple of times and had to feather the accelerator to keep it running for 10 seconds or so before it would idle on it's own.
Thinking that the alternator or voltage regulator may be on the way out, but voltage seems OK. Any ideas?
Rennlist Member
Joined: Apr 2004
Posts: 2,570
Likes: 538
From: Oslo, Norway
This certainly sounds like a major power failure, I would guess low/failing battery and maybe a failing alternator that won't top up the battery. I'd start with measuring charging voltage on the battery (around 14V) and check all GND and + connections on the alternator/battery.
Cheers,
Tore
Cheers,
Tore
Rennlist
Basic Site Sponsor
Basic Site Sponsor

Joined: Dec 2011
Posts: 776
Likes: 23
IMHO, the importance of this cannot be stressed enough, due to age.
Clean the battery terminals and posts.
Are the terminals sitting squarely on the posts (my + terminal was not due to battery design)?
Clean the power take-off on the positive terminal.
Clean the battery ground wire and the other ring terminals where they attach to the body.
I used steel wool to clean the ring terminals until they were shiny and all traces of oxidation were removed. Use a light action with a wire brush on the battery posts and terminals. Tighten grounds very firmly. Battery terminals snug. All of this work should be done with the battery disconnected.
If you are really ambitious, there are more than a dozen ground points on the car. These can be found in electrical sheet 14 in the 993 workshop manual.
__________________
Thread Starter
Rennlist Member
Joined: Oct 2005
Posts: 13,463
Likes: 768
Thanks, guys. Great idea on the ground connections. I got a little panicked initially on thinking that the CCU was the culprit, then the alternator, that I didn't stop to consider grounding issues.
As mentioned in the OP, charging is at a steady 13.85. BesideTheBox, could you name a couple of other grounding points that may be likely culprits which are somewhat easy to reach?
As mentioned in the OP, charging is at a steady 13.85. BesideTheBox, could you name a couple of other grounding points that may be likely culprits which are somewhat easy to reach?
Rennlist
Basic Site Sponsor
Basic Site Sponsor
Joined: Dec 2011
Posts: 776
Likes: 23
Based on your description, my WAG is that is that your issue is the battery ground strap connection to the body. However, any investment in cleaning grounds will pay off handsomely in the long run.
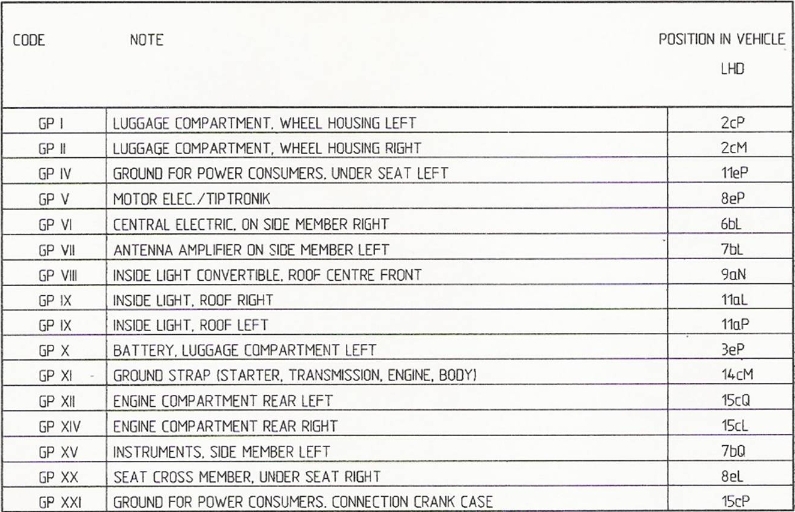
I recently cleaned the two ground points on the right (II) and left (I) wheel housings in the front trunk, the battery ground (X), the grounds under the left seat (IV), engine compartment rear right (XIV), and the ground for the power consumers camshaft casing cyl 3 (XXI).
None of it is terribly difficult, but it is time consuming. The right and left wheel housings in the front trunk, and the battery ground will require removal of the front trunk carpet. And I removed the CD changer so I could see what I was doing when I removed the battery ground below it.
To get to both grounds under the left seat, it will need to be removed. You might be able to get to the rear post without removing the seat. If you DIY, buy a 6 mm allen head socket for this. **edit** >> You can get to the rear post by moving the seat all the way forward and you can get to the front post by moving the seat all the way back.
You can get easier access to the right rear engine compartment ground by removing the air filter housing cover.
The ground for the power consumers camshaft cyl 3 requires removal of the air intake , the duct leading to the aux fan, and the aux fan itself. Then loosen the 'tree' (two 5 mm allen head bolts) that holds several connectors and vacuum tubes to allow access to the 6 mm bolt head just forward of injector 3. Don't be tempted to access this bolt with a 6 mm allen wrench as injector 3 could take a hit with the tool. Access it through the middle of the tree with a 6 mm allen head socket, 3" extension, union, and another 6" extension. This way you are working with a ratchet above the varioram.
Here is a list of grounds and their locations from the 993 workshop manual.
993 Ground Points List.jpg
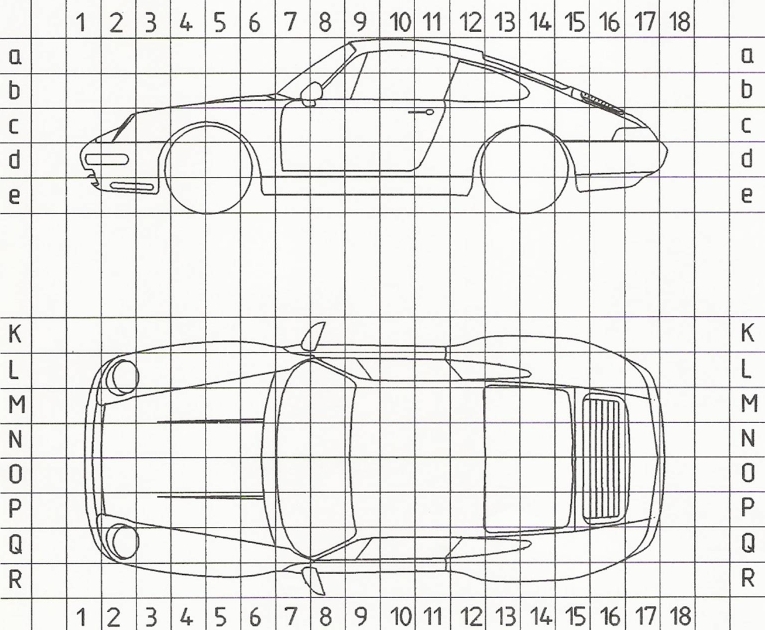
The list above has locators to be used along with the diagram below in order to locate the grounding point. The locator contains 3 parts.
1. Number to identify the front to back location
2. small letter to identify the elevation or height
3. capital letter to identify the right to left location
993 Ground Points Locations.jpg
I recently cleaned the two ground points on the right (II) and left (I) wheel housings in the front trunk, the battery ground (X), the grounds under the left seat (IV), engine compartment rear right (XIV), and the ground for the power consumers camshaft casing cyl 3 (XXI).
None of it is terribly difficult, but it is time consuming. The right and left wheel housings in the front trunk, and the battery ground will require removal of the front trunk carpet. And I removed the CD changer so I could see what I was doing when I removed the battery ground below it.
To get to both grounds under the left seat, it will need to be removed. You might be able to get to the rear post without removing the seat. If you DIY, buy a 6 mm allen head socket for this. **edit** >> You can get to the rear post by moving the seat all the way forward and you can get to the front post by moving the seat all the way back.
You can get easier access to the right rear engine compartment ground by removing the air filter housing cover.
The ground for the power consumers camshaft cyl 3 requires removal of the air intake , the duct leading to the aux fan, and the aux fan itself. Then loosen the 'tree' (two 5 mm allen head bolts) that holds several connectors and vacuum tubes to allow access to the 6 mm bolt head just forward of injector 3. Don't be tempted to access this bolt with a 6 mm allen wrench as injector 3 could take a hit with the tool. Access it through the middle of the tree with a 6 mm allen head socket, 3" extension, union, and another 6" extension. This way you are working with a ratchet above the varioram.
Here is a list of grounds and their locations from the 993 workshop manual.
993 Ground Points List.jpg
The list above has locators to be used along with the diagram below in order to locate the grounding point. The locator contains 3 parts.
1. Number to identify the front to back location
2. small letter to identify the elevation or height
3. capital letter to identify the right to left location
993 Ground Points Locations.jpg
Last edited by BesideTheBox; Apr 18, 2013 at 12:11 AM.
Thread Starter
Rennlist Member
Joined: Oct 2005
Posts: 13,463
Likes: 768
A quick update. Finally had some time this morning to pull the battery. Cleaned the battery posts, clamps, wire terminals and the main chassis ground and that seems to have fixed the problem, so I went no further. Neither the battery posts or the clamps looked particularily clean, so that is likely where the problem was.
Thanks, Tore and Box!
Thanks, Tore and Box!


