
DIY Coolant Fitting Fix with Motor In the Car
 02-07-2012, 03:43 PM
#1
Racer
Thread Starter
We had an '07 GT3 with 12k miles blow it's fitting out this past December at an AX at El Toro airfields (where Top Gear USA is filmed), the one right under the left intake manifold. Subsequently we had to reroute part of the the course because it was so slippery. The session prior to it happening, the owner and myself couldn't figure out where the leak was coming from because it was dripping fluid right under where the rear main seal normally leaks and the fluid on the ground was dark and slippery like oil so we though it might have been the rear main seal.
Regardless better to be proactive and fix the problem permanently, and I wasn't convinced that the motor really needed to be pulled out to fix all the fittings. So on my car, I took a few minutes to remove the alternator and power steering pump and I'm convinced all six fittings can be pinned in with the motor in the car. I've marked all six locations where you would just drill, tap, and insert six stainless screws to lock the fittings from ever coming out. The two under the intake manifold is a tight area and will require a 90 degree drill or Dremmel to drill out, but after you gather the right tools and bits you need, I estimate all this should take no more than 4 hours to complete.
The first three are on the water pump housing under the alternator. Two of them where you would tap and screw are pointed out in the red arrows:
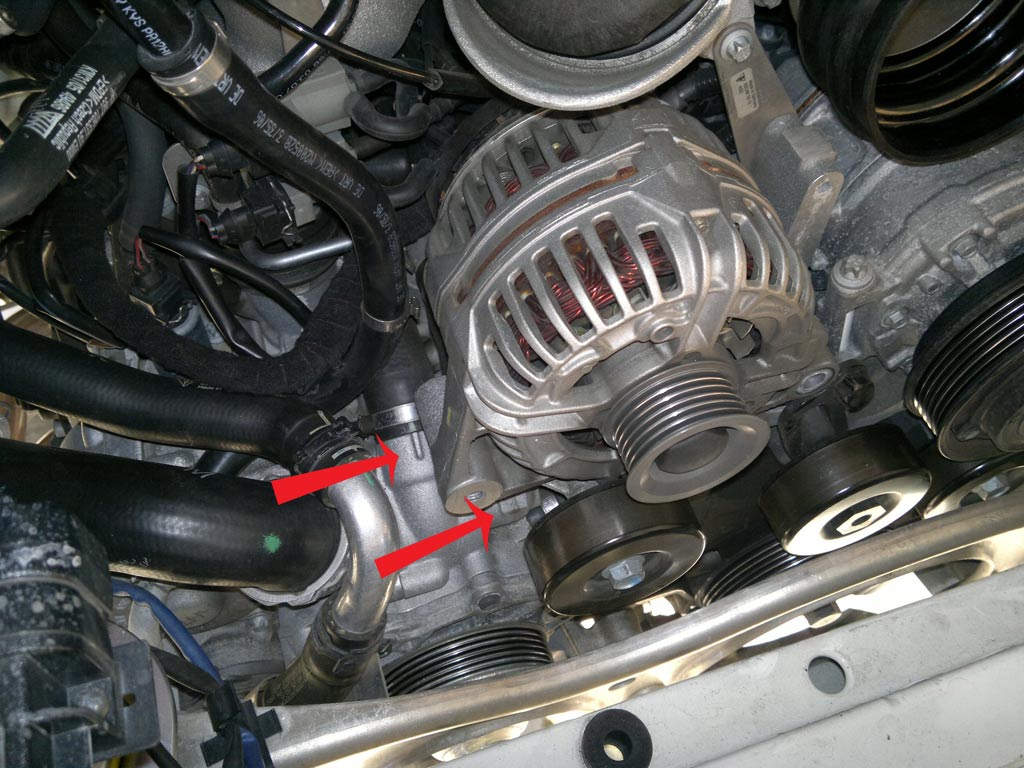
After removing the alternator, a closer look showing all three. These should be very easy to access:
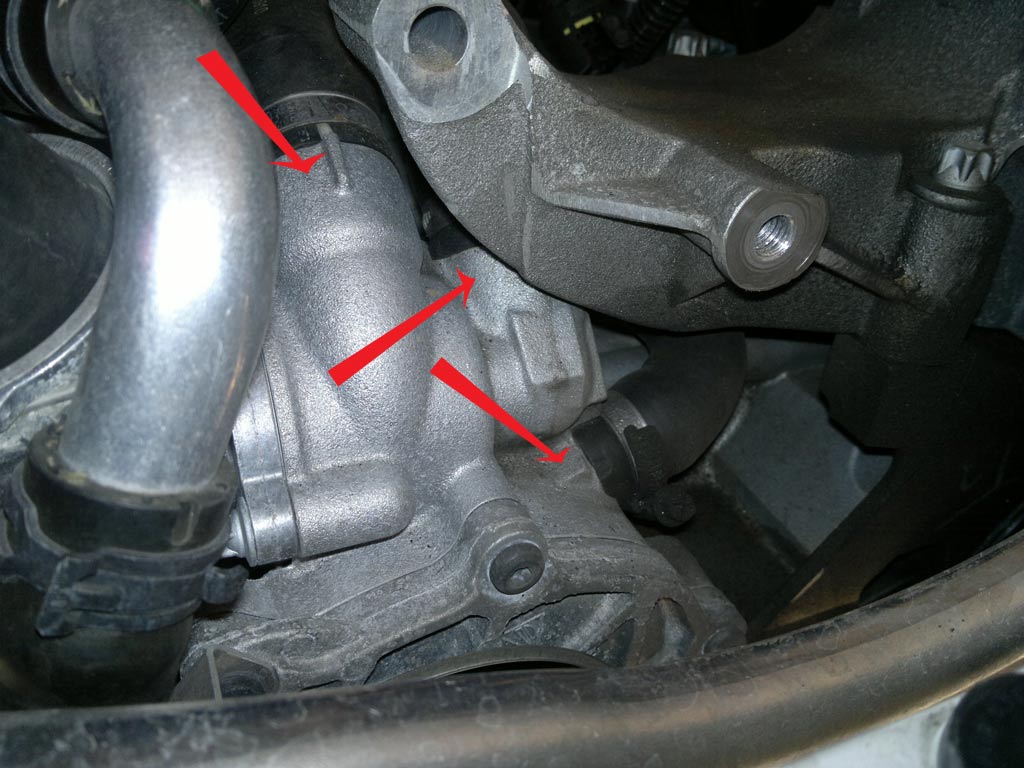
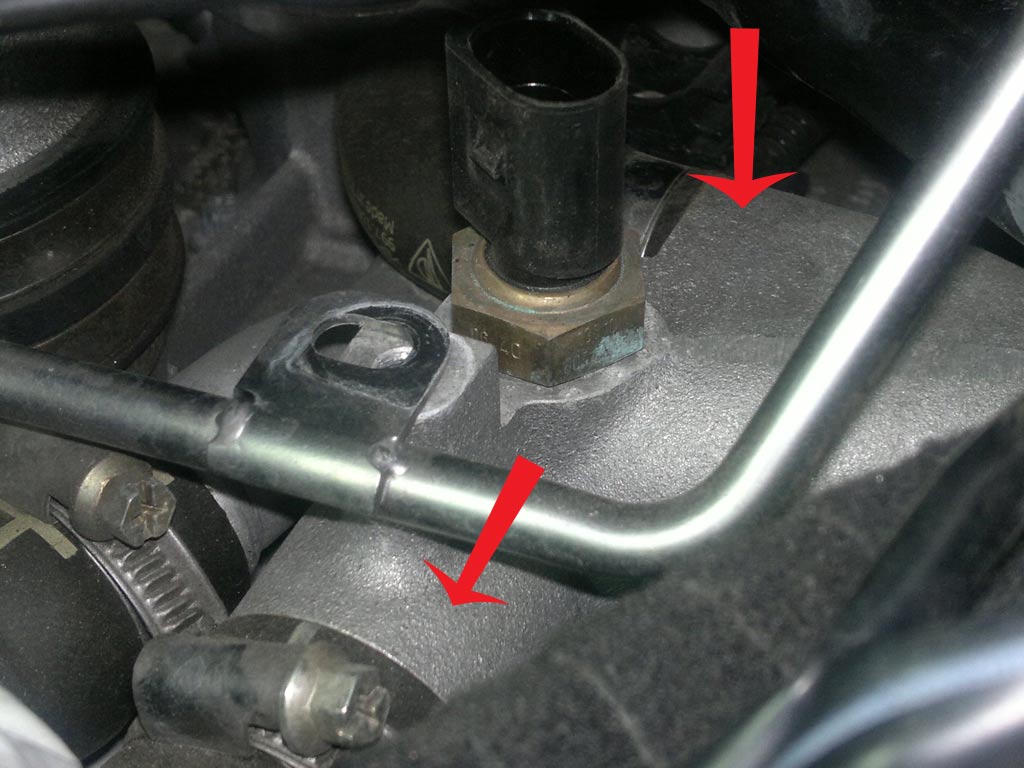
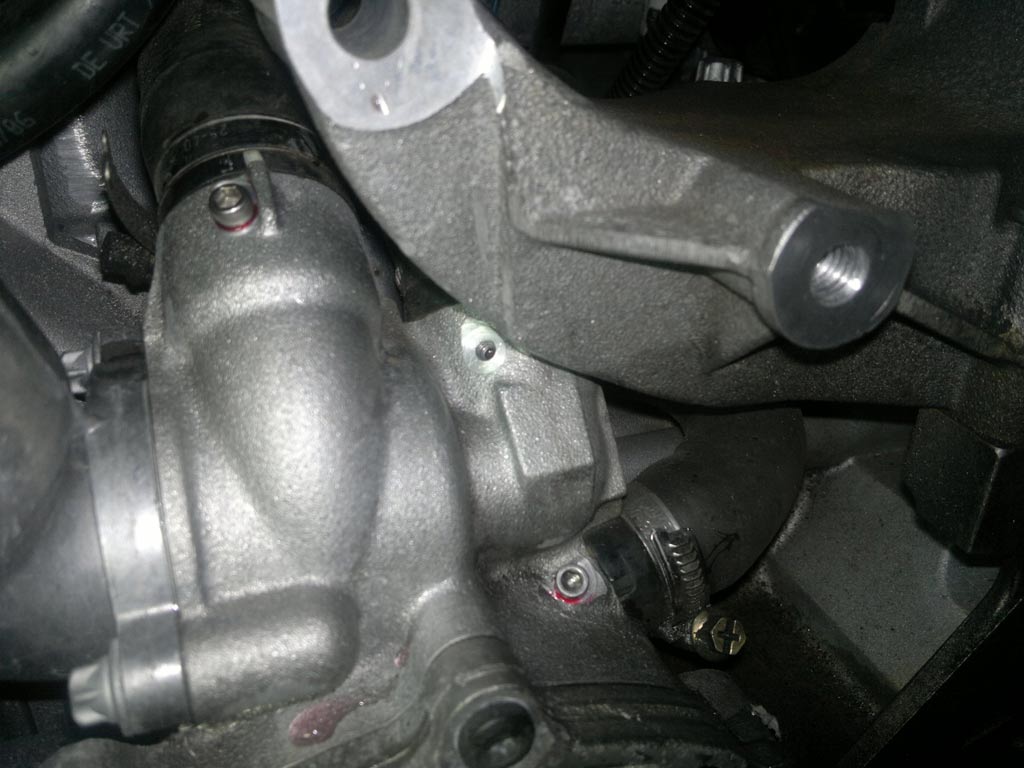
The other two are on the cast elbow under the left intake manifold. With the alternator removed, you can see one of the one of the joints below:
And the other joint on the same casting:
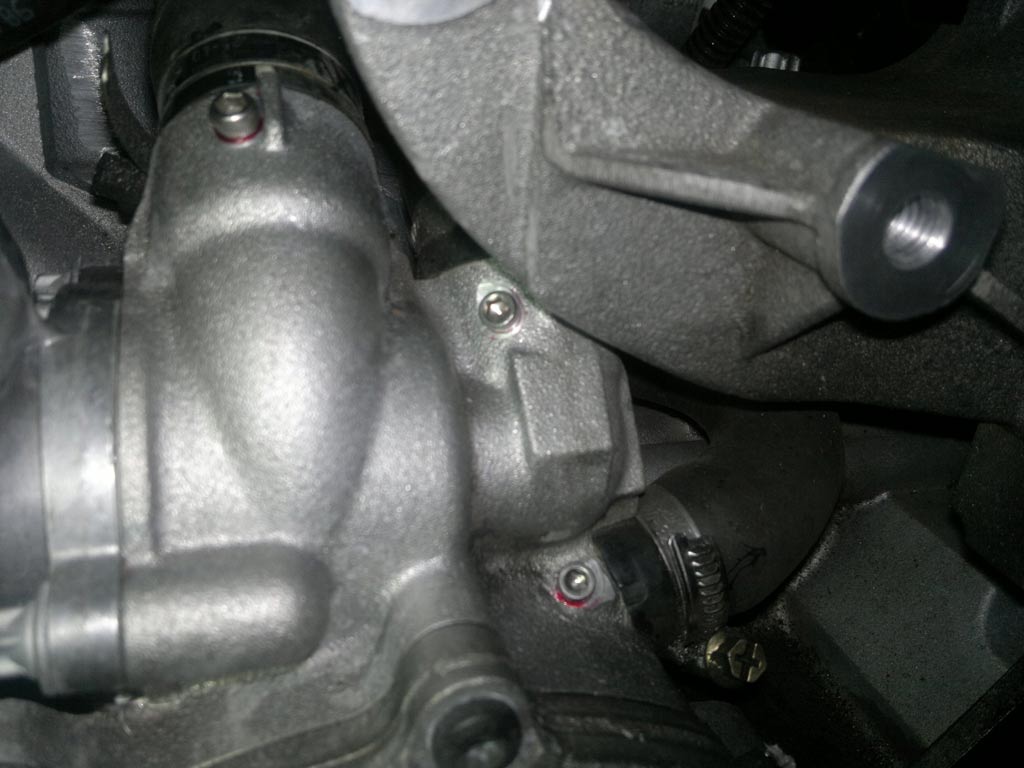
And a close up view of these same two. These will require a 90 degree drill to access:
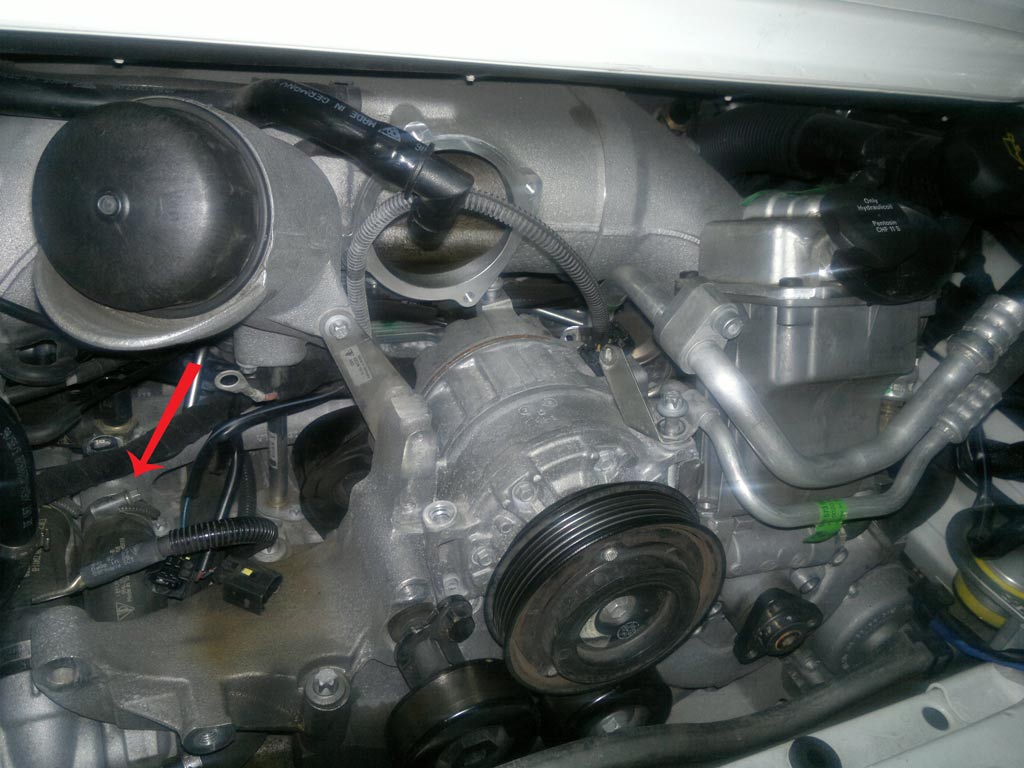
With the power steering pump removed, you can see the sixth fitting which is part of the power steering bracket. This one should also be very easy to access:
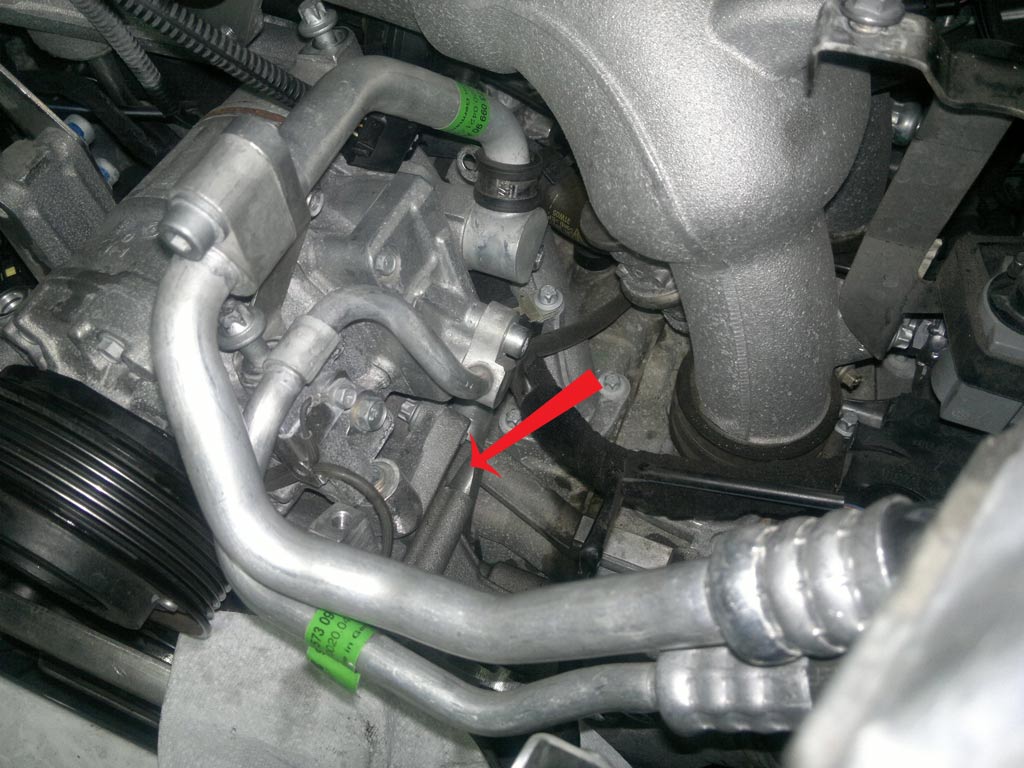
And a close up view:
Drill each location with the appropriate drill and bit, with a shop vac to capture as much of the shavings prior to penetration, and liberally coat the tip of your drill bit with grease to capture as much as the shavings as you can. Constantly clean off and recoat your drill tip as you get close to penetration to prevent/minimize any shavings from going in. You can modify a coolant cap with a tire valve stem and pressurize the system slightly so once you get through, some coolant and any debris should blow out. Tap for M4x1.0 screw, and thread a hex socket stainless screw into each location with red Locktite.
I haven't had a chance to do all this yet, but when I do, I'll post some additional pics.

Regardless better to be proactive and fix the problem permanently, and I wasn't convinced that the motor really needed to be pulled out to fix all the fittings. So on my car, I took a few minutes to remove the alternator and power steering pump and I'm convinced all six fittings can be pinned in with the motor in the car. I've marked all six locations where you would just drill, tap, and insert six stainless screws to lock the fittings from ever coming out. The two under the intake manifold is a tight area and will require a 90 degree drill or Dremmel to drill out, but after you gather the right tools and bits you need, I estimate all this should take no more than 4 hours to complete.
The first three are on the water pump housing under the alternator. Two of them where you would tap and screw are pointed out in the red arrows:
After removing the alternator, a closer look showing all three. These should be very easy to access:
The other two are on the cast elbow under the left intake manifold. With the alternator removed, you can see one of the one of the joints below:
And the other joint on the same casting:
And a close up view of these same two. These will require a 90 degree drill to access:
With the power steering pump removed, you can see the sixth fitting which is part of the power steering bracket. This one should also be very easy to access:
And a close up view:
Drill each location with the appropriate drill and bit, with a shop vac to capture as much of the shavings prior to penetration, and liberally coat the tip of your drill bit with grease to capture as much as the shavings as you can. Constantly clean off and recoat your drill tip as you get close to penetration to prevent/minimize any shavings from going in. You can modify a coolant cap with a tire valve stem and pressurize the system slightly so once you get through, some coolant and any debris should blow out. Tap for M4x1.0 screw, and thread a hex socket stainless screw into each location with red Locktite.
I haven't had a chance to do all this yet, but when I do, I'll post some additional pics.
 02-07-2012, 04:27 PM
#2
Rennlist Member
>Drill each location with the appropriate drill and bit, with a shop vac to capture as much of the shavings prior to penetration
no way if you do it with a consumer grade cheap hand-held drill you will do a clean straight hole nor you`ll be able to catch shavings, they will definitely go inside of cooling system and may destroy water pump afterwards or get stuck somewhere in passages. only proper way is to uncouple all joints, get it dry, put some cloth or sponge inside and make sure how deep you need to drill.
and after you drill - i do not think it is a good idea. it is all aluminum, not steel. how are you going to seal those holes after you make them? with steel screws and silicone on top? coolant will destroy them very fast and it all will be leaking in no time.
imho driling holes there is a horrible approach, it should be welded at the contact edge.
02-07-2012, 04:56 PM
#3
Racer
Thread Starter
I disagree. People are overengineering the solution. The cooling system sees a max of 15psi so each fitting being appx 1 square inch only sees a max of 15, maybe 20 lbs axial force. The rubber hoses and clips are less high tech than that. A screw through the fitting will do fine. Proper tapping after drilling with Locktite on the screws will seal the threads. Anyone who's ever had some mechanical experience would know this. Silicone is useless and unnecessary. While welding is nice, it's completely excessive and since very few people are going to spend $2-3k plus to pull their motor out, it's better if more people would do something if they knew it was practical.
Very few if any shavings will go in if you do it the way described. Remember, you are vacuuming and removing all that is drilled out before penetration. Just at penetration, the grease at the bit should grab what little there is at the penetration and if anything little goes in, it will be negligible and don't expect any future issues including the water pump. But if it bothers you, you could flush the cooling system afterwards, or if the water pump really goes bad, they are easy and cheap to replace relative to removing and welding the fittings.
Very few if any shavings will go in if you do it the way described. Remember, you are vacuuming and removing all that is drilled out before penetration. Just at penetration, the grease at the bit should grab what little there is at the penetration and if anything little goes in, it will be negligible and don't expect any future issues including the water pump. But if it bothers you, you could flush the cooling system afterwards, or if the water pump really goes bad, they are easy and cheap to replace relative to removing and welding the fittings.
The following users liked this post:
cbracerx (01-07-2023)
02-07-2012, 05:19 PM
#4
Rennlist Member
i`ve never seen screws inserted right into coolant joints all the way through, that`s all.
i would never do such a thing, from engineering standpoint it does not seem good.
plus, it is soft aluminum, not steel. with steel it would not be a problem, you would carve a thread and put in bolt with rubber gasket under its head and end of story. here you got constant vibration and movement of insert on which rubber hose sits and it will keep destroying that hole you just made and it will leak.
anyway, it is my opinion. i would not do that, it is your car, if you are sure it will be fine - why not to try and tell here after year or so how it worked out? may be indeed it is a simplest way.
 02-07-2012, 05:39 PM
#6
Rennlist Member
Would be nice to have some sorta registry on who addressed the coolant fittings welded or pinned and have updates on longevity of weld or pinned. I had mine pinned- my mechanic doesn't weld. Mike
02-07-2012, 06:08 PM
#7
Three Wheelin'
Join Date: Jul 2006
Location: North Vancouver, Canada
Posts: 1,771
Likes: 0
Received 0 Likes
on
0 Posts
I agree with Utkinpol, there is always the potential to get foreign objects were they shouldn't. As well you have had a leak already, and you don't think that the one you can't get to won't have an issue? I think the chances increase when one has gone.
I have only had my GT3 a few months, and have yet to take it to the track, but my car is getting the coolant welds done as we speak, should get it back tomorrow.
I have only had my GT3 a few months, and have yet to take it to the track, but my car is getting the coolant welds done as we speak, should get it back tomorrow.
Trending Topics
02-07-2012, 07:31 PM
#8
Racer
Thread Starter
The leak was on a friend's car, not mine. I believe he had a shop fix it by regluing/or epoxying it back in and from what I heard it was a lot of work. If you are willing to have it welded, then great, but you and I know you most owners aren't going to go through the trouble and expense of having the motor pulled and weld the fittings, no matter how much you pound them about it. That leaves a lot of potential time bombs out there. If just a few guys have their fittings pinned in, it's 100x better than doing nothing at all, and just might save a few cars or lives.
02-07-2012, 07:35 PM
#9
Three Wheelin'
Join Date: Jul 2006
Location: North Vancouver, Canada
Posts: 1,771
Likes: 0
Received 0 Likes
on
0 Posts
Sorry, I thought it was your car.
I did ask my local dealer about it, and they said it is possible to tack weld the fitting in place, but they can't get all of the fittings without removing the engine. They did agree the full weld is always better, and a car off warranty they would recommend them to get it done. Makes you wonder why they wouldn't just fix this from the start.
I did ask my local dealer about it, and they said it is possible to tack weld the fitting in place, but they can't get all of the fittings without removing the engine. They did agree the full weld is always better, and a car off warranty they would recommend them to get it done. Makes you wonder why they wouldn't just fix this from the start.
02-08-2012, 12:12 AM
#10
Rennlist Member
The amount of metal, thickness, of some of the bosses were the tube is glued in looks to be a bit thin. So there may not be a lot of threads.
02-08-2012, 02:00 AM
#11
Racer
Thread Starter
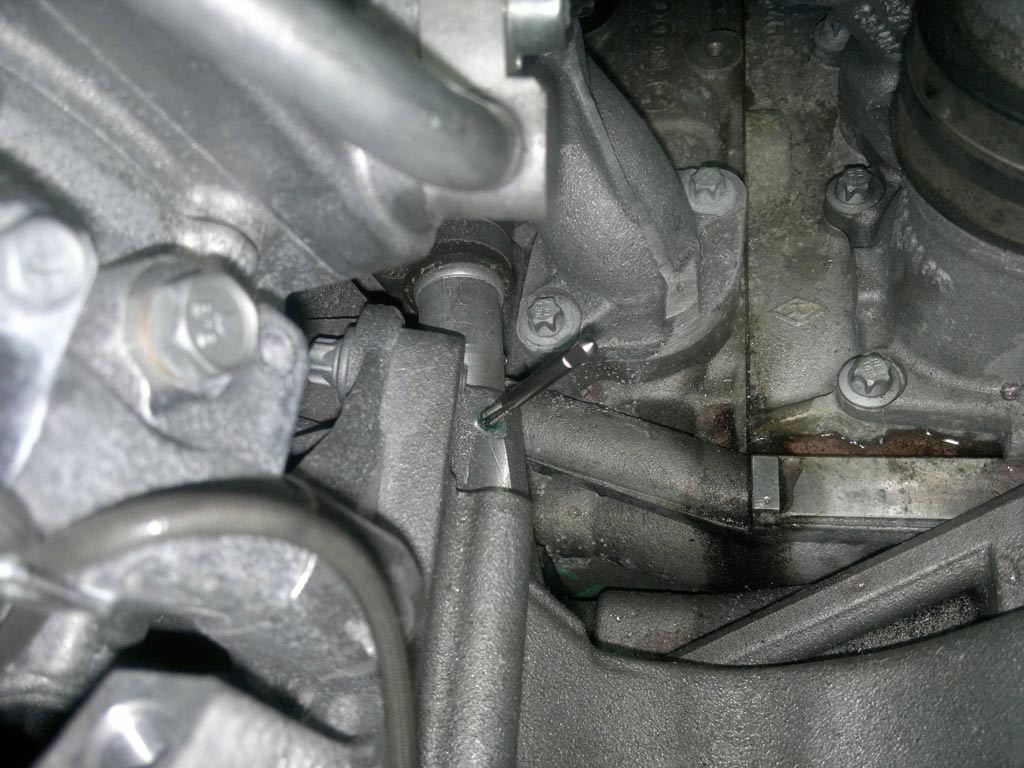
It's very tight in there and difficult to move any of the hoses, not sure how a decent tack or stitch weld is going to be done without compromising the rubber hose or the existing glue. High temp Locktite breaks down at around 500 degrees, and any fumes from the oxidation of the glue could cause weld contamination. If you are really hard set on welding these things, you could remove the water pump housing and the power steering bracket and do it outside. It's a little more work but can be removed with the motor in the car. The inner cast elbow might also be removable but it is very very tight there.
The castings are from 6 to 8 mm thick, more than sufficient to retain a 4mm diameter screw.
These are just low pressure coolant hoses guys, not 3000 psi hydraulic lines.
The castings are from 6 to 8 mm thick, more than sufficient to retain a 4mm diameter screw.
These are just low pressure coolant hoses guys, not 3000 psi hydraulic lines.
The following users liked this post:
cbracerx (01-07-2023)
02-09-2012, 04:46 AM
#12
Racer
Thread Starter
Made some progress today. Four of the six are now locked in permanently.
First pic is of the water pump housing. A Dremmel with the appropriate cutting bit was used to face a flat surface where the screws would go:
The connection on the power steering pump bracket is also faced:
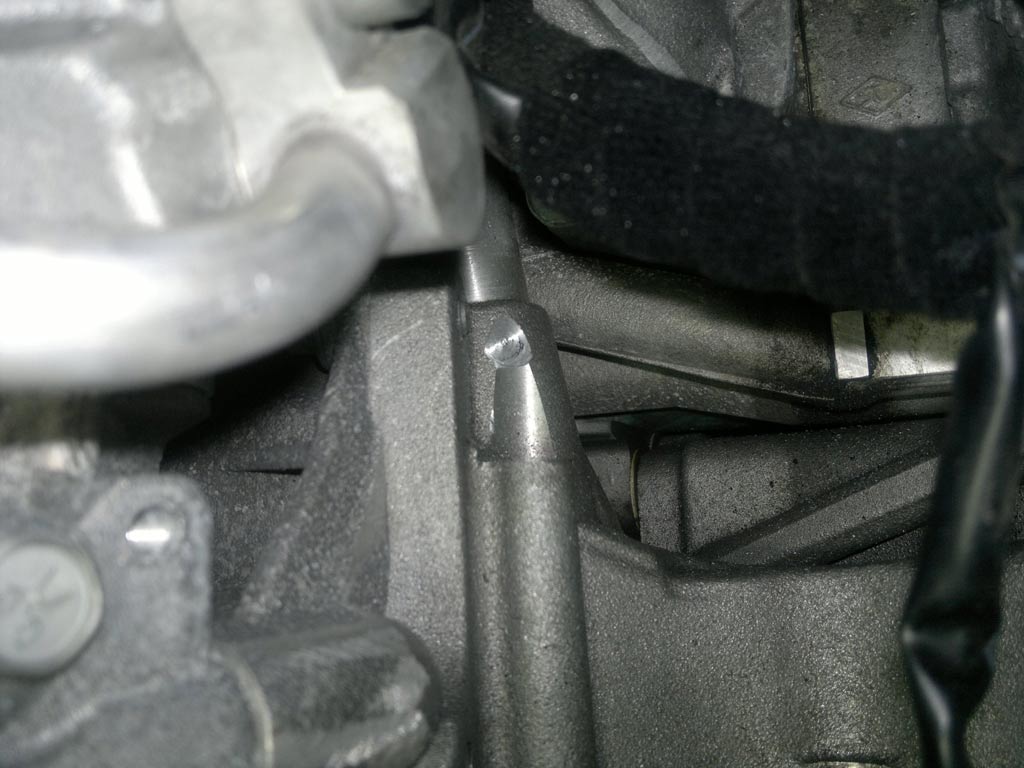
The screws I will be using are stainless 8-32 x 3/8" long hex heads. A matching drill and tap set are used to drill in the set screw points. The drill tip is coated with a very sticky grease, while a shop vac at the point of drilling is used to evacuate loose shavings. The technique worked very well. All loose chips/shavings evacuated out of the backside of the drill bit and went right into the vacuum. What little was left remained stuck with the grease. At the moment of penetration, coolant shoots out and purges out of the hole, about three ozs. and stops.
The 8-32 tap is also coated with grease to collect the fine shavings of tapping the threads.
Clean your newly tapped hole of any grease and debris. The stainless 8-32 x 3/8" screws are coated with red locktite and screwed into the new hole. 3/8" long screws work perfect. The depth of each hole including the fitting each measured appx. 7 to 7.5 mm, so the 3/8" screws (9.5mm) penetrates past the fitting by 2 mm. It will be very difficult to remove the fittings without tearing up the fittings with lots of force.
Open your coolant cap for a moment to let air into the system and close your cap. This will allow your coolant to purge some again when you drill your next hole. Repeat for the other two:
tapping the threads for the fitting on the power steering pump bracket:
completed:
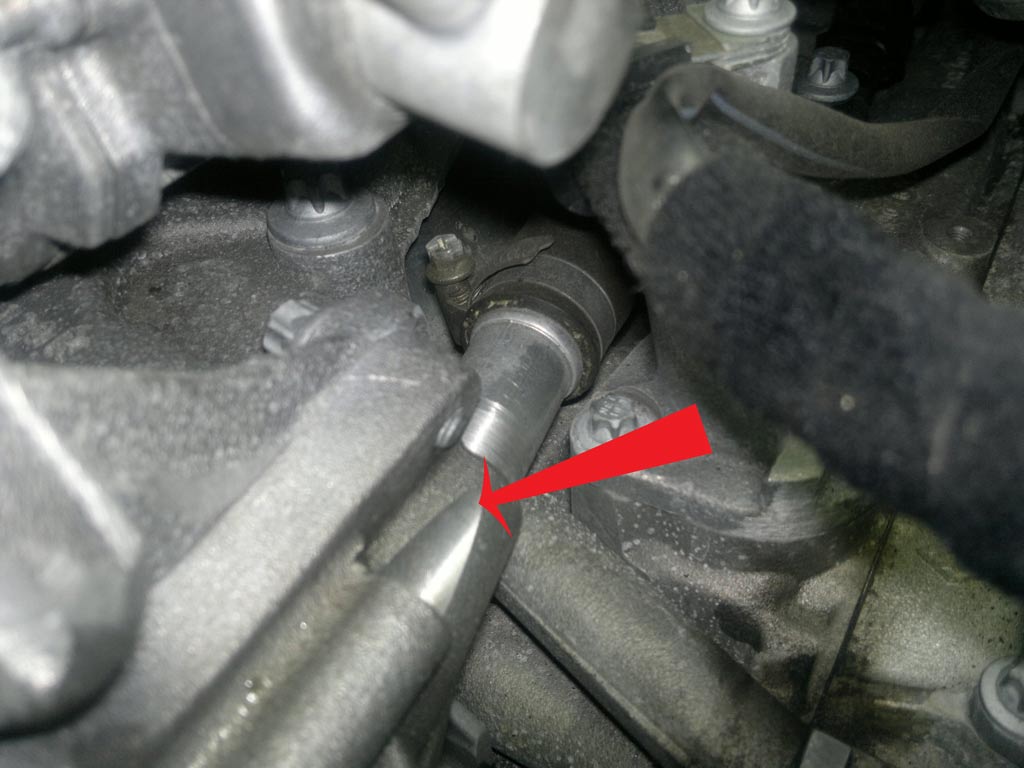
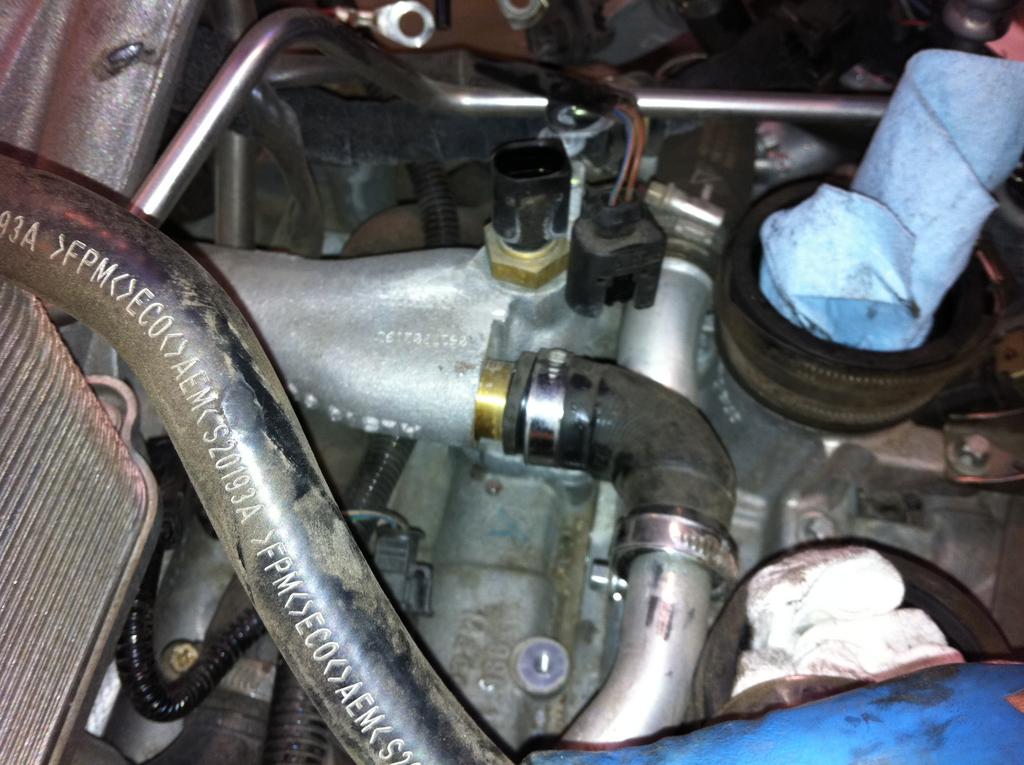
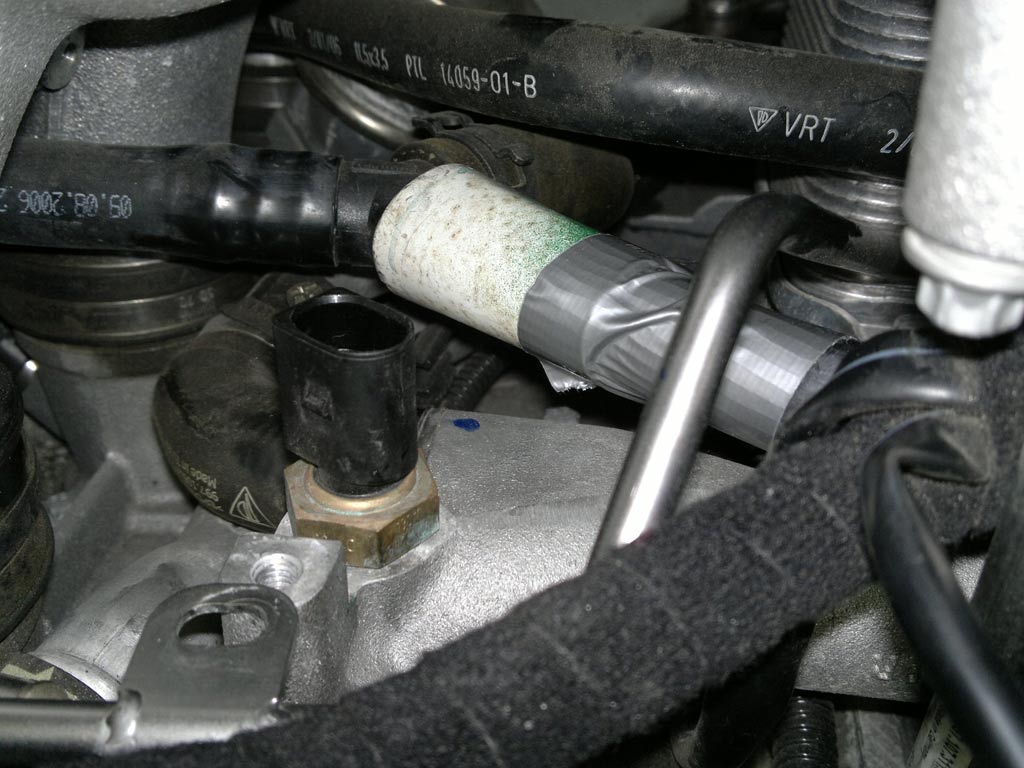
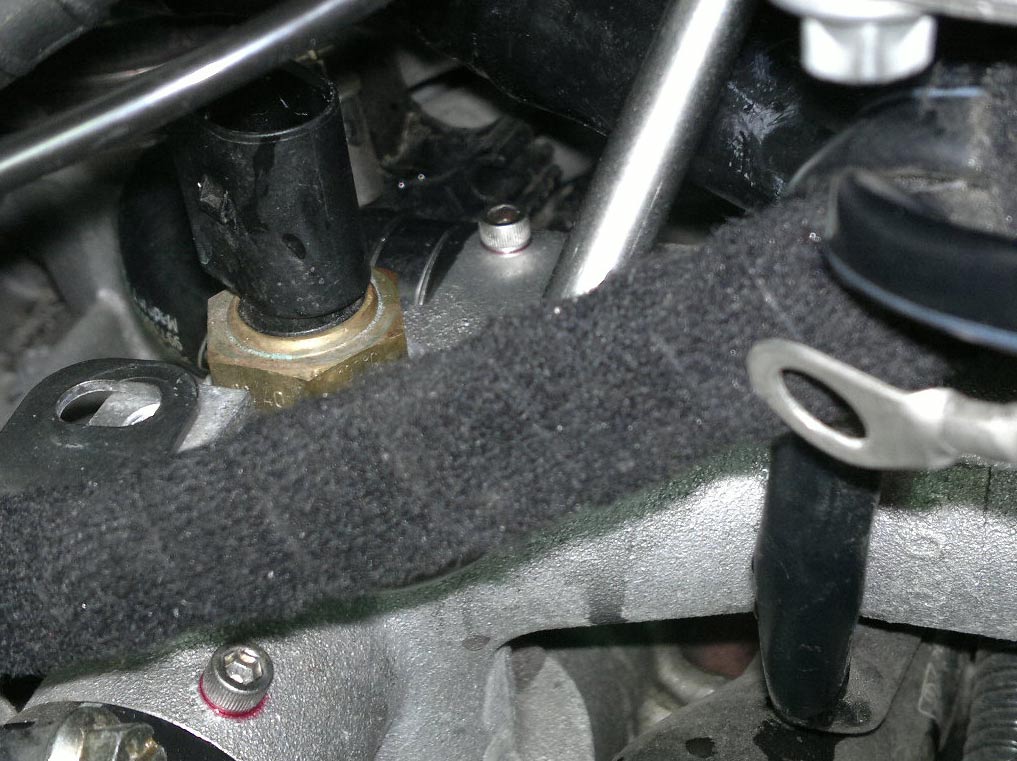
Up next will be this area, but first I'll need to source the correct angle drill to get into this area:
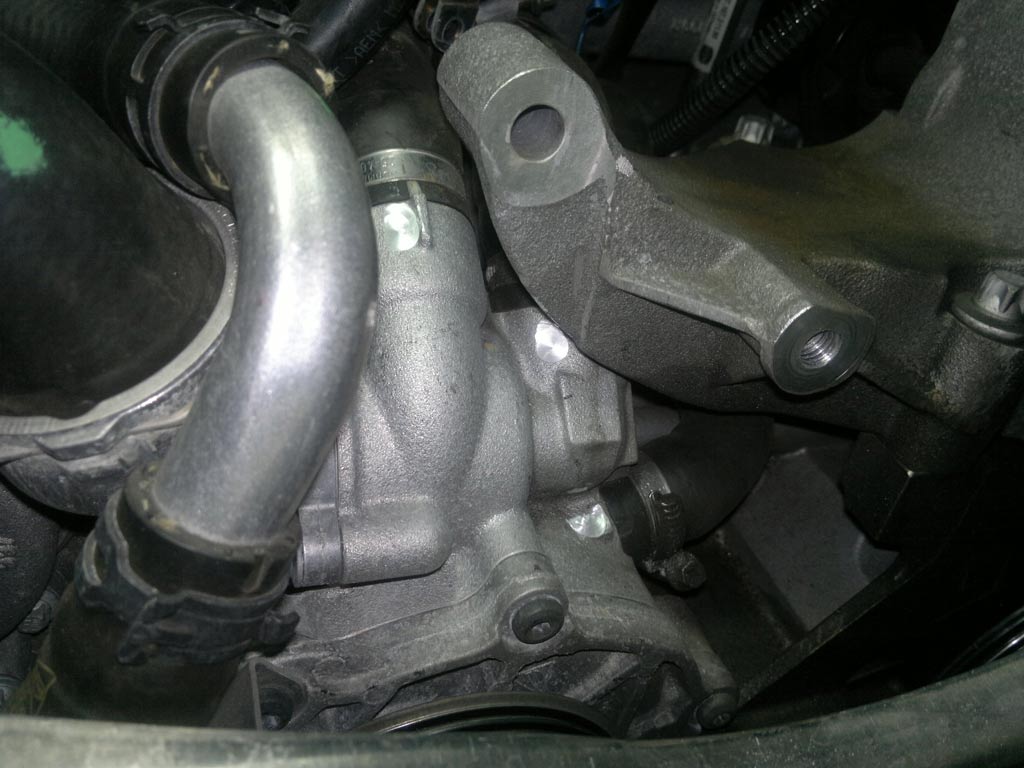
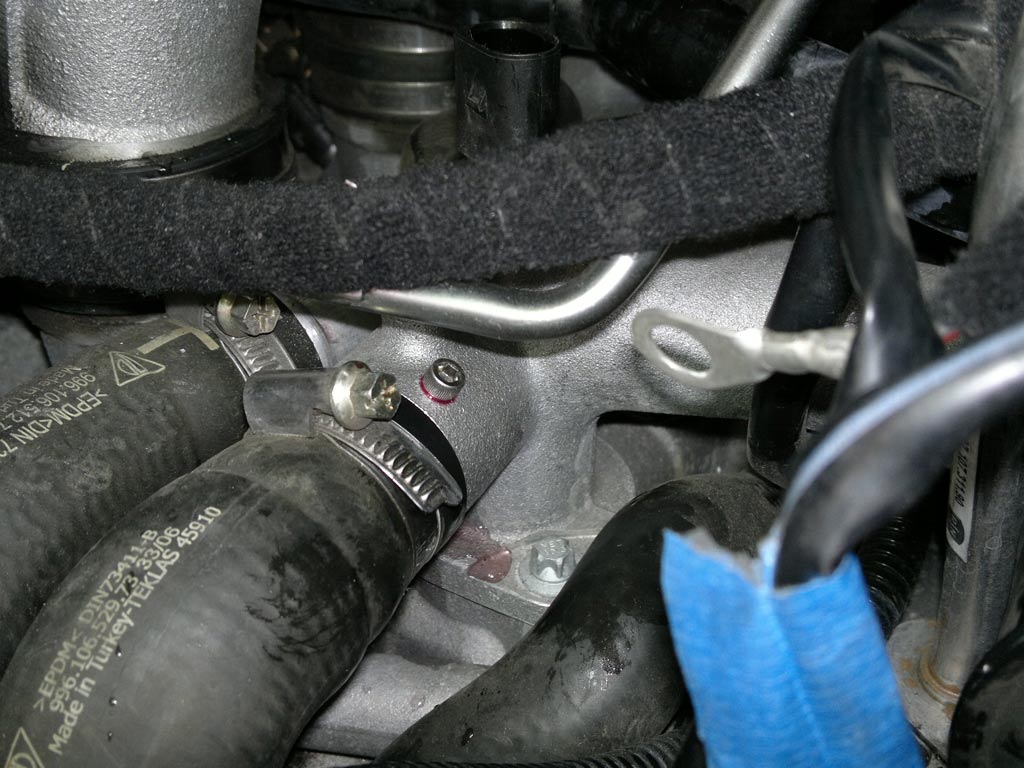
Not my car, but gives you an idea of what you are working with and the particular fitting that blew out on my friend's car:
First pic is of the water pump housing. A Dremmel with the appropriate cutting bit was used to face a flat surface where the screws would go:
The connection on the power steering pump bracket is also faced:
The screws I will be using are stainless 8-32 x 3/8" long hex heads. A matching drill and tap set are used to drill in the set screw points. The drill tip is coated with a very sticky grease, while a shop vac at the point of drilling is used to evacuate loose shavings. The technique worked very well. All loose chips/shavings evacuated out of the backside of the drill bit and went right into the vacuum. What little was left remained stuck with the grease. At the moment of penetration, coolant shoots out and purges out of the hole, about three ozs. and stops.
The 8-32 tap is also coated with grease to collect the fine shavings of tapping the threads.
Clean your newly tapped hole of any grease and debris. The stainless 8-32 x 3/8" screws are coated with red locktite and screwed into the new hole. 3/8" long screws work perfect. The depth of each hole including the fitting each measured appx. 7 to 7.5 mm, so the 3/8" screws (9.5mm) penetrates past the fitting by 2 mm. It will be very difficult to remove the fittings without tearing up the fittings with lots of force.
Open your coolant cap for a moment to let air into the system and close your cap. This will allow your coolant to purge some again when you drill your next hole. Repeat for the other two:
tapping the threads for the fitting on the power steering pump bracket:
completed:
Up next will be this area, but first I'll need to source the correct angle drill to get into this area:
Not my car, but gives you an idea of what you are working with and the particular fitting that blew out on my friend's car:
02-09-2012, 01:28 PM
#13
Race Car
Great thread, controversial but good info and outstanding pictures. My repair needs to be done soon and I've said all along if there's a way to correct this in the car that I'd give it a shot. A '6 GT3 has two more fittings on the other side of the motor behind the power steering pump, any clue if those can be done with a little disassembly and effort as well? I already had to fix one of those with epoxy last year and think it might be difficult to pin in the car based on how difficult it was to get to just to epoxy it back in.
...though If the motor comes out for my fix I've justified doing a flywheel while it's out. That money is better spent on tires and track time though.
Andy
...though If the motor comes out for my fix I've justified doing a flywheel while it's out. That money is better spent on tires and track time though.
Andy
02-09-2012, 07:58 PM
#14
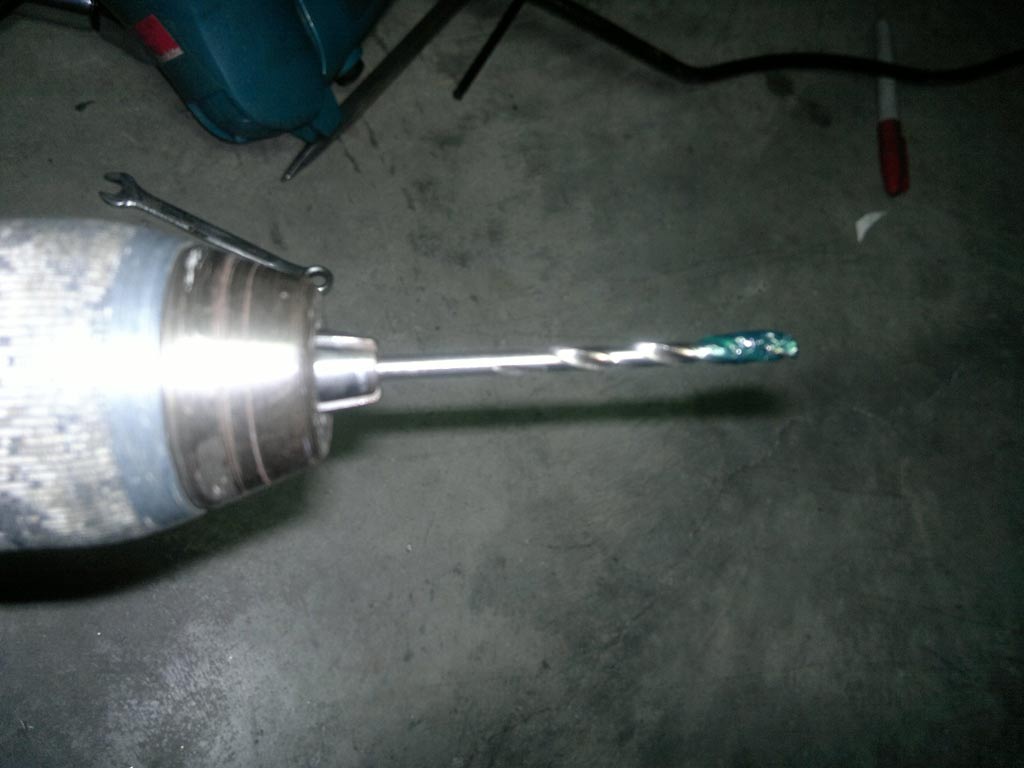
Racer
Thread Starter
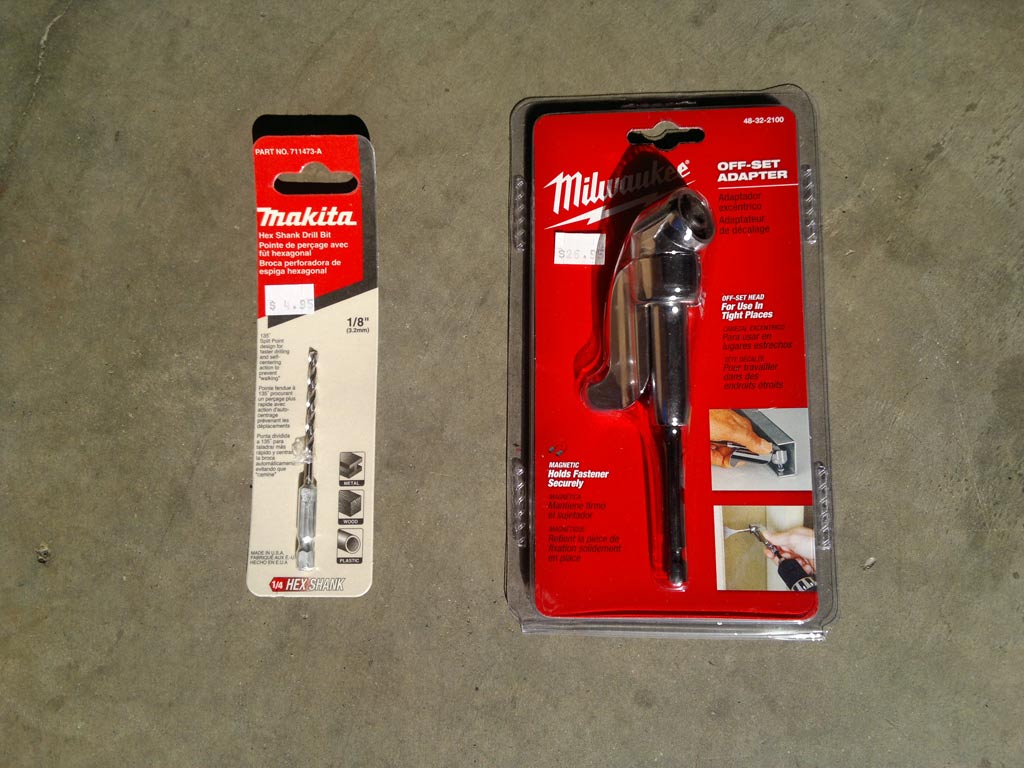
Job complete! Here's what I was able to find this morning at the local tool shack. A Milwaukee angle adapter that you attach to the end of your drill to get into tight spaces, ~$27. Also the Makita 1/8" drill bit with a hex shank that fits onto the angle adapter that will be used to drill the holes for the 8-32 tap. Pep Boys also has a nice compact Kawasaki angle drill driver for $20, but it's air driven and would require dragging out your compressor and hose.
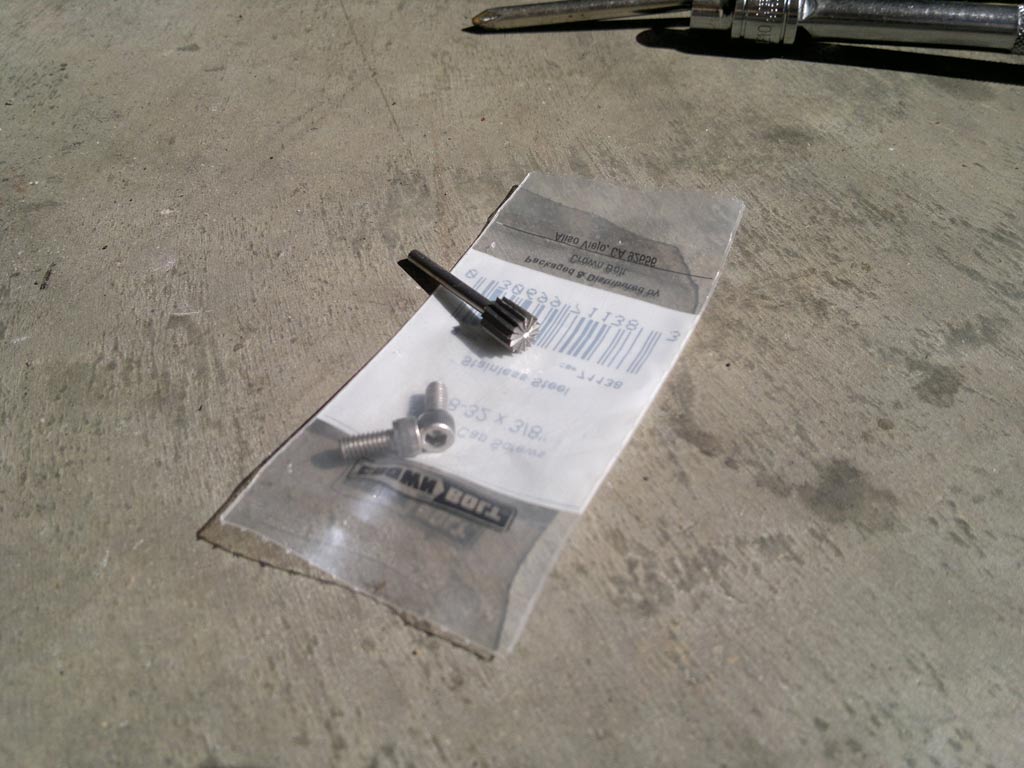
I had a PM asking what Dremel bit I used to cut a face in the castings previously. Don't have the part number, but here's what it looks like relative to the screws:
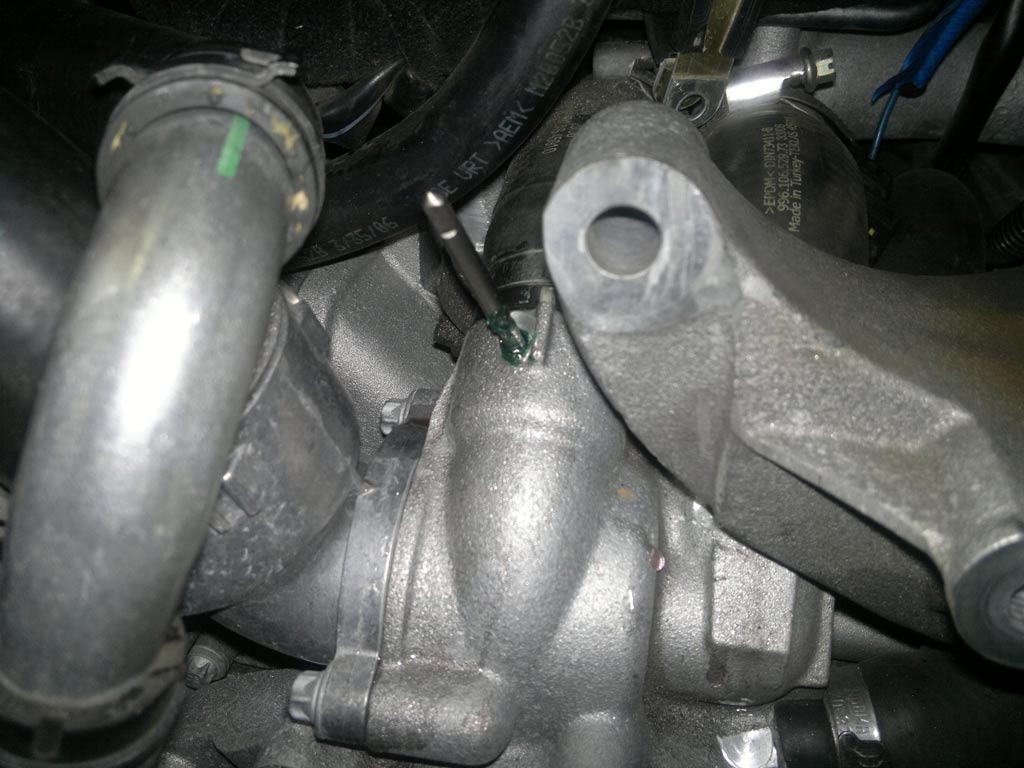
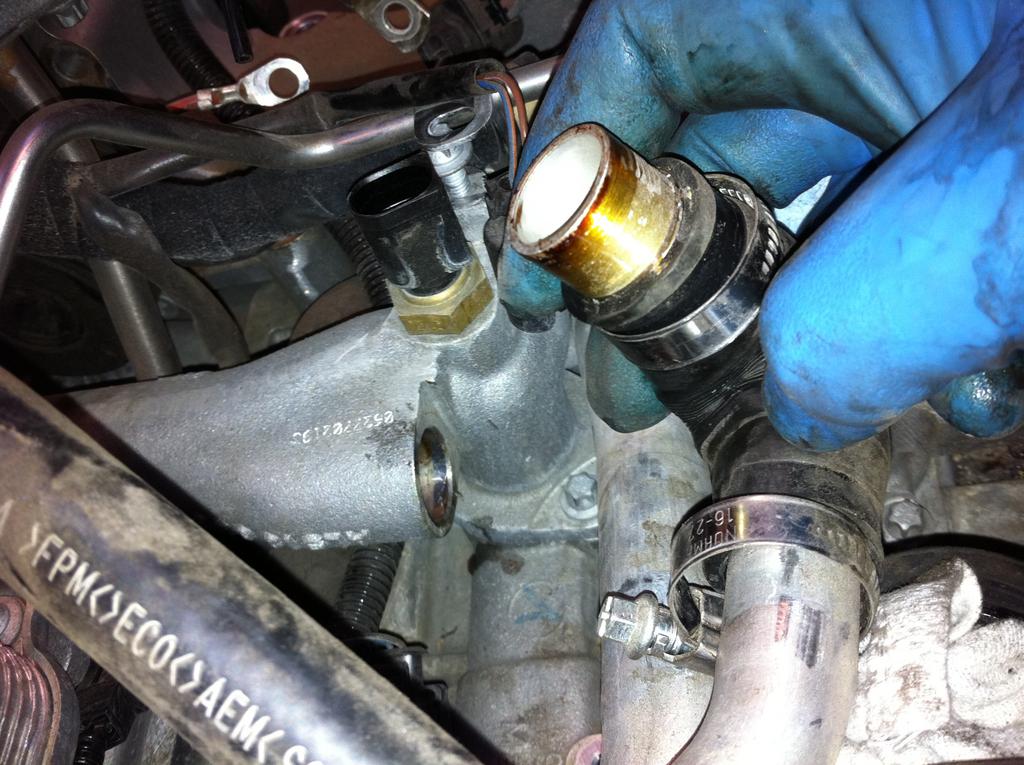
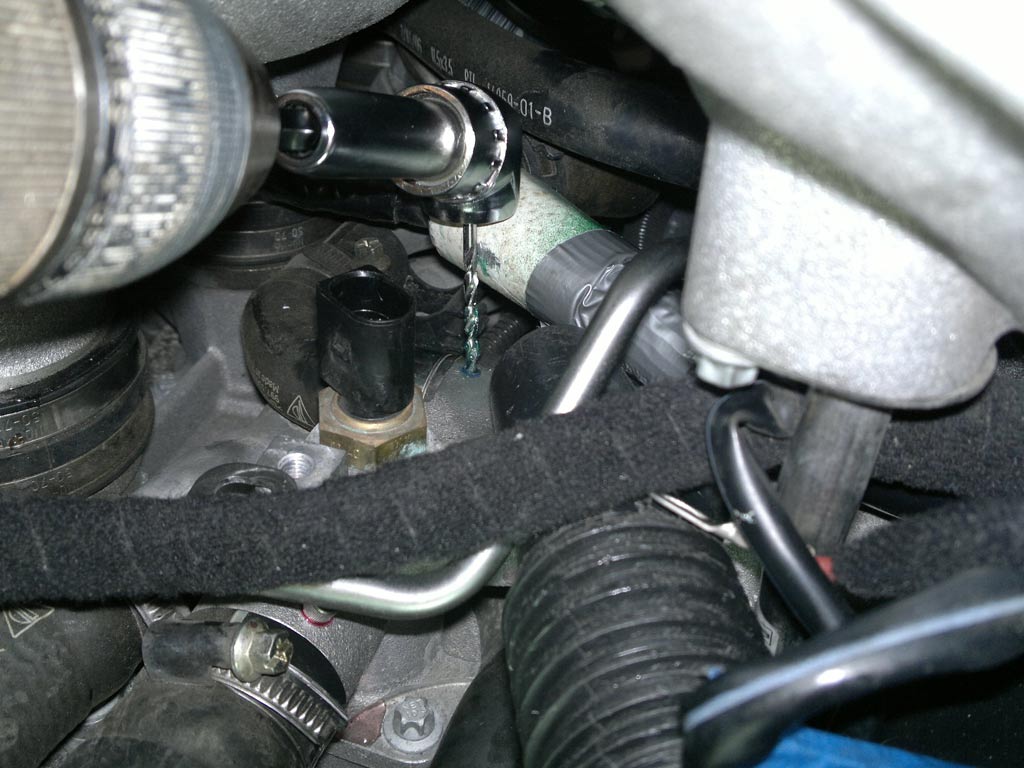
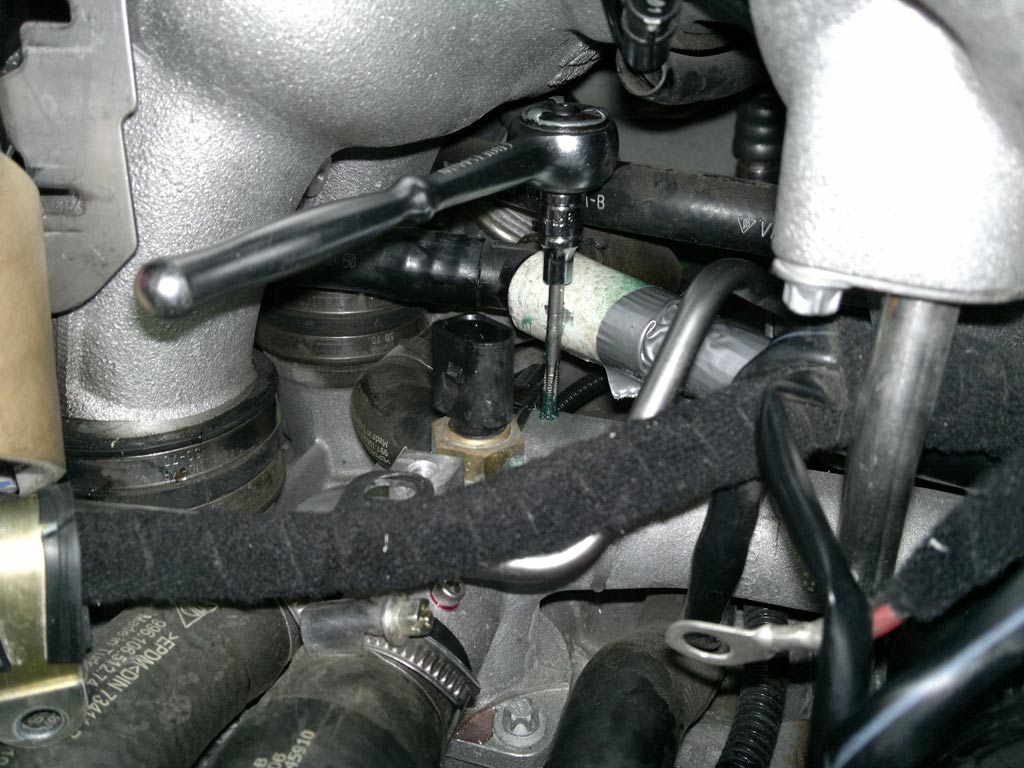
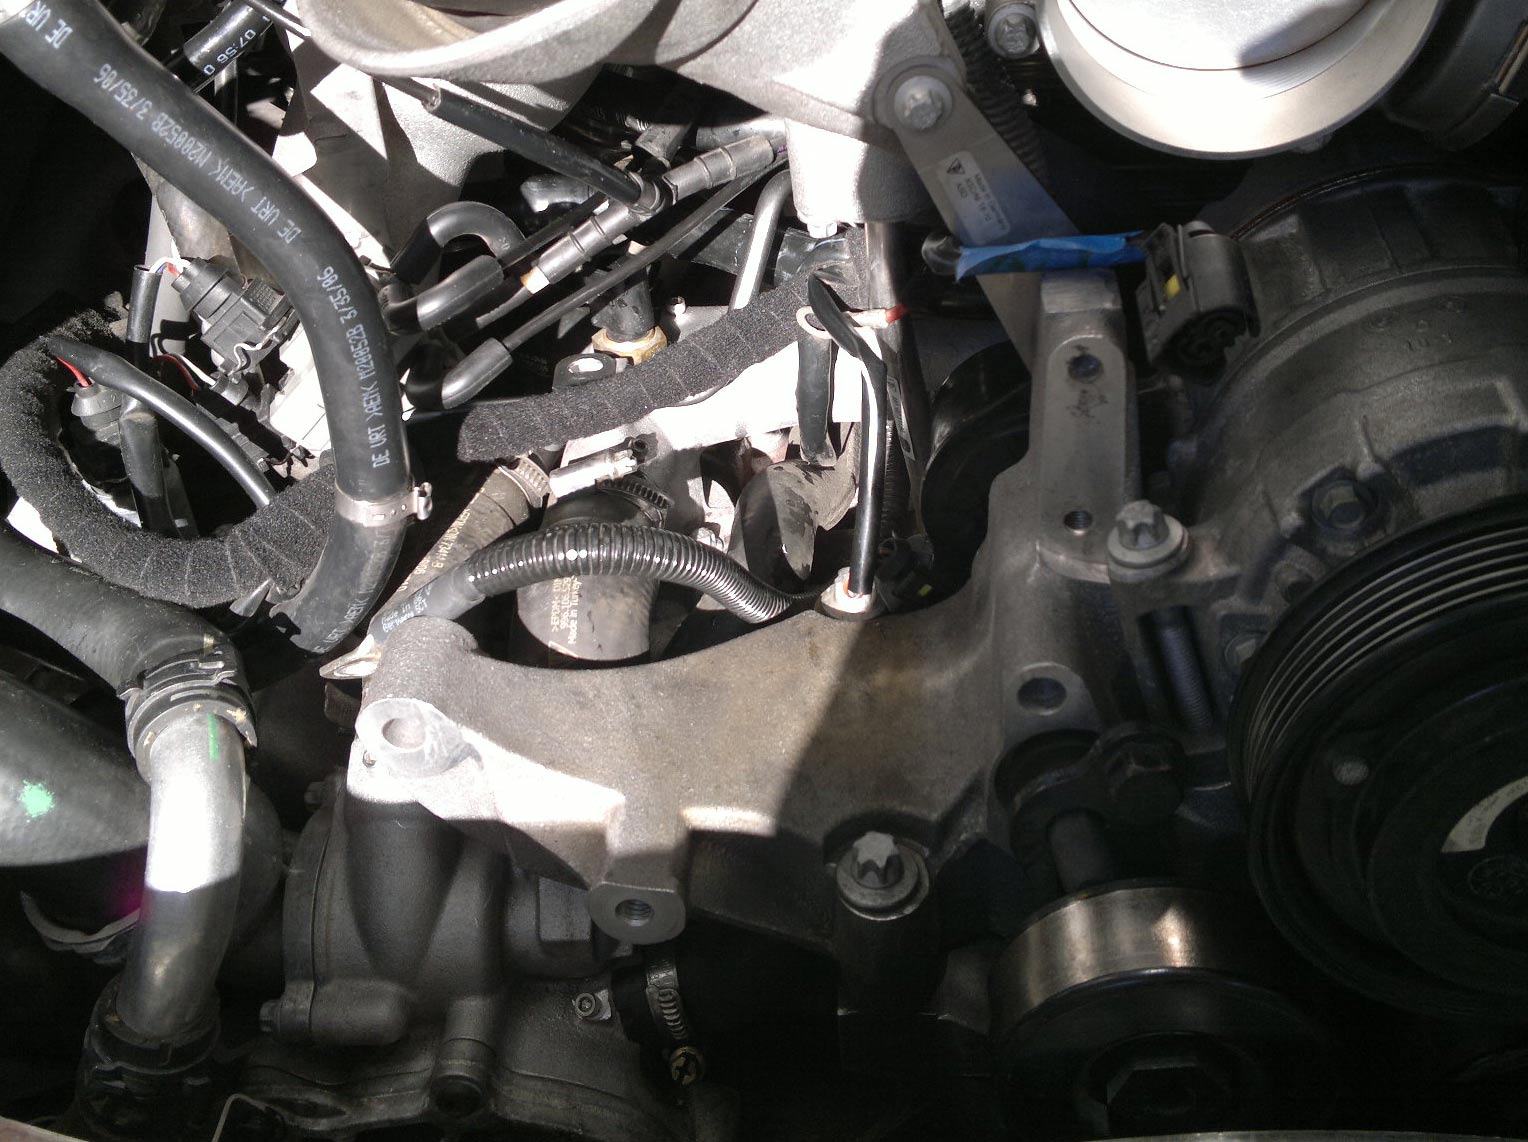
I didn't cut a face in the rear casting but it's not really necessary. The screw head is not what creates the seal but the threads of the screw and locktite. I used a small file and cut what I could on the forward hole, and some sandpaper and smoothed out the sand casing finish on the back hole. Drilling the fifth hole with the new adapter and bit. Liberally coat the bit with a very sticky grease, and cut at a slow speed on your cordless. This will make for long and thick strand shavings backing out of the flutes of your drill bit to gather with your shop vac. Clean your bit and regrease liberally several times as you get near penetration. This minimizes the chance of anything going inside. The shop vac near the hole also creates a venturi effect around the hole sucking coolant and debris around the area of the hole.

Insert tap into appropriate socket on a small 1/4" drive ratchet, coat liberally with grease and cut the threads:

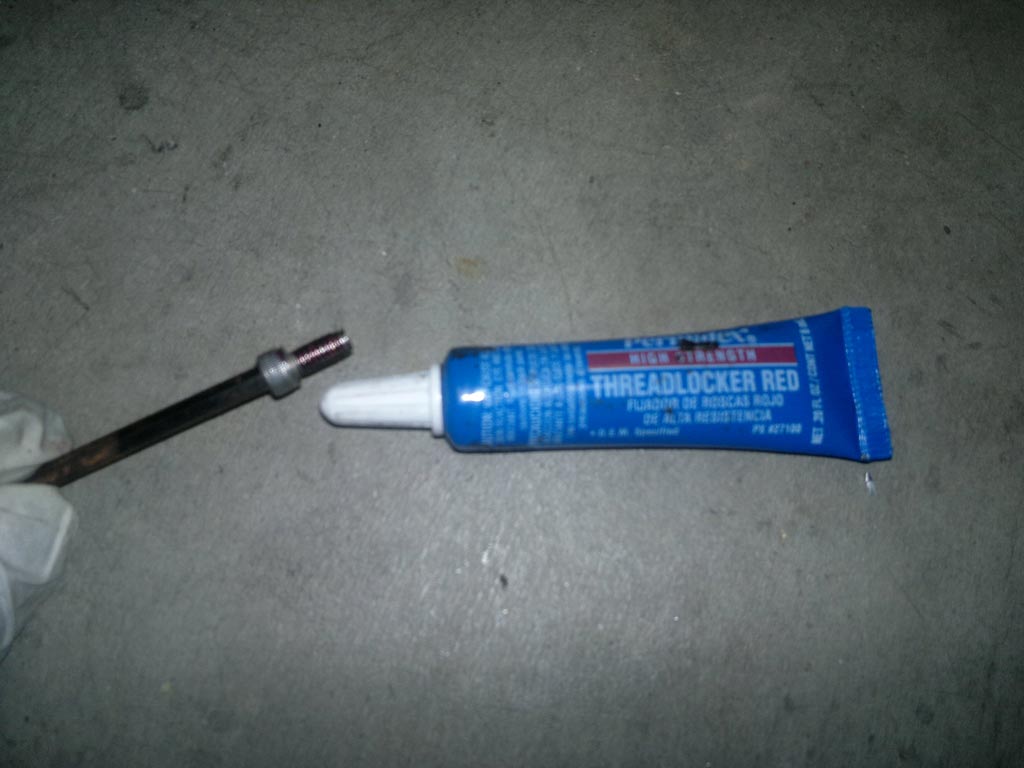
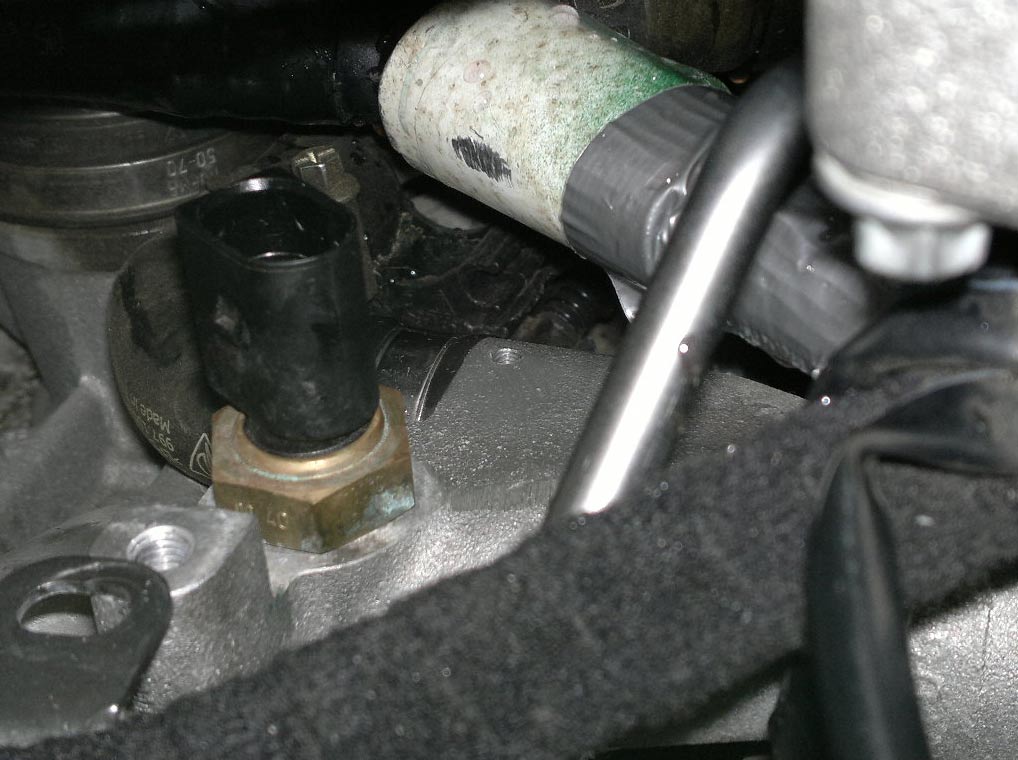
Clean area and set screw with red loctite:
For the back fitting, the big plastic tube above the hole comes too close against the the side of the drill bit. Some sheet metal is cut, bent, and taped around it to protect it during the work:
I cut off part of the drill shank to shorten it and gain more working depth. Wasn't really needed but you gain another inch of working depth, making it a bit easier to handle:

Tap threads as before:
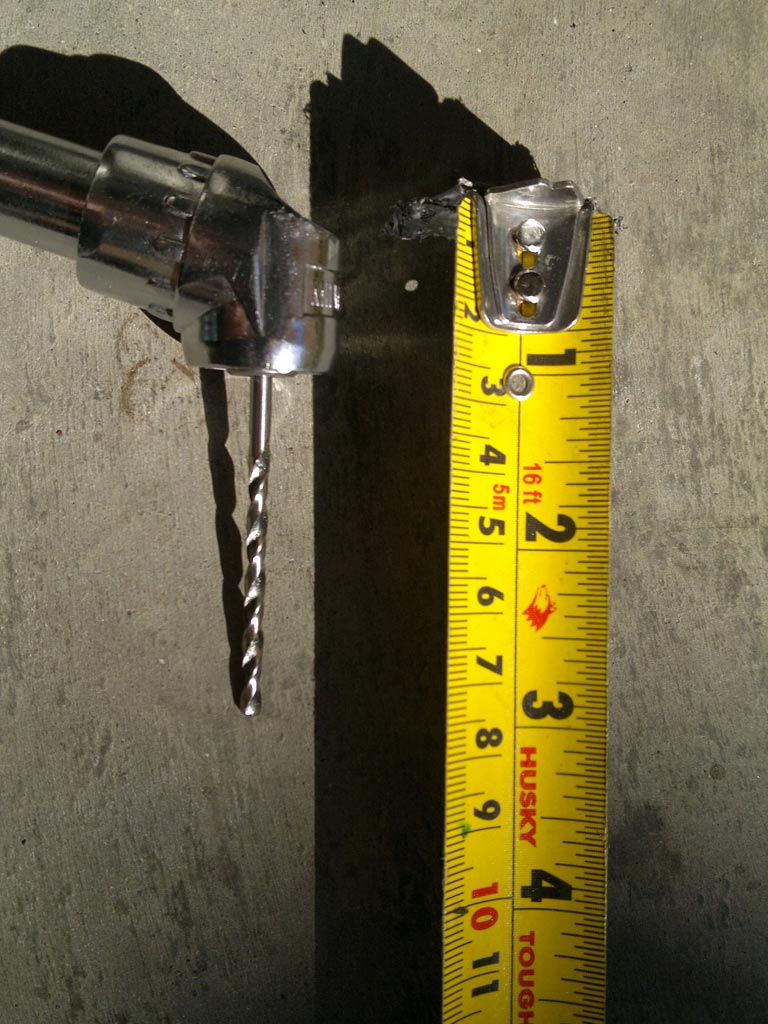
Paper clip I've bent to use as a measuring jig to verify the total depth of the holes. This ensures that the screw you are using is long enough to provide full threaded penetration. In this photo, the paper clip is bent to the same length as the 3/8" long screw.
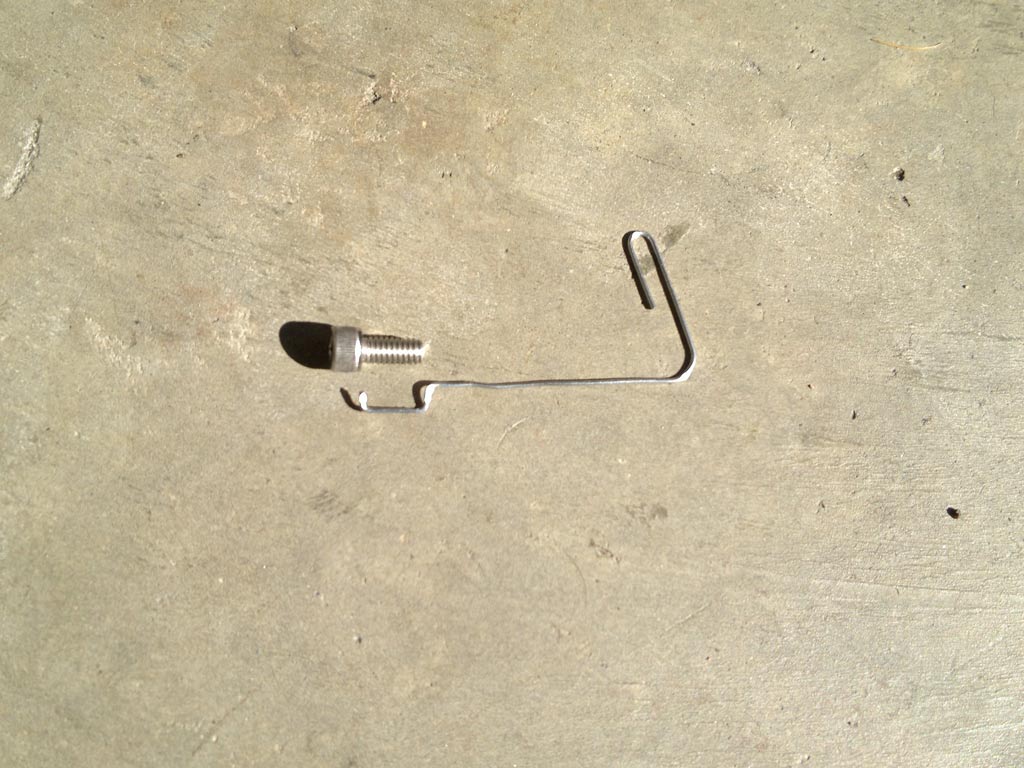
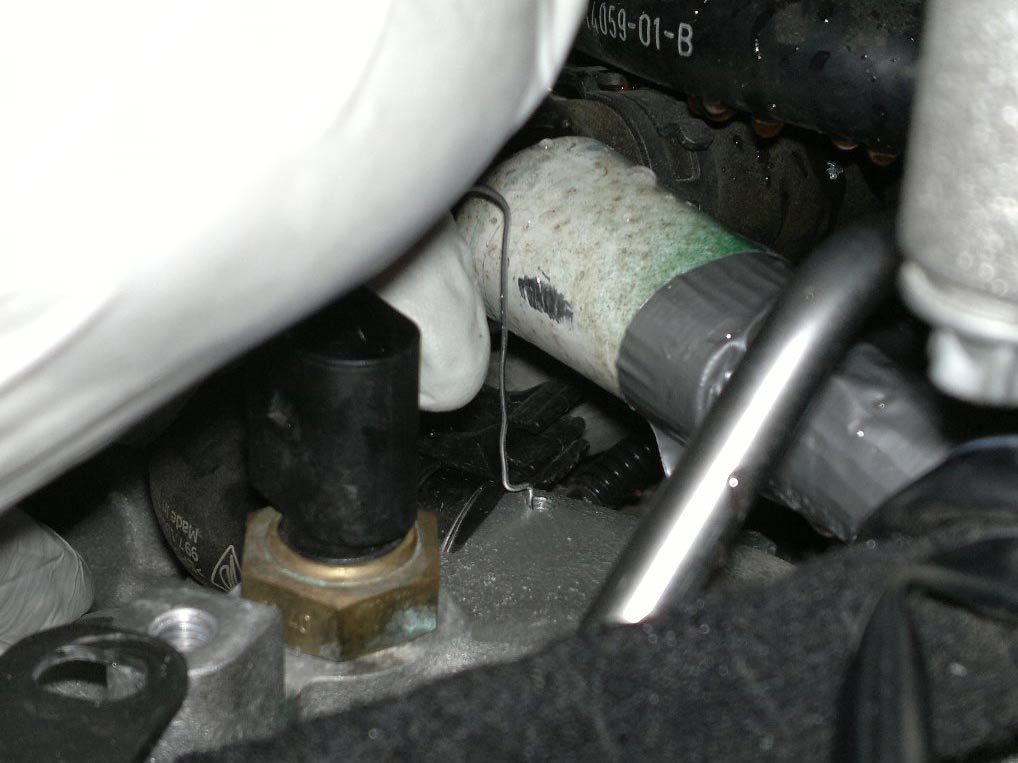
Insert clip in hole and hook the tip on the inner edge of the hole verifying depth is less than 3/8" as shown. Interesting is they all measured the same depth, about 7.0-7.5mm.
Job completed, ready to be buttoned back up:
Total cost of project under $50 and less than 6 hours of work.
I had a PM asking what Dremel bit I used to cut a face in the castings previously. Don't have the part number, but here's what it looks like relative to the screws:
I didn't cut a face in the rear casting but it's not really necessary. The screw head is not what creates the seal but the threads of the screw and locktite. I used a small file and cut what I could on the forward hole, and some sandpaper and smoothed out the sand casing finish on the back hole. Drilling the fifth hole with the new adapter and bit. Liberally coat the bit with a very sticky grease, and cut at a slow speed on your cordless. This will make for long and thick strand shavings backing out of the flutes of your drill bit to gather with your shop vac. Clean your bit and regrease liberally several times as you get near penetration. This minimizes the chance of anything going inside. The shop vac near the hole also creates a venturi effect around the hole sucking coolant and debris around the area of the hole.
Insert tap into appropriate socket on a small 1/4" drive ratchet, coat liberally with grease and cut the threads:
Clean area and set screw with red loctite:
For the back fitting, the big plastic tube above the hole comes too close against the the side of the drill bit. Some sheet metal is cut, bent, and taped around it to protect it during the work:
I cut off part of the drill shank to shorten it and gain more working depth. Wasn't really needed but you gain another inch of working depth, making it a bit easier to handle:
Tap threads as before:
Paper clip I've bent to use as a measuring jig to verify the total depth of the holes. This ensures that the screw you are using is long enough to provide full threaded penetration. In this photo, the paper clip is bent to the same length as the 3/8" long screw.
Insert clip in hole and hook the tip on the inner edge of the hole verifying depth is less than 3/8" as shown. Interesting is they all measured the same depth, about 7.0-7.5mm.
Job completed, ready to be buttoned back up:
Total cost of project under $50 and less than 6 hours of work.
02-09-2012, 08:22 PM
#15
Steve- very nice. My respect to whoever is doing the actual work. You?
The picture you used above of a fitting that came out is from one of my posts about this time last year. My local Porsche tech and I did a 10000% over-engineered solution on that gentleman's car
The potential for catastrophic results if the fitting fails in inarguable. Your solution allows for what should be a "soft fail" with plenty of warning the epoxy has let loose - steam, smell, drips of coolant rather than an instant spin producing firehose release.
Also, with a (~70%+) lower cost to implement, your fix is much more likely to be done. Great work and a well thought out process. Thanks for taking the time to post this!