996 TT rear spoiler problems - Help!
 08-07-2011, 10:25 PM
#31
AutoX

Join Date: May 2007
Posts: 13
Likes: 0
Received 0 Likes
on
0 Posts
There is also an easier way to remove the spoiler, rather than pulling up with great force. If you are going to remove the hydraulic system anyway, do so before trying to disconnect the wing. Remove the banjo bolts and hydraulic lines. You will expose a snap ring. Once the snap ring is removed from both sides, the spoiler, still attached to the two hydraulic cylinders, will pull up relatively easily. Make sure to pull evenly on both sides.
Look for my kit on ebay, which fixes the spoiler in one position (can be manually adjusted up and down although most would leave it at its full height). I have one kit for stock height, and another that allows for about 1.5" of extra extension.
Look for:
Porsche 996TT 996 Turbo Fixed Spoiler Rear Wing Kit
or
Porsche 996 Turbo Fixed Spoiler / Wing Kit Extra Tall
 08-08-2011, 03:29 PM
#32
RL Community Team
Rennlist Member
Rennlist Member
Here is a direct ebay link to the spoiler fix.
http://cgi.ebay.com/ebaymotors/ws/eB...K%3AMEWAX%3AIT
http://cgi.ebay.com/ebaymotors/ws/eB...K%3AMEWAX%3AIT
10-07-2011, 01:51 PM
#33
Drifting
I just fixed my spoiler issue this weekend. I am reviving this thread, in case others of you are having similar problems. IF YOU ARE IN SAN ANTONIO OR SURROUNDING AREAS AND YOU WANT HELP DOING THIS _ CALL ME - I will help you - 210-240-5464
My spoiler was raising on both sides, but the drivers side was lagging, it was only coming up about half way. All of the posts I could find said that the culprit was that the hydraulic fluid has leaked from one side (the pump has 2 seperate resivoirs, one for each ram). However, there was no 'easy' way to add fluid, so the dealer quoted 1800 to fix the problem (replace the entire system).
I read everything I could find on the subject - here, planet porsche, 6 speed online. The genereal concensus was that if it was raising on both sides, it was just a low fluid level issue. I generally followed the instructions and fixed it within 2 hours. Here are some pointers.
First of all, this is not hard, I am an accountant, I dont change my own oil or have special tools. I do like to tinker a little, mostly electronics. If you have a 'lagging' side on your spoiler (but it raises on both, at least a little) - YOU CAN FIX THIS. Just open the deck lid and sit down with a chair. Look at the inside of the deck lid - you will see a shrowd that covers most everything, a cooling fan, the rams for the spoiler, and some lines (mine is a turbo, so I have a little more that the regular 996). When you look at this, you will see that this is not rocket science, it litterally takes 10 minutes to take the system out (or at least where you can access it). It is no big deal.
Most write ups talk about removing the entire system and putting it on a work bench. Then, hooking an external 12 v power source to the unit to raise and lower it. I DID NOT DO THIS - there is no need. I left the system in the car, and filled it there. i used the power from the car to lower and raise it, nothing more. I don't know why anyone would pull it our, you have enough room to do all that you need to do.
I will say that it is helpful to have a coule of small tables, a chair, and the 'magic tool'. The magic tool is a special tool that is made to rotate the cylindes that connect to the wing itself. I will post a picture, I ordered online for maybe 30 bucks. It did help. Also, yo need some hydraulic fluid, people have listed different things, but I recommend buying something that has a leak preventer in it. There are many options at the auto parts store, I went with a transmision fluid/lub with leak preventer.
Removal/access of the unit -
First - take off the wing itself. This is really easy - just raise the wing (using car power) to access the metal cylinders that hold it up. If your wind will nat raise enough, you may have to have a buddy pull it up on one side to get to the cylinders. I recomment using one or more towels between the car and the spoiler to be safe (no scratches, etc).
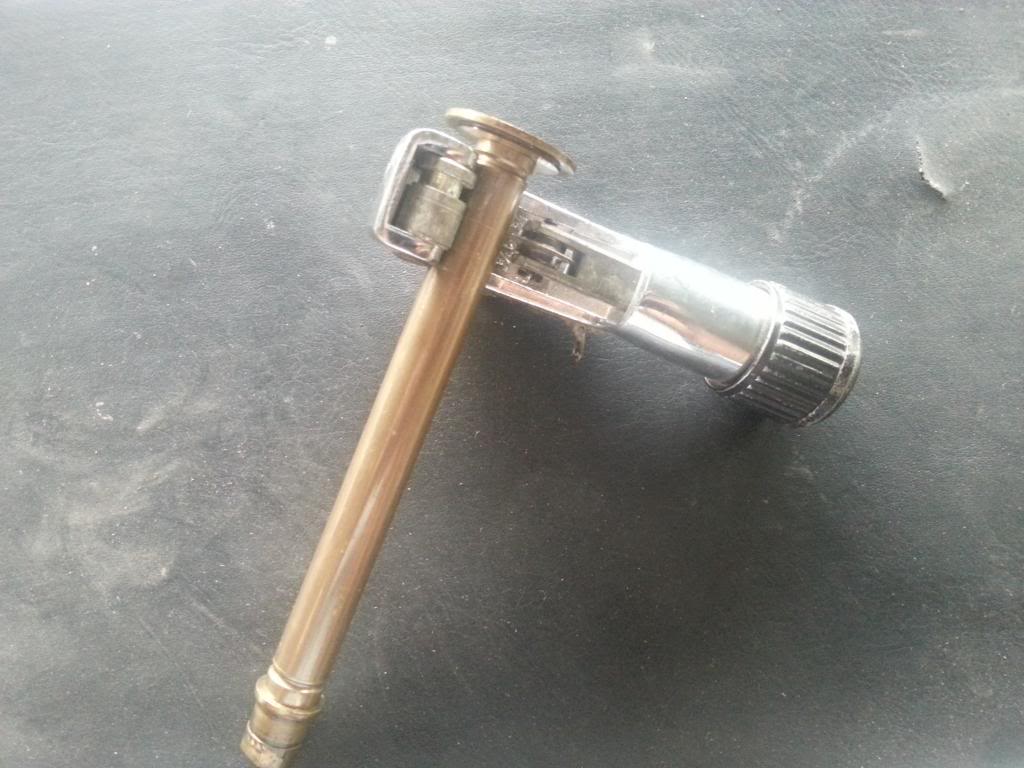
Once raised, you must use turn the cylinders about 3/4 a turn CLOCKWISE to release the wing. I used the magic tool, but I am almost possitive you could do this with your hand. The tool mkes it easier, since it is made to fit the curve of the cylinder and has a metal protrusion that fits into the hole to grip the cylinder. When you turn one side, that side pops off, the other is easier, and the wing is off. Looking at the struts after the wing is removed, they are easy to turn, so there is no worry about them not being oriented correctly later for re-attachment. Open the deck lid and move on, I would lower the struts at this time (using button in car). Now, cover the entire engine with 1 - 2 towels, to keep it clean, have a place to set stuff withour worry of it falling.
You must take down the large hard plastic piece that covers most of the inside of the deck lid. You DO NOT have to unbolt the fan from this unit - leave it in place. It is connected to the large plastic cover (shrowd) and can stay attached. Also, you do not have to unplu any of the wires (brake light, etc). If you want to - know yourself out, I did not.
On the right side (on my turbo) there was a air vent or tunnel that feeds air into the airfilter. This removes with 2 bolts at the (as it is open) top right side of the air tunnel, then it pops out of place on the back side. The same size bolt is used in about 8 places to hold the plastic cover/shrowd in place, take them all out. Once these are all out, the entire assembly is loose. It is fit in tightly, but you can wiggle it and slide it down to access the pump (and rams) easier. Push it down 6-8 inches (sliding it flat agains the deack lid, towards the engine). If it does not move, you have missed a bolt.
Once this is loose, change to the torque sockets and remove the rams. I suggest taking a picture so you know how the hydraulic line is oreinted coming into the ram (it connects at the bottom). Also, each is marked (L or R). Take note of where this mark is - so you put it back in the same position. It may only fit one way, but take note.
When the 3 torque bolts are removed, the ram pulls easily out of the decklid.
Just set it on the towels on the engine, or let it dangle for now. Remove the other ram, set it on the engine as well. In the top middle of the shrowd, above the fan, are 4 nuts (rounded cap looking nuts) that attach the cylinder/pump/oil ressiviour to the shrowd. Remove these 4 nuts, this will allow you to remove the pump. After the nuts are removed, pull the shrowd away from the decklid a little, and slide the pump out. You should be able to stand the pump up on its end on top of the towels covering the engine. It is a little tight, but there is plenty of room/ length on cables to allow for this. You want to put the end of the pump that has the hydraulic lines coming into it pointing up (with the pump itself in a verticle position resting on the towels). Take a picture of the end of the pump - noting the orientation of the lines, etc.
I did this by myself, so I did not have someone to hole the pump straight up, or the lines up, etc. It would be easier to have someone do this for you. What I did was use 2 zip ties for eac side of the pump. I used the middle, top 2 holes on the shrowd, and looped 1 zip tie through this hole and zipped it to make a big secure tie (big circle). I then attached a second zip tie to the pump and through the first ZIP tie. I repeated on the other side and tighted. This gives me 2 loops (connected like a chain) on each side the holds the pump straight up. I then put a second zip tie on each side (on the shrowd) to use later to hold up the lines.
To fill the unit, you are not going to remove the lines from the rams. The rams themselves do not hold much fluid (when down - not extened). Make sure that the rams are down - not extended!
You only have to remove the hydraulic lines from the pump itelf to add fluid. You do not need to remove the top of the pump, so see the 2 resivoirs in the unit - there is no need.
Before removing the bolts (banjo bolts) that connect the lines to the pump, use a marker and draw an arrow on the top of the bolt, pointed to the hydraulic line it feeds. The "banjo bolt" has a hole in it that allows the fluid to pass through it and into the line. Therefore, you must have this bolt oriented in the same way later when you tighten it back up. Drawing the arrow makes this fool proof - the arrow must later point at the line again when you are finished.
Remove one bolt (and hydraulic line) first. It will take a good grip on the pump (to make sure it wont turn) and a good pull on a socket wrench to break the bolt loose. If you cant hold it in place, put a cresent wrench on the lower part of the connection and pull the opposite direction - it come loose pretty easy this way. Remove the bolt (there is a washer on top, also a washer on the very bottom where it goes into the pump). hold the line itself up (or put it in the zip tie to hold up). You will see the bolt hole itself is where you add the fluid. First remove the line from the other pump, then top off both sides - pouring into the small hole that the banjo bolt goes into. Many people say that it helps to use a medicine saringe for this. The fluid I used had a little spout to it and poured right in.
After topping off, I left the unit there (hanging) for a while. Mostly because I got a call, but I also thought to let the fluid settle for a bit. I topped it off a little more when I returned. All that is left is to put the connectors back on. Remember, the right connector lays flat against the pump, with the connector on top, and the line running down the side of the pump. The other (left, the line does not run down the pump, but rather the line runs away from the pump. put the bolt back through the washers and the connector to affix back to the pump. The arrows must be lined up to point at the lines (the arrows you drew). Go ahead and tighten at this point.
Turn on the power to the car and raise/lower the rames several times. To raise, you press the button once (I think). But to lower, you must hold it in until it is all the way down. I only raised/lowered 4 - 5 times, then left the rams extended. I meassured each to see how long they were extended. Each was 2 marks over 3 inches - the same length! SWEET!.
Lower the rams again and reassemble the units into the car. This is really easy and fast - the hardest part is moving the shrowd around to get it in the right place - but even this is not bad.
As I said - this is not hard at all, and frankly, I am amazed that anyone pays for the fix. The fluid itslef in the unit is very little at all, maybe 6 ounces on each side. The leak preventer should help, but since it took 9 years for 3 ounces to leak out, I dont see this as a big problem in the future. Especially compared to a 2000 repair bill - jeez.
My spoiler was raising on both sides, but the drivers side was lagging, it was only coming up about half way. All of the posts I could find said that the culprit was that the hydraulic fluid has leaked from one side (the pump has 2 seperate resivoirs, one for each ram). However, there was no 'easy' way to add fluid, so the dealer quoted 1800 to fix the problem (replace the entire system).
I read everything I could find on the subject - here, planet porsche, 6 speed online. The genereal concensus was that if it was raising on both sides, it was just a low fluid level issue. I generally followed the instructions and fixed it within 2 hours. Here are some pointers.
First of all, this is not hard, I am an accountant, I dont change my own oil or have special tools. I do like to tinker a little, mostly electronics. If you have a 'lagging' side on your spoiler (but it raises on both, at least a little) - YOU CAN FIX THIS. Just open the deck lid and sit down with a chair. Look at the inside of the deck lid - you will see a shrowd that covers most everything, a cooling fan, the rams for the spoiler, and some lines (mine is a turbo, so I have a little more that the regular 996). When you look at this, you will see that this is not rocket science, it litterally takes 10 minutes to take the system out (or at least where you can access it). It is no big deal.
Most write ups talk about removing the entire system and putting it on a work bench. Then, hooking an external 12 v power source to the unit to raise and lower it. I DID NOT DO THIS - there is no need. I left the system in the car, and filled it there. i used the power from the car to lower and raise it, nothing more. I don't know why anyone would pull it our, you have enough room to do all that you need to do.
I will say that it is helpful to have a coule of small tables, a chair, and the 'magic tool'. The magic tool is a special tool that is made to rotate the cylindes that connect to the wing itself. I will post a picture, I ordered online for maybe 30 bucks. It did help. Also, yo need some hydraulic fluid, people have listed different things, but I recommend buying something that has a leak preventer in it. There are many options at the auto parts store, I went with a transmision fluid/lub with leak preventer.
Removal/access of the unit -
First - take off the wing itself. This is really easy - just raise the wing (using car power) to access the metal cylinders that hold it up. If your wind will nat raise enough, you may have to have a buddy pull it up on one side to get to the cylinders. I recomment using one or more towels between the car and the spoiler to be safe (no scratches, etc).
Once raised, you must use turn the cylinders about 3/4 a turn CLOCKWISE to release the wing. I used the magic tool, but I am almost possitive you could do this with your hand. The tool mkes it easier, since it is made to fit the curve of the cylinder and has a metal protrusion that fits into the hole to grip the cylinder. When you turn one side, that side pops off, the other is easier, and the wing is off. Looking at the struts after the wing is removed, they are easy to turn, so there is no worry about them not being oriented correctly later for re-attachment. Open the deck lid and move on, I would lower the struts at this time (using button in car). Now, cover the entire engine with 1 - 2 towels, to keep it clean, have a place to set stuff withour worry of it falling.
You must take down the large hard plastic piece that covers most of the inside of the deck lid. You DO NOT have to unbolt the fan from this unit - leave it in place. It is connected to the large plastic cover (shrowd) and can stay attached. Also, you do not have to unplu any of the wires (brake light, etc). If you want to - know yourself out, I did not.
On the right side (on my turbo) there was a air vent or tunnel that feeds air into the airfilter. This removes with 2 bolts at the (as it is open) top right side of the air tunnel, then it pops out of place on the back side. The same size bolt is used in about 8 places to hold the plastic cover/shrowd in place, take them all out. Once these are all out, the entire assembly is loose. It is fit in tightly, but you can wiggle it and slide it down to access the pump (and rams) easier. Push it down 6-8 inches (sliding it flat agains the deack lid, towards the engine). If it does not move, you have missed a bolt.
Once this is loose, change to the torque sockets and remove the rams. I suggest taking a picture so you know how the hydraulic line is oreinted coming into the ram (it connects at the bottom). Also, each is marked (L or R). Take note of where this mark is - so you put it back in the same position. It may only fit one way, but take note.
When the 3 torque bolts are removed, the ram pulls easily out of the decklid.
Just set it on the towels on the engine, or let it dangle for now. Remove the other ram, set it on the engine as well. In the top middle of the shrowd, above the fan, are 4 nuts (rounded cap looking nuts) that attach the cylinder/pump/oil ressiviour to the shrowd. Remove these 4 nuts, this will allow you to remove the pump. After the nuts are removed, pull the shrowd away from the decklid a little, and slide the pump out. You should be able to stand the pump up on its end on top of the towels covering the engine. It is a little tight, but there is plenty of room/ length on cables to allow for this. You want to put the end of the pump that has the hydraulic lines coming into it pointing up (with the pump itself in a verticle position resting on the towels). Take a picture of the end of the pump - noting the orientation of the lines, etc.
I did this by myself, so I did not have someone to hole the pump straight up, or the lines up, etc. It would be easier to have someone do this for you. What I did was use 2 zip ties for eac side of the pump. I used the middle, top 2 holes on the shrowd, and looped 1 zip tie through this hole and zipped it to make a big secure tie (big circle). I then attached a second zip tie to the pump and through the first ZIP tie. I repeated on the other side and tighted. This gives me 2 loops (connected like a chain) on each side the holds the pump straight up. I then put a second zip tie on each side (on the shrowd) to use later to hold up the lines.
To fill the unit, you are not going to remove the lines from the rams. The rams themselves do not hold much fluid (when down - not extened). Make sure that the rams are down - not extended!
You only have to remove the hydraulic lines from the pump itelf to add fluid. You do not need to remove the top of the pump, so see the 2 resivoirs in the unit - there is no need.
Before removing the bolts (banjo bolts) that connect the lines to the pump, use a marker and draw an arrow on the top of the bolt, pointed to the hydraulic line it feeds. The "banjo bolt" has a hole in it that allows the fluid to pass through it and into the line. Therefore, you must have this bolt oriented in the same way later when you tighten it back up. Drawing the arrow makes this fool proof - the arrow must later point at the line again when you are finished.
Remove one bolt (and hydraulic line) first. It will take a good grip on the pump (to make sure it wont turn) and a good pull on a socket wrench to break the bolt loose. If you cant hold it in place, put a cresent wrench on the lower part of the connection and pull the opposite direction - it come loose pretty easy this way. Remove the bolt (there is a washer on top, also a washer on the very bottom where it goes into the pump). hold the line itself up (or put it in the zip tie to hold up). You will see the bolt hole itself is where you add the fluid. First remove the line from the other pump, then top off both sides - pouring into the small hole that the banjo bolt goes into. Many people say that it helps to use a medicine saringe for this. The fluid I used had a little spout to it and poured right in.
After topping off, I left the unit there (hanging) for a while. Mostly because I got a call, but I also thought to let the fluid settle for a bit. I topped it off a little more when I returned. All that is left is to put the connectors back on. Remember, the right connector lays flat against the pump, with the connector on top, and the line running down the side of the pump. The other (left, the line does not run down the pump, but rather the line runs away from the pump. put the bolt back through the washers and the connector to affix back to the pump. The arrows must be lined up to point at the lines (the arrows you drew). Go ahead and tighten at this point.
Turn on the power to the car and raise/lower the rames several times. To raise, you press the button once (I think). But to lower, you must hold it in until it is all the way down. I only raised/lowered 4 - 5 times, then left the rams extended. I meassured each to see how long they were extended. Each was 2 marks over 3 inches - the same length! SWEET!.
Lower the rams again and reassemble the units into the car. This is really easy and fast - the hardest part is moving the shrowd around to get it in the right place - but even this is not bad.
As I said - this is not hard at all, and frankly, I am amazed that anyone pays for the fix. The fluid itslef in the unit is very little at all, maybe 6 ounces on each side. The leak preventer should help, but since it took 9 years for 3 ounces to leak out, I dont see this as a big problem in the future. Especially compared to a 2000 repair bill - jeez.
10-10-2011, 01:25 PM
#34
Advanced
Join Date: Sep 2007
Location: Fort Wayne Indiana
Posts: 72
Likes: 0
Received 0 Likes
on
0 Posts
Bought the wing fix kit on Ebay and installed yesterday in about an hour. Instructions are quite lucid. And the wing stays up!! Works great and no more annoying "alarms", Viagra for the wing.. i will repair pump as time avails and re-install if I sell the car (not likely). Wish I had done the kit right from the start of issues a year ago.
12-30-2011, 11:25 PM
#35
Racer

Join Date: Sep 2004
Posts: 327
Likes: 0
Received 0 Likes
on
0 Posts
Well, my spoiler motor stopped working, however the hydraulics are fine (whole system was replaced about 2.5 years ago).
Does anybody who has done the fixed solution have a motor they want to unload?
Does anybody who has done the fixed solution have a motor they want to unload?
12-31-2011, 11:48 AM
#36
Rennlist Member

I have a leaking drivers side hydraulic ram, justbiout one for a little under $400, anyone know where I can get the banjo bolt washers, are they crush washers?
BTW I don't think lining up the holes on the banjo bolt to the hole in the lines is critical as posted previously. The line has a wide end on it that allows for fluid flow, therefore the hole will allow fluid to flow into the line wide end and into the hole for the line.
BTW I don't think lining up the holes on the banjo bolt to the hole in the lines is critical as posted previously. The line has a wide end on it that allows for fluid flow, therefore the hole will allow fluid to flow into the line wide end and into the hole for the line.
12-31-2011, 12:10 PM
#37
Drifting
I have a leaking drivers side hydraulic ram, justbiout one for a little under $400, anyone know where I can get the banjo bolt washers, are they crush washers?
BTW I don't think lining up the holes on the banjo bolt to the hole in the lines is critical as posted previously. The line has a wide end on it that allows for fluid flow, therefore the hole will allow fluid to flow into the line wide end and into the hole for the line.
BTW I don't think lining up the holes on the banjo bolt to the hole in the lines is critical as posted previously. The line has a wide end on it that allows for fluid flow, therefore the hole will allow fluid to flow into the line wide end and into the hole for the line.
GL
12-19-2012, 12:38 AM
#38
4th Gear

Join Date: Dec 2012
Location: Miami, FL
Posts: 4
Likes: 0
Received 0 Likes
on
0 Posts
Not sure if it is relevant anymore. but I fixed both of my leaky hydraulic rams this past weekend. bought seals from a local Hydraulic shop and few items from home depot. took 3 o-ring seals & 2 copper crush washers each side.
very very in-expensive.
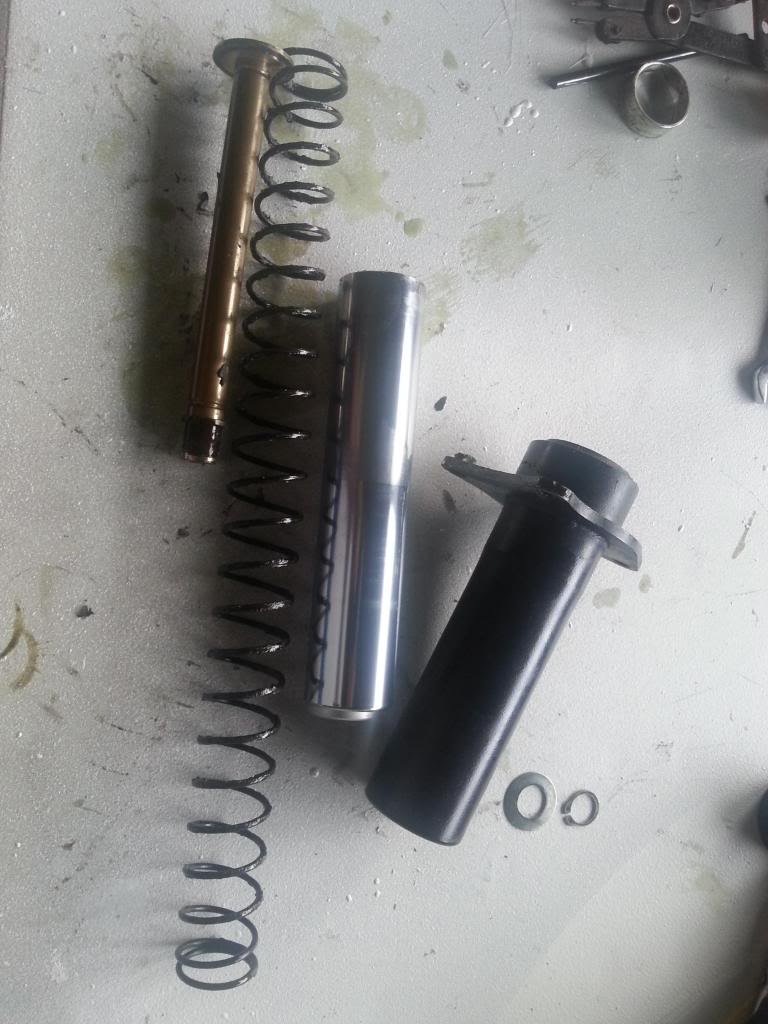
FYI, if you plan on taking apart yours. word of advice after you remove the ring clips. take off the bigger ring clip on top first. remove the pieces that attach to the spoiler and then remove the smaller ring clip on the bottom. when you do remove the smaller clip. point the other end away from you and anyone else. I pointed mine inside a box (this was the second one I opened. LOL). The first one I was un-aware of what happens. took 5 mins to take apart and 2 hours searching for the missing parts. basically everything shoots out. There is a big spring that helps to lower the spoiler and keep it down. when released it is very violent.
I completed the repair on 12/15/12, I also have a warehouse where I park my cars. left my spoiler in the up position and will check back if it remains for a few days to verify the fix. didn't take any pictures of my process but plan on fixing my friends setup which is also leaking. Will take pictures then and post if needed.
Agree with others on the post at first they look like you cannot repair them but I was able to take apart, change seals and reassemble and my spoiler works.
Don�t like the manual spoiler fix as your spoiler stay up and as anyone knows. your spoiler can be removed very easy. and it's very expensive to replace.
My fix also leaves them where I can repair seals in future again for only the seal cost.
Oh yeah since I was already in repair mode, I changed the seals on the spoiler hydraulic motor. takes 6 larger orings. 3 on each side.
Just twist the rams and the spoiler pops right off the rams.
I have also fixed my Hydraulic cylinders for my cabro roof. Took 4 seals each side and misc stuff from home depot.
Both spoiler and top stop working, got fed up and figured why not try to repair them worst case if failed I am still gonna replace them so cost me nothing but time. and now I saved a lot on the repairs. Also got a quote from someone that repairs the roof hydraulic cylinders and figured if he can do it why can't I.
He also wanted my cylinders to replace as cores. and a few hundred dollars.
I spent nowhere close to his quote and repaired roof and spoiler.
very very in-expensive.
FYI, if you plan on taking apart yours. word of advice after you remove the ring clips. take off the bigger ring clip on top first. remove the pieces that attach to the spoiler and then remove the smaller ring clip on the bottom. when you do remove the smaller clip. point the other end away from you and anyone else. I pointed mine inside a box (this was the second one I opened. LOL). The first one I was un-aware of what happens. took 5 mins to take apart and 2 hours searching for the missing parts. basically everything shoots out. There is a big spring that helps to lower the spoiler and keep it down. when released it is very violent.
I completed the repair on 12/15/12, I also have a warehouse where I park my cars. left my spoiler in the up position and will check back if it remains for a few days to verify the fix. didn't take any pictures of my process but plan on fixing my friends setup which is also leaking. Will take pictures then and post if needed.
Agree with others on the post at first they look like you cannot repair them but I was able to take apart, change seals and reassemble and my spoiler works.
Don�t like the manual spoiler fix as your spoiler stay up and as anyone knows. your spoiler can be removed very easy. and it's very expensive to replace.
My fix also leaves them where I can repair seals in future again for only the seal cost.
Oh yeah since I was already in repair mode, I changed the seals on the spoiler hydraulic motor. takes 6 larger orings. 3 on each side.
Just twist the rams and the spoiler pops right off the rams.
I have also fixed my Hydraulic cylinders for my cabro roof. Took 4 seals each side and misc stuff from home depot.
Both spoiler and top stop working, got fed up and figured why not try to repair them worst case if failed I am still gonna replace them so cost me nothing but time. and now I saved a lot on the repairs. Also got a quote from someone that repairs the roof hydraulic cylinders and figured if he can do it why can't I.
He also wanted my cylinders to replace as cores. and a few hundred dollars.
I spent nowhere close to his quote and repaired roof and spoiler.
12-19-2012, 12:52 AM
#39
Three Wheelin'
Good job Keenanc1! I it is possible for you next time you do the job take some pictures and if possible post different part# that you used like o-ring and washer sizes etc. Thanks for your help!
Last edited by jpflip; 12-19-2012 at 11:28 AM.
12-19-2012, 10:45 AM
#40
Burning Brakes
+1
12-25-2012, 11:46 PM
#41
1st Gear

Join Date: Dec 2012
Posts: 1
Likes: 0
Received 0 Likes
on
0 Posts
I fixed my system with about two hors of time some Lucas Hydraulic with stop leak new MM copper washers and costed about 28.00 bucks. No reason to mess with the micro switches and I did not even remove the rams.
01-03-2013, 05:08 PM
#42
I see a lot of this.......here's what worked for me. KEY POINT is that oil leaking from one ram may will go away in a well balanced and operatiing system and stay away......it did for me. KEY POINT: the leaking may vary and then stop.
Forget the external cleaning........the real crud is down in the rams where you can get at it.
NOTE: a small film of hydr. oil coats the rams (small pin rams inside the big chrome slides you can see outside) and some very small evaporation takes place with use.........over 7-10 years, this evaporation eventually will cause an out of sync condition when you've never had a single drop of oil leakage. Once out of sync, the system tends to push oil through the sael on one or the other of the ramss due to high loading on one side. The crud that tends to stick the chrome sides doesn't help a bit......but may not be the real problem in most cases.
Here's the sequence to fix:
1) raise the wing and then renmove it........lots of other posts on wing removal.
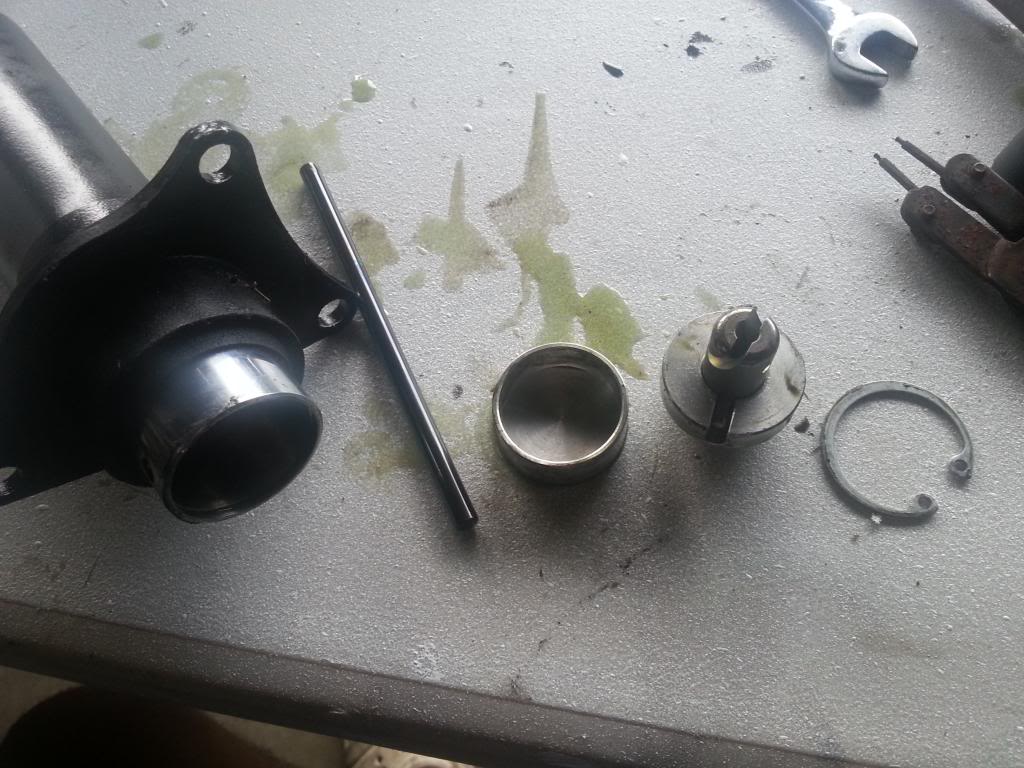
2) lower the rams, and remove their upper snap rings to get them apart. This can be done in or out of the car, feel free to open the hoses........we'll re-bleed next. CAREFUL: There are springs inside (used to help retract the rams).......no dangerous load when the rams are retracted.
3) Clean the Chromed external sliding surfaces of the rams and the I.D.'s of their mating sleeves. This is where youi'll find the crud you can get at otherwise. I wouldn't lube beyond maybe a light rub with a silicone spray...certainly nothing that will collect dirt like a greese or oil. Put the rams all back together. Don't install the wing.
4) Flush and re-bleed:
a) Uncover the hydr. pump under the deck lid so you can apply an external power source. Note a battery charger will do it and note that swapping the input polarity reverses the direction of the pump.
NOTE: the pump is really two syringes driven in parallel by a motor driven screw..........this is how it synchroniozes the two rams........out of snyc rams means one side has less fluid in it than the other.....simply, the fliud colums are different in length.
b) Submerge both of the open hose ends (the ram end banjos) in a few ounces of fresh hydraulic oil (as used for power steering and for the small hydraulic brake reservoir up front). A clear container is good so you can see the fluid exchange and when the air is blead out.
c) Cycle the motor back and forth until all the air is out. CAUTION: don't over heat the electric pump motor.
NOTE: the total oil volume in the pump is very small..........maybe an ounce or so........so don't expect any big flow or spray here, and the fact that the flow is very small doesn't mean the pump is shot either.
d) With the hose ends STILL submerged in the oil.........retract the pump .......i.e. draw in a full fluid charge. KEEP the hose ends submerged.
d) Reconnect the hoses to the rams; A spare pair of hands hepls but yopu can do it alone too. Just have your self set up so that you loose the least oil from the dripping hose end as possible as you pull the hose end out of the oil container and get the banjo bolt and washeras screwed in. Do one hose after the other keeping the second one submerged until you are ready to connect it up. Some loss is inevitable and no big deal.
e) cycle the rams up/down 6-8 times.........their operation will become consistent.......although they will probably be out of sync. due to different oil loss during the two hose connections.
f) Sync the two rams: Realize that the big springs are pusing the Chrome rams down......and the oil in the hose/pump is pushing them up aginst the spring load. So following the manual more or less;
f1) raise the rams to a mid point.
f2) on the ram that sticks up the highest, crack the banjo bolt on its end allowing the ram spring to force to bleed bit of oil out as the ram lowers matching the height of the other........go back and forth a bit until they are within about 2 mm or 1/16 inch of each other........perfection is nice, but not required.
NOTE: If you let too much oil out.........refill the pump per e)above and start over.
g) Cycle the rams up and down to be sure they remain pretty closely synced........and re-install the wing.
NOTE: you'll end up with oil all in and over the rams and it may appear to leak.........drive and clean with the black covers on the bottom over the banjo bolts off for a week or two to be sure you either really do have a leaky ram........or just long term 'run off'.
Again; these leaks go away when well blead and synced..........at least they did for me. I did my daily driver over a year ago and its fine and dead dry today.
Best of luck. MK19
Forget the external cleaning........the real crud is down in the rams where you can get at it.
NOTE: a small film of hydr. oil coats the rams (small pin rams inside the big chrome slides you can see outside) and some very small evaporation takes place with use.........over 7-10 years, this evaporation eventually will cause an out of sync condition when you've never had a single drop of oil leakage. Once out of sync, the system tends to push oil through the sael on one or the other of the ramss due to high loading on one side. The crud that tends to stick the chrome sides doesn't help a bit......but may not be the real problem in most cases.
Here's the sequence to fix:
1) raise the wing and then renmove it........lots of other posts on wing removal.
2) lower the rams, and remove their upper snap rings to get them apart. This can be done in or out of the car, feel free to open the hoses........we'll re-bleed next. CAREFUL: There are springs inside (used to help retract the rams).......no dangerous load when the rams are retracted.
3) Clean the Chromed external sliding surfaces of the rams and the I.D.'s of their mating sleeves. This is where youi'll find the crud you can get at otherwise. I wouldn't lube beyond maybe a light rub with a silicone spray...certainly nothing that will collect dirt like a greese or oil. Put the rams all back together. Don't install the wing.
4) Flush and re-bleed:
a) Uncover the hydr. pump under the deck lid so you can apply an external power source. Note a battery charger will do it and note that swapping the input polarity reverses the direction of the pump.
NOTE: the pump is really two syringes driven in parallel by a motor driven screw..........this is how it synchroniozes the two rams........out of snyc rams means one side has less fluid in it than the other.....simply, the fliud colums are different in length.
b) Submerge both of the open hose ends (the ram end banjos) in a few ounces of fresh hydraulic oil (as used for power steering and for the small hydraulic brake reservoir up front). A clear container is good so you can see the fluid exchange and when the air is blead out.
c) Cycle the motor back and forth until all the air is out. CAUTION: don't over heat the electric pump motor.
NOTE: the total oil volume in the pump is very small..........maybe an ounce or so........so don't expect any big flow or spray here, and the fact that the flow is very small doesn't mean the pump is shot either.
d) With the hose ends STILL submerged in the oil.........retract the pump .......i.e. draw in a full fluid charge. KEEP the hose ends submerged.
d) Reconnect the hoses to the rams; A spare pair of hands hepls but yopu can do it alone too. Just have your self set up so that you loose the least oil from the dripping hose end as possible as you pull the hose end out of the oil container and get the banjo bolt and washeras screwed in. Do one hose after the other keeping the second one submerged until you are ready to connect it up. Some loss is inevitable and no big deal.
e) cycle the rams up/down 6-8 times.........their operation will become consistent.......although they will probably be out of sync. due to different oil loss during the two hose connections.
f) Sync the two rams: Realize that the big springs are pusing the Chrome rams down......and the oil in the hose/pump is pushing them up aginst the spring load. So following the manual more or less;
f1) raise the rams to a mid point.
f2) on the ram that sticks up the highest, crack the banjo bolt on its end allowing the ram spring to force to bleed bit of oil out as the ram lowers matching the height of the other........go back and forth a bit until they are within about 2 mm or 1/16 inch of each other........perfection is nice, but not required.
NOTE: If you let too much oil out.........refill the pump per e)above and start over.
g) Cycle the rams up and down to be sure they remain pretty closely synced........and re-install the wing.
NOTE: you'll end up with oil all in and over the rams and it may appear to leak.........drive and clean with the black covers on the bottom over the banjo bolts off for a week or two to be sure you either really do have a leaky ram........or just long term 'run off'.
Again; these leaks go away when well blead and synced..........at least they did for me. I did my daily driver over a year ago and its fine and dead dry today.
Best of luck. MK19
01-03-2013, 06:08 PM
#43
Rennlist Member
Problem with the bleed, the volume of oil is so small you can overbleed and run it out of hydarulic oil , then you have to refill and rebleed, until u get it right! Not fun!
Last edited by Kevinmacd; 01-03-2013 at 06:27 PM.
09-04-2013, 01:58 AM
#44
4th Gear
Join Date: Dec 2012
Location: Miami, FL
Posts: 4
Likes: 0
Received 0 Likes
on
0 Posts
ok here are some pictures of the repair. sorry for short write up, just wrote this reply post in detail , hit preview and lost the write up thus hopefully the pictures explains enough of my process in my retry to post.
Basically I cut open the cylinders and replace the seals, then I Solder back the cylinders together and reassemble and reinstall in car.
Parts used:
For lines:
copper seals rings
6.2mm x 11.9mm x 1mm
$0.21 each (qty 8)
For Pump:
O-ring
13/16 x 1 x 3/32
$0.25 each (Qty 6)
Urethane Backup
13/16 x 0.050
$0.25 each (qty 4)
For Cylinders:
Metrics O-ring
7 x 2.5
$0.28 each (qty 4)
Urethane backup
5/16 x 0.050 (qty 4)
from Home depot
Brass coupling 3/8
042805446515
$4.17 each (qty 2)
Brass Pipe 3/8
042805446645
$6.57 each (qty 1)
Here are the pictures:
internal parts of pump:
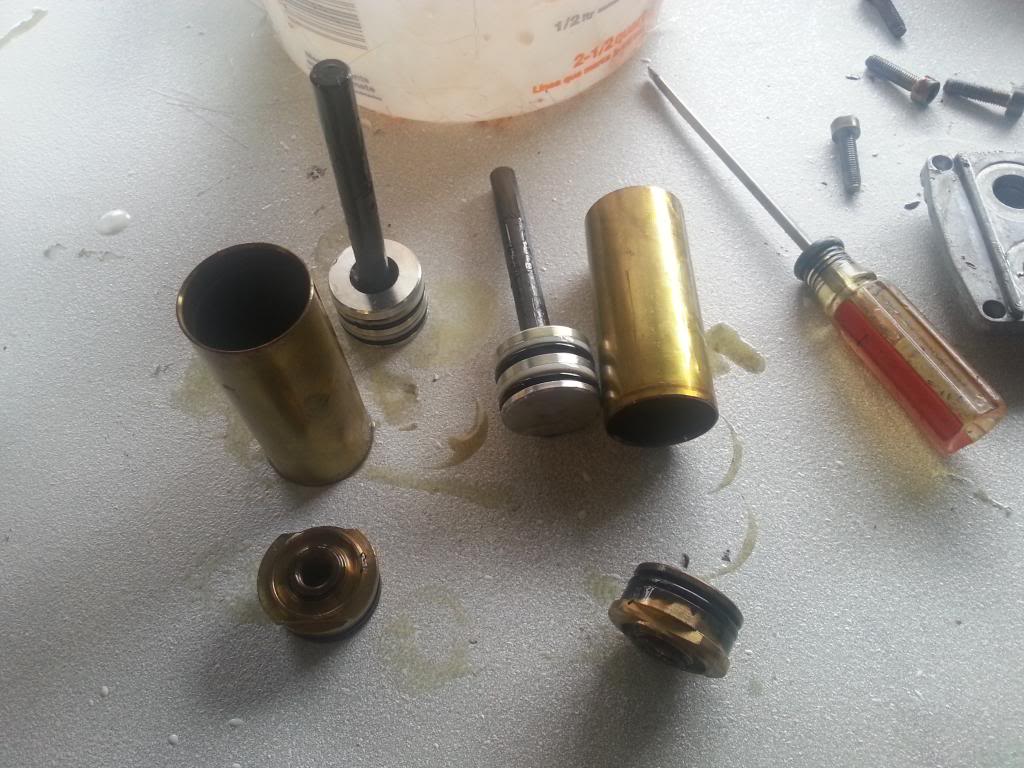
Top of cylinder: remove these b4 removing cylinder from housing.
Then I place the jack housing facing down, I hold the pressure to the floor with my feet while i remove the small clip. the spring pressure will be released. lift slowly.
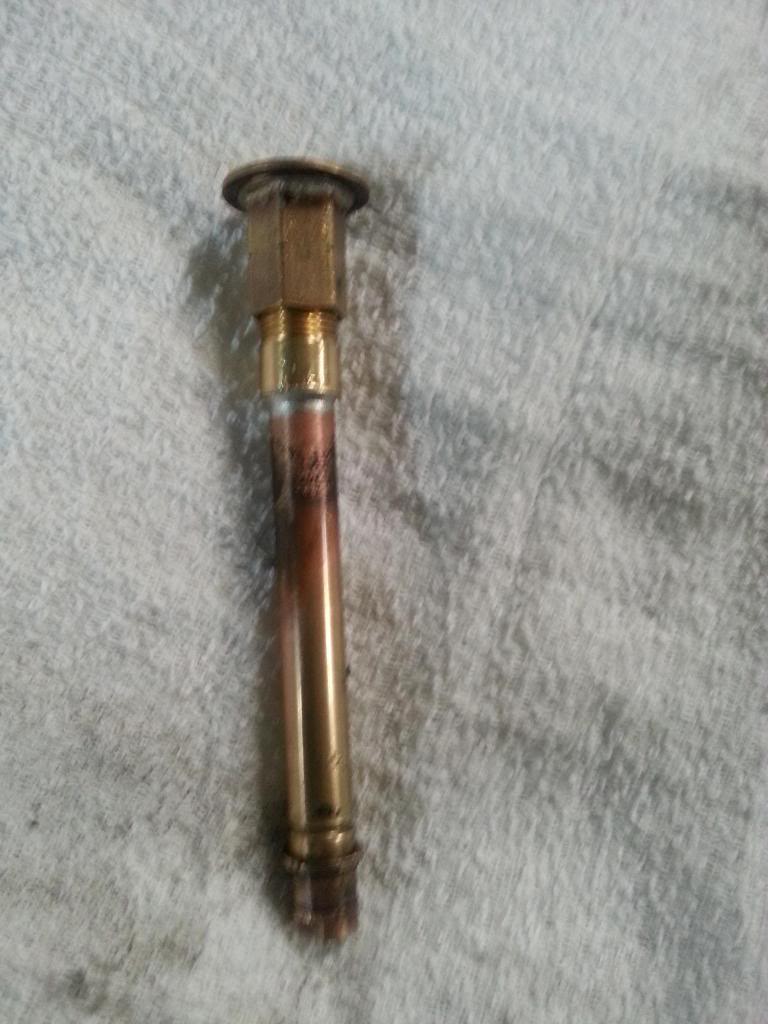
Then cut the cylinder at the top.
notice the internal parts:
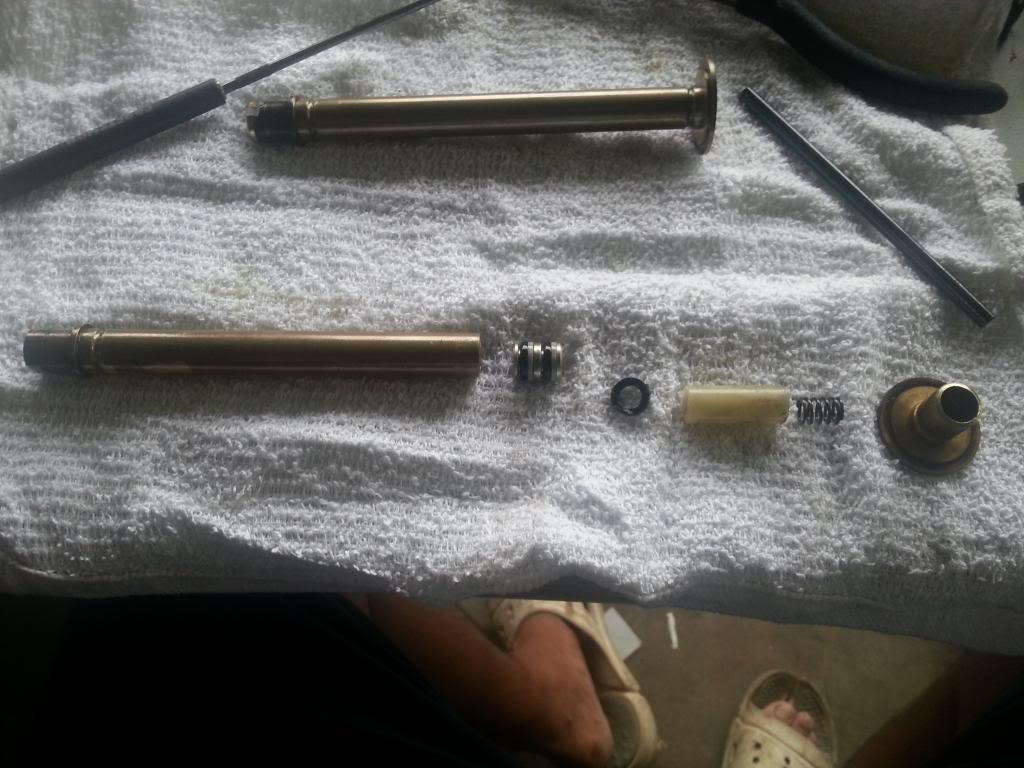
also notice the limitation to the piston. it doesn't reach to the cut section of the pipe, thus fluid doesn't rise to the area, and we dont have to have the area air tight sealed.
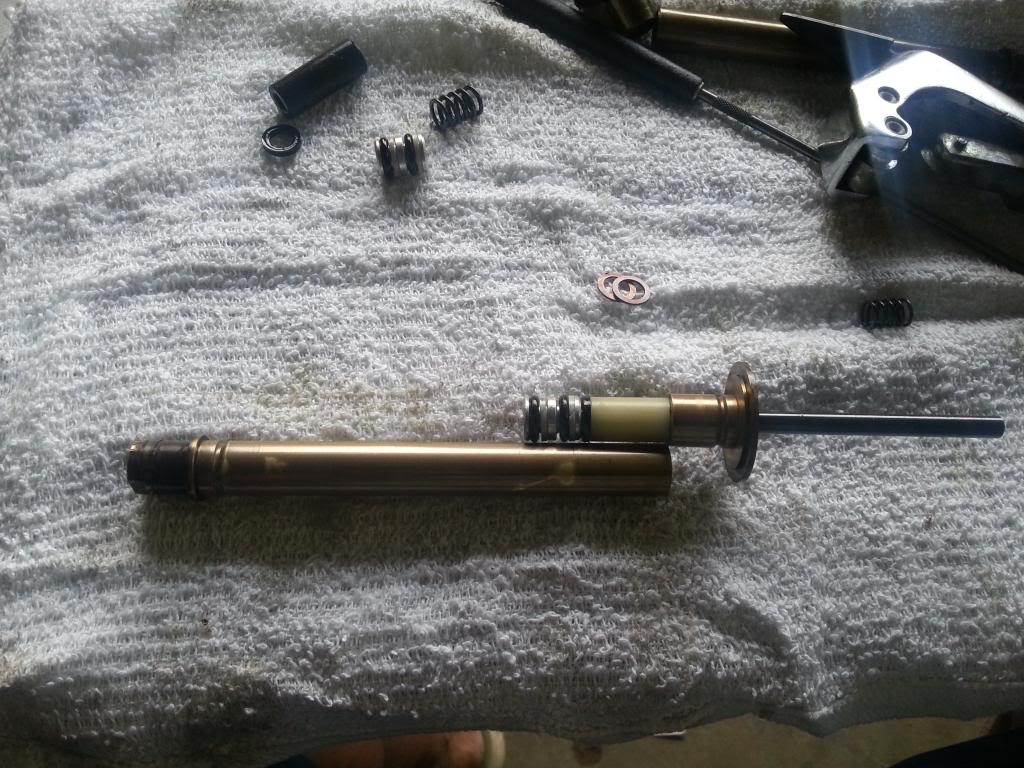
ok finally, take the brass pipe purchased from home depot. cut to desired length, use a step bit to drill pipe from 1/2 to 9/16, change to a reg 9/16 bit to increase 9/16 distance. once your happy with the fit and cylinder back to original length. Solder the pieces together. Hopefully you solder the cylinder without the internals inside the pipe. to keep the heat away from the seals. Once your done. screw the 2 pieces apart and install the internals. reassemble and test your repair.
My Friend's cylinders were leaking from the bottom factory press crimp. thus I clean and solder the bottom of his as well. no more leaks.
his spoiler working:
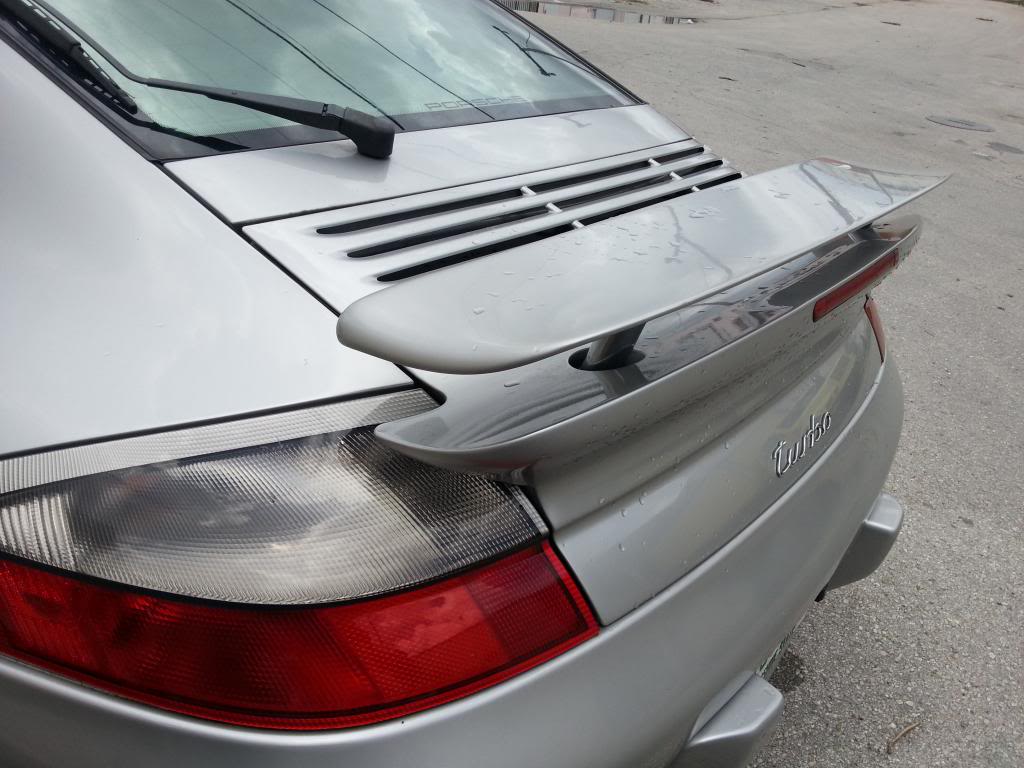
My spoiler still working after 9 months.

Basically I cut open the cylinders and replace the seals, then I Solder back the cylinders together and reassemble and reinstall in car.
Parts used:
For lines:
copper seals rings
6.2mm x 11.9mm x 1mm
$0.21 each (qty 8)
For Pump:
O-ring
13/16 x 1 x 3/32
$0.25 each (Qty 6)
Urethane Backup
13/16 x 0.050
$0.25 each (qty 4)
For Cylinders:
Metrics O-ring
7 x 2.5
$0.28 each (qty 4)
Urethane backup
5/16 x 0.050 (qty 4)
from Home depot
Brass coupling 3/8
042805446515
$4.17 each (qty 2)
Brass Pipe 3/8
042805446645
$6.57 each (qty 1)
Here are the pictures:
internal parts of pump:

Top of cylinder: remove these b4 removing cylinder from housing.

Then I place the jack housing facing down, I hold the pressure to the floor with my feet while i remove the small clip. the spring pressure will be released. lift slowly.

Then cut the cylinder at the top.

notice the internal parts:

also notice the limitation to the piston. it doesn't reach to the cut section of the pipe, thus fluid doesn't rise to the area, and we dont have to have the area air tight sealed.

ok finally, take the brass pipe purchased from home depot. cut to desired length, use a step bit to drill pipe from 1/2 to 9/16, change to a reg 9/16 bit to increase 9/16 distance. once your happy with the fit and cylinder back to original length. Solder the pieces together. Hopefully you solder the cylinder without the internals inside the pipe. to keep the heat away from the seals. Once your done. screw the 2 pieces apart and install the internals. reassemble and test your repair.

My Friend's cylinders were leaking from the bottom factory press crimp. thus I clean and solder the bottom of his as well. no more leaks.
his spoiler working:

My spoiler still working after 9 months.
