Notices
993 Forum 1995-1998
Sponsored by:
Sponsored by:

Shorted Oxygen Sensor in a '95 993

Thread Tools
 
Search this Thread
 
Old 10-29-2014, 08:26 PM
  #1  
Spyder_Man
Drifting
Thread Starter
 
Spyder_Man's Avatar
 
Join Date: Jan 2014
Location: SF Bay Area
Posts: 2,042
Likes: 0
Received 8 Likes on 8 Posts
Default Shorted Oxygen Sensor in a '95 993

Hey folks,

My CEL has been on for sometime and I finally got around to decoding it using the ignition-gas pedal trick. I've got a '95 993 with OBD 1 so it can be a little harder to tease out the codes. Anyhow, it does not surprise me in the least that my O2 sensor is shot. The car's gas mileage hasn't been as good as I anticipated so I suspect this sensor might be the culprit.

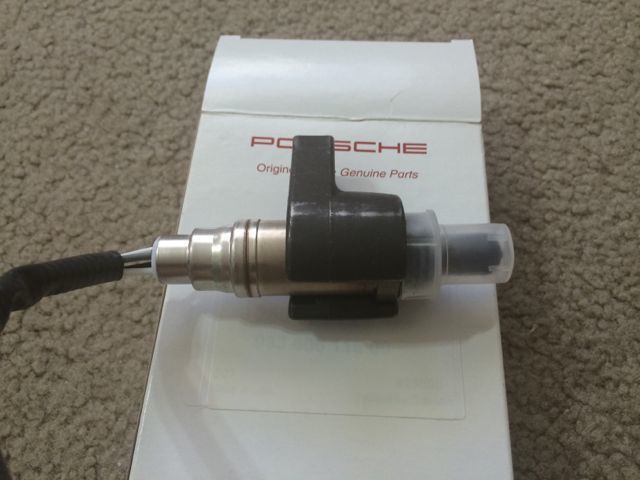
I have done some poking around on the forum using the search feature and it seems like most O2 sensor threads are for non-95 993s. '95 993 only has 1 O2 sensor, rather than 4. (Yet another reason by '95 is the best MY) It looks like the BOSCH brand part through sunset will cost about $120.

I'm curious how easy of DIY swapping out this sensor would be? My gut is telling me it should be super easy to do, but I'm wondering if I am missing something. Are there any special tools that I'll need? Can I accomplish this repair by backing the car onto a ramp and not having to remove the wheels and bust-out the jack stands?

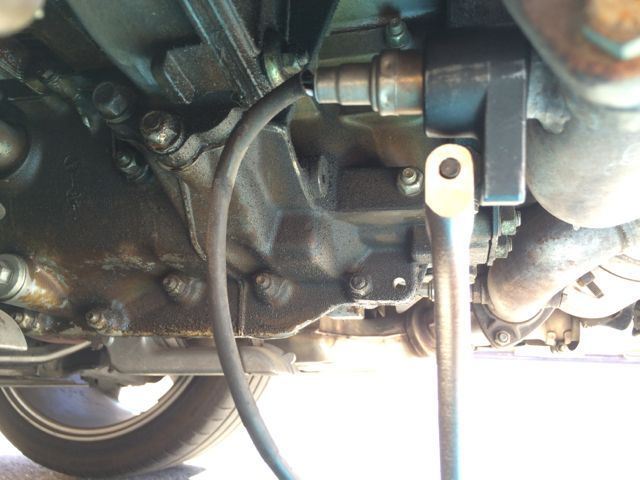
It will be plainly obvious where the sensor installs in the exhaust, but I'm not 100% certain where the electrical contact connects to. I suspect that too will be obvious once I'm under the car, but I'm curious if anyone can warn me as to how much of a PITA it will be to reach the plug end of the sensor cable.

Thanks in advance! Photos are welcome too!
Old 10-29-2014, 08:38 PM
  #2  
Vorsicht
Burning Brakes
 
Vorsicht's Avatar
 
Join Date: Feb 2010
Location: SF Bay Area, CA
Posts: 1,139
Received 19 Likes on 16 Posts
Default

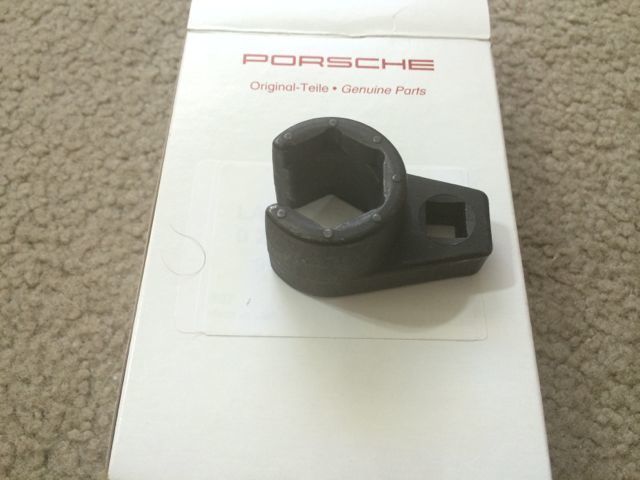
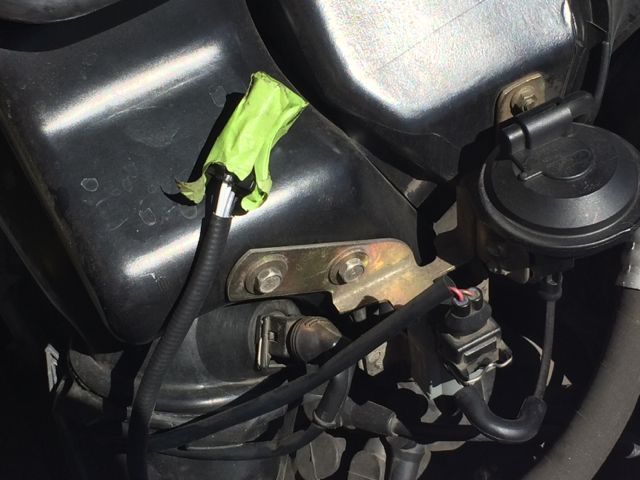
IIRC, when I swapped mine out it was relatively straight forward. I think I used a large adjustable wrench. The wiring goes up through a small metal clasp-like holding thing (to keep the wire away from hot things like exhaust) which is held in by a 10mm allen head bolt. Then the wire goes thru a rubber grommet (oval shaped) into the engine compartment (carefully pry up with screwdriver) and then off to the right. You will see a black plastic cover on the right side of engine compartment. That is where it get connected/disconnected.

Edit: I think the allen bolt holder is 6mm.
Old 10-29-2014, 08:58 PM
  #3  
Spyder_Man
Drifting
Thread Starter
 
Spyder_Man's Avatar
 
Join Date: Jan 2014
Location: SF Bay Area
Posts: 2,042
Likes: 0
Received 8 Likes on 8 Posts
Default

Thanks for the info. Do I need to remove the intake assembly to get at where the plug connects in?
Old 10-29-2014, 09:00 PM
  #4  
Vorsicht
Burning Brakes
 
Vorsicht's Avatar
 
Join Date: Feb 2010
Location: SF Bay Area, CA
Posts: 1,139
Received 19 Likes on 16 Posts
Default

PS $61 on Amazon.

http://www.amazon.com/Bosch-13369-Original-Equipment-Fitment/dp/B000HCWN1A/ref=au_as_r?ie=UTF8&Make=Porsche%7C2&Model=911%7C10&Year=1995%7C1995&carId=1&n=15684181&s=automotive&vehicleType=automotive#productDetails http://www.amazon.com/Bosch-13369-Original-Equipment-Fitment/dp/B000HCWN1A/ref=au_as_r?ie=UTF8&Make=Porsche%7C2&Model=911%7C10&Year=1995%7C1995&carId=1&n=15684181&s=automotive&vehicleType=automotive#productDetails
Old 10-29-2014, 09:03 PM
  #5  
Vorsicht
Burning Brakes
 
Vorsicht's Avatar
 
Join Date: Feb 2010
Location: SF Bay Area, CA
Posts: 1,139
Received 19 Likes on 16 Posts
Default

Originally Posted by Spyder_Man
Thanks for the info. Do I need to remove the intake assembly to get at where the plug connects in?
Thankfully, No! Much closer to the rear. Open engine lid, look straight down on the right side. Look for the black rubber oval grommet.
Old 10-29-2014, 09:04 PM
  #6  
stace
Rennlist Member
 
stace's Avatar
 
Join Date: Oct 2005
Location: Gig Harbor, WA still the great NW!
Posts: 1,115
Received 26 Likes on 21 Posts
Default

very easy DIY.
Old 10-29-2014, 09:12 PM
  #7  
Vorsicht
Burning Brakes
 
Vorsicht's Avatar
 
Join Date: Feb 2010
Location: SF Bay Area, CA
Posts: 1,139
Received 19 Likes on 16 Posts
Default

The grommet is located directly under the A/C Compressor. Here is a pic:
Attached Images  

Last edited by Vorsicht; 10-29-2014 at 09:26 PM. Reason: change condensor to compressor. Doh!
Old 10-29-2014, 09:32 PM
  #8  
Spyder_Man
Drifting
Thread Starter
 
Spyder_Man's Avatar
 
Join Date: Jan 2014
Location: SF Bay Area
Posts: 2,042
Likes: 0
Received 8 Likes on 8 Posts
Default

Awesome info! Thanks for the amazon link too! Every dollar saved on maintenance is a dollar saved for mods right?
Old 10-29-2014, 09:35 PM
  #9  
996scott
Rennlist Member
 
996scott's Avatar
 
Join Date: Dec 2002
Location: Utah
Posts: 1,639
Received 216 Likes on 133 Posts
Default

Very easy diy. Unscrew the sensor, follow the wire up through the grommet and unplug. Takes 10 min.
Old 10-29-2014, 09:55 PM
  #10  
P-daddy
Rennlist Member
 
P-daddy's Avatar
 
Join Date: Nov 2010
Location: MD
Posts: 6,973
Received 478 Likes on 283 Posts
Default

Scott- I've never done this DIY, but isn't it easier to disconnect first then unscrew the sensor? I've done O2 sensors on other cars before and the wire gets all twisted.
Old 10-29-2014, 09:57 PM
  #11  
Spyder_Man
Drifting
Thread Starter
 
Spyder_Man's Avatar
 
Join Date: Jan 2014
Location: SF Bay Area
Posts: 2,042
Likes: 0
Received 8 Likes on 8 Posts
Default

Can anyone else confirm that is the correct sensor linked above on Amazon? The vendor doesn't list it as compatible with my car.
Old 10-29-2014, 11:34 PM
  #12  
bruce7
Racer
 
bruce7's Avatar
 
Join Date: Aug 2008
Location: Los Angeles
Posts: 476
Likes: 0
Received 27 Likes on 20 Posts
Default some pics from my recent O2 R&R

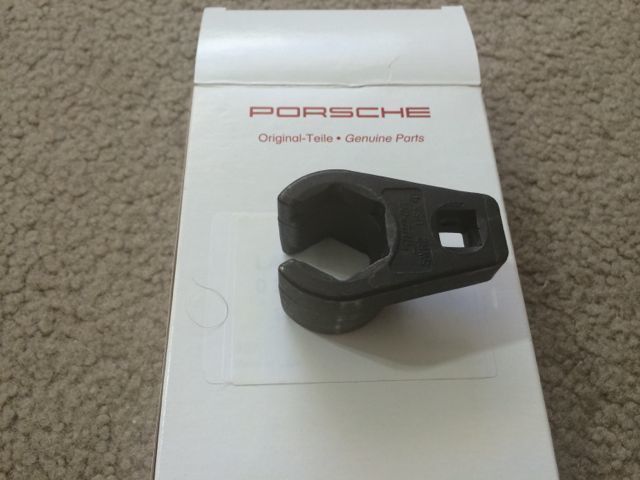
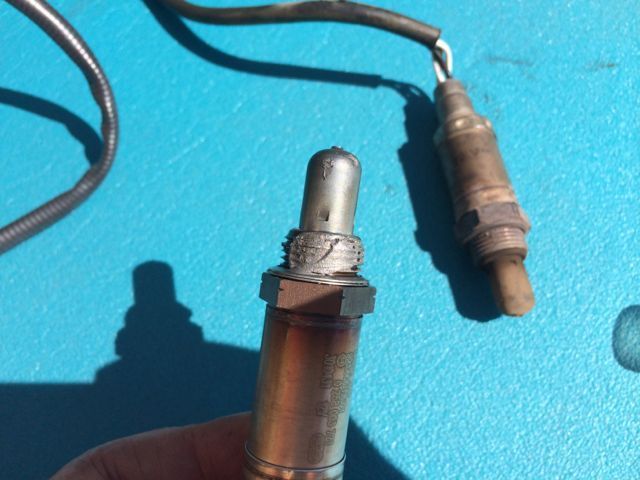
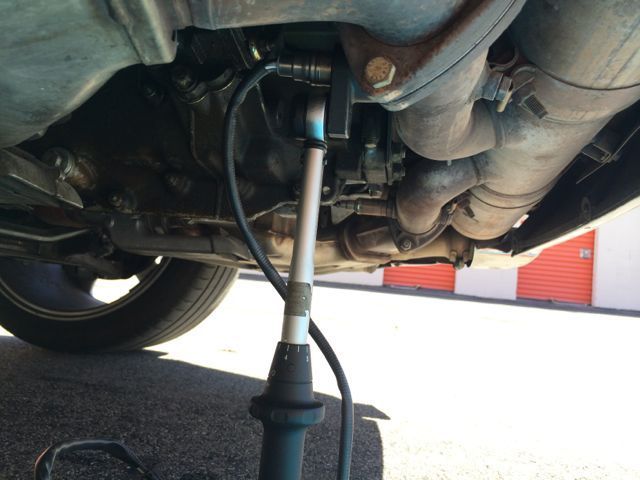
Hi, since you asked for some pics before starting I thought I would post these up.
This is on a 97 but the procedure would be the same. You can cut the wires on
the old sensor if you want before removing to eliminate snarls. You only need to
raise the car enough to swing the wrenches.

Good luck!

-bruce


Snap-on Oxygen Sensor Socket Drive, 22mm Hex, 3/8 Drive, Item SWR2, $37.80


Other side.


How it fits the O2 Sensor.


Removing the old O2 Sensor with a breaker bar.


O2 sensor comes with graphite paste on the threads. Try not to disturb it while handling the sensor.


Torque the O2 Sensor to 50-60Nm. I used 50 and it was tight enough.


Protect the plug end to keep dirt and gunk out of the connector while installing.
Old 10-30-2014, 12:32 PM
  #13  
996scott
Rennlist Member
 
996scott's Avatar
 
Join Date: Dec 2002
Location: Utah
Posts: 1,639
Received 216 Likes on 133 Posts
Default

Originally Posted by P-daddy
Scott- I've never done this DIY, but isn't it easier to disconnect first then unscrew the sensor? I've done O2 sensors on other cars before and the wire gets all twisted.
yes it is, sorry I put those in reverse order.
Old 10-30-2014, 12:39 PM
  #14  
996scott
Rennlist Member
 
996scott's Avatar
 
Join Date: Dec 2002
Location: Utah
Posts: 1,639
Received 216 Likes on 133 Posts
Default

Originally Posted by Spyder_Man
Can anyone else confirm that is the correct sensor linked above on Amazon? The vendor doesn't list it as compatible with my car.
I can't confirm that one but I know this works for sure on my 95.

http://www.warehouse33auto.com/99360...126-01-w00.htm

It was a little more expensive but perfect fit. The first one I ordered from Amazon (not the one mentioned above) was too short and had to send it back.
Old 10-30-2014, 01:39 PM
  #15  
Warehouse33.net
Former Vendor
 
Warehouse33.net's Avatar
 
Join Date: Jan 2014
Location: Kansas City, MO
Posts: 1,411
Likes: 0
Received 2 Likes on 2 Posts
Default

Thanks 996scott for mentioning me. Spyder_Man, I can have it at your door on Friday or at the latest Monday with the free shipping.

thanks
Jason


Quick Reply: Shorted Oxygen Sensor in a '95 993


All times are GMT -3. The time now is 03:25 AM.