DIY - Heater Core swap
 01-21-2008, 05:59 AM
#1
RL Community Team
Rennlist Member
Rennlist Member
Thread Starter
In the spirit of building a larger 968 DIY library...
This article will walk you through the removal of your heater core. The factory manuals will tell you to remove the dashboard to gain access to the heater core. Actually, the absence of the dashboard is not necessary. It would make the heater core easier to reach, sure, but it would make the job much harder overall! I did this job on a 1992 968 so this procedure should apply to any late (1985.5-1991) 944 or 968.
1. Disconnect the battery negative terminal.
2. Drain the coolant system.
3. Remove the glove box.
4. Disconnect the rubber hose for the thermometer (if equipped) and also remove the plastic air duct.
5. These two plastic duct pieces must now be removed.
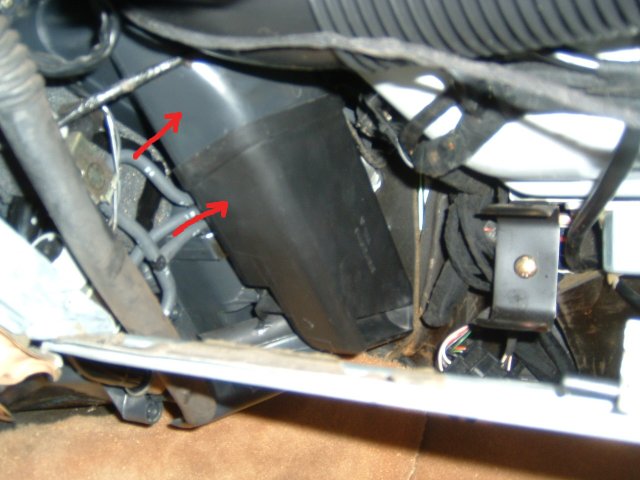
6. The lower piece is secured with one screw. Undo it, and remove the piece.
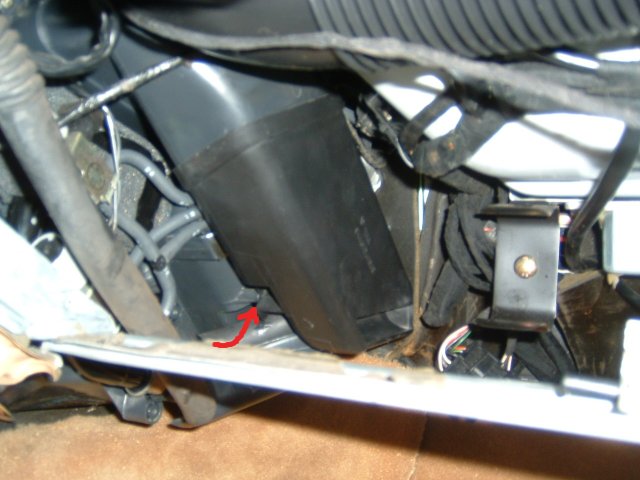
7. Cut this zip-tie holding a wire to the upper duct piece.
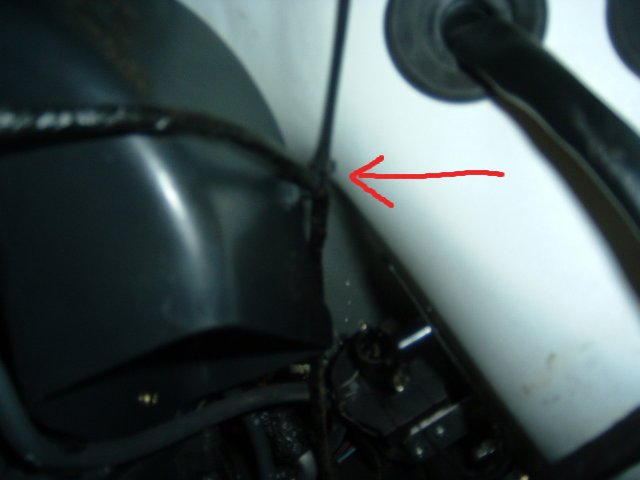
8. There are 3 screws holding the upper duct piece. Remove this screw pictured.
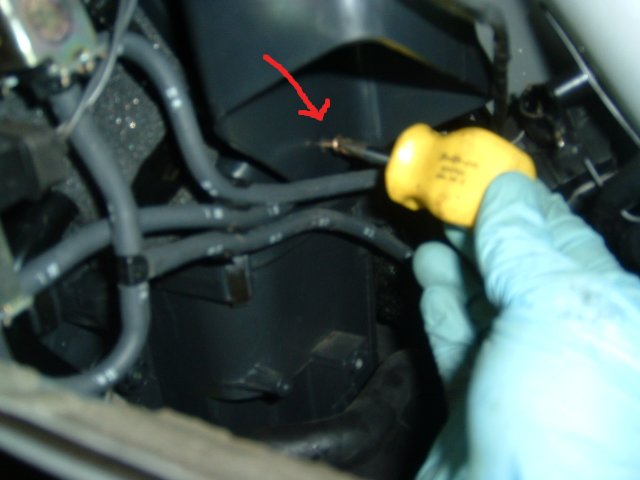
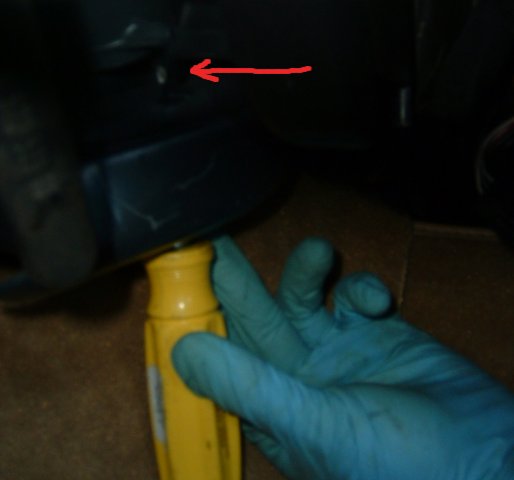
9. Now remove these 2 screws.
10. The yellow arrows show again the 2 upper screws for the upper duct piece. With all 3 screws out, pull and remove the piece.
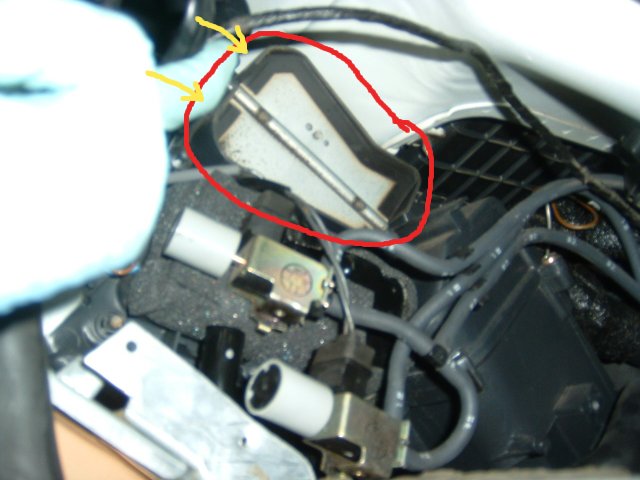
11. Here's the piece in my hand. Note the shape, and note shape of where you just pulled it from, so you know how to reinstall it.
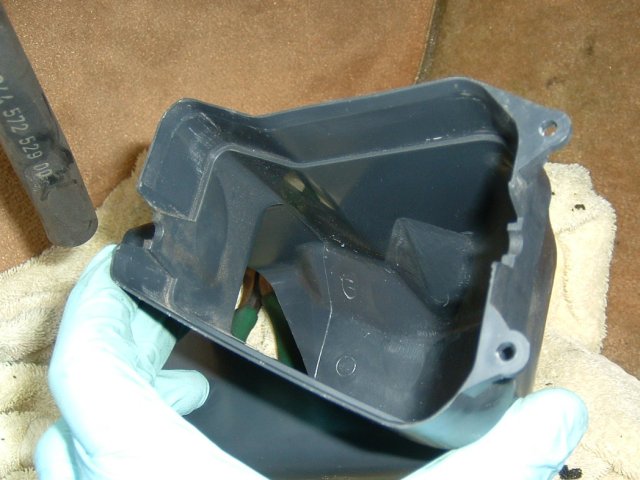
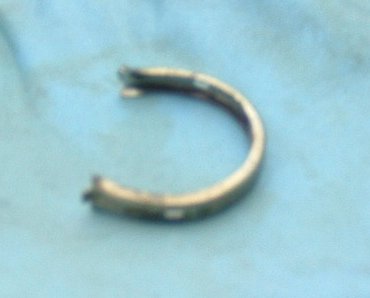
12. Place a container under the heater core pipe connections to catch spilling coolant. I used tuperware. Use a screwdriver to pry off these 2 clips on the heater core pipes. Don't lose these clips!
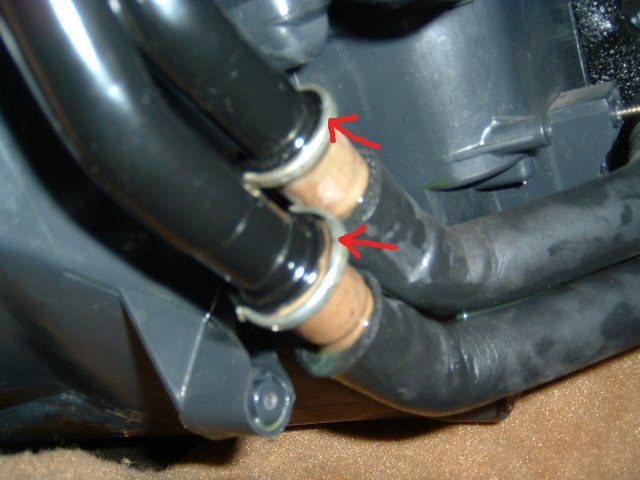
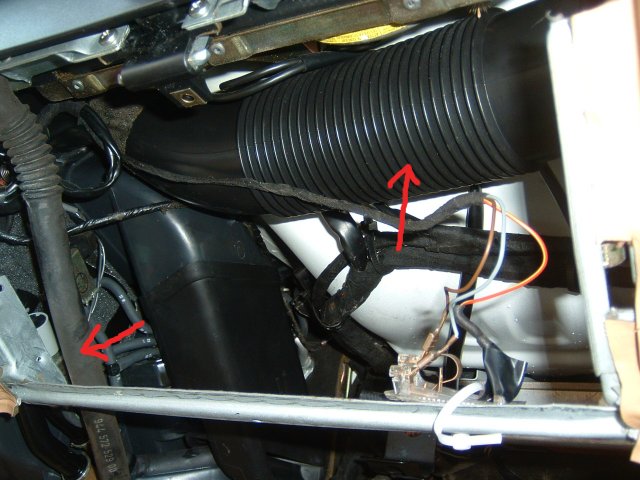
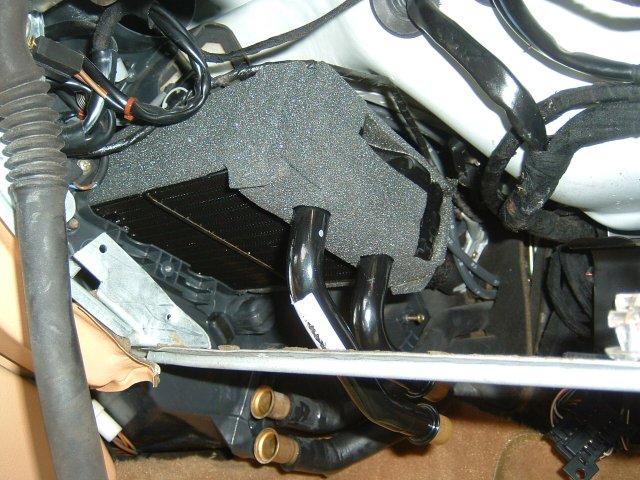
13. Separate the heater core pipes. Pull/hold these vacuum elements out of the way, along with anything else obstructing the foam-padded heater core.
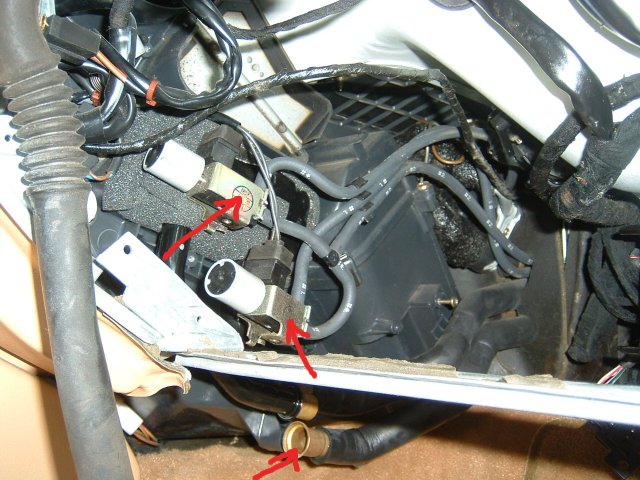
14. Start pulling out the core. Yea! The heater core is coming out, and you didn't even have to touch the dash!
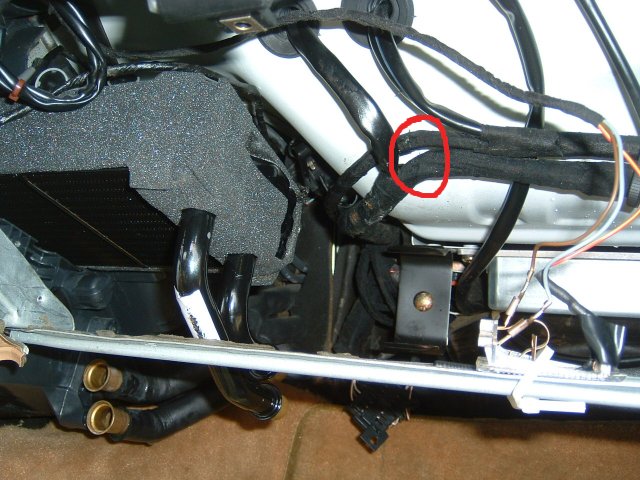
15. You will soon find the core won't simply slip out. It will run into the wire looms circled. It would seem the wiring was run AFTER the core was installed, because there just isn't enough clearance here. You need to undo the plastic strap here, which I have already done in this picture, and remove it completely. Then just push and pull on the wires while tugging out the core.
16. Eventually the core will squeeze by and finally make it all the way out of its housing.
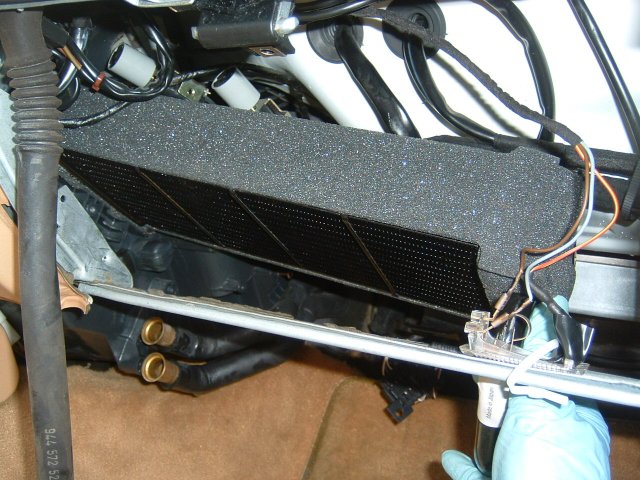
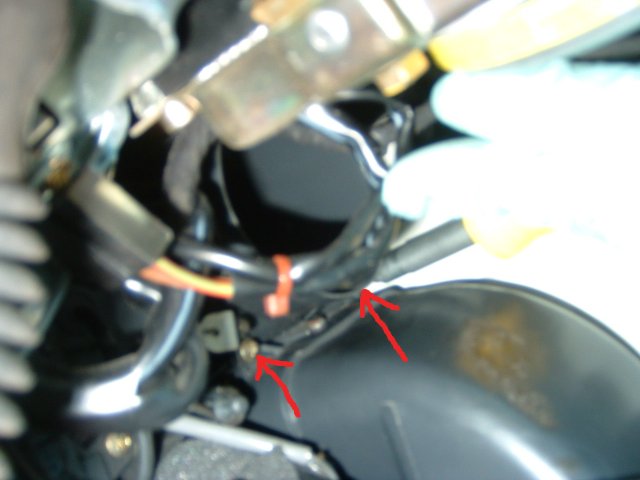
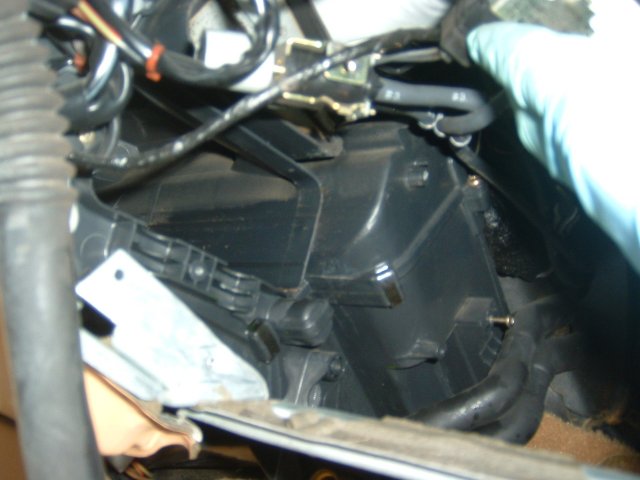
17. The dotted circle shows the inevitable damage that will occur to your wire loom. As long as no insulation was broken, it's fine. The arrow above that shows the painted stud where that plastic strap was removed from.

18. The heater core is now out.
Installation is the reverse of removal.
This article will walk you through the removal of your heater core. The factory manuals will tell you to remove the dashboard to gain access to the heater core. Actually, the absence of the dashboard is not necessary. It would make the heater core easier to reach, sure, but it would make the job much harder overall! I did this job on a 1992 968 so this procedure should apply to any late (1985.5-1991) 944 or 968.
1. Disconnect the battery negative terminal.
2. Drain the coolant system.
3. Remove the glove box.
4. Disconnect the rubber hose for the thermometer (if equipped) and also remove the plastic air duct.
5. These two plastic duct pieces must now be removed.
6. The lower piece is secured with one screw. Undo it, and remove the piece.
7. Cut this zip-tie holding a wire to the upper duct piece.
8. There are 3 screws holding the upper duct piece. Remove this screw pictured.
9. Now remove these 2 screws.
10. The yellow arrows show again the 2 upper screws for the upper duct piece. With all 3 screws out, pull and remove the piece.
11. Here's the piece in my hand. Note the shape, and note shape of where you just pulled it from, so you know how to reinstall it.
12. Place a container under the heater core pipe connections to catch spilling coolant. I used tuperware. Use a screwdriver to pry off these 2 clips on the heater core pipes. Don't lose these clips!
13. Separate the heater core pipes. Pull/hold these vacuum elements out of the way, along with anything else obstructing the foam-padded heater core.
14. Start pulling out the core. Yea! The heater core is coming out, and you didn't even have to touch the dash!
15. You will soon find the core won't simply slip out. It will run into the wire looms circled. It would seem the wiring was run AFTER the core was installed, because there just isn't enough clearance here. You need to undo the plastic strap here, which I have already done in this picture, and remove it completely. Then just push and pull on the wires while tugging out the core.
16. Eventually the core will squeeze by and finally make it all the way out of its housing.
17. The dotted circle shows the inevitable damage that will occur to your wire loom. As long as no insulation was broken, it's fine. The arrow above that shows the painted stud where that plastic strap was removed from.
18. The heater core is now out.
Installation is the reverse of removal.
 01-21-2008, 11:54 AM
#2
Rennlist Member
Wow, very detailed with excellent pics. I like the way you started the thread with a DIY 1st. That is how I will start all my DIY threads so all someone would have to do is a search for DIY under 968 forum and all these DIY's will pop up.
Excellent writeup and a big than you.
Quick question, where are you hosting these pics? I have a few writeups that are in word format with pictures.
Raj
Excellent writeup and a big than you.
Quick question, where are you hosting these pics? I have a few writeups that are in word format with pictures.
Raj
01-21-2008, 07:45 PM
#3
RL Community Team
Rennlist Member
Rennlist Member
Thread Starter
Thanks Raj! The screen on my camera is broken, so I can't see how the pictures come out until I download them... some of them came out blurry but I think the gist of it gets across. The pictures were uploaded to the rennlist picture server, using the "upload photo" option all the way on the upper right corner of any RL page.
I also put it into a basic html format and emailed it to Clark.
If anyone ever has pointers on improvement please tell me and I'd be happy to revise the first post.
I also put it into a basic html format and emailed it to Clark.
If anyone ever has pointers on improvement please tell me and I'd be happy to revise the first post.
01-21-2008, 09:40 PM
#4
Rennlist Member
Sounds good.
I have 3 DIYers so far that I need to get up.
Odometer gear swap
Valve cover gasket
Hall sender R&R
I should have them up as soon as I can upload pictures.
Raj
I have 3 DIYers so far that I need to get up.
Odometer gear swap
Valve cover gasket
Hall sender R&R
I should have them up as soon as I can upload pictures.
Raj
12-24-2008, 06:52 AM
#6

I've replaced the heater matrix twice, the first time i removed the dash! The second time i realised the same as above, that the matrix will come out with the dash in place - just. Really wanted to add that this was on a RHD car, so instuctions are pretty much the same for the UK owners.
JP
JP
Trending Topics
12-24-2008, 11:40 PM
#8
Oh yeah, Raj...I look forward to your valve cover R&R. I have removed mine about 5 times so I want to see if your procedure is very much different from mine. Also the Hall Sender R&R would be helpful too.
12-25-2008, 04:26 PM
#9
Rennlist Member
Rob, the one trick I found with the valve cover gasket is that you can remove it with the variocam gasket and spacer in place. You can pull the entire cover with the spacer in place.
I took tons of pictures, just have to find time to do a DIY.
As Arash can attest, its a pretty time consuming process .
.
Raj
I took tons of pictures, just have to find time to do a DIY.
As Arash can attest, its a pretty time consuming process
.Raj
12-25-2008, 04:54 PM
#10
Raj,
I usually pull that spacer and that gasket is iffy as it tends to get scraped up a bit. I can see that pulling the gasket with the spacer / gasket in place is a good idea. That one little gasket is like 3-4 dollars!!
I usually pull that spacer and that gasket is iffy as it tends to get scraped up a bit. I can see that pulling the gasket with the spacer / gasket in place is a good idea. That one little gasket is like 3-4 dollars!!
12-25-2008, 08:17 PM
#11
RL Community Team
Rennlist Member
Rennlist Member
Thread Starter
Raj, that is a nice trick I never thought of until you mentioned it. Sometimes I get too caught up in the current step, I forget to look 5 steps ahead, or look at the ultimate goal, and try to see shortcuts or tricks. If that gasket has ever been replaced before, there should be no need to take it out again, so like you said you can leave it on.
Rob, for a valve cover DIY, in lieu of Raj's write up, you can read steps 28-35 of our variocam DIY. Sorry there aren't many pictures in those steps.
Rob, for a valve cover DIY, in lieu of Raj's write up, you can read steps 28-35 of our variocam DIY. Sorry there aren't many pictures in those steps.
12-27-2008, 03:10 PM
#12
Rennlist Member
Join Date: Mar 2004
Location: Phoenix and Forest Virginia
Posts: 1,913
Received 283 Likes
on
157 Posts
Arash - great write up and love the pics. It's one of those jobs that look more familiar once you are upside down with your nose under the dash. I pray I do not have to do one soon but you never know. I am going after a overheat issue next so it may be related but we will see...
Thanks for effort, it is a help to all- Hope you guys all had a great Christmas!!!
Cheers, Mike
Thanks for effort, it is a help to all- Hope you guys all had a great Christmas!!!
Cheers, Mike
12-28-2008, 01:58 PM
#13
Arash, et all.
Im contemplating removing all of my AC system from my car. Im in the UK so we dont get to use it that often...
The car is being used prodimently as a track day car So less weight = more speed...
So, next question.
Does the DIY above apply to removing the AC "heater" core as i beleive its different to the standard core.??
As anybody ever done such a task.???
Arash. Thanks a lot for doing this pictoral DIY . It will come in VERY handy....
12-28-2008, 05:16 PM
#14
RL Community Team
Rennlist Member
Rennlist Member
Thread Starter
Moook, my pleasure. The heater core in this article is the heat exchanger with engine coolant flowing through it. I.e. the "standard" heater core. The flow is controlled by the temperature **** on your dashboard, regardless of whether AC is turned on or off. I don't know if the AC system has its own heater, and even if it did, it won't have coolant flowing through it.