Porsche 997: How to Install GT3 RS Door Pulls
A popular upgrade for any Porsche 997 is a set of race-inspired GT3 RS fabric door pulls. These door pulls are available in a variety of colors to add a sporty touch to your cockpit. This article will guide you through the installation.
This article applies to the Porsche 997 (2005-2012).
In the world of racing, the idea of "less is more" is often implemented by shedding vehicle weight wherever possible to improve performance. Porsche had clearly used this philosophy when developing the Porsche 997 GT3 RS by dropping an additional 44 pounds over the standard GT3. A notable touch that embraced this minimalist approach in the GT3 RS was the fabric door pulls. These door pull straps are now available as a kit that can be installed in Porsche 997 models (excluding Targas and Cabriolets). While the weight savings for this particular modification is minimal at best, it will add a sporty touch to the interior that will be easily recognizable by any Porsche aficionado.

Materials Needed
- T20 and T30 Torx wrenches/drivers
- Plastic interior trim removal tool
- Razor blade
- Phillips screwdriver
- Razor blade
- Drill and 1/4" drill bit
- Cut off saw, hacksaw, or similar
- Hand file
- Butane torch or soldering iron (optional)
Warning
Installation of GT3 RS fabric door pulls requires you to work near the side impact airbags located in the doors. Disconnect the battery before beginning Step 1.
Step 1 – Remove door panels
To access the door pull mechanism, the door panel must first be removed.
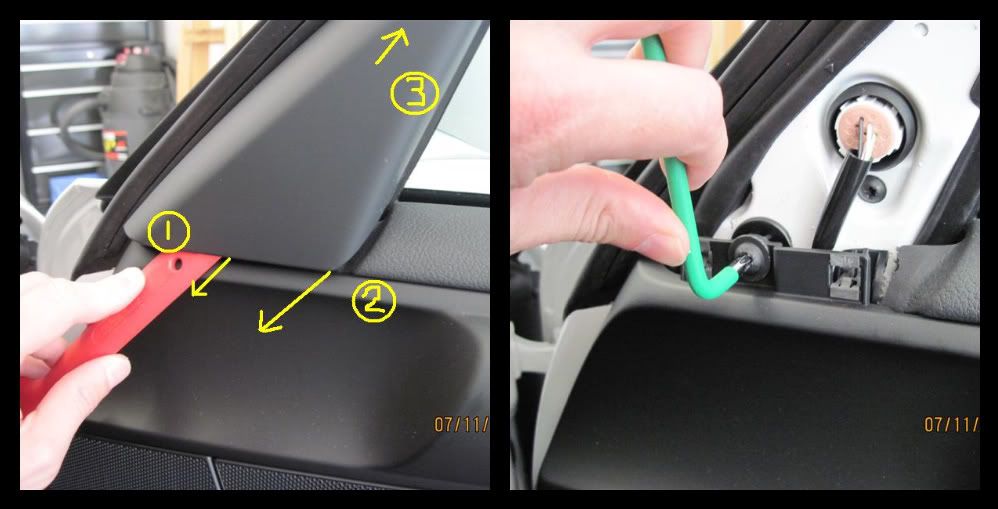
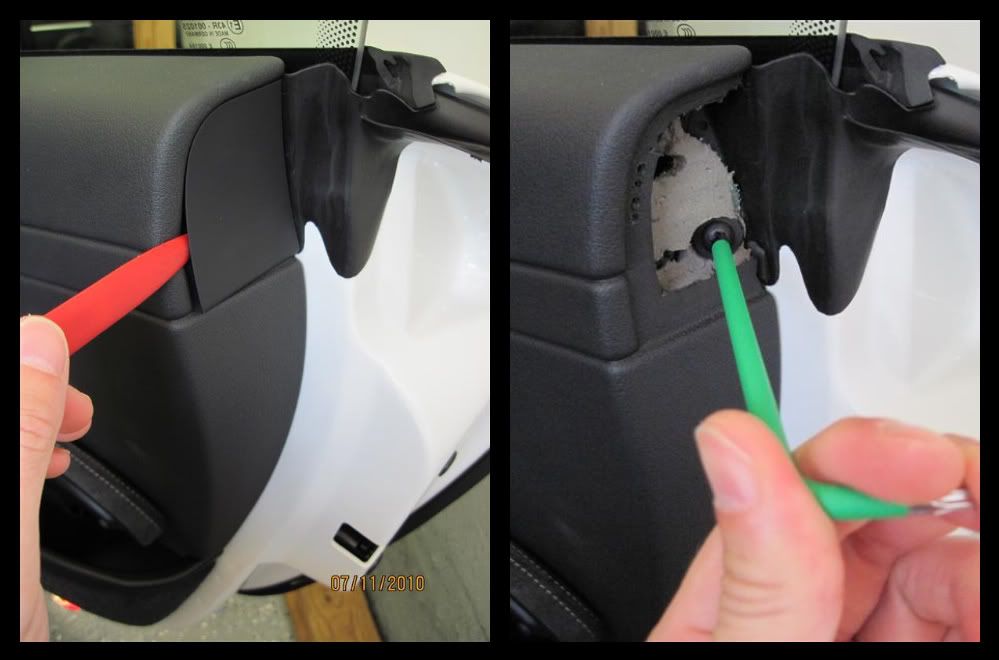
- Using a plastic interior trim removal tool, remove the side mirror trim cover. To do so, gently pry up from the bottom of the cover to release the two clips securing the trim cover in place. With the bottom of the cover released, push it upwards where it should come free of the door. Be careful with this step as there is a small plastic tab at the top of the cover that can easily be damaged.
- With the side mirror trim cover out of the way, remove the securing screw located underneath using a T30 Torx driver.
- Next, separate the door handle from the lever mechanism. Simply pull out on the door handle, and remove the T20 Torx screw securing the handle to the lever. With the screw removed, the handle should slide off of the lever.
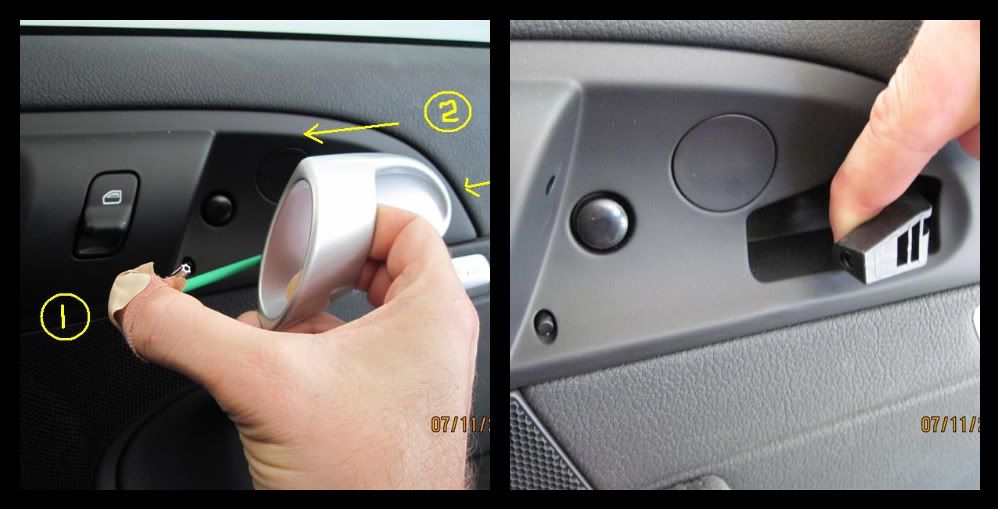
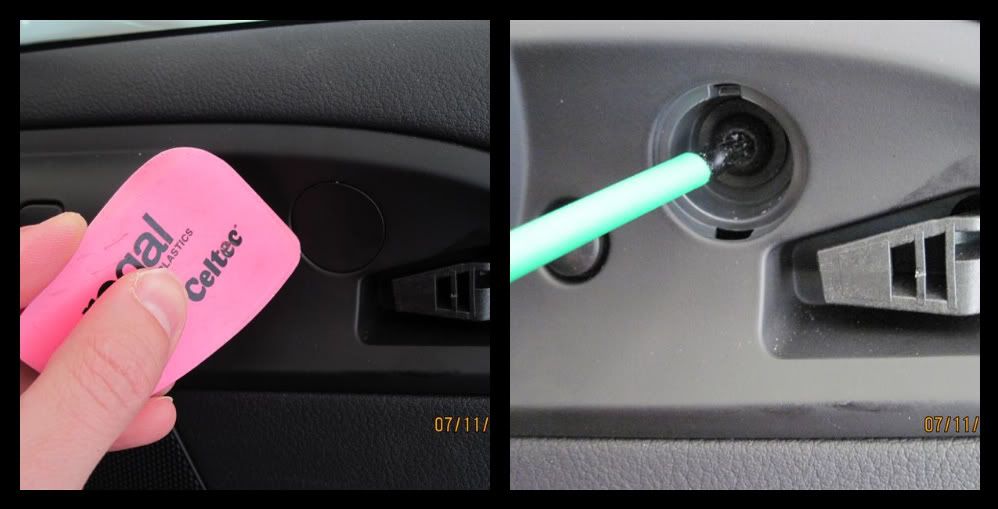
- Behind the door handle is a round plastic plug that needs to be removed. There are tabs located at the top and bottom of the plug. A razor blade or similar can be used to pry out the plug without marring the finish. With the plug out of the way, remove the T30 Torx screw.
- Using your plastic trim removal tool, remove the lower speaker trim. Underneath is a T30 Torx screw that needs to be removed as well.
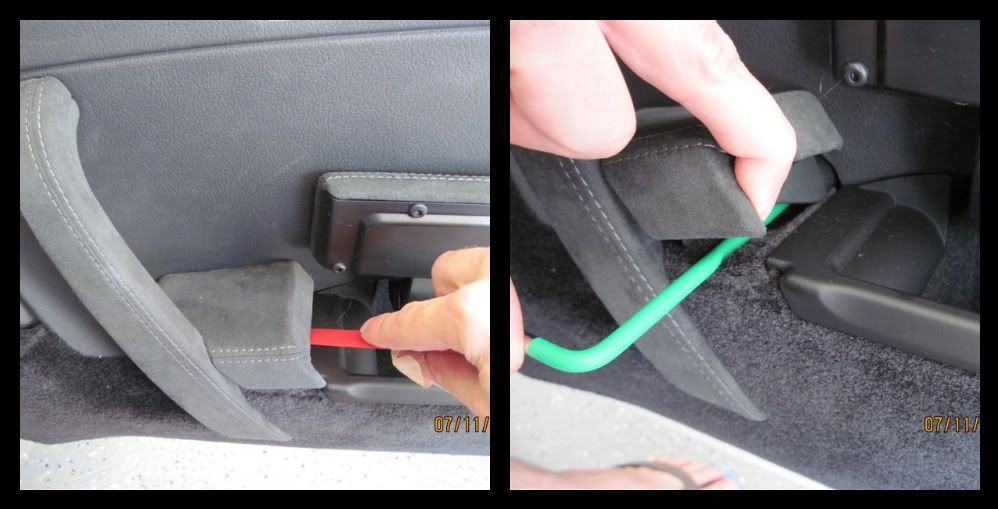
- Open the armrest storage compartment, and gently pry upwards on the small armrest trim section just off of the door handle. This section of trim will un-clip, but is not completely removed. With the armrest trim un-clipped and being held up, remove the T30 Torx screw located underneath.
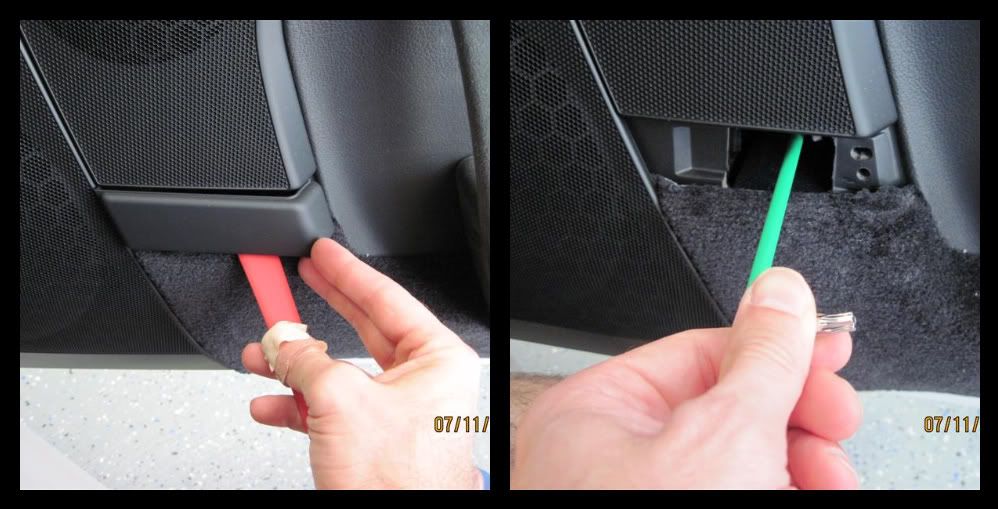
- At the rear of the door, remove the plastic cover with your trim removal tool by gently prying at various points around the cover to release the two securing tabs. Remove the T30 Torx screw behind the cover.
- The door panel is now ready to be separated from the door. The door is secured with plastic rivets that require some force to release. With a plastic trim removal tool, pry between the bottom of the door panel and the door. Do not be alarmed to hear a "breaking plastic" noise, as this is the tightly secured rivet pulling out of the door. Once one of the rivets pops free and releases from the door, there should be a larger gap in the panel to allow you to use your hands to pry on the door panel and remove the remaining rivets. There are nine in total.
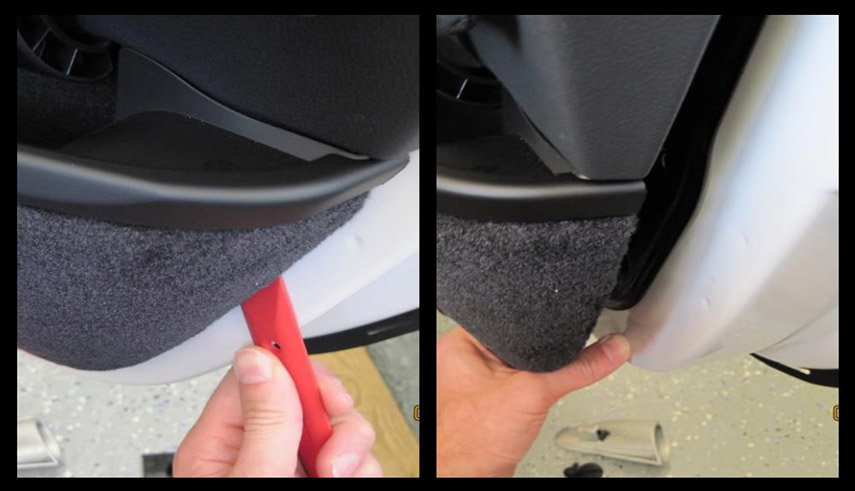
Figure 8. Prying door panel from door to release plastic rivets. 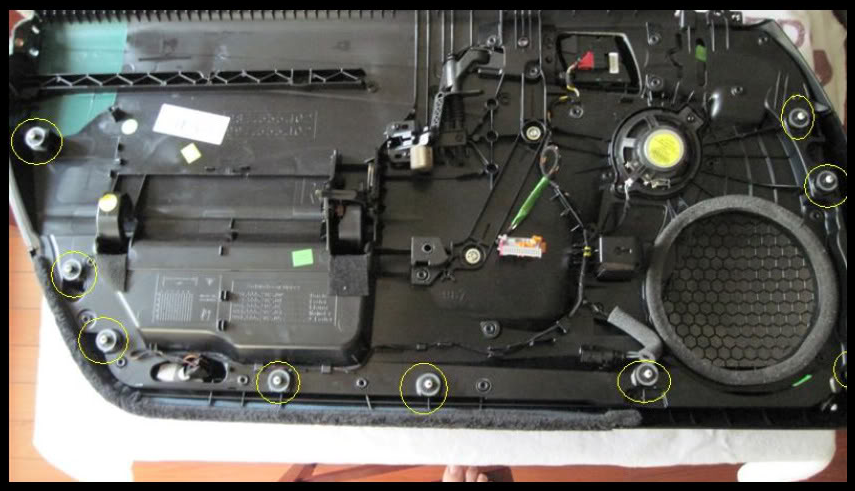
Figure 9. Door panel plastic rivet locations.
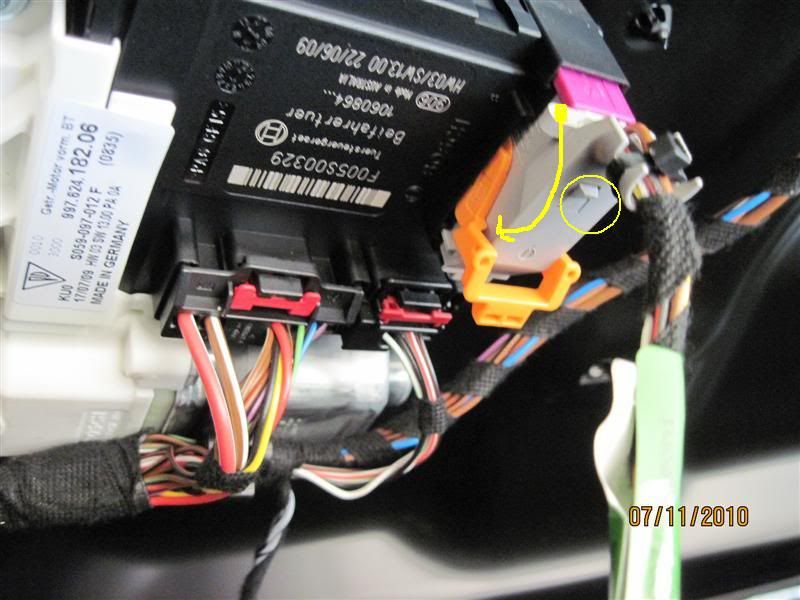
- With the rivets removed, the door panel should lift upwards and off of the door. Be careful as three connections still need to be removed before the door panel will be completely free. The first connection is the black power window module located in the center portion of the door. Disconnect the grey/orange plug from the module by depressing the locking tab and rotating the swinging-arm downwards.The plug can now be pulled outwards and disconnected from the module.
- Next, disconnect the speaker plug located just behind the speaker grill. Depress the plastic locking tab, and pull to separate the plug.
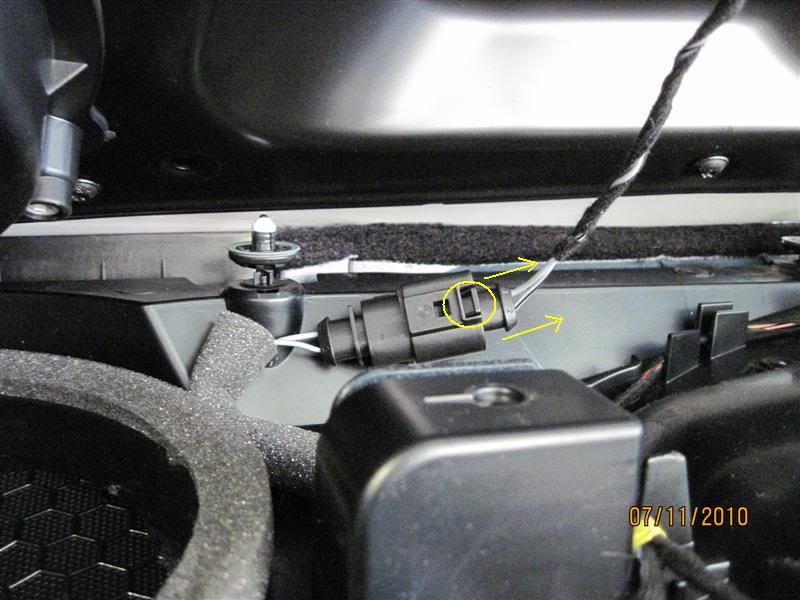
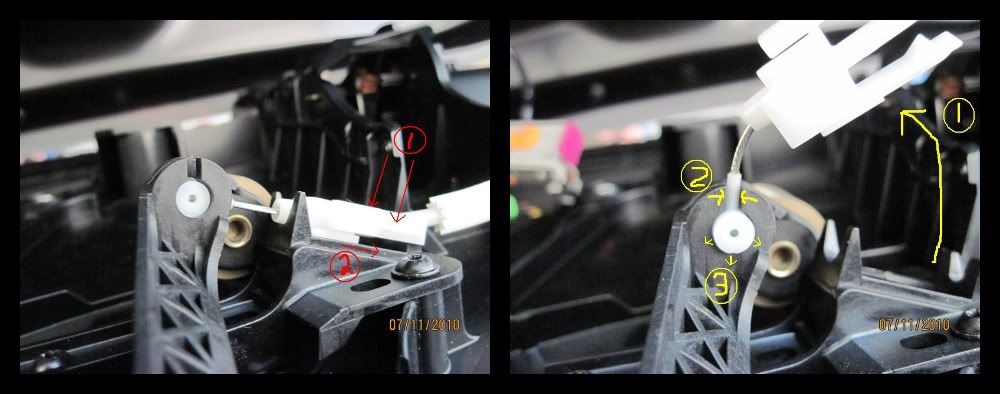
- Lastly, release the door actuator cable that runs along the back half of the door to the axle mount (door lever actuator). Pinch the white clip on both sides to depress the locking tabs and slide the clip away from the mechanism. Doing so should allow the cable to now be rotated and removed from the axle mount.
-
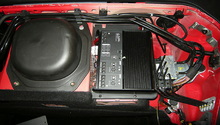
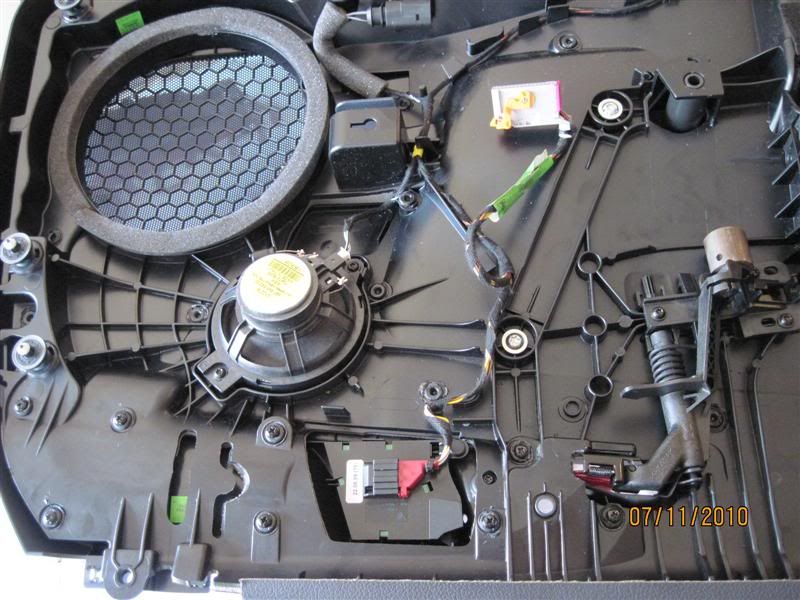
The door panel can now be safely removed from the door. Be careful not to disturb the the airbag and airbag module (the piece with yellow sticker and attached aluminum cylinder).

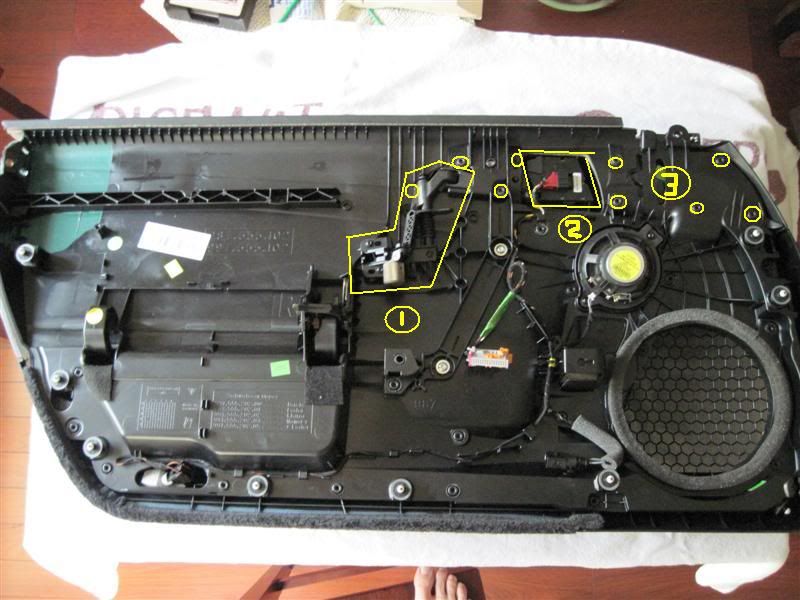
Figure 13. Door with door panel removed.
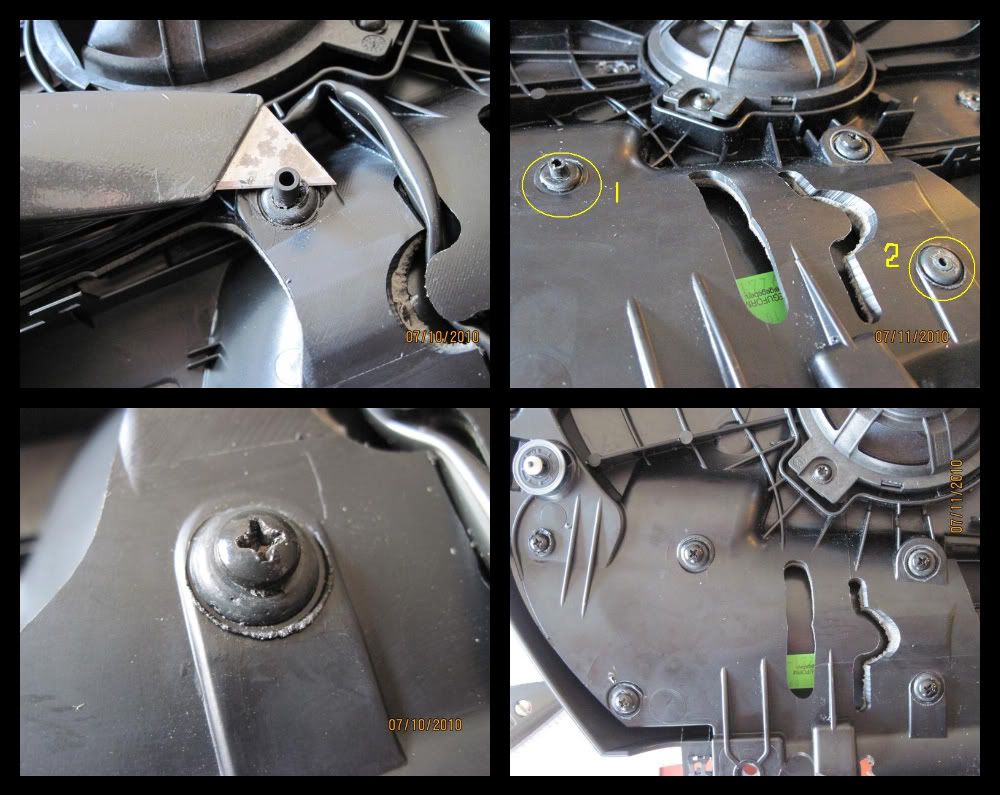
Step 2 – Prep door panels
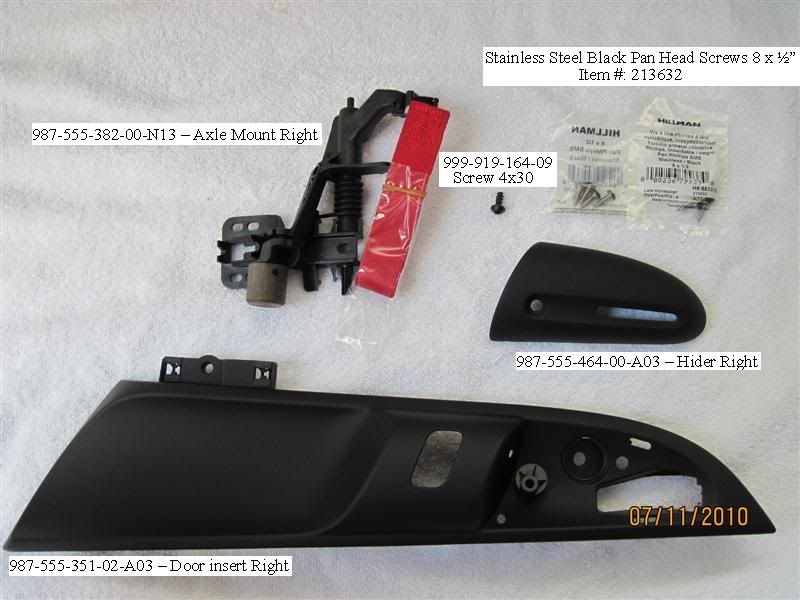
Before the new door pulls can be installed, removal of several components and modifications to the door panel must be completed. Be sure the door panel is placed upon a clean, soft surface to avoid damage to its finish. The areas to be worked on include the axle mounts (1), the window rocker switches (2), and plastic door insert rivets (3).
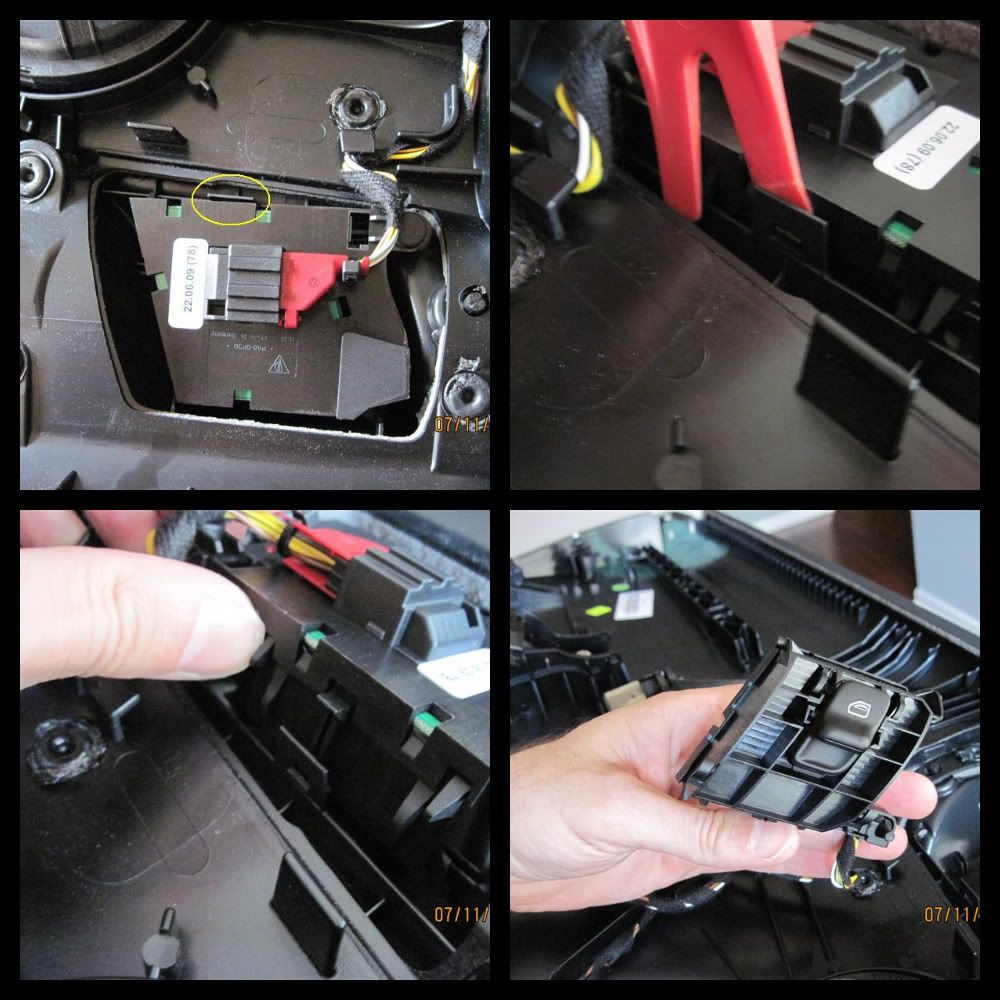
- Remove the window switch by prying outwards on the tab, and rotating the switch out of the door panel.
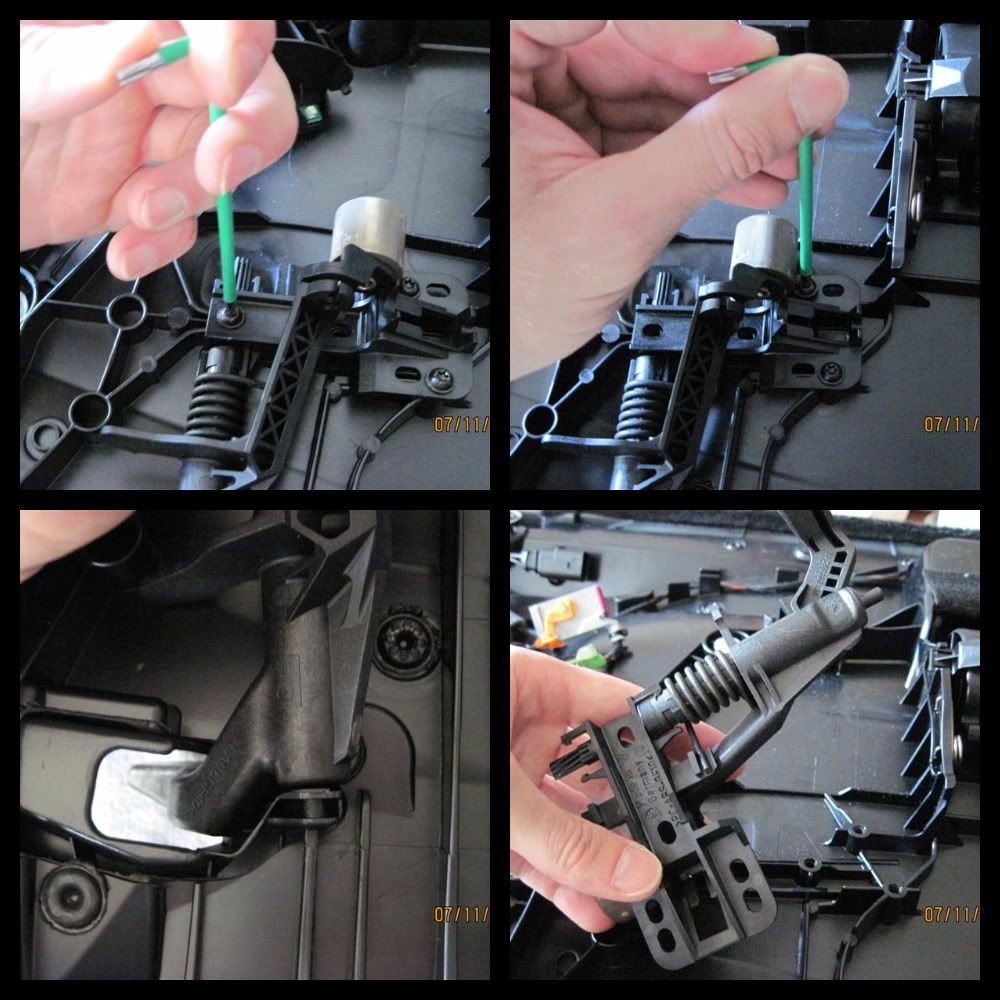
- The axle mount (a.k.a door lever actuator) is secured to the panel with three T20 Torx screws. Remove the three screws, and wiggle the plastic base of the axle mount out of the door panel.
- Remove the door insert by drilling out each of the nine plastic rivets. Using a 1/4" drill bit, carefully drill through the rivets approximately 2 to 3mm to allow the rivet to be removed. Do not drill too deep as damage to the door insert can occur. With all nine rivets removed, separate the door insert from the door panel. The door panel is now ready for installation of the RS door pull kit.

Figure 17. Plastic rivet locations. 
Figure 18. Drilling the rivets. 
Figure 19. Door insert removed.
Step 3 – Install RS door pull kit
- Place the new door inserts into the door panel. The new insert can be secured to the door panel in two different ways. The first method involves using a small torch or soldering iron to melt the posts of the door insert to the door panel as was done at the factory. The second method involves trimming the posts of the door insert to install #8 x 1/2" screws and washers to secure the insert to the panel. Either way, make sure pressure is placed upon the door insert when melting the posts or installing the screws to ensure the insert fits tight against the door panel.
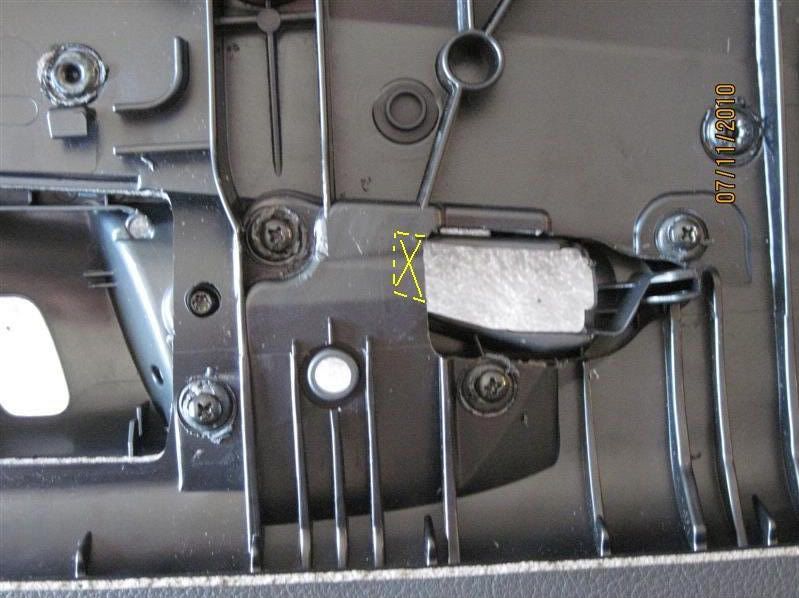
- In order for the RS axle mount to fit in the door without binding, the door panel must be trimmed as depicted below. This area is not visible with the door panel installed, even if you decide to revert back to the original door handles.
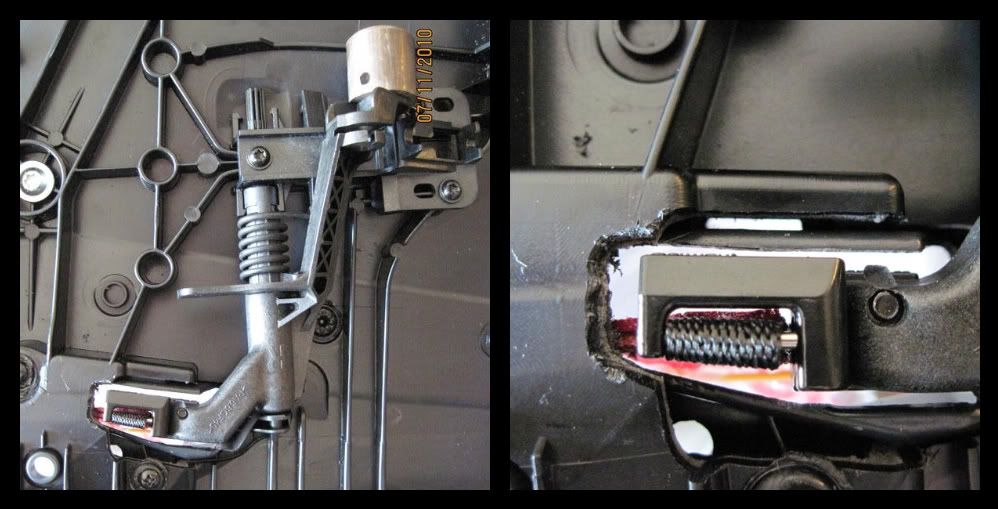
- With the door panel trimmed, install the new RS axle mount. Test operation of the mount to make sure there is no binding. The mount can be slightly adjusted by loosening its mounting screws. If binding still occurs, consider trimming more material out of the door panel.
- Re-install the mirror switch, making sure it properly clips into place.
Step 4 – Re-install door panel
- Attach the door actuator cable to the axle mount. Install white clip to lock cable in place.
- Attach speaker and window module plugs.
- Attach door panel to door, ensuring the plastic rivets lock into place. Before installation, be certain the rivets are in the "closed position" as depicted by the rivet on the left (in Figure 24). Simply pull out on the rivet to get it into the correct position.

- Install the remaining Torx screws and trim pieces as depicted in Step 1.
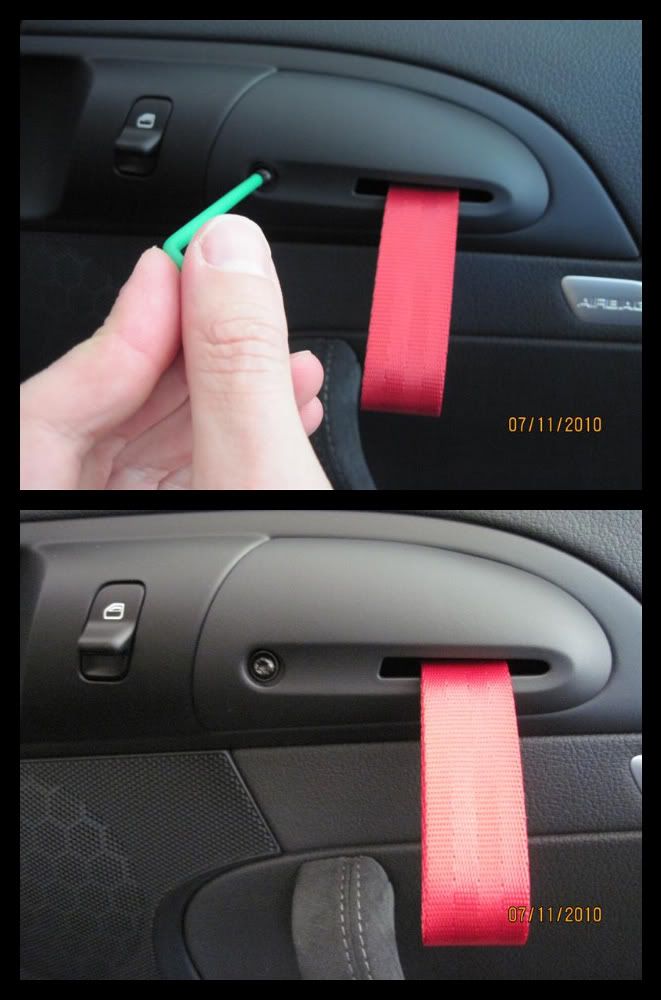
- Feed the door strap through the opening on the door pull cover, and snap the cover into place on the door panel.
- Install the securing screw using a T20 Torx bit.
- Re-connect the battery.
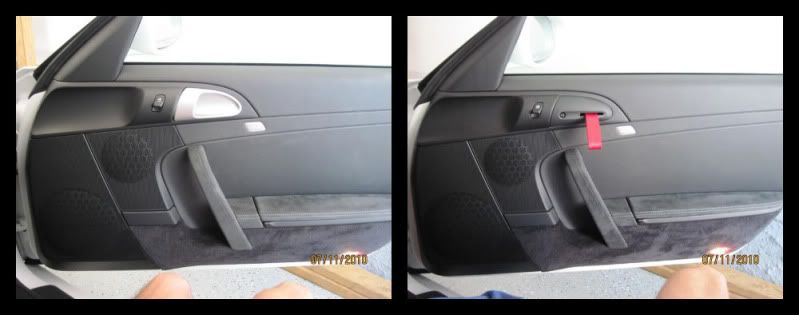
- Finally, test operation of new door pulls.
Related Discussions
- RS Door Pulls - Rennlist.com
- Door Pulls - Rennlist.com
- Replacement Door Handles Interior 997.2 - Rennlist.com
- RS Door Panel Pic - Rennlist.com