Rennlist - Porsche Discussion Forums
  • LOG IN
  • REGISTER
  • Forums
    • Rennlist Help and Welcome Sections
      • New Member Welcome Area
      • Rennlist Forum Glitches - post them here. Test posts are permitted.
      • Rennlist Premium Member Help (Account and Membership Issues Only)
    • Rennlist Classifieds
      • The Rennlist Marketplace
      • Vendor Announcements
      • For Sale Ads - (Member to Member FS/WTB/Free)
      • Buyer and Seller Feedback
    • Porsche Technical Discussion Areas
      • Taycan
      • Macan EV
      • 992
      • 992 GT3 and GT2RS Forum
      • 992 Turbo and Turbo S
      • 991
      • 991 GT3, GT3RS, GT2RS and 911R
      • 991 Turbo
      • 997 Forum
      • 997 GT2/GT3 Forum
      • 997 Turbo Forum
      • 996 Forum
      • 996 GT2/GT3 Forum
      • 996 Turbo Forum
      • 993 Forum
      • 993 Turbo Forum
      • 964 Forum
      • 964 Turbo Forum
      • 911 Forum
      • 911 Turbo (930) Forum
      • 718 Forum
      • 981 Forum
      • 987 Forum
      • Boxster & Boxster S (986) Forum
      • 928 Forum
      • Macan
      • Cayenne 9Y0 2019 -
      • Cayenne 958 - 2011-2018
      • Cayenne 955-957 2003-2010
      • 924/931/944/951/968 Forum
      • 968 Forum
      • 944 & 944S Forum
      • 944 Turbo and Turbo-S Forum
      • 924 and 931 Forum
      • Panamera
      • Porsche Supercars Carrera GT, 918,960
      • 912 Forum
      • 914/914-6 Forum
      • 356 Forum
    • Performance & Competition Discussion Areas
      • Racing & Drivers Education Forum
      • Porsche Cup Cars
      • Autocross
      • Performance Modifications Forum
      • Wheel and Tire Forum
      • Concours & Car Care
      • Dakar, Safari, Rally & Off-Roading
    • General Discussion Forums
      • European Delivery and or Porsche Experience Center
      • Audio and Video Forum
      • General Porsche Discussions Forum
      • Other Marque Discussions
      • "HEY, WAIT FOR ME" Racing Forum
      • Porsche Memorabilia
      • Rennpository Video Clips and Other Online Videos
      • Jobs Wanted - Help Needed
    • Rennlist Regional Forums (Regional Events, Discussions, Announcements, Etc.)
      • Events
      • Region Finder
      • Rennlist Region Florida
      • East US Rennlist Region
      • Central US Rennlist Region
      • West US Rennlist Region
      • Rennlist United Kingdom
      • Rennlist Europe
      • Rennlist Canada
      • Rennlist Asia-Pacific
      • Rennlist Africa & Middle East
    • International Forums
      • Norsk
      • Deutsch
      • Español
      • Français
      • Italiano
      • 日本語 (Japanese)
      • Nederlands
      • Svenska
    • Marketplace Archive
      • DIY Submission Forum
      • General DIY Forum
      • Parts Marketplace - Old
      • Vehicle Marketplace - Old
  • News
  • Marketplace
    • Parts Marketplace
    • Vehicle Marketplace
    • Vendor Directory
    • Become a Vendor
  • New Posts
  • Tools
    • Car Payment Calculator
    • Tire Rim Calculator
    • Vin Decoder
    • Recalls
    • Members List
    • Live Feed
  • How-Tos
  • Gallery
  • View Dark Mode
    • Please register or login to enable Dark Mode.
  • Log In
  • Register
Rennlist - Porsche Discussion Forums
    • Threads
      • Advanced
Dark Mode

Please register or login to enable Dark Mode.

Log In

Forgot your Password?

By logging into your account, you agree to our Terms of Use and Privacy Policy, and to the use of cookies as described therein.
or
 
  • Recent
  • Commented
  • Albums
  • My Pictures

964 Seat Restoration

hamah
April 11, 2013
 17
 0
Description:
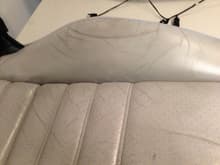
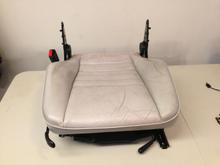
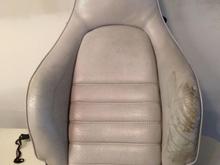
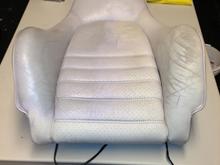
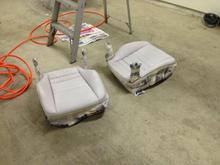
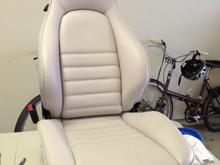
In the winter of 2013 one of my projects was to restore the front leather seating surfaces of my 964.

I had thought about recovering them with new leather but when I looked into it the cost ranged from about $1000 for a pair of pre-made covers installed at a location I wasn't familiar with to $2500 at a shop I knew and trusted.

I then discovered you could restore the old leather instead (clean, repair, re-dye). I wasn't to sure how it would work out but for around $250 in materials plus my labour I thought it was worth a shot...even if the results were inferior or did not hold up.

Well at the end of the day the results look pretty good. They feel a bit rough to the touch but I attribute much of that to my inexperience with the use of a spray gun. We will just have to see how they hold up in the longer term.

Read more »
Sort:
Default
  • Default
  • Most Recent
Here is a close up of the right side bolster on the driver side base.
0 2013/04/11 09:29:59 hamah
After removing the seats from the car I took the backs off to make it easier to do the work. I figured it was would be hard enough to do with the pleats along the sides of the bottoms and the insert in the backs. Here is the drivers side base. You can see the right side lower bolster is well worn and there are some pretty deep creases on the the front.
0 2013/04/11 09:29:59 hamah
Here is the driver side back. The outside bolster (right in this pic as my car is LHD) was in the worst condition which is understandable as this area gets the most use/abuse over time.
0 2013/04/11 09:29:59 hamah
Here is a closer look at the driver side bolster. I thought it was pretty bad and this area was the main reason I wanted to restore the seats and figured I needed new covers. As I researched my options I discovered that re-dying the seats after properly prepping them was a viable option.
0 2013/04/11 09:35:43 hamah
The first step in a re-dye is to remove as much of the original dye as possible. This is done using copious amounts of auto body lacquer  thinners and elbow grease. A nasty, messy, time consuming job to be sure. Here is the driver side back 1/2 stripped
The first step in a re-dye is to remove as much of the original dye as possible. This is done using copious amounts of auto body lacquer thinners and elbow grease. A nasty, messy, time consuming job to be sure. Here is the driver side back 1/2 stripped
0 2013/04/11 09:35:43 hamah
The next step after stripping the old finish would be to resurface/fill any deep cracks. The badly worn area on the bolster did not actually need to be resurfaced as it turns out and as it was the worst area on the seats I did not even bother with the effort to fill and sand the seats.

As I had skipped resurfacing the next step was to recondition the seats. After lightly sanding the leather with a 320 grit paper I used a product from Color Plus called Soffener. This made the leather very soft and pliable.
The next step after stripping the old finish would be to resurface/fill any deep cracks. The badly worn area on the bolster did not actually need to be resurfaced as it turns out and as it was the worst area on the seats I did not even bother with the effort to fill and sand the seats. As I had skipped resurfacing the next step was to recondition the seats. After lightly sanding the leather with a 320 grit paper I used a product from Color Plus called Soffener. This made the leather very soft and pliable.
0 2013/04/11 09:43:46 hamah
After cleaning and conditioning the leather I masked of the areas I would not be applying the new dye to.
0 2013/04/11 09:43:46 hamah
The backs prepped for spraying on the new colour.
0 2013/04/11 09:43:46 hamah
Here are the seat bases after me shooting the first coat of new colorant.
0 2013/04/11 09:59:10 hamah
The driver side back after stripping, cleaning, conditioning, and ready for the application of new dye.
0 2013/04/11 09:59:10 hamah
The driver side back after the coat of dye has been applied.
0 2013/04/11 09:59:10 hamah
A close up of the passenger side bolster. Looks almost new to me. I swapped the seat backs when I reassembled them seeing as the driver side gets so much more use and to "wear level" the seats as best I could.
0 2013/04/11 10:07:21 hamah
The driver side seat ready to go. I will say that the surface feels a bit rough. I buffed the seats with a cloth and that did help and perhaps the surface will feel smoother over time. I blame this on spray gun inexperience and not the product. It isn't too bad and the improved looks more than compensate.
0 2013/04/11 10:07:21 hamah
Here are my seats after being restored and ready to be put back in the car. They look great (I think).
0 2013/04/11 10:07:21 hamah
The driver side bolster after applying the dye.
0 2013/04/11 10:08:00 hamah
Seats reinstalled.
Seats reinstalled.
0 2013/04/11 10:14:45 hamah
All in all I'm really happy with how the refinishing of the seats went and at this point I'd highly recommend the Color Plus products.

Would I do it again? I'm not sure about that. The amount of prep time I put in was substantial.
All in all I'm really happy with how the refinishing of the seats went and at this point I'd highly recommend the Color Plus products. Would I do it again? I'm not sure about that. The amount of prep time I put in was substantial.
0 2013/04/11 10:14:45 hamah


Top
Rennlist - Porsche Discussion Forums
  • Contact Us
  • FAQ
  • Advertising
  • Cookie Policy
  • Privacy Statement
  • Terms of Service
  • About Us
  • Your Privacy Choices
  • Manage Preferences

© 2026 MH Sub I, LLC dba Internet Brands

Follow Us        


When you click on links to various merchants on this site and make a purchase, this can result in this site earning a commission. Affiliate programs and affiliations include, but are not limited to, the eBay Partner Network.