When you click on links to various merchants on this site and make a purchase, this can result in this site earning a commission. Affiliate programs and affiliations include, but are not limited to, the eBay Partner Network.
How are you going to route the wires from the back of the car?
I haven't decided. Right now they're in a loom zip tied to the passenger side of the roll bar coming over the top. I don't like them over the engine cover in the long term but it makes things pretty easy at the moment. I can cut the zip tie and lift the loom and throw it over the driver side, passenger side, or the middle where it is, but it must cross the engine cover when on the passenger side and I'm not sure I could get around that without extending some wires. Extending wires is easy enough but takes time, and all things equal I prefer leaving wiring connections alone to eliminate the risk of introducing a new fault or bad connection.
I'm hoping when I finish all of the wiring consolidation later on it will become clear what the best approach is. If there aren't a lot of wires left, extending will make more sense.
When I run out of other projects I'll probably look at quick disconnect options and see what I can install instead of just extending by splicing wires to wires and having a long run. For instance if I have 8 wires or 16 wires of appropriate sizes, cutting off the bundle at each end and putting in Ethernet cable terminals might make sense - then I could just plug or unplug an Ethernet cable to get them out of the way for work and I could change the length at any time by buying a longer or shorter cable.
Don't waste a lot of time making it art is my advice. These cars should be "wreck and forget", like all low end race cars. Just MHO of course..
I appreciate the perspective. Right now it's kind of an escape to work on the car when our baby is napping. But spending time and emotionally investing time are different, and you're absolutely right - I bought the car so I wouldn't beat on my 911. This one is a tool to be properly maintained and used.
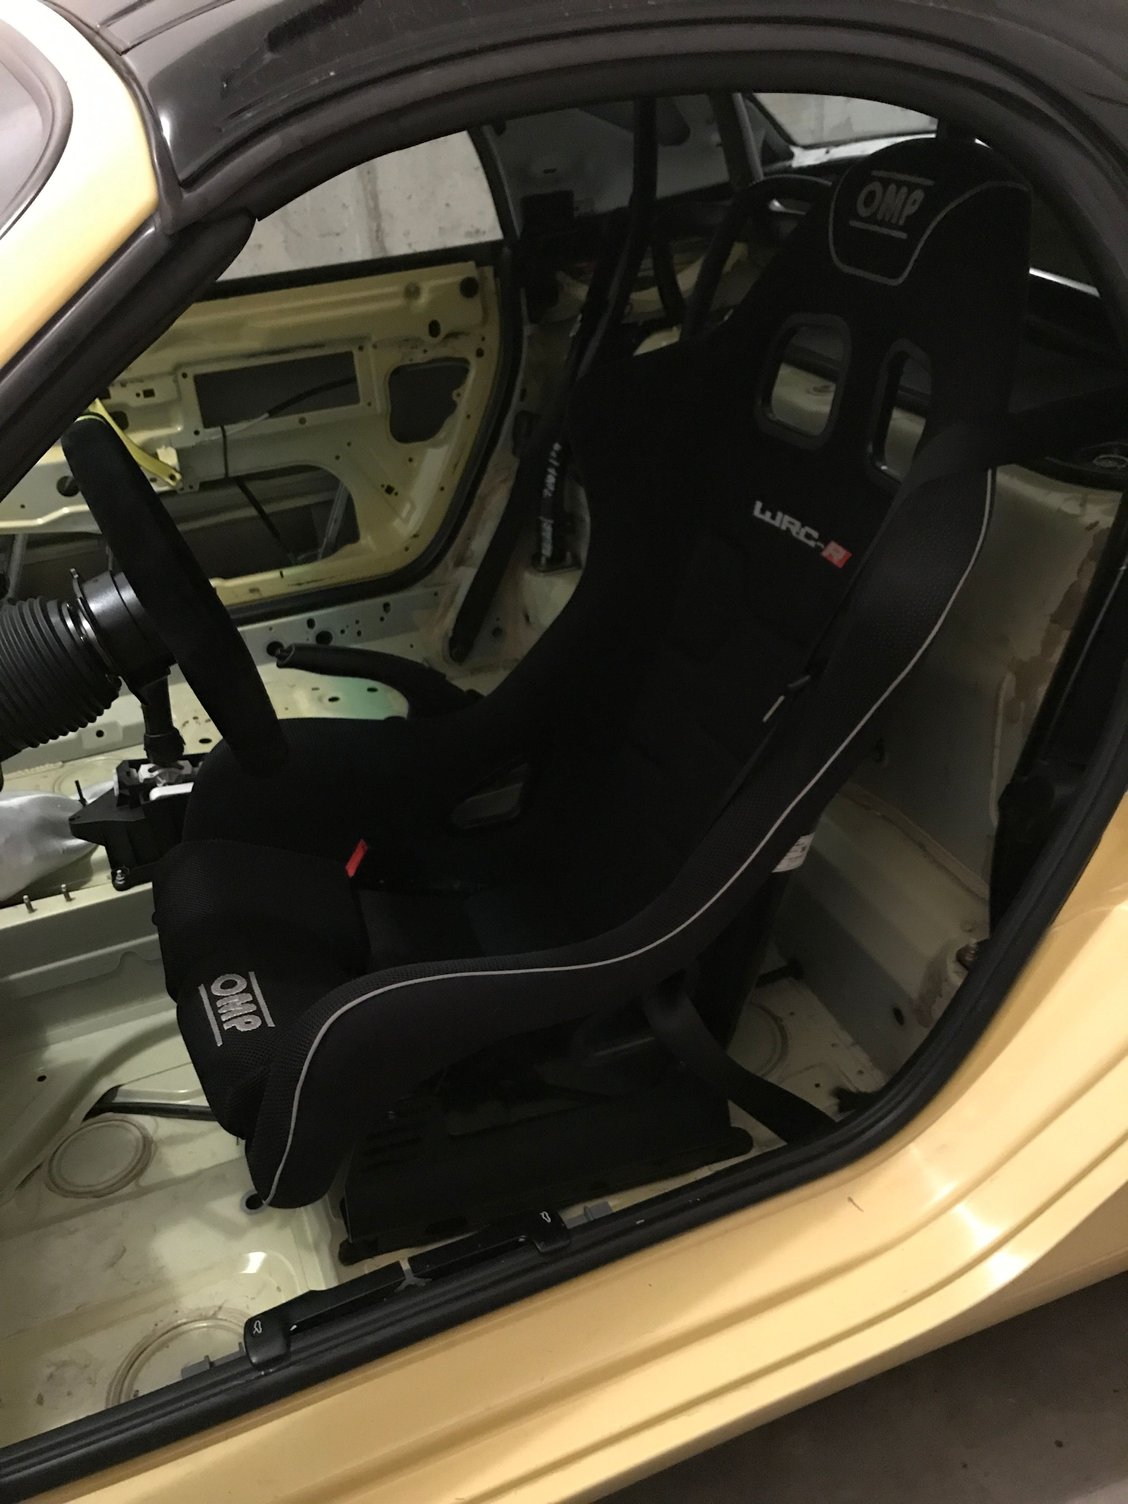
I bought planted side mounts that are inset so the center of the bolt pattern is where the seat mounts. It also offers quite a bit of adjustment. I installed the seat in the car yesterday. I also zip tied the wiring mess in the fire blanket and put the gauge cluster on top with more zip ties. I need to mount a seat belt receiver and fix the ABS and then the car is ready for more DE work. The seat with OMP sliders, Planted side mounts, and the Brey Krause steel beam style floor mounts weighed 31 lbs.
I had the code read to see what I cut that defeated the ABS, and if I remember right it was the front right wheel speed sensor. Told the shop that read it to just fix it for me this week. I'm sure I can do it but they just want an hour of labor. I'll be happier ripping out the spoiler or something instead of doing wiring troubleshooting the next time I have an hour. Wiring is not a lot of fun for me. Unbolting and chucking parts on the other hand is kind of fun for me.
Partially cut out the doors today. I did it with a zipsaw type tool. I'm pretty messy with it but I'll probably just retrim it better later on. As is it needs some kind of edge guard or to be sanded down to get rid of the sharps.
My door cuts looks similar at this point, although I have removed the door bar since my cage protrudes into the door cavity, as well as the window and runners (need to save weight). I'm currently trying to decide if I want to remove more of the door to help with weight. However, with the entire inside of the door removed, it will be difficult to fabricate a lexan window bracket/holder for travel.
My door cuts looks similar at this point, although I have removed the door bar since my cage protrudes into the door cavity, as well as the window and runners (need to save weight). I'm currently trying to decide if I want to remove more of the door to help with weight. However, with the entire inside of the door removed, it will be difficult to fabricate a lexan window bracket/holder for travel.
I was struggling with that so I stopped pretty far short of fully gutting the door. Easy to go back and remove more. If I pull the window runners I will probably only keep the forward and aft ~3-5 inches of upper door frame metal so the storage window has something to rest against. But the sharp edges (on my car) are sure ugly! Right now the car is parked outside so I wanted to maintain weatherproofing until that changes.
It seems like one could take a lexan or other plastic sheet with 4-8 quarter turn quick releases/clamps/levers around the perimeter that could be turned from outside the car and hold the plastic sheet against the interior top, sides, and door but I haven't quite come up with a good workable idea yet. I'd like something that can very quickly clip securely in place for storage and remove for working on the car or getting to the track. Maybe it would have weatherstripping around the perimeter too so it makes a good seal for rain.
I check your thread here and on 986 and will be interested to see if you come up with something you like. If I do I'll post it here.
Shop replaced the wire for me. Glad to not have to sort through that. No big deal, just no fun and I'd be slow to figure it out.
I did another not very fun job though - cleaned the adhesive residue from the inner hardtop. Started with a plastic razor to get the bulk of it off and ended up using gasoline and paper towels to get the last of it. I also bolted the seat belt receiver to my race seat for now. When the cage goes in I'll weld in a proper harness receiver and use a harness.
Very minor thing: with the door mostly gutted, the windows made a very loud (annoying) vibration/rattle. I saw the issue was the window when down was now resting on part of the window regulators. To fix it I grabbed a piece of adhesive-felt (typically used to make sure furniture doesn't scape up a wood floor) and stuck it right on the plastic piece where the glass would rest. It worked like a charm and the annoying loud rattle is gone. It will be gone for good when the windows come out but in the meantime it was quick and an improvement. I also removed the piece of black plastic sound dampener (it's a foot or two long and stuck against the lower outer door skin) from the lower area of the door using a thin metal scaper tool. I think it was some kind of cheap painting tool from years back. Anyway, the sound dampener peeled right off when I put the metal scraper between it and the door skin.
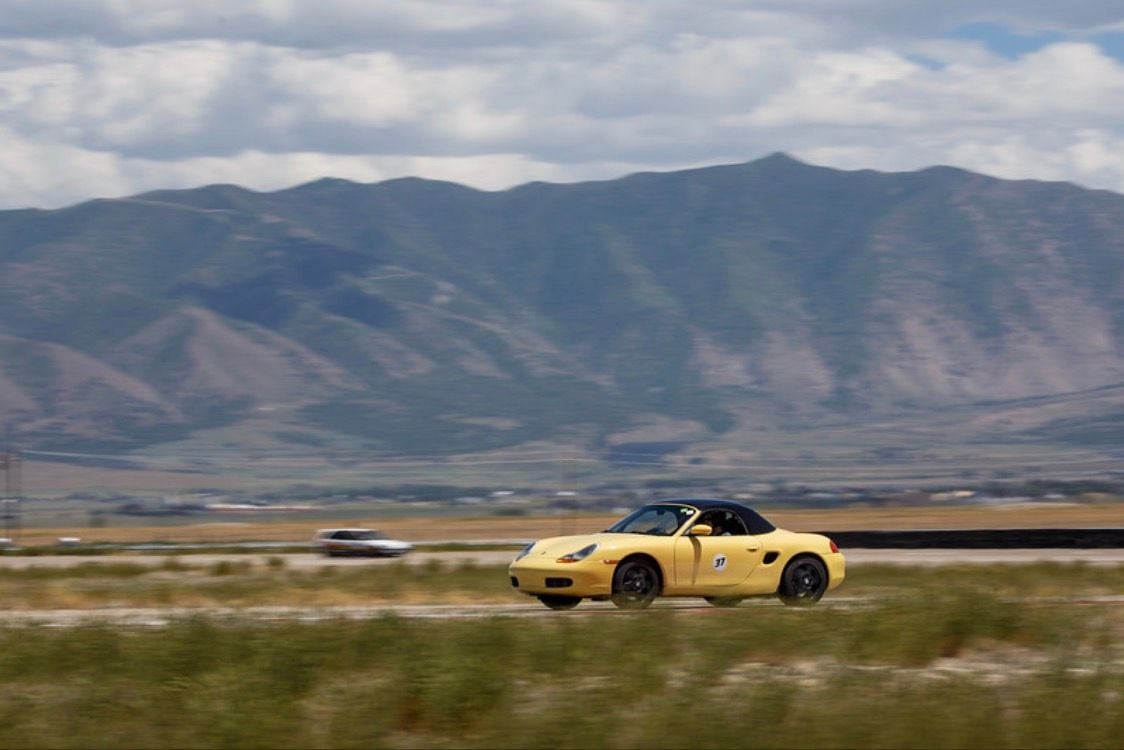
I ran the car at a DE today at Utah Motorsports Campus and had no issues. Just a fun time. I can feel the reduced weight compared to stock - it's better to drive all around.
I also ordered some vinyl numbers. The magnetic ones I've had are a bit small and one fell off the car at some point during the day. I'd rather be done with it.
Today I pulled the rear spoiler motor out. It was a quick and easy job. One pair of bolts was hard to reach and turning the nuts just spun them, so I simply bent the motor brace until it was easy to reach and finished in very little time. I trimmed the motor wires back to the ECU area and taped them off for another day. I'm a bit bored with the wiring work so I'm leaving it more or less alone for now. It will only get easier later on.
Since that just took a bit of time, I figured I'd do another quick job and removed the two rubber rear bumper plugs (just one bolt in each of them). The rear bumper looks bad with metal hanging out but it's a race car so quite frankly I don't care. I wasn't ready to pull the bumper and trim it so I called it a day and moved on to other things.
It's nice to be able to just spend a half hour or an hour here and there and make progress on the car - now it's a few pounds lighter than it was yesterday.
I ordered the Planted seat base for the passenger seat so I'll be able to put that in the car and take an instructor along.
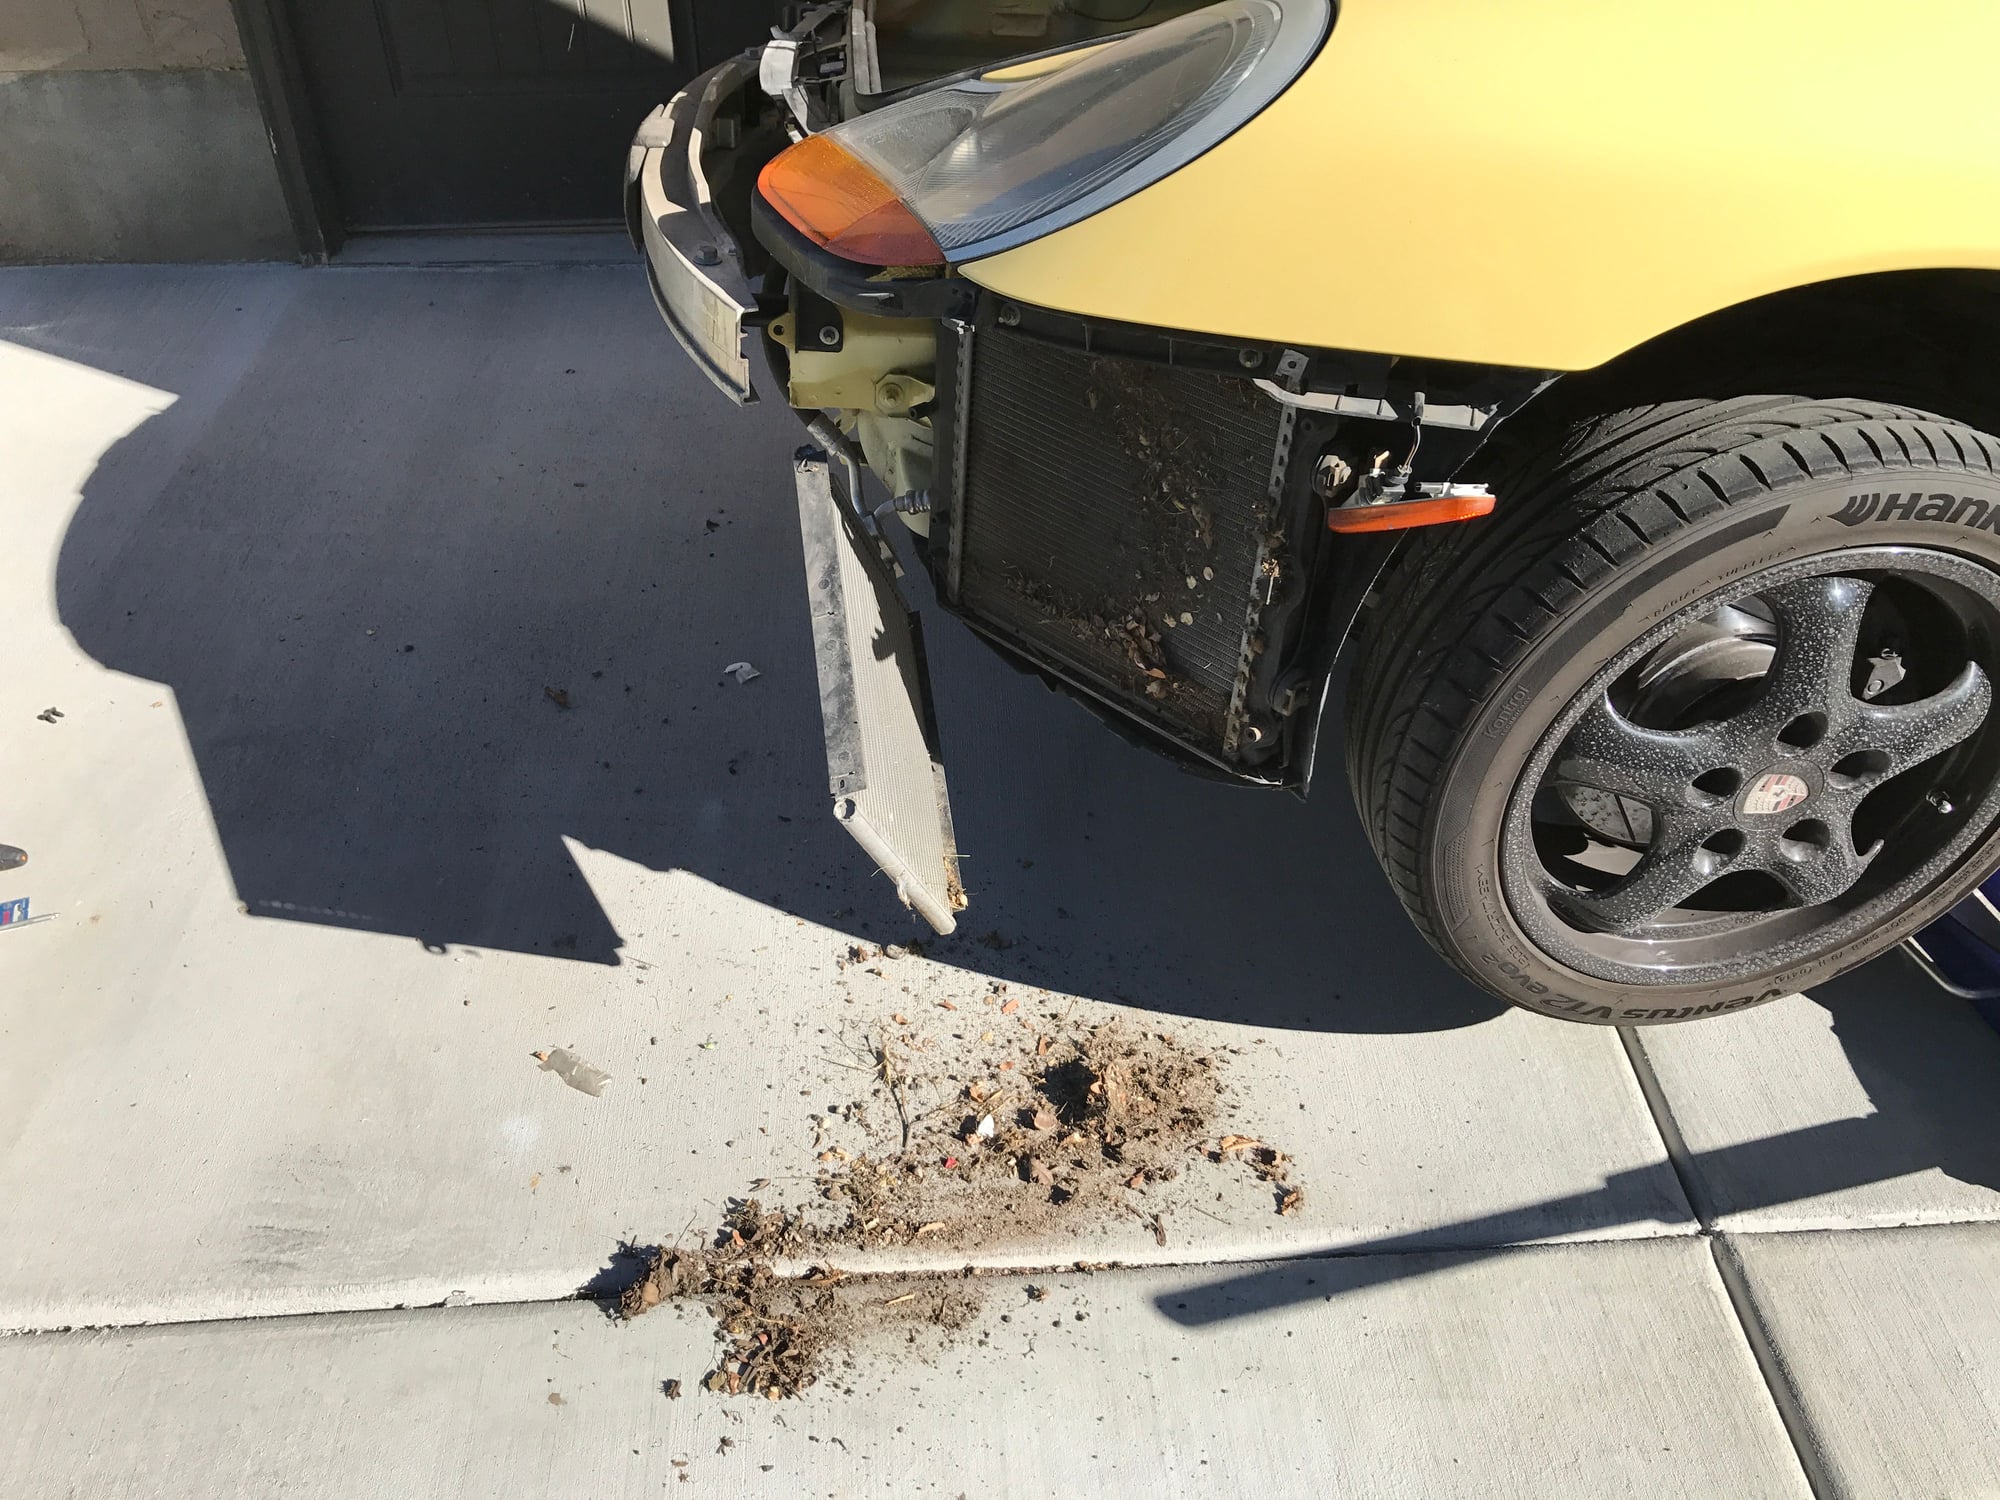
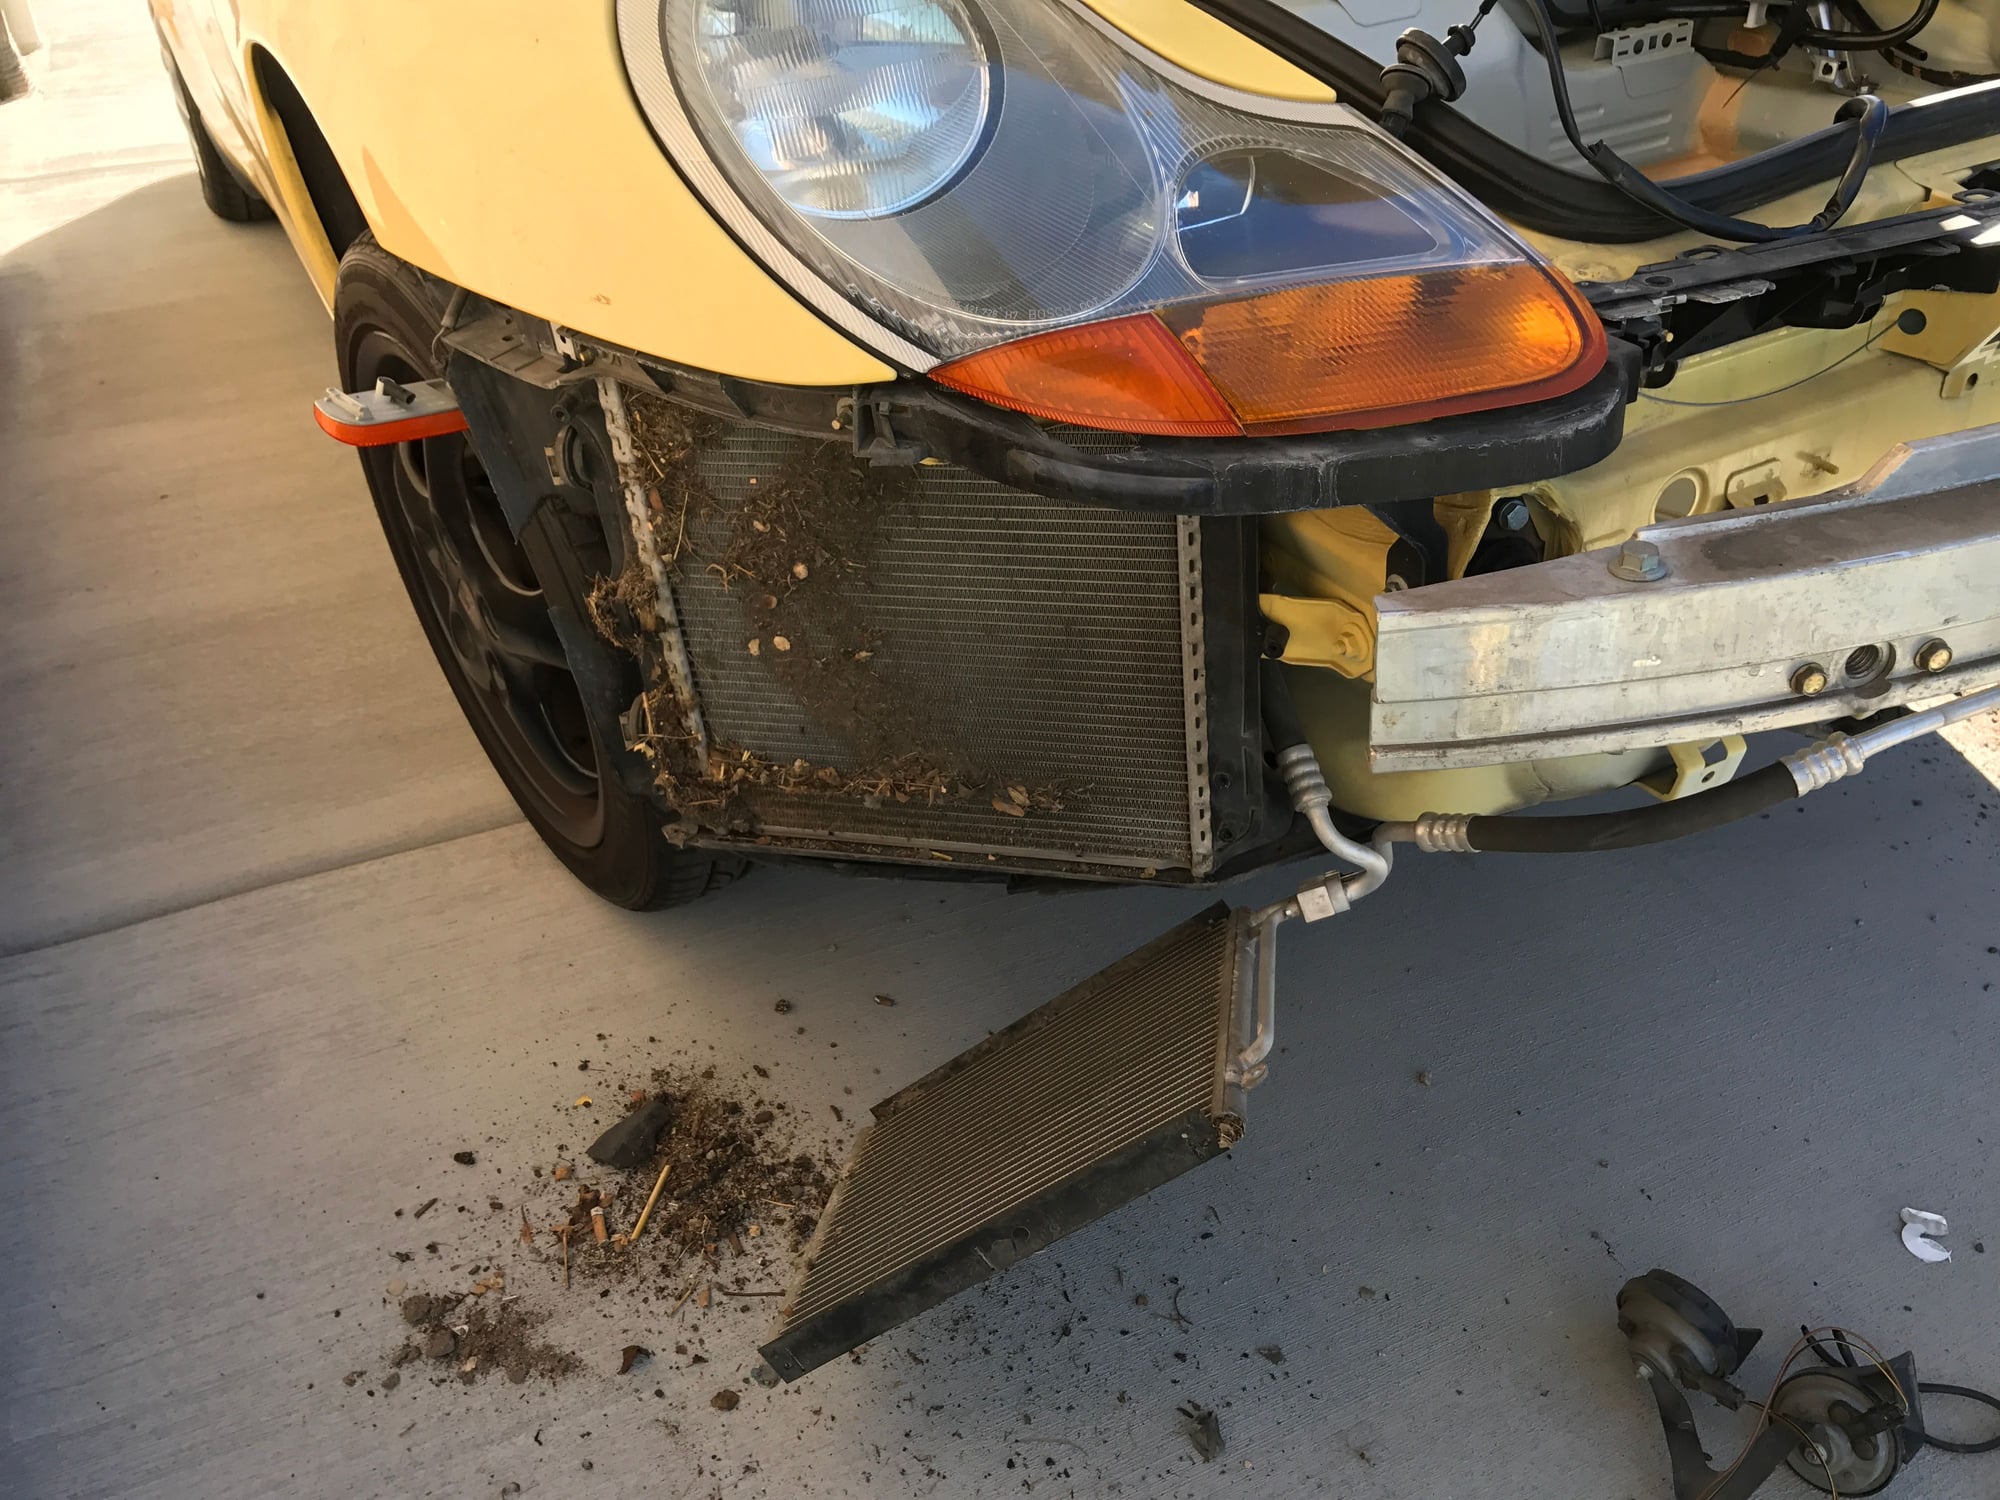
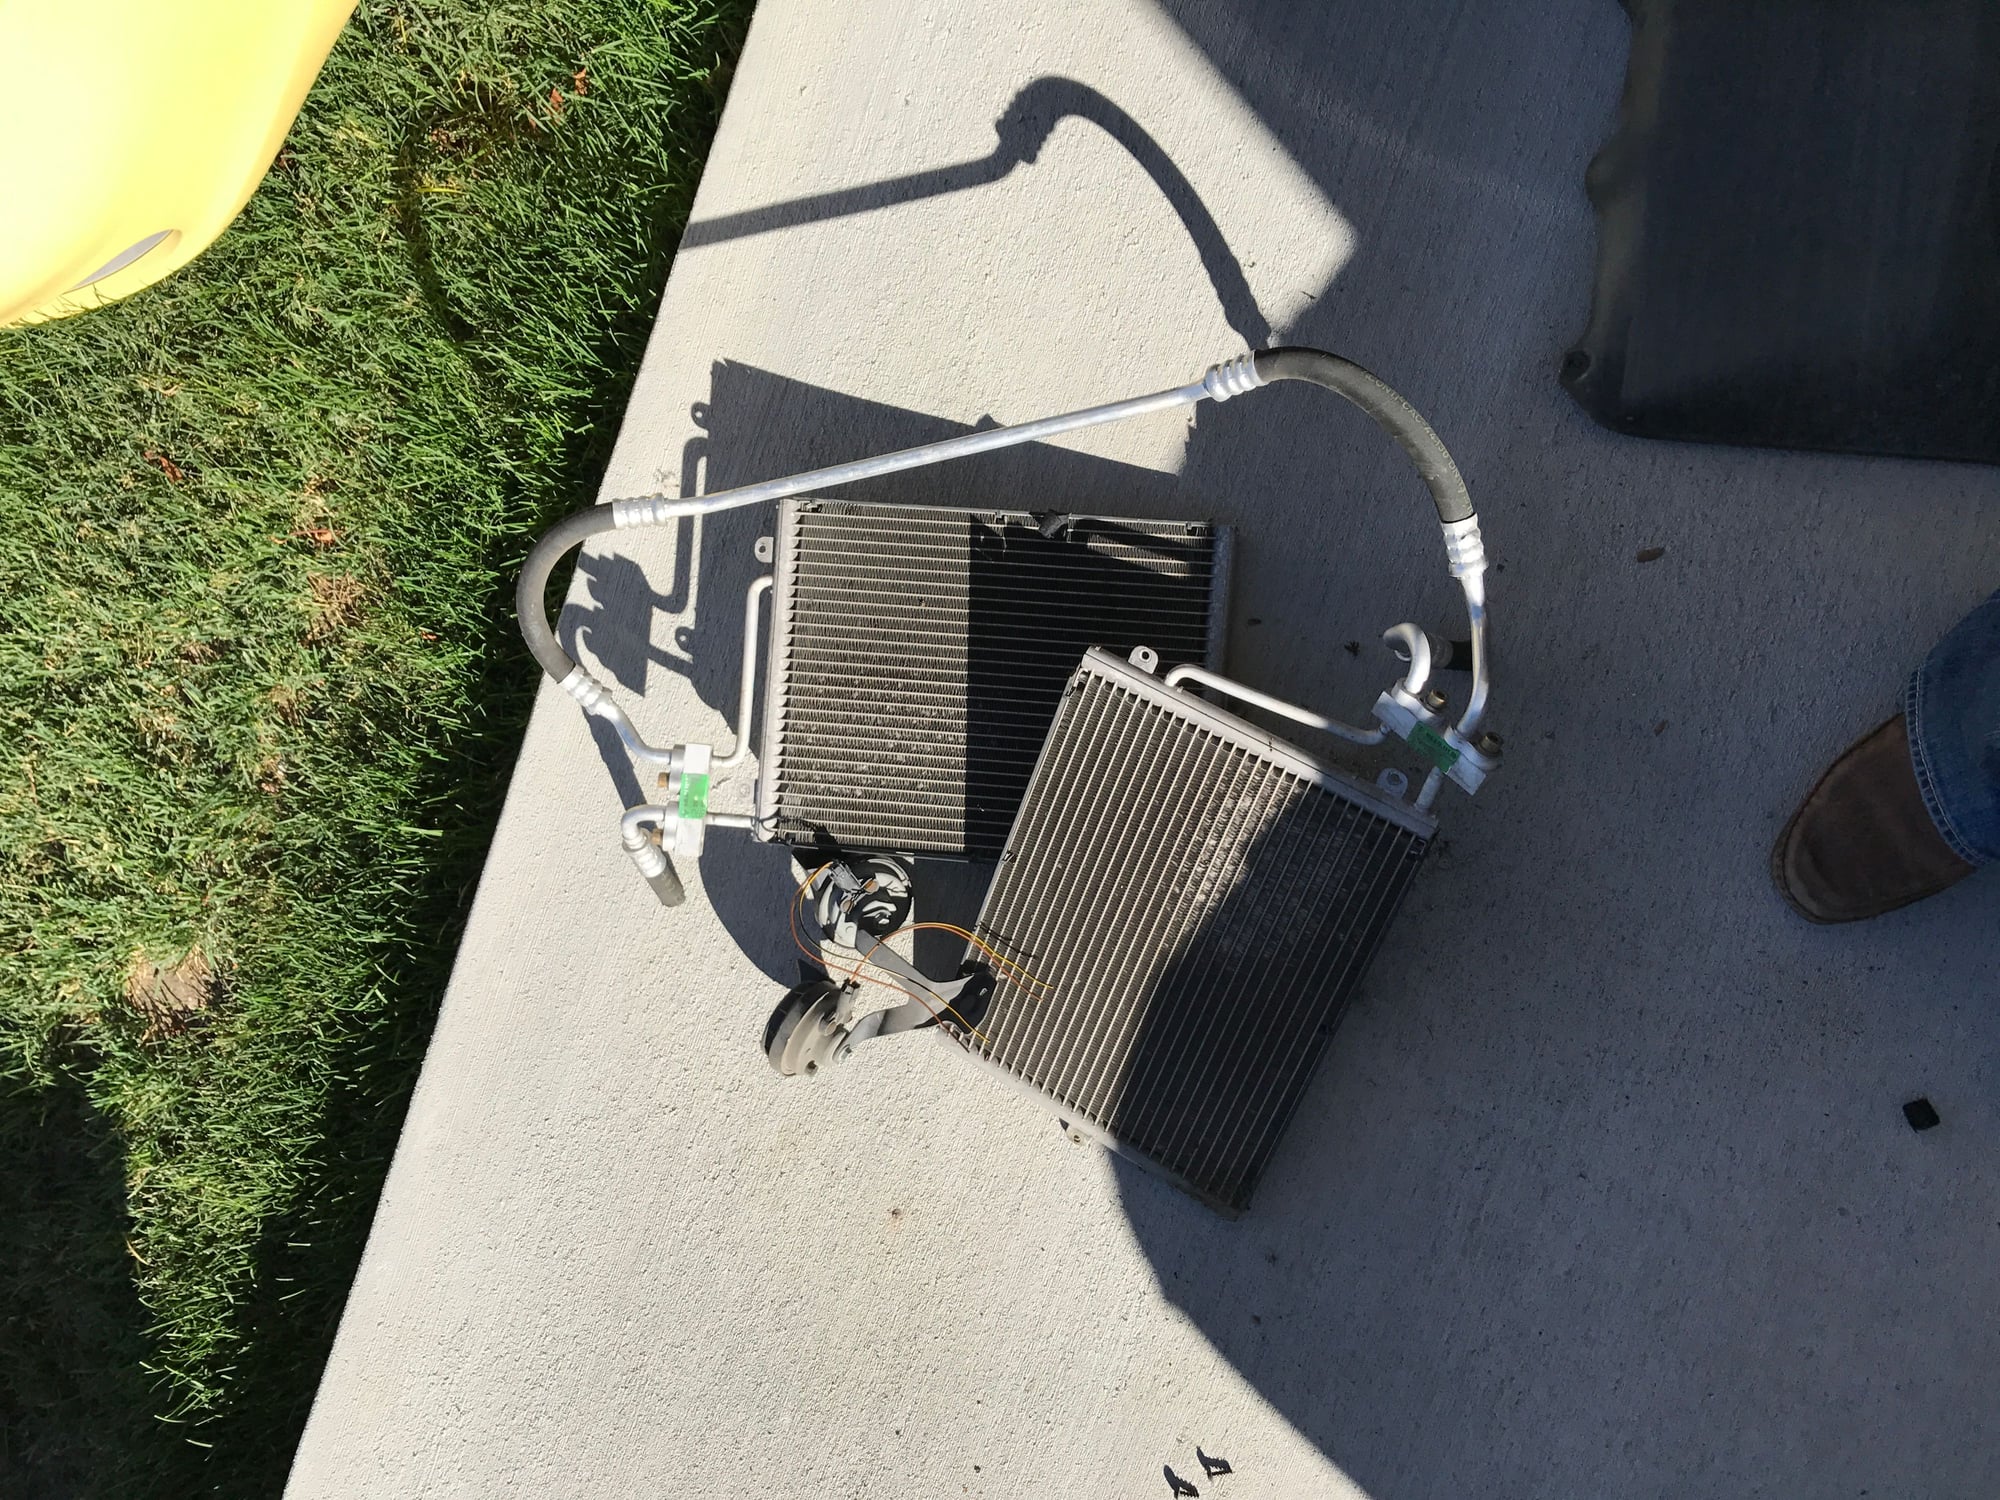
Removed the AC condensers today. A ton of dirt and debris came out as well. I removed the two horns and detached the AC lines back a bit on the left and right sides of the front trunk. I cut the rubber part of the AC lines to remove the condensers. Another easy job down, another few pounds shed, and now between the condensers and the debris removal I bet the radiators are more effective.
Took off the rear bumper yesterday to see what I could remove. Until I get an exhaust or some wire to cut the bumper, not much honestly.
Pulled the bumper assembly. I'd like to build to the limits of the rules, or at least know where the lines are before deciding where to leave it.
So here's the question: if I slap the bumper back on, would the car be SPB legal to race like this? My thinking is it meets the letter but not necessarily the spirit of the rules. And perhaps that's ok or not by PCA - which is why I ask.
Hmmm, I don't recall ever seeing those two tubes running over the top of the stock muffler on either of the two cars that I started with. Are they functional?
Hmmm, I don't recall ever seeing those two tubes running over the top of the stock muffler on either of the two cars that I started with. Are they functional?
They will have to come off as I don't want the weight of the stock muffler. The car came with both the fister system and a fully stock muffler. Two sets of cats as well.

 05-17-2017, 01:27 PM