When you click on links to various merchants on this site and make a purchase, this can result in this site earning a commission. Affiliate programs and affiliations include, but are not limited to, the eBay Partner Network.
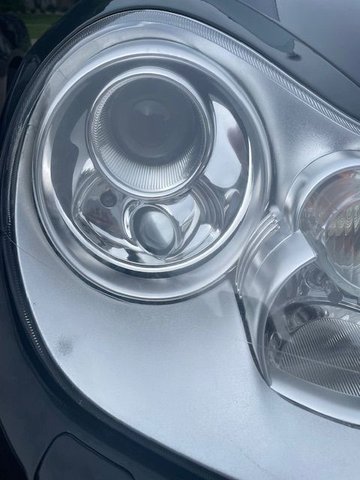
Question first...does anyone know what color the interior of the lens is? Its silver, but I mean is there a specific brand and maybe its a metallic silver? I have a few scratches on it so I want to respray it.
I have had some pretty good success refinishing the headlights (then applying headlight every 2-3 years). However, for my last attempt, I wet sanded with 120 grit or so working up to 3000 grit. Then 3 step polish and it still wasn't that great. There is just too much yellow around the edges and corners, microcracks, etc.
Instead, I replaced the lens. The advantage is you can clean out any debris in the lens, easily replace it after this (thats the big one that makes it better than new in some ways), and even touch up the silver paint (I had previously marred it when attempting to clean out debris).
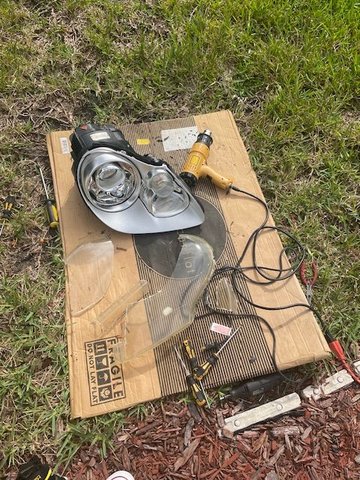
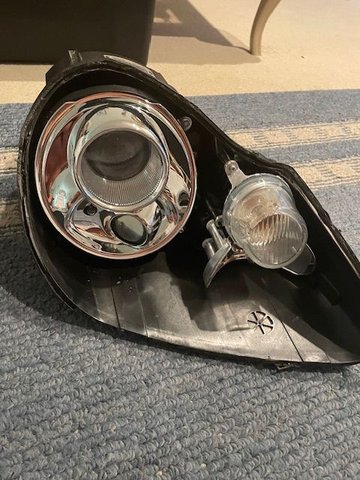
Not sure if anyone else has done this, but didn't see anything for this gen Cayenne. First, you need to get some lenses from eBay or wherever. Then, use a heat gun to soften the adhesive and the plastic. I used a screwdriver to start scraping away as much adhesive as possible. Its on real good, try to get as much off as possible (maybe 30-60 min). Next, see if you can pry the lens off "somehow". I don't have any great solutions, but what I did was use a Dremel and a reinforced cutting disc to cut into the lens and to give me something to pull on. I also cut it all the way to the housing (being careful to not cut the silver inside area), but didn't care if I cut the housing a bit (since you can seal this later). After heating, pulling, prying, cutting, etc..this is what I got:
I really worked to refinish this lens, but its no comparison to a new one..
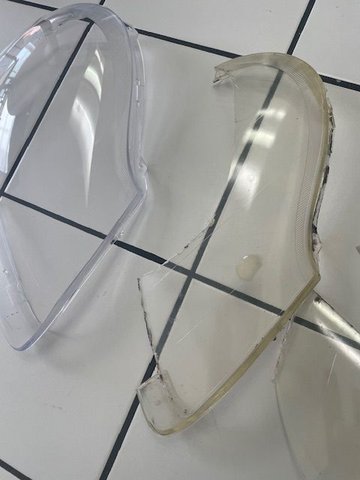
I ran into an issue here. The inner silver lining is quite large and I cracked it when taking the lens off. Its quite difficult (probably impossible) to get the lens back without cracking the plastic silver piece (unless you mod it as I do later). Here is what it looks like with just accepting the crack. Its probably OK for a lot of people, so if you want, you can just add the butyl tape seal and be done. This it the result (crack is in the upper left). Its still way better than before and now can be easily swapped at a later date.
Another view...
I wasn't that happy with the crack, so I took out the silver lining (heating and prying out the connections), but cracked it again! But as I show next, I could have just cut the tabs and then pulled them off with heat (to avoid damaging the silver lining).
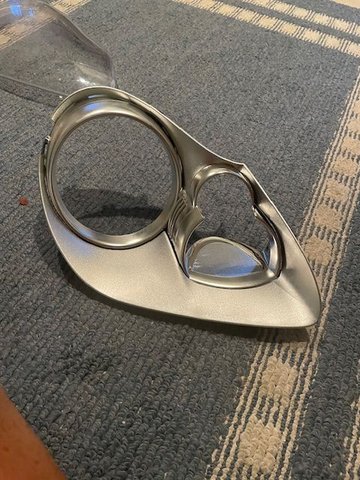
Here is the lining...with a piece missing on the upper left (I bonded it back on later).
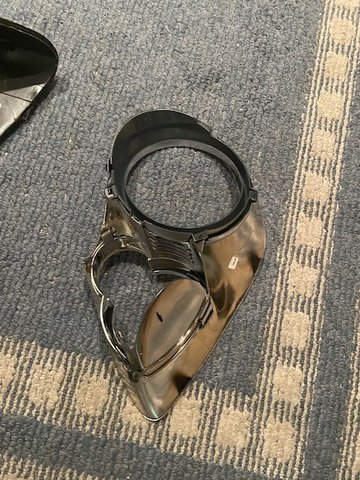
After realizing I didn't think I could get possibly get the lens and lining back in as one piece in a realistic manner, I just cut all the tabs off the silver lining...as shown. These are the tabs that connect it to the housing.
Once you cut the tabs off, then it will rattle (since its a "bit" loose in there - though its still trapped by the lens and the housing). I put some thin foam strips as shown below).
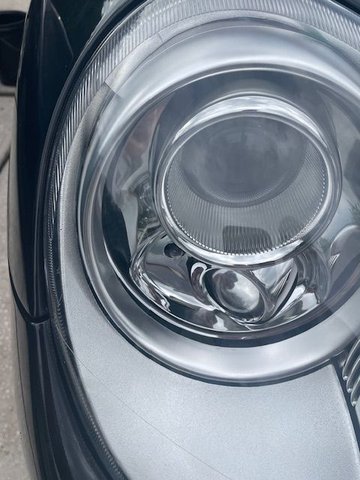
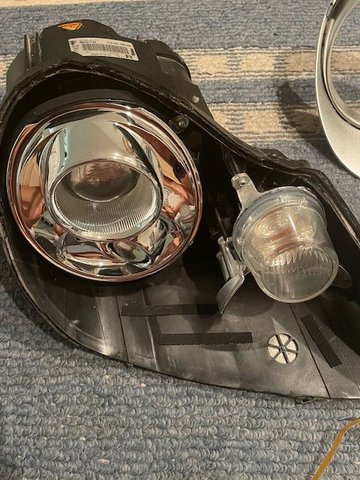
After that, I was able to put the repaired silver lining into the lens first (without it breaking), and then slide those two pieces into the housing. After you squeeze it on pretty tight, its on pretty good and I doubt it would come off. Then put the butyl tape as both a weather seal and a bit of structural seal (it doesn't need much to stay on).
I am going to do a bit of a touch of up the repairs I made to the silver lining and post pictures of the result tomorrow, but it looks pretty good right now. At a later date, I will go back and spray the silver lining, but I want to do both sides at the same time so they color match. So again, if anyone knows the right color for that, it would be helpful.
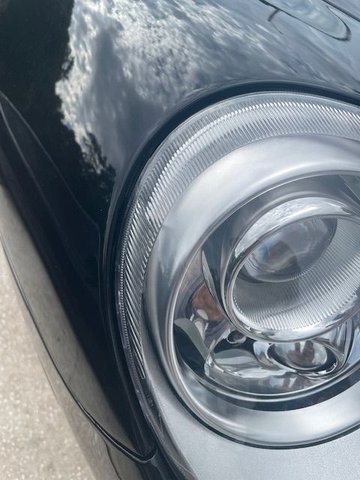
Here are the pictures after I repaired the ring. The touch up didn't do much. I would have to sand/fill it a bit and then spray it. Good enough for now at least. Hopefully I will have a result for the driver side.
Last edited by AeroStress; 09-16-2024 at 11:02 AM.
Thanks for the tip on the color. I will order that soon. The challenge with matching is they may need a sample to put in a machine (it may need to be flat). Not sure on that one, but I will start with the Wurth paint since I need to order some stuff from Pelican anyway.
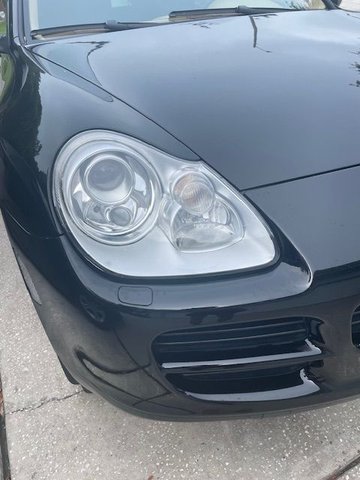
In my case, I have a new paint job and everything has been restored to like new condition. So I had to either fix the headlights or get new ones (I wasn't going to accept them as they were). So I figured, if I break it, then I will get new ones...but if I can fix it, then I never have to worry about them yellowing again (its about $150 for new lens both L and R). Knowing what I know now (and posted about), I could have probably avoided cracking the silver lining (or least just had one crack - instead of the three I have now). Then a bit of touch up and it would be fine. I only want to repaint because I bungled it up a bit and also have to some prior scratches from a hanger I used to fix out old debris. Thats another nice thing about this approach...can easily clean out that old debris that collects in there. Its quite a nice "mod" if you dont mess it up too much.
The challenge with matching is they may need a sample to put in a machine
There are not less than two in my one horse town that are actually good enough to eyeball this process, will guess their cousins exist in your village as well
There are not less than two in my one horse town that are actually good enough to eyeball this process, will guess their cousins exist in your village as well
I've only tried Home Depot and Lowe's (for house paint) and the required a patch of a specific size. They also didn't seem that competent and generally unpleasant to work with. I suspect there are better options, but not sure who that would be. If the Wurth paint is a match, that is definitely the path of least resistance...but not sure if that will be a match.
They also didn't seem that competent and generally unpleasant to work with.
I am speaking to an auto body supply house for your needs, they can even rattle can 2k paint
For coatings, house paint etc, a pro counter person can and will match by eye as well ...a cool one is matched sherwin williams caulking, the process can take several days to allow for the dried color to reveal itself
I am going to change gears and buy a used headlight since that silver trim piece is protected and in good shape in general. Then I should be able to cut it out easier since I don't have to worry about separating it from the housing. Plus I will get a little more experience so hopefully get the driver side done without issue. This will be a better result and overall less time. It also a consideration for anyone else who wants to try this "mod".
If you are comfortable and proffecient in painting, I believe it is Eastwood 2k clear. I have used it on headlights before clean and thin will protect for years and does not refract like cheaper basic clears.
If you are comfortable and proffecient in painting, I believe it is Eastwood 2k clear. I have used it on headlights before clean and thin will protect for years and does not refract like cheaper basic clears.
Not sure what you mean by this? I replaced these with new lenses and the whole point is that they can be easily removed and replaced with new ones. So I don't see a need for a clear coat on them. However, I will add the Adams Graphene Advanced coating to it. Lets see how long that lasts. At $150 for 2 new lenses, if I can get 2-3 years out of them, then it would be just fine with me. I can probably replace the lens in about 30 min per headlight now. If they don't last more than a year or so, then I will clear coat it next go around. I have used the Spray Max 2k before and sees OK (I get it on Amazon).
Not sure what you mean by this? I replaced these with new lenses and the whole point is that they can be easily removed and replaced with new ones. So I don't see a need for a clear coat on them. However, I will add the Adams Graphene Advanced coating to it. Lets see how long that lasts. At $150 for 2 new lenses, if I can get 2-3 years out of them, then it would be just fine with me. I can probably replace the lens in about 30 min per headlight now. If they don't last more than a year or so, then I will clear coat it next go around. I have used the Spray Max 2k before and sees OK (I get it on Amazon).
I was conveying that if you put a clean and thin coat over the lenses you could expect 6-8 years from them atleast.
I was conveying that if you put a clean and thin coat over the lenses you could expect 6-8 years from them atleast.
Gotcha. I had previously applied a 2K clear coat on the lens and got a decent amount of orange peel. I could wet set and polish out (or just leave it alone), but I figured I was likely to get a few years out of them with the Graphene coating. Plus, I can replace the butyl seal and clean out the debris every 3 or 4 years anyway. That said, I am curious to see what would happen if I had one with just the Adams graphene coating vs another with a 2K clear coat. But I think I will just ride this first set out and see how it goes. Its really easy to replace at this point so not sure its worth applying the clear coat. Either way, Ill give an update when it starts to yellow.


 09-16-2024 | 12:34 AM