When you click on links to various merchants on this site and make a purchase, this can result in this site earning a commission. Affiliate programs and affiliations include, but are not limited to, the eBay Partner Network.
The radiator louver motor on my 2016 CTT seized on me with the louvers in the closed position, which started causing all kinds of overheating issues. I found that Porsche only sells the entire louver assembly, and it's $400, but all I needed to replace was the motor. So I found the VW equivalent part ($90) and was able to successfully do the install without any real issues other than having to trim down the brackets that hold the motor in place in order to get the old motor out. Here's the DIY for anyone who needs it. This also includes the steps for removing the front bumper cover.
Tools Needed
T25, T30 Torx Bits
Small flat-head screwdriver
10mm, 13mm, 15mm sockets
Headlight Wrench (found in trunk under the mat in right side tool kit
Ramps (if you have PASM)
Jack and Stands (if you don’t have PASM)
Parts Needed
VW95B-965-501-AA ($90 Volkswagen part versus the $400 Porsche Louver Assembly)
Zip Ties
Procedure
If your car has PASM, set the ride height to maximum and drive car up ramps. This will give you the clearance you need to do the job.
If you don’t have PASM or you don’t have ramps, then jack up the front end of the car and remove the front wheels. If you have PASM and choose to jack up the car, remember to set the car to jack mode by holding up on the ride height switch for several seconds until the car informs you it’s in that mode.
------------------
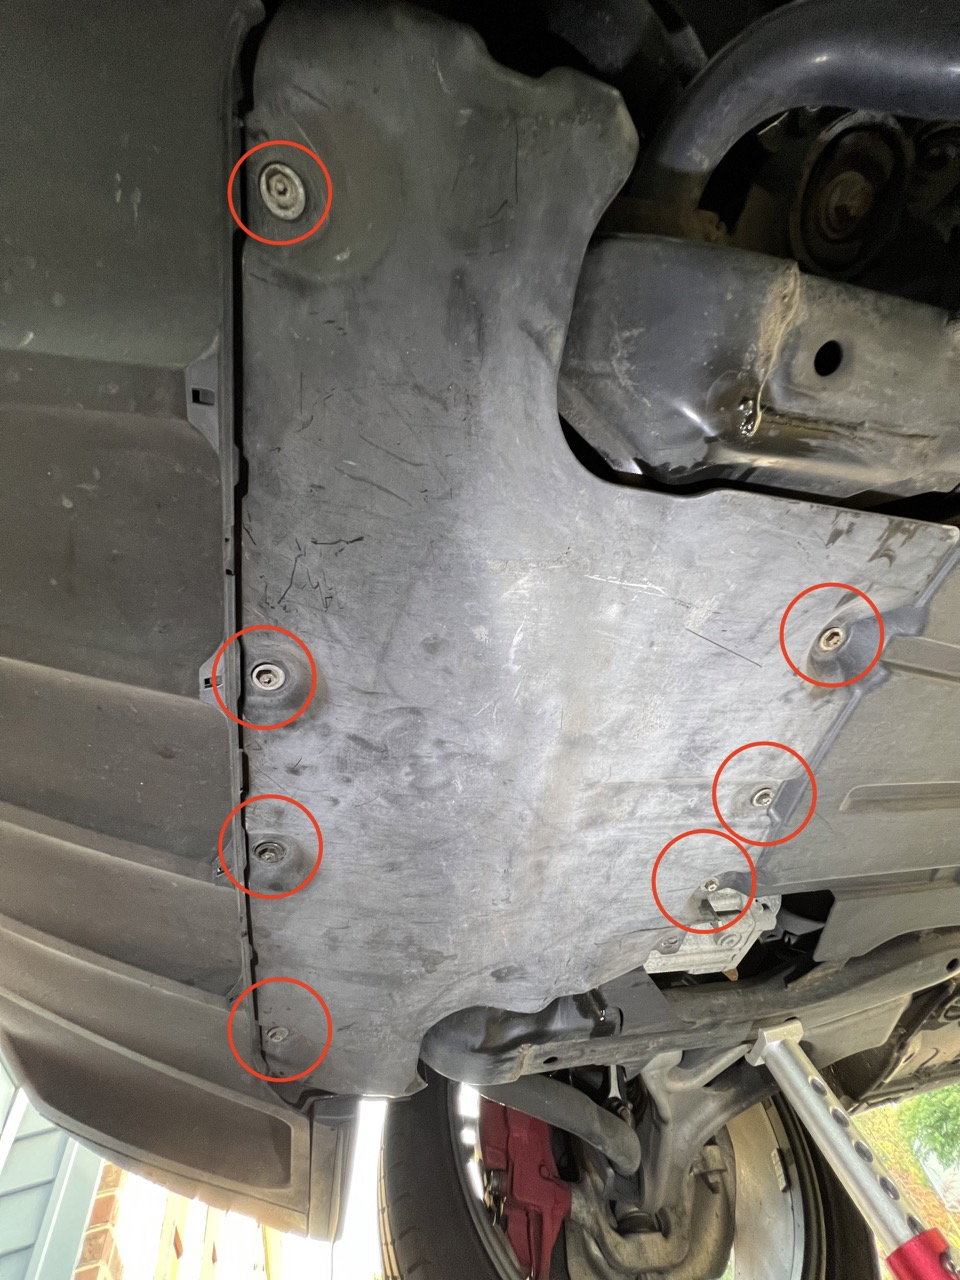
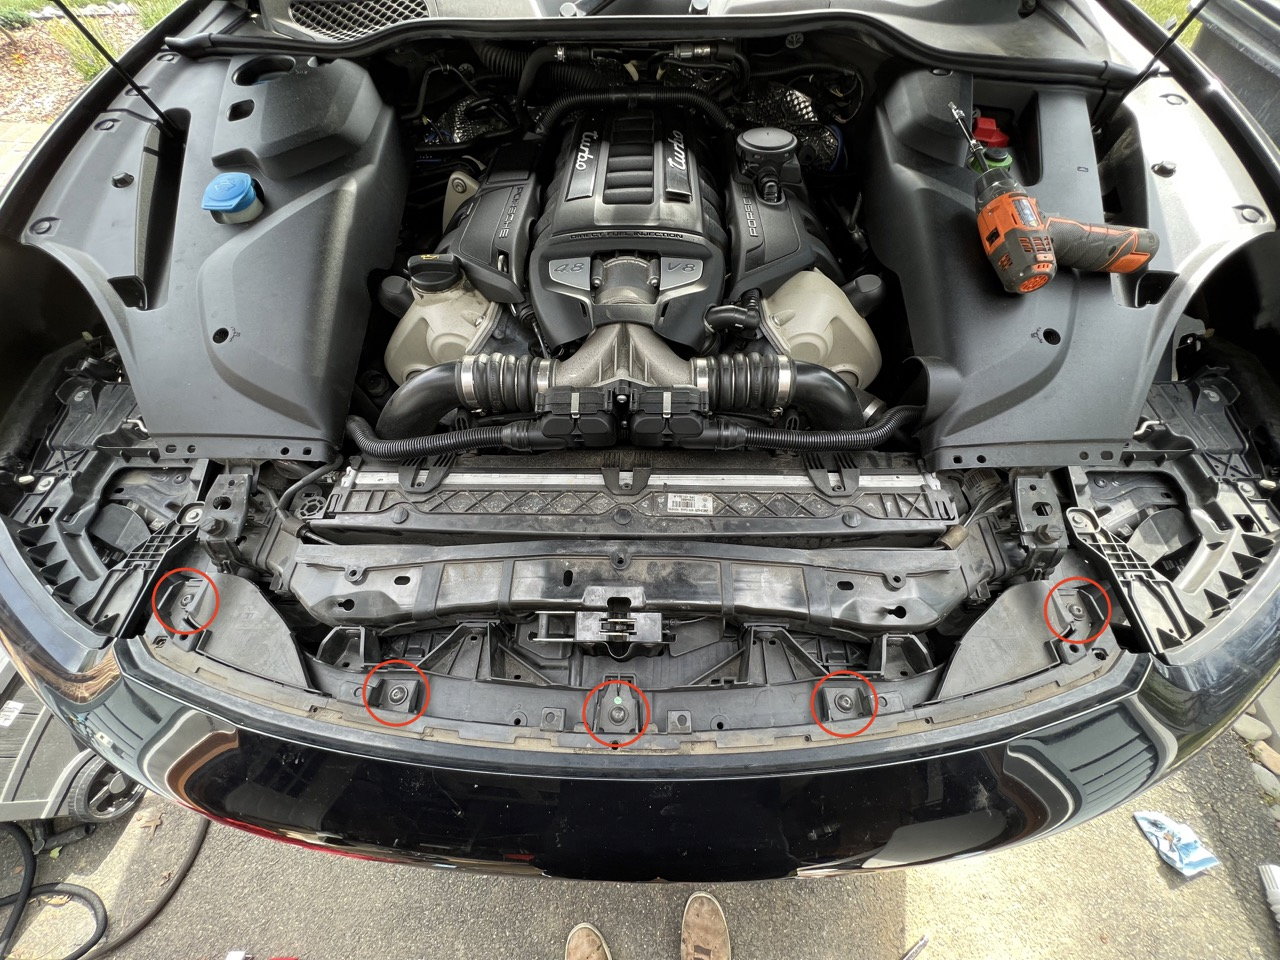
Remove (7) T30/10mm screws from front undertray and pull out undertray.
---------------------
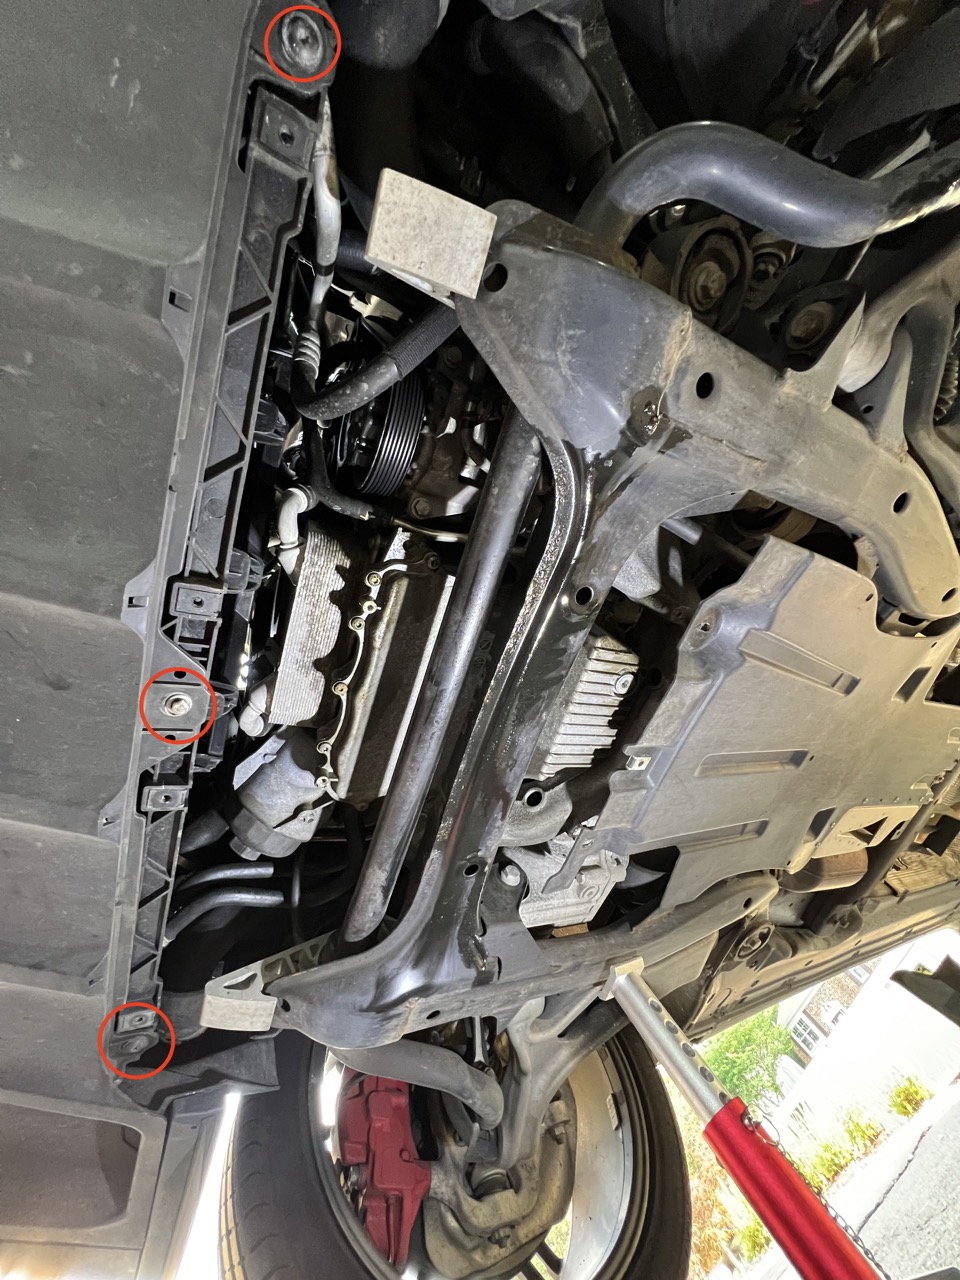
Remove (3) T30 screws from bumper cover.
---------------------
Remove 13 plastic rivets using fingernails to pull up center release from upper radiator cover and remove upper radiator cover.
---------------------
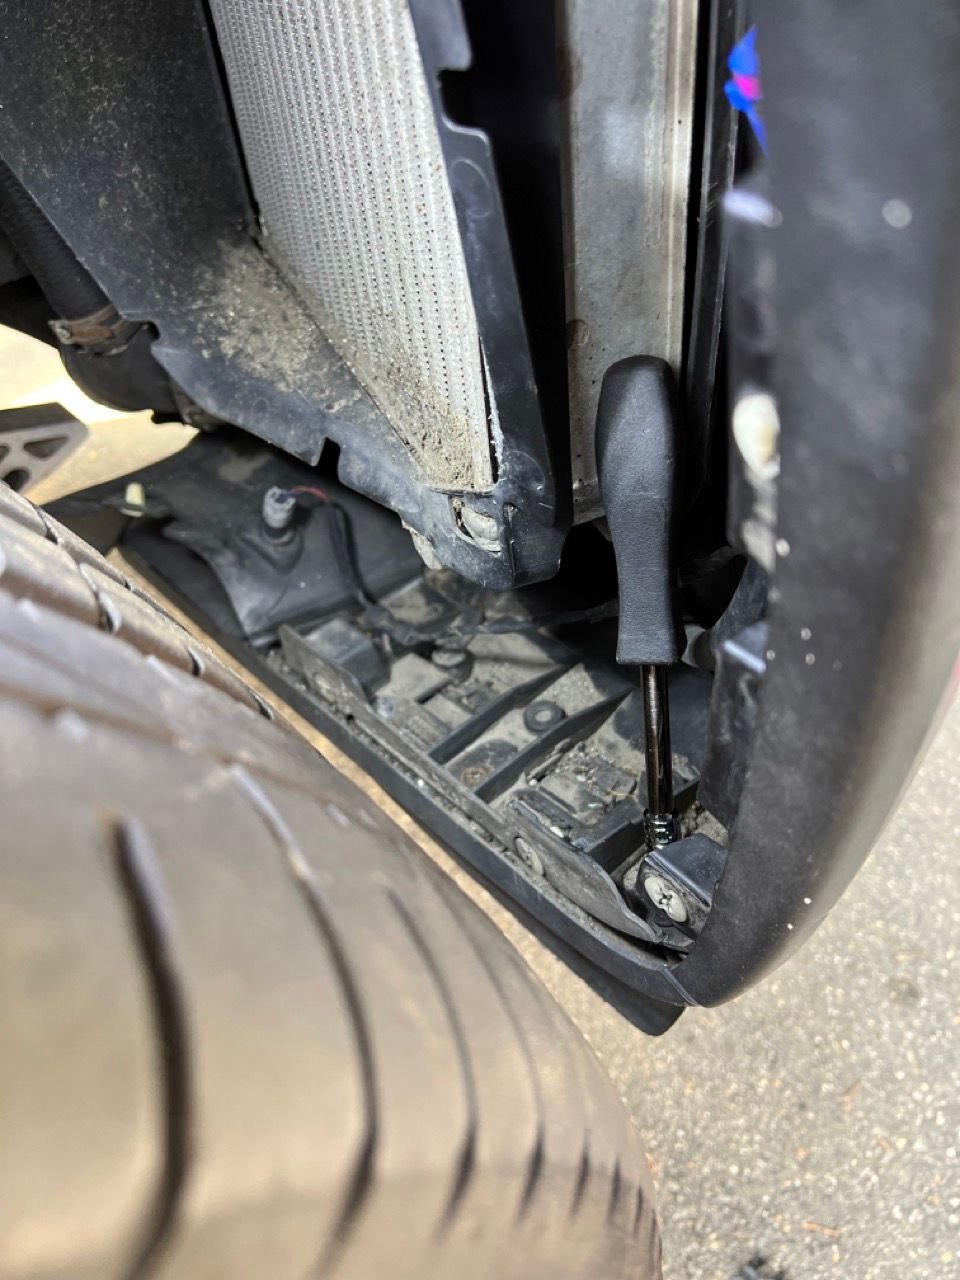
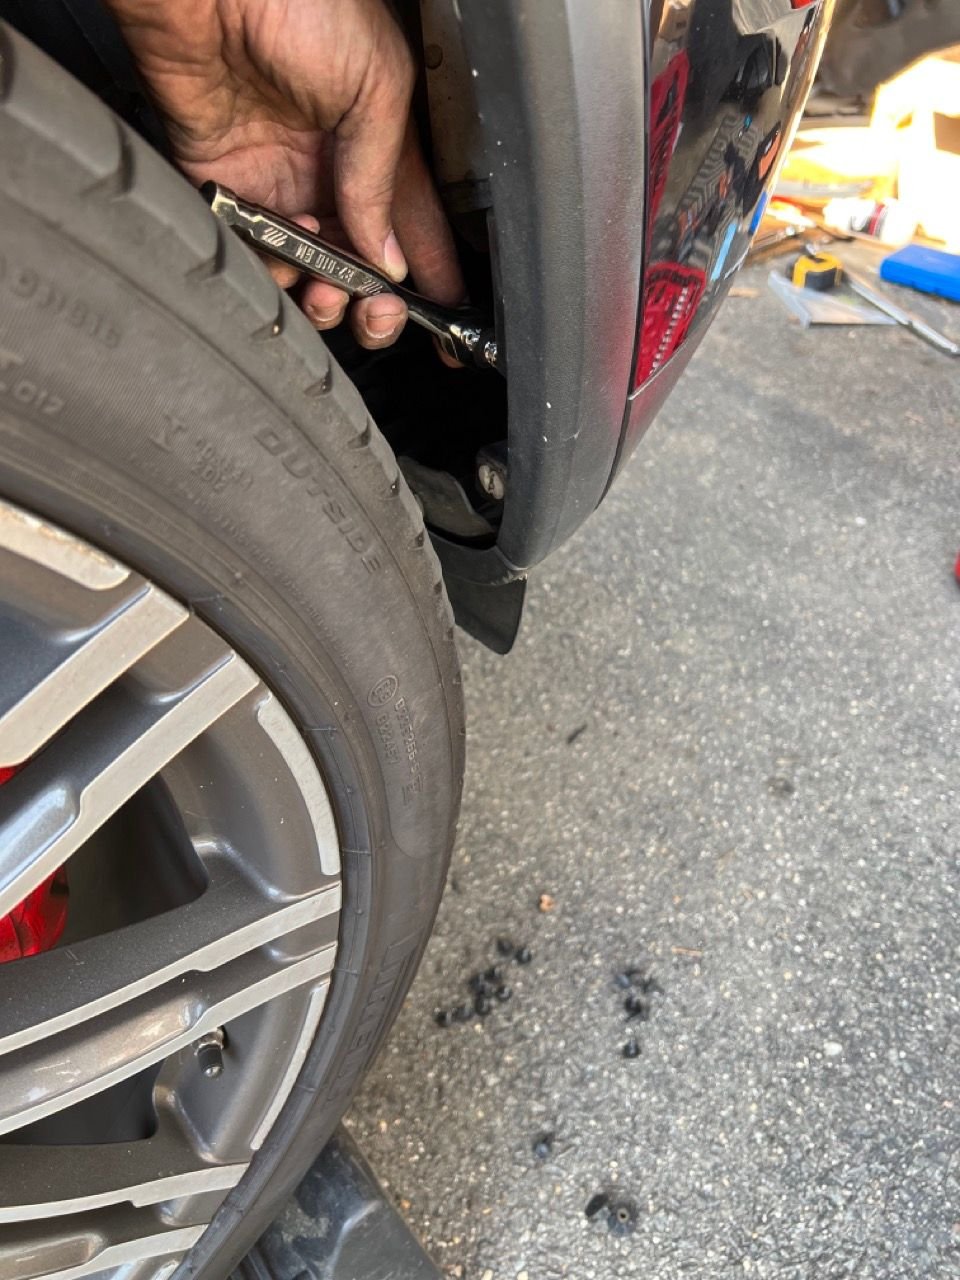
Using Porsche headlight tool (see pic below), release headlights. It takes a fair amount of force and they pop when released.
---------------------
Gently slide headlights forward and disconnect wire connector before removing from car.
Repeat on other side.
---------------------
Remove (19) T25 and (2) 10mm screws from front wheel well liner and pull out wheel well liner. If found it easiest to untuck the rear bottom portion of the liner first and then work my way forwards to release it.
Repeat on other side.
---------------------
Unclip headlight cleaner tube from passenger side wheel well
---------------------
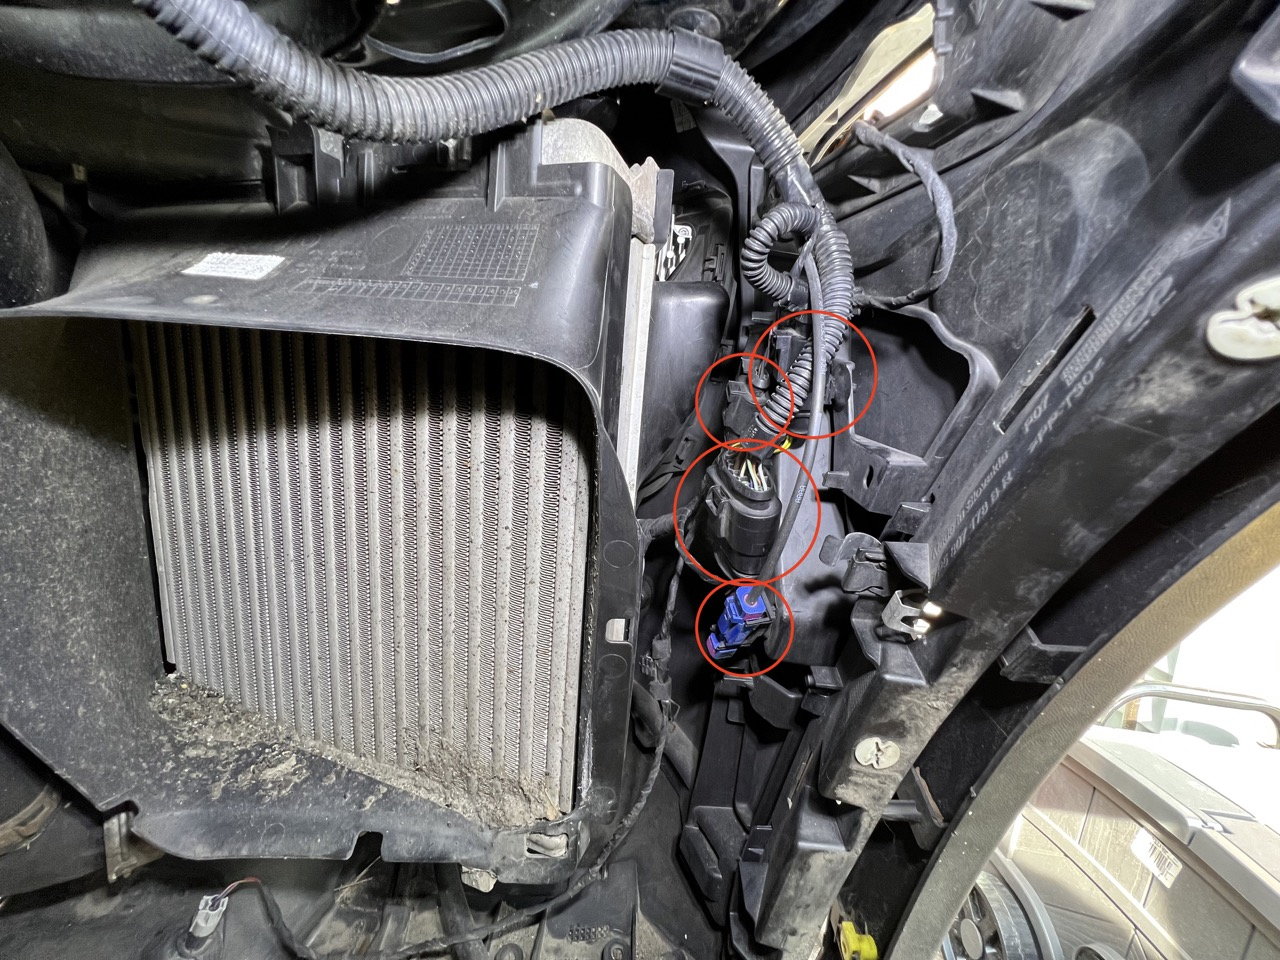
Disconnect (4) electrical plugs in passenger wheel well.
Detach blue connector from bumper.
Second pic shows them all disconnected.
---------------------
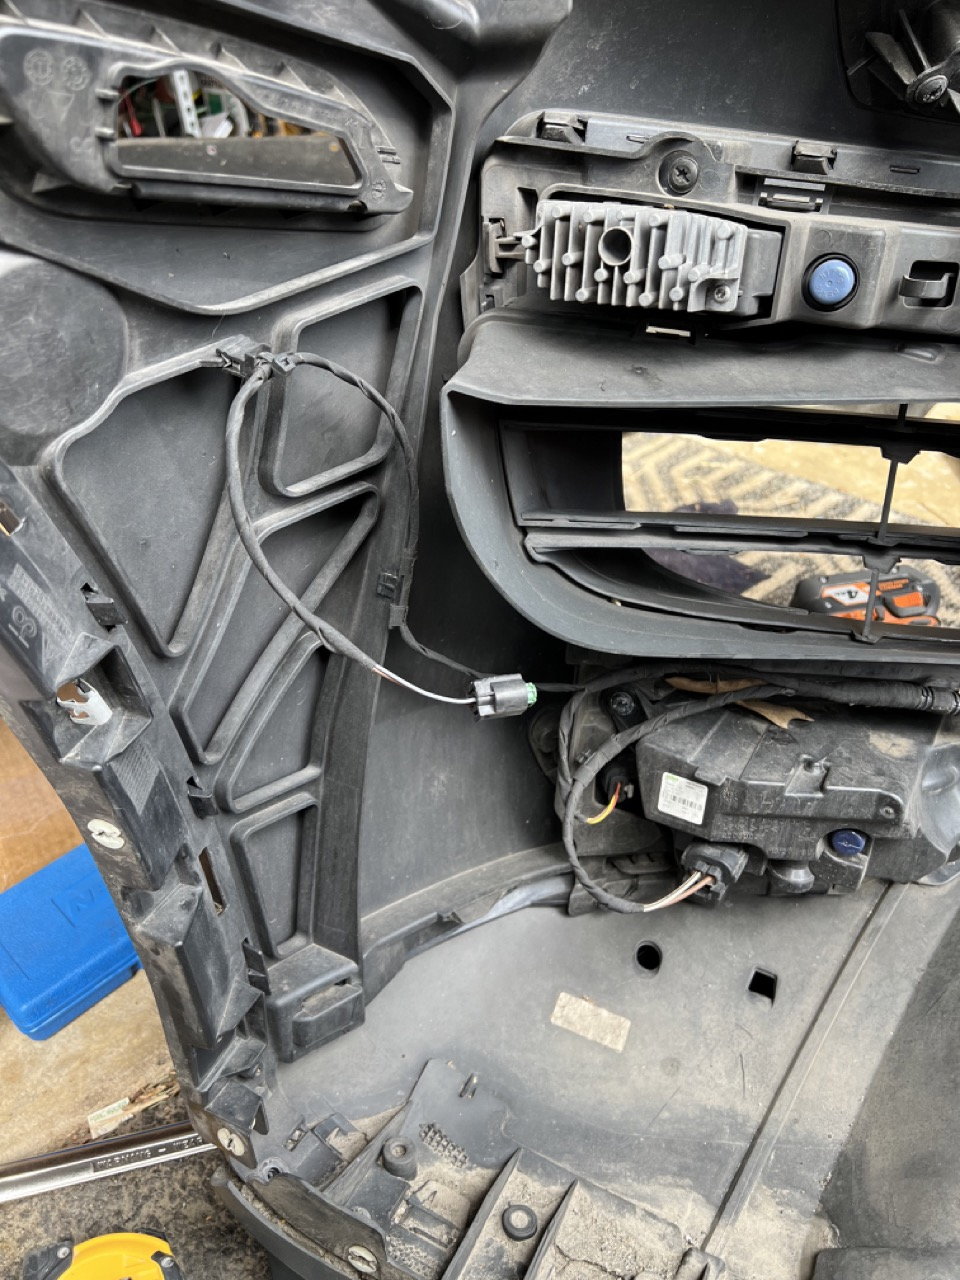
Disconnect turn signal lamp plugs and remove turn signal lamps.
The pic below shows the connector type and the hole where the turn signal lamp was. I took this after removing the cover from the car to make it easier to see.
---------------------
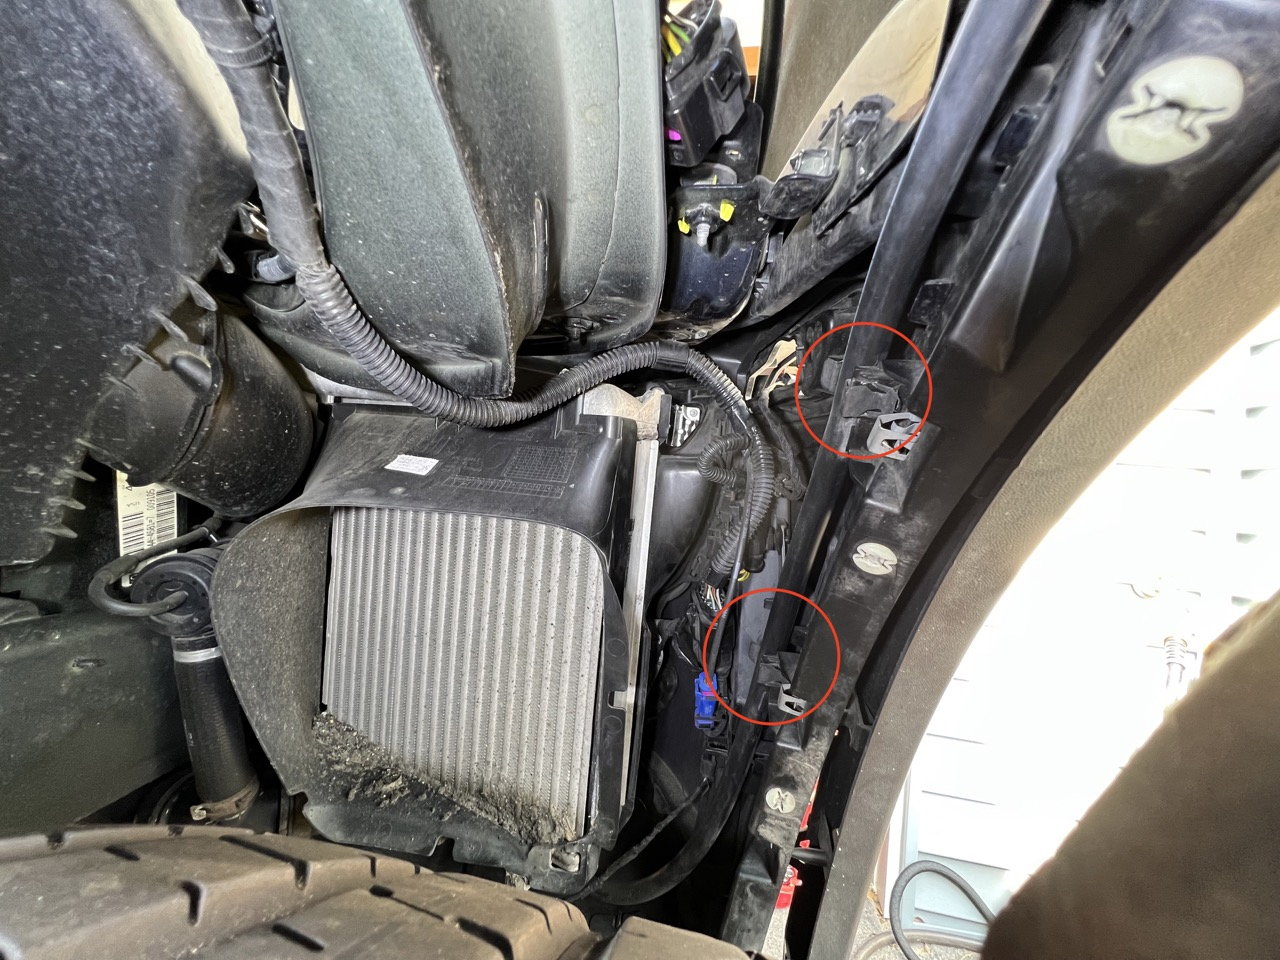
Disconnect front half of wheel arch from front bumper. There are (2) T25 screws (see pics below) and some snaps you just need to pull on to detach it.
Repeat on other side.
---------------------
Remove (2) T25 screws from upper wheel well to release front bumper cover.
Repeat on other side.
---------------------
Remove the (5) T30 screws from the front bumper cover.
---------------------
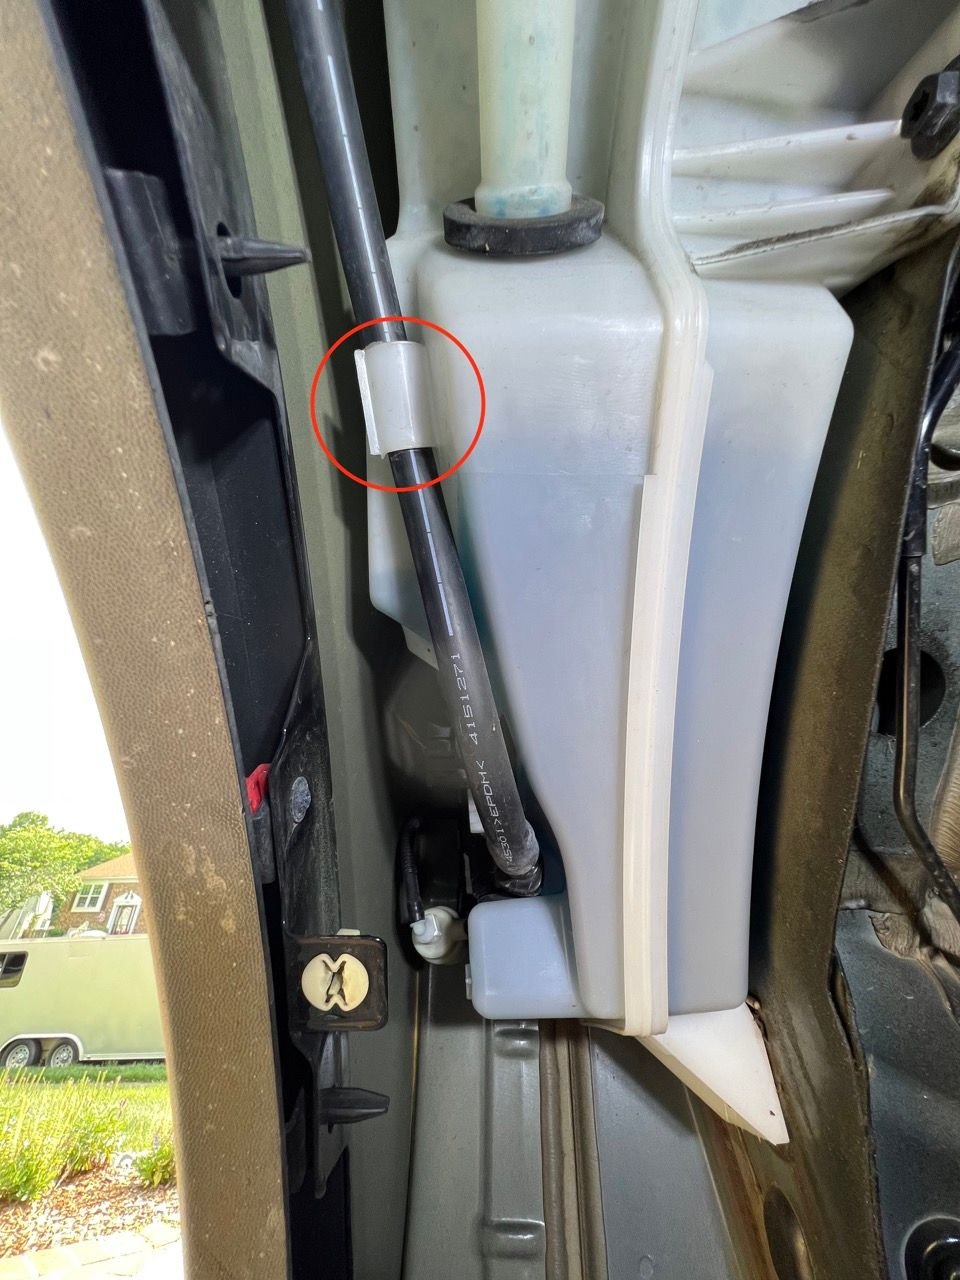
Remove the front bumper cover. This will take some patience - there are some slotted tabs that need to be pulled out. Slide the bumper forwards to remove. It will still be connected via the washer fluid hose, but you will be able to set it aside out of your way.
---------------------
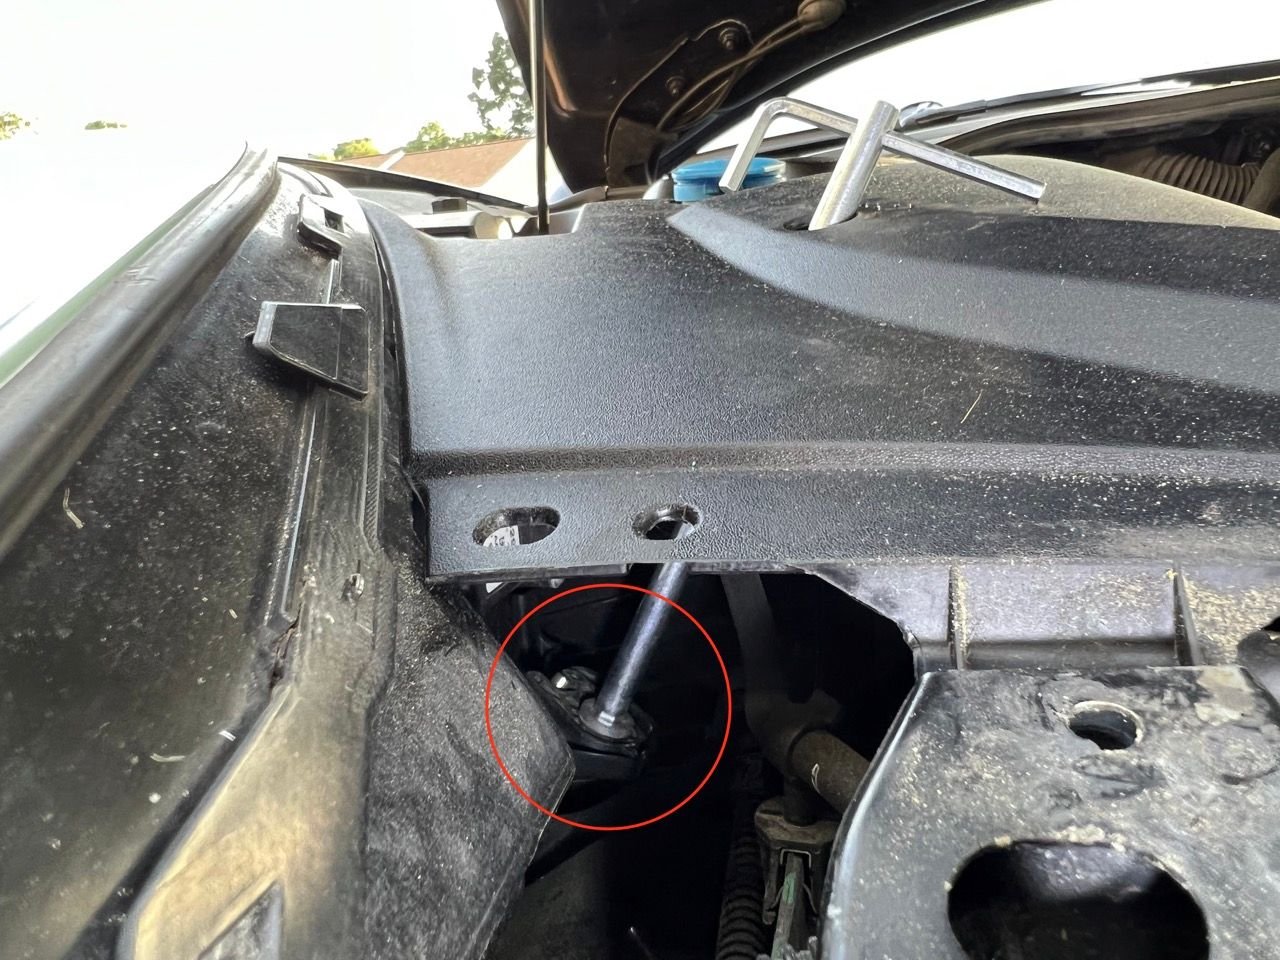
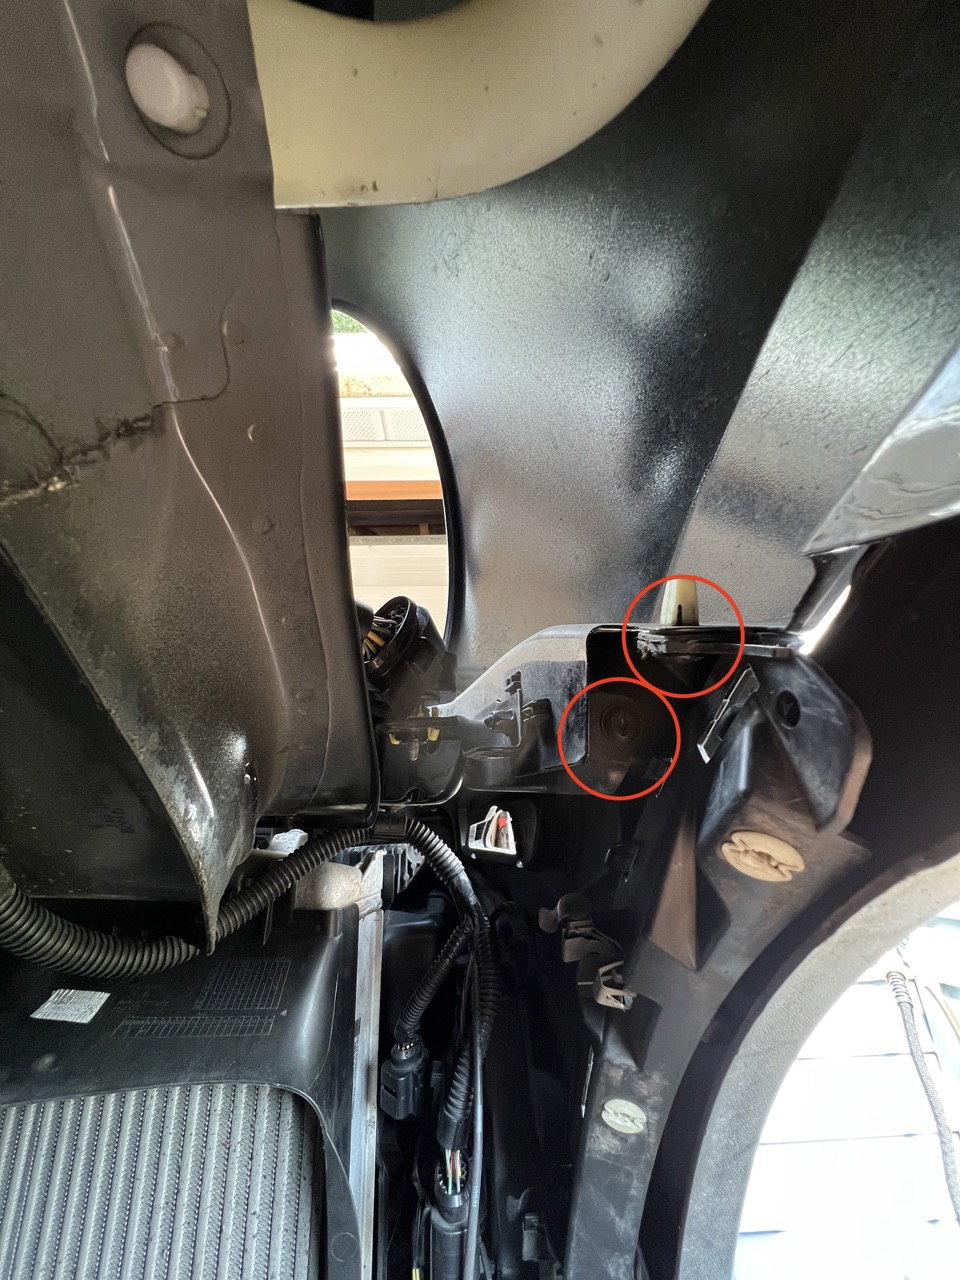
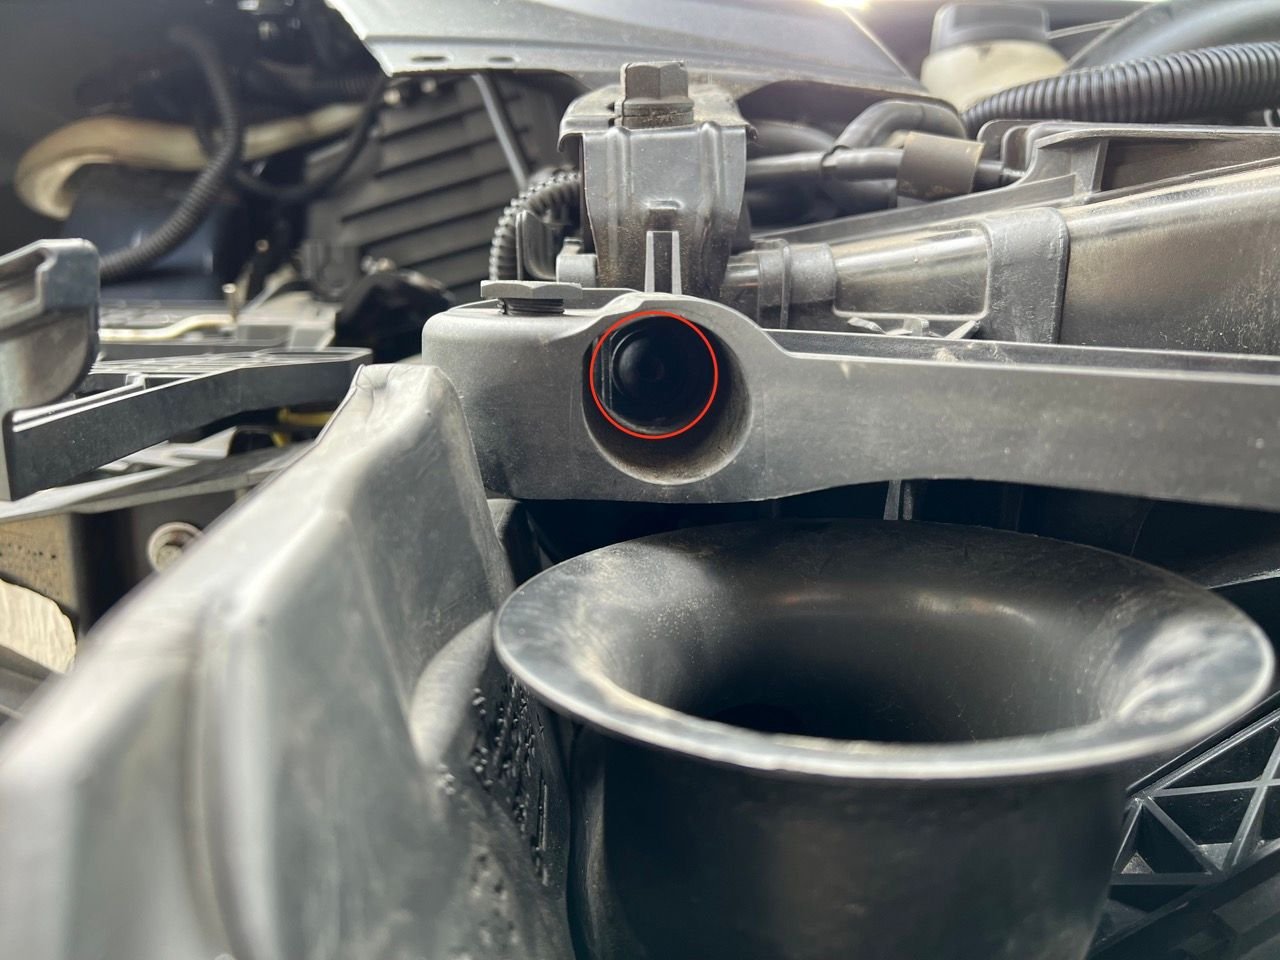
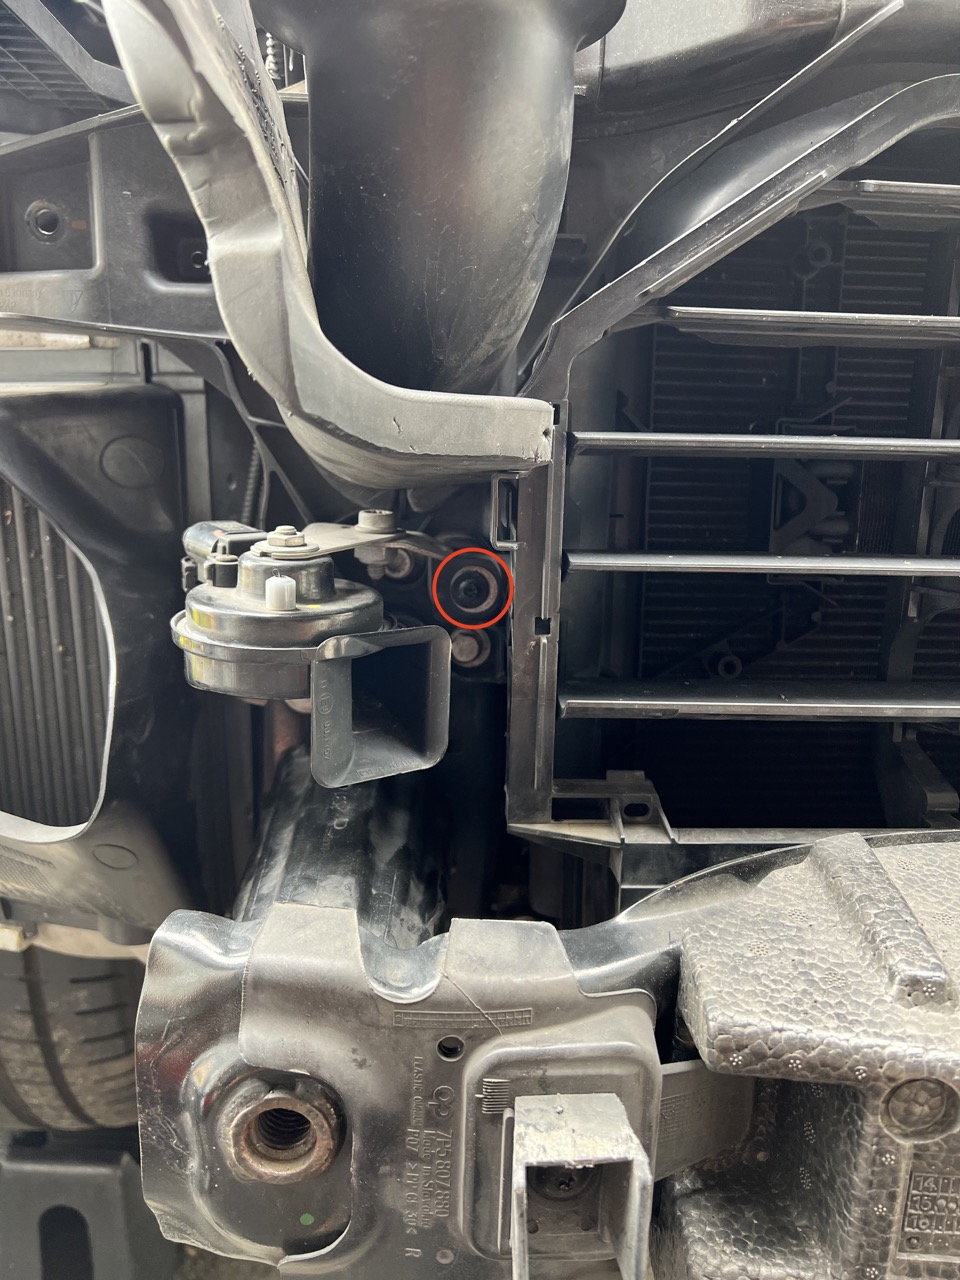
Remove the front air guide (large black plastic piece). Pay attention to the little captivating nub circled in red. You’ll need to work with that carefully to remove the guide. There are clips along the top and sides of the guide that you’l need to work with to pull it off as well.
---------------------
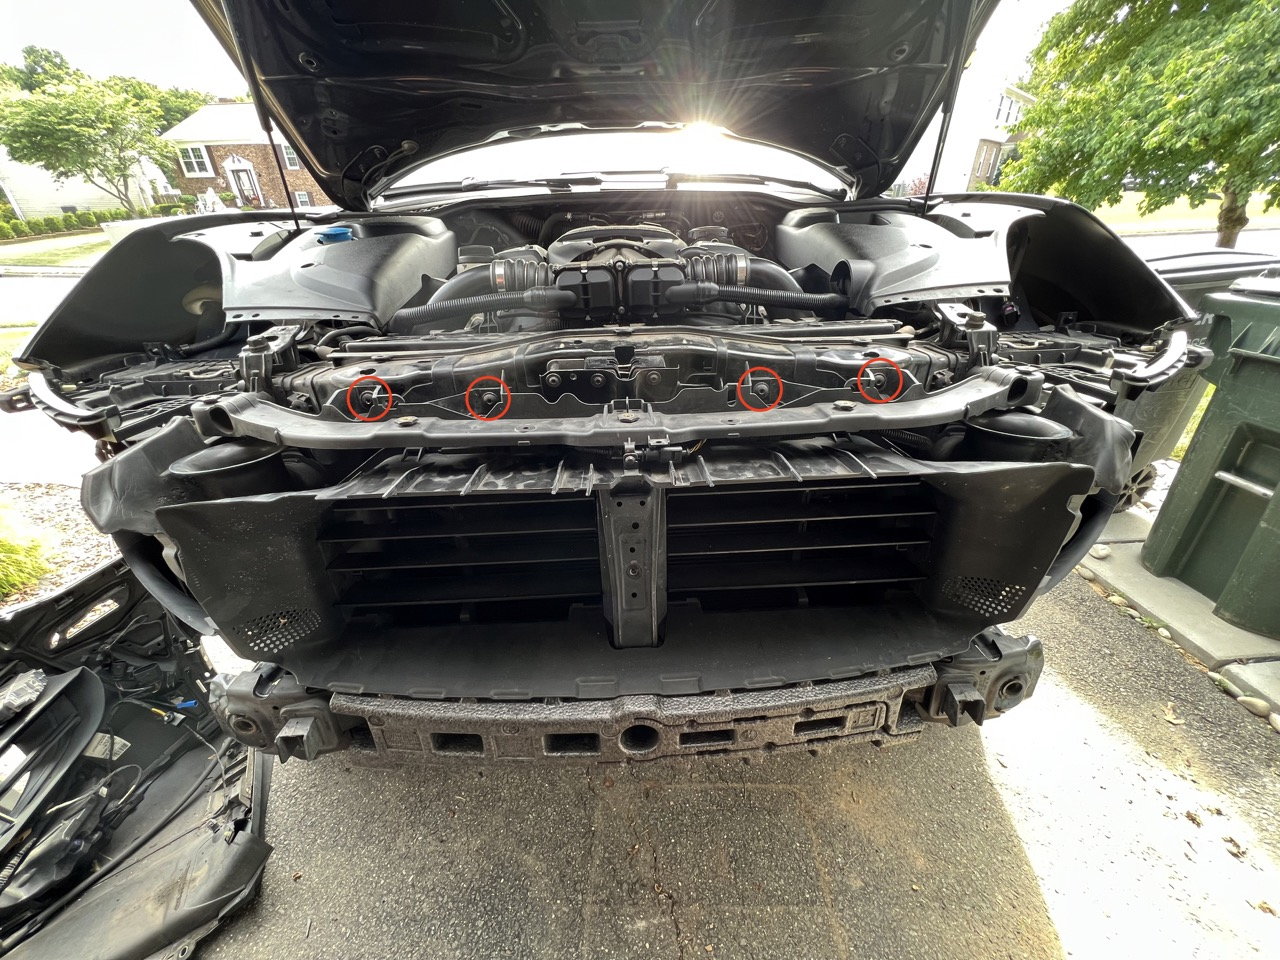
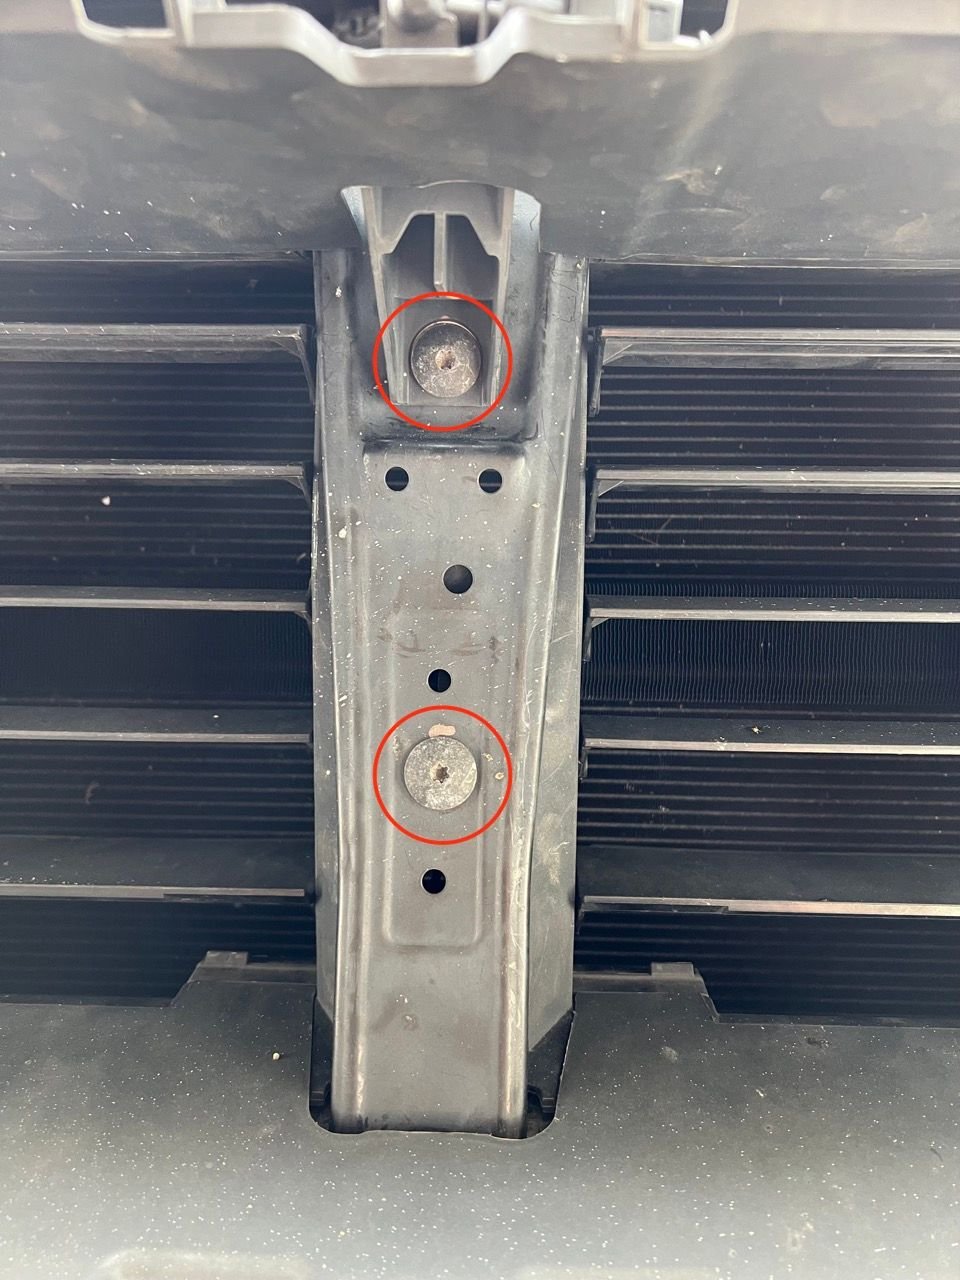
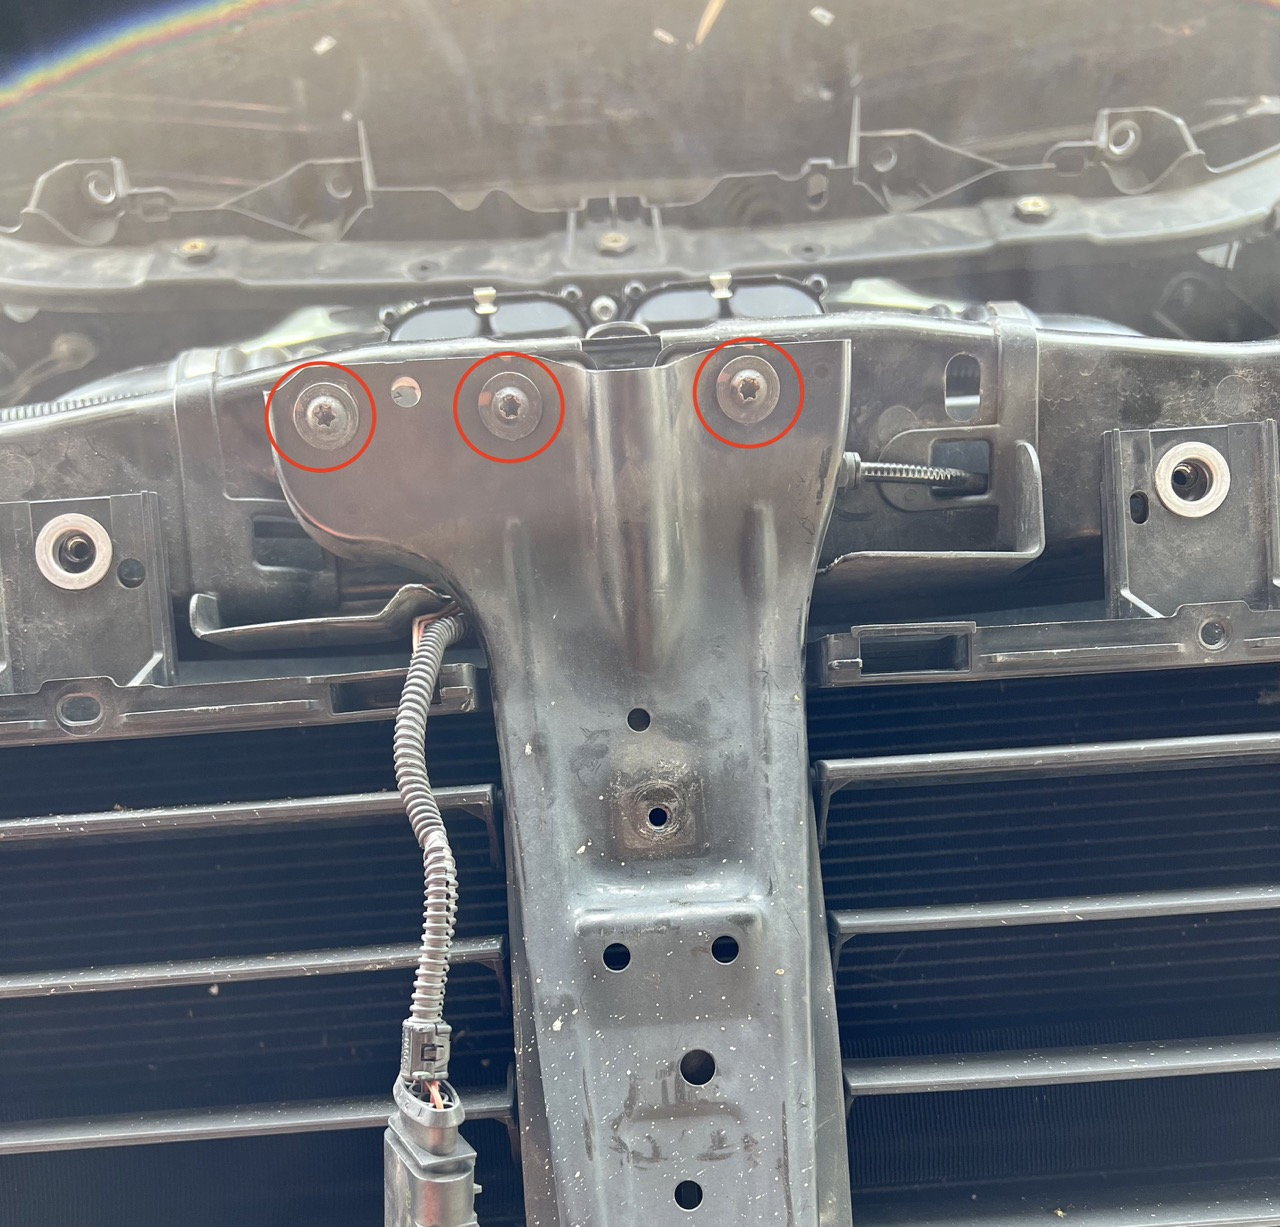
Remove the (6) T30 screws from the front grille support. Two of them are hidden inside the hole shown in the second picture (one on each side of the car).
(I took this photo at the wrong time, so the front air guide is still present)
---------------------
Remove the (2) T30 screws from T-Mount.
(I took this photo at the wrong time, so the front air guide is still present)
---------------------
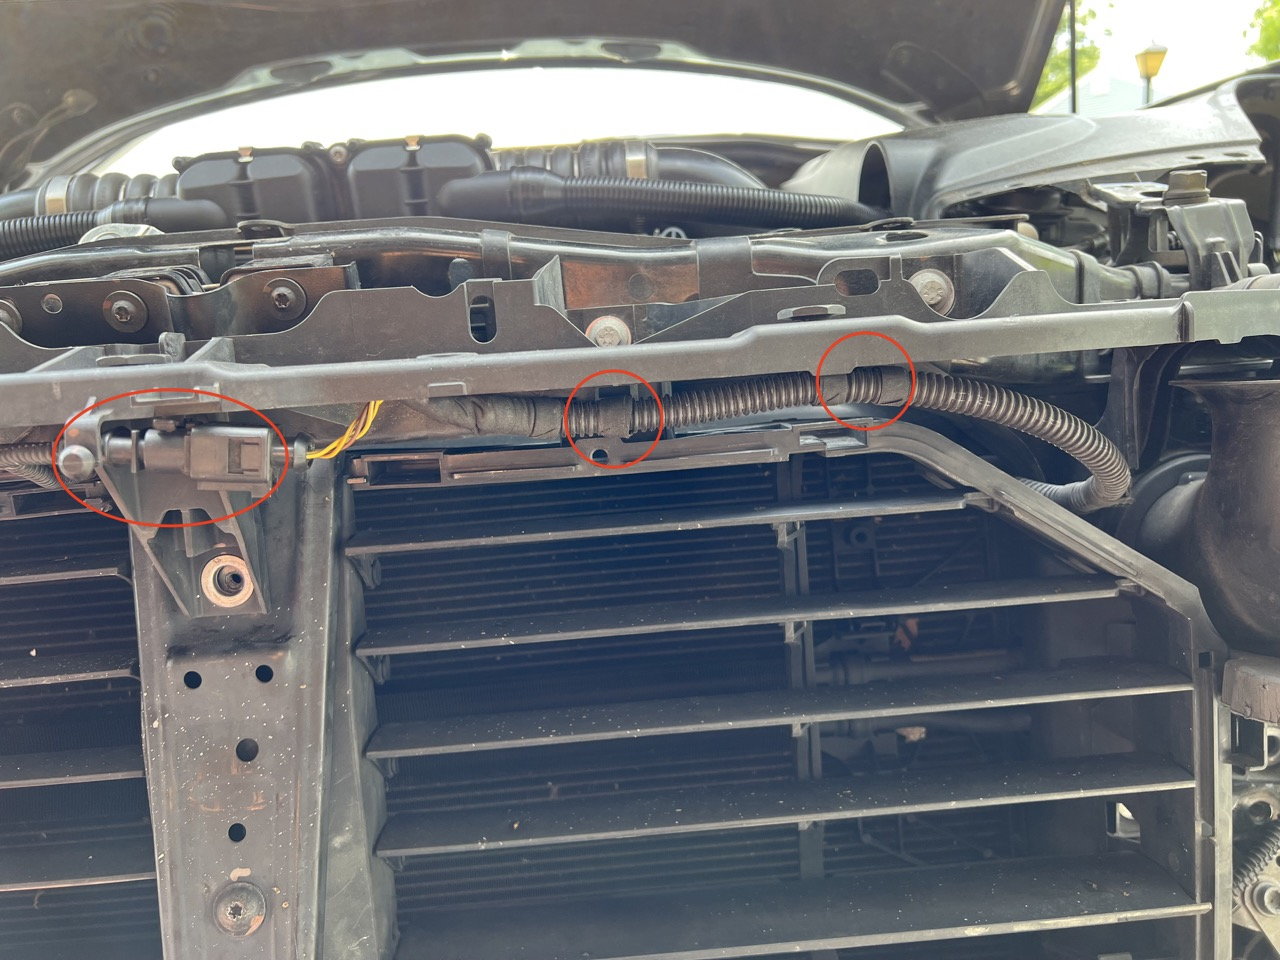
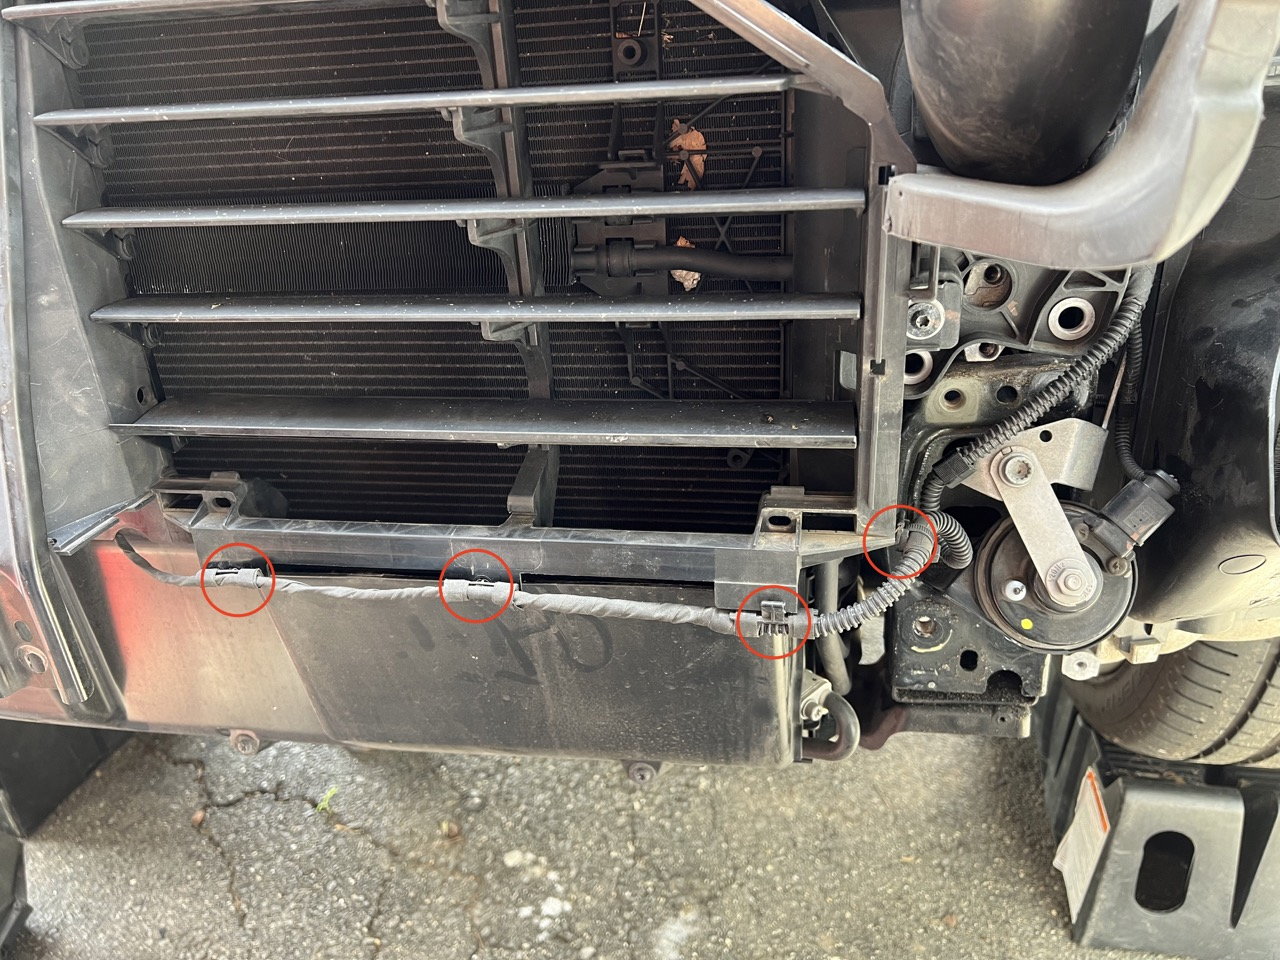
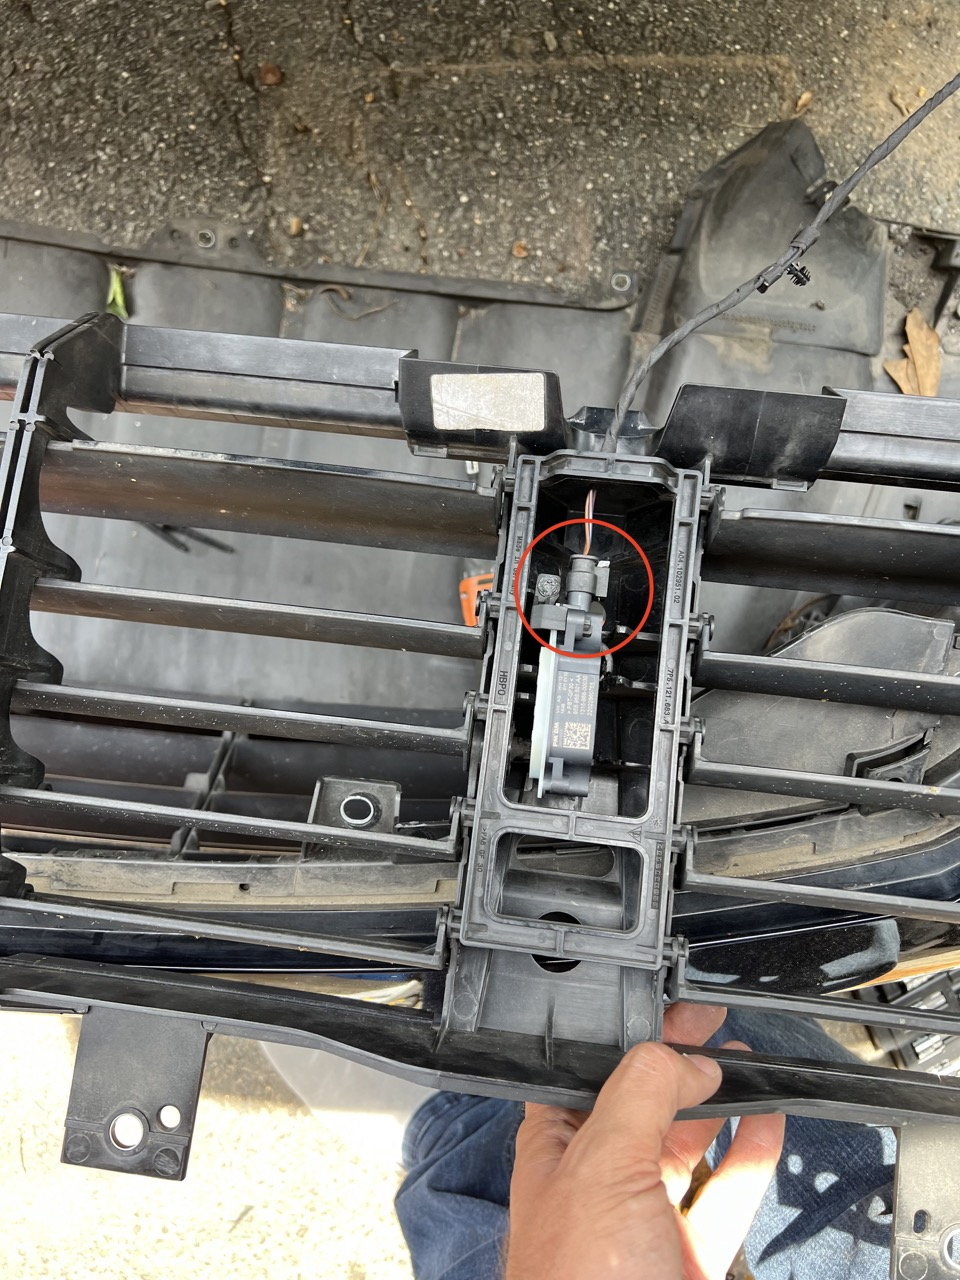
Disconnect electrical plug and unfasten wire harness from grille support.
---------------------
Unfasten louver motor harness from louver assembly.
---------------------
Remove (3) T30 screws from T-Mount.
---------------------
Remove T30 screw from flap assembly.
Repeat on other side.
---------------------
Remove flap assembly from car - careful not to strain the motor wire.
---------------------
Disconnect Louver Motor plug.
---------------------
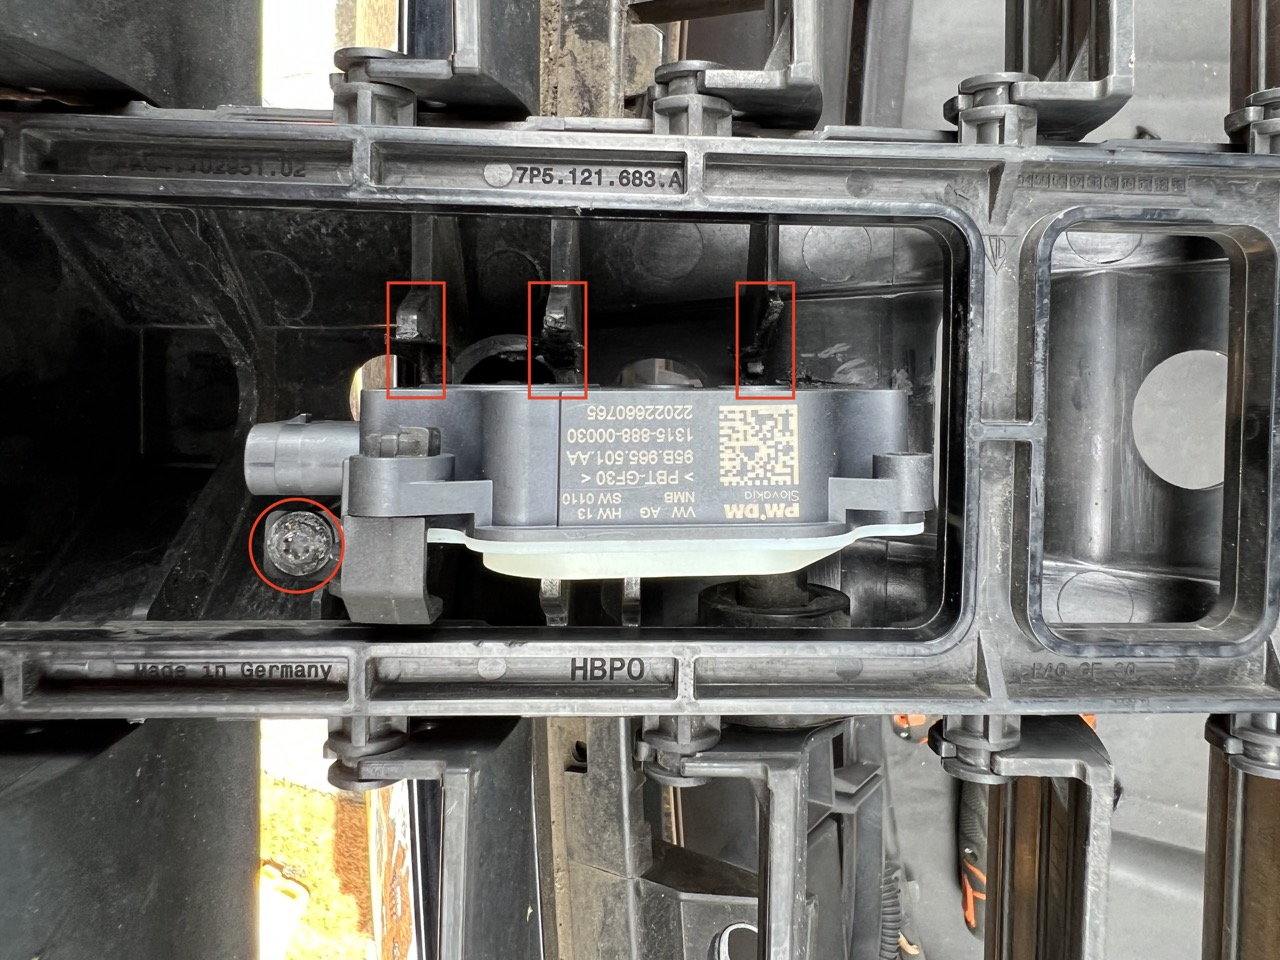
Remove T25 screw.
In order to get the motor out, I had to cut the plastic supports (red rectangles) in a “V” shape. Work slowly and only remove as much material as you have to to get the motor out. I bent and twisted pretty aggressively to get the motor out to minimize the amount of material removed.
Once I popped the new motor in, it was clear that it wasn’t going anywhere, and so far it’s been working great.
---------------------
Assembly is the opposite of removal.
When installing the wheel well liners, there was a lot of road dirt that had fallen into the trenches where the liners go, so I had to brush that out with a screwdriver. I found it best to set them up in the wheel well, tuck in the front bottom lip, and then work my way backwards. I used the brake vent hole as a way to be able to move the liner around. Once in place, align the brake vent.
Last edited by KenneBraun; 07-06-2022 at 12:42 PM.
Thanks for the write up. I think I am going to need to do this.
958.2 Turbo
all of a sudden I had a humming noise from the front of the car while unlocking or locking the car. Took it in to an Indy who says I have to replace the whole assembly.
Before I go and do this I just want to clear something up which is not making sense.
How can my motor have failed if I manually open the flaps, they close themselves shortly after driving off, causing my temperatures to start rising? Surely the motor still working and it would seem to be perhaps a sensor issue?
if that is the case, replacing the motor would not really work? worried I do this and get no results.
I hear of a lot of guys drilling something and putting a screw to disable the flaps all together? What exactly is done to disable the flaps?
Also what is the normal runing temperature of the car suppose to be? I see it engine oil rising up to 120 celcious and water going over 100celsious which is where I worry and stop the car. The flaps are then closed even if I manually opened them before driving off.
also does the new motor not need to be initialized ?
I am half way done with it. Just replaced the motor.
Note that to remove the old monitor, the driving slat can be removed and slides out. Once you slide it out you can take out the old motor. That way you don�t have to cut the �V� to remove.
4 hours for me to get the bumper off. 10 min to do the motor replacement. Now another 4 hours to put it back together 😂😂😂
Did you install the new motor with flaps open or closed or does it even matter?
Thanks
I don�t recall which position they were in when I installed them. What I did do is actuate them using my friend�s PIWIS to make sure it worked before I buttoned up the bumper again. I wish I�d taken note of the position. Not sure if I got lucky or if it doesn�t matter.
I don�t recall which position they were in when I installed them. What I did do is actuate them using my friend�s PIWIS to make sure it worked before I buttoned up the bumper again. I wish I�d taken note of the position. Not sure if I got lucky or if it doesn�t matter.
I made sure that the slat was inserted in the close position into the motor the first time (not sure if it matters).
In addition made sure it was closed when I plugged them in for the first time. (Read it should be closed from a Macan DIY on the same thing I found online).
I can confirm all is working perfectly. Every single bolt went back (relief) and the louvers are working right. Temperature is 90 reg celcious on the water side and 105 celcious in the oil side (after I drove it like it�s stolen).
I decided to inspect the broken motor. Light wear on one of the gears. However the culprit seems to have been the actual motor in the actuator. It�s either loose or developed play which causes it not to have its gear fixed in the right place. It�s shaft/driving gear is wobbly. Explains why it could actuate it one way (closing) but failed to move open by itself. The small gear has play which stops it from turning the gears reliably.
Edit.
no coding or calibration done. The car seems to actuate the louvers all the way up and down, almost like a self calibration.
no visible errors on dash. Not sure if anything saved on the Ecu but nothing complaining. Will check later when I find my reader.
Great DIY instructions, but definitely not one of my favorite DIYs to do. Pretty fiddly and took close to 8hrs total (although I did waste an hour looking up how to calibrate it which turned out to be unnecessary), figuring out where things were and trying to to destroy things along the way. Few things:
No need to take out the headlights on my 958.2 GTS. Once all the screws are out, the bumper will slide out forwards towards the front of the car. Wasn't an issue having the headlights still in.
I was able to pull out the bad motor w/o cutting the plastic by taking off the one fin that connects into the motor. You have to precariously flex the fin, to the point where you think it's going to crack, to get it out.
I installed the motor with the fins closed, but I don't think it matters. Don't fire up the car until all the connectors are connected again and that should trigger it to auto calibrate and remove any warning codes. My car wasn't happy when I first fired it up with those 3-4 harnesses unplugged.
My broken motor would also close but not open the louvers. They generally seem to work only in the closed direction once broken which is great for overheating your car.
Is it possible to keep them manually open or disable the motor. I don't want to spend 1500 on a part that can overheat my engine.
Yeah, I temporarily jammed a piece of plastic between 2 of the open louvers to keep them from closing. You'd think the louvers not operating would throw a warning on the dash, but it doesn't.
Did you end up leaving the plastic inside or fixing it? Did the motor still try to engage with the plastic there. I would like to just leave it open permanently. I live in Southern US for it very hot most of the year.

 07-06-2022, 12:14 PM