When you click on links to various merchants on this site and make a purchase, this can result in this site earning a commission. Affiliate programs and affiliations include, but are not limited to, the eBay Partner Network.
Folks, Awhile back I posted on the 997TT side of the Forum, that I have a repair solution for our cars..
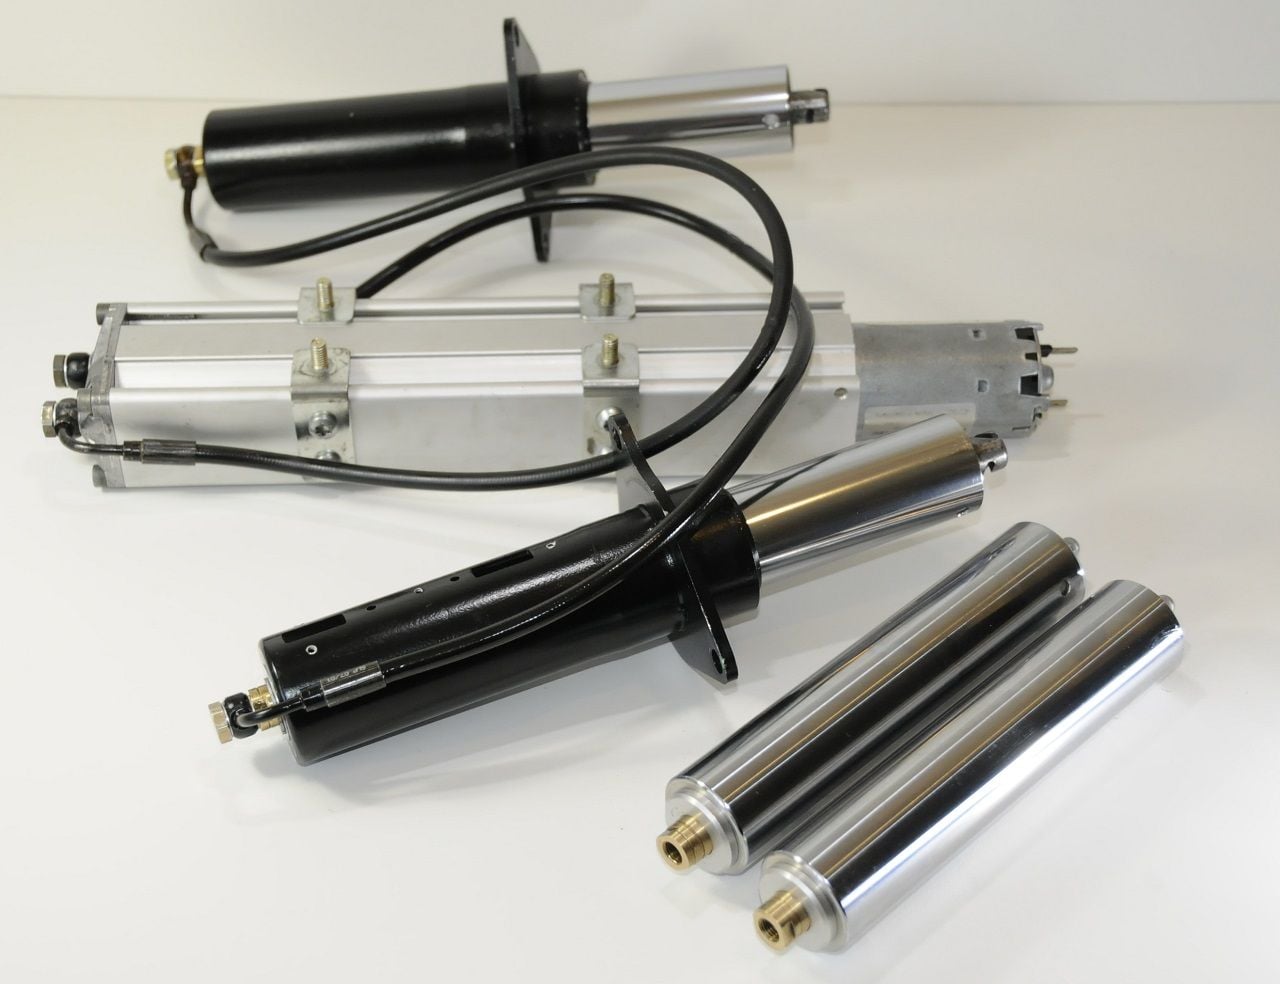
Below is a picture showing the 996TT wing cylinders repaired (for long time customer/Rennlister) and under pressure.
The two chrome cylinders are from a fellow 997TT Rennlister who sent his in for repair last week.
I will need to install the chrome cylinders into the black 997TT lift housings and put under "test" pressure.
For those that didn't see the 996TT thread, I rebuild leaking lift cylinders for $248.00 per cylinder. I have re-designed the factory components by CNC'ing new brass components that will allow "anyone" to replace the 3 oring seals.
The factory design is sealed and swedged at both ends. The components that I have manufactured allows for a quick change/reseal in the future. From the failures that I have seen, excessive side thrust loading causes the orings to tear and flat spot.
I have addressed this issue by adding more brass material to support the internal "lift" rod. The other improvement is using modern seals "Viton" Each cylinder cartridge is cleaned, updated, bore honed, and then polished to a mirror finish..
Please note: One should think about draining and refilling/bleeding the factory hydraulic system every 3 to 5 years to reduce contamination and prolong the factory or repaired seals. Bleeding the wing assy is really an easy process.
I know that there are other options available in the market place. My option allows owners a inexpensive method/repair to keep the factory system working for many years.
I have coined the phrase for this repair. "Save the Whale Tail" Tshirts coming (smile)
Those are my cylinders in the pic above, I really enjoyed talking with Kevin and learned a lot about them as well as some other great pointers. I was really happy Kevin could restore the original parts in a way that would keep the spoiler functional the way it was meant work as well as make the system easy (and cheap) to maintain for the life of the vehicle. I'll add more pics when they arrive. Cheers!
Those are my cylinders in the pic above, I really enjoyed talking with Kevin and learned a lot about them as well as some other great pointers. I was really happy Kevin could restore the original parts in a way that would keep the spoiler functional the way it was meant work as well as make the system easy (and cheap) to maintain for the life of the vehicle. I'll add more pics when they arrive. Cheers!
Exactly! I love the factory setup!
Kevin, does the heat in the engine bay kill the factory seals? Are the factory seals just buna?
My son is taking some pictures.. If you look at the posted pump picture. You have two spade terminals You will need to remove the engine compartment fan and then lower the pump assy to gain access to the electric terminals. Remove the two connectors.
Remove the Banjo fitting from the both lift cylinders. Have a helper put the lines is a glass jar filled 1/2 with Pentosin (If you need two jars use two)
With a DC 12 volt battery source> supply power with this orientation.
Negative cable on large terminal pulls the pump assy pistons toward BDC watch for MAXIMUM cylinder filling with Pentosin (fluid level will drop) then switch your cables connections. Please Note when you hear and feel the pump reach the maximum travel STOP the electrical currect (quickly)
Positive cable on large terminal pushes the pump assy pistons up towards the TDC > wing raises. Please NOTE: when you hear and feel the pump reach the maximum travel STOP the electrical current (quickly)
Do this a couple times. Then place the cylinders/wing in the down position (pump assy piston AND hydraulic lines are FULL of Pentosin) Place new crush washers on the banjo fitting. Then as quick as possible pull one hydraulic line out of the jar of pentosin and attach to your lift cylinder. Do not strip or force the threads>> I have seen cross threaded cylinders (not good)… Then tighten with a 12mm wrench and socket.
Go to the other side and do the same..
Yes, you will lose some Pentosin but not much..
Tip, you need a 12mm wrench to hold the center lift cartridge to loosen the 12mm banjo fitting. The wrench needs to be cut down to fit between the banjo fitting and cylinder. Grind it with a grinder or Dremel. Purchase a cheap 12mm open wrench (this is a must)…
Have fun..
Negative cable on large terminal pulls the pistons toward BDC MAXIMUM cylinder filling with Pentosin
Kevin, I just received the cylinders back today and plan to install tomorrow. One quick question, as I understand it the orientation of the banjo bolts doesn't matter in order for fluid travel. However, on some of the bolts there is a red mark where it appears they were marked for some type of alignment. Am I missing something with the assembly or does it not matter which direction the banjo bolts are pointing once properly torqued? Thank you!

 05-15-2018, 03:18 AM