When you click on links to various merchants on this site and make a purchase, this can result in this site earning a commission. Affiliate programs and affiliations include, but are not limited to, the eBay Partner Network.
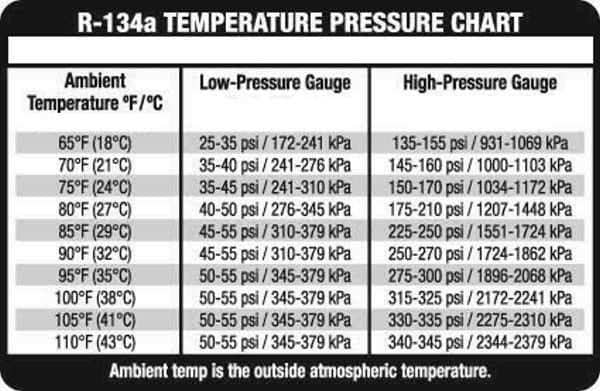
Why do the pressure numbers in the Porsche Service Manual differ from those from the general R134a pressure charts? According to the Porsche Service Manual, the low pressure side should never exceed 20psi. I added Fahrenheit and psi to the charts to make it easier for us Americans to read. According to the PSM, I might be just a tad overcharged. According to the standard R134a chart my pressures are off. Can anyone educate me on this?
So, what the factory shop manual is suggesting is that, for example:
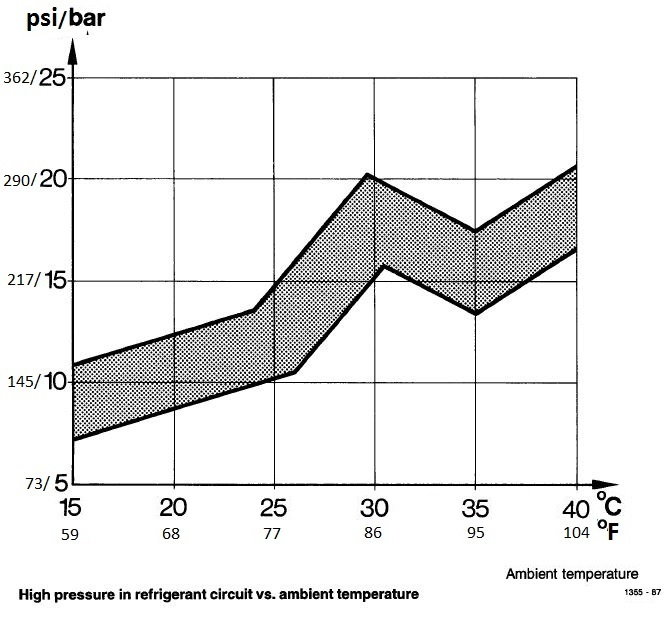
Let's just take a look at the high side for a moment:
High side, say at 25C or 77F ambient (air temp surrounding the outside of the car), there could be a range in pressure from 10 bars to 15 bars or 145 psi to 217 psi. Yes, when you think about that you got a spread of 72 psi. Let's cut that in half and say the middle would be 145+36 or 181 psi at 77F ambient. On the non factory chart, nearest ambient reference is 75F, and here you have a range of 150 to 170 psi; middle range of 160 psi. So things are not too far off: factory 181 vs other chart of 160 psi with a 2 degree difference between the two.
The factory manual is suggesting the observation should be performed with a perfect vacuum (meaning a liquid flush of refrigerant using the factory "SECU", then pulling a vacuum with same machine) 840 grams of R134a, clutch engaged, windows and doors closed, max ac thermostat setting, evap blower at 4th speed, and after system has been running like this for 10 minutes and pressures noted at 2000 rpms.
Higher rpms do raise the high side pressure and drive down the low side.
So the question is with respect to the alternative pressure chart you have....what are the conditions when those pressures are observed?
Jimq I got a cheapo off eBay for about $35 to the door. The short term plan is to milk as much as I can out of the system (barring any major leaks) until I can upgrade and convert to 134A.
As long as it fits, the dessicant is the same in all of the dryers.
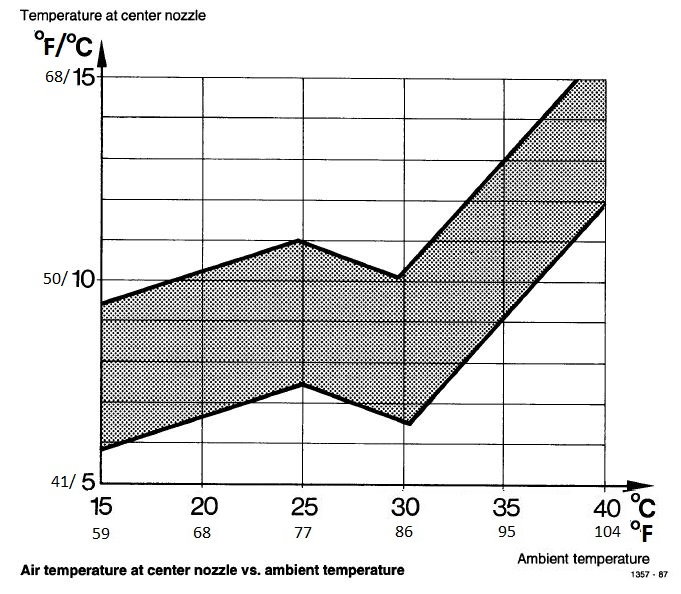
Sorry to hi-jack, but does anyone here obtain the vent temps from the factory chart? I just did a test today using a thermocouple that reads accurately at 32F and 100F. Ambient was a very humid 87-88F, recirc on, max fan speed, center vents only:
30sec after a cold start I get 70F at idle
30sec of 2k rpm I get a steady 65F
Compare to my wife's 2015 Mini:
60F at idle, 55F at 2k rpm.
Big window unit AC in the house: 55F
And the chart from 199x for a non-optimal system says that we should be seeing vent temps of 45-52F? Yeah right!
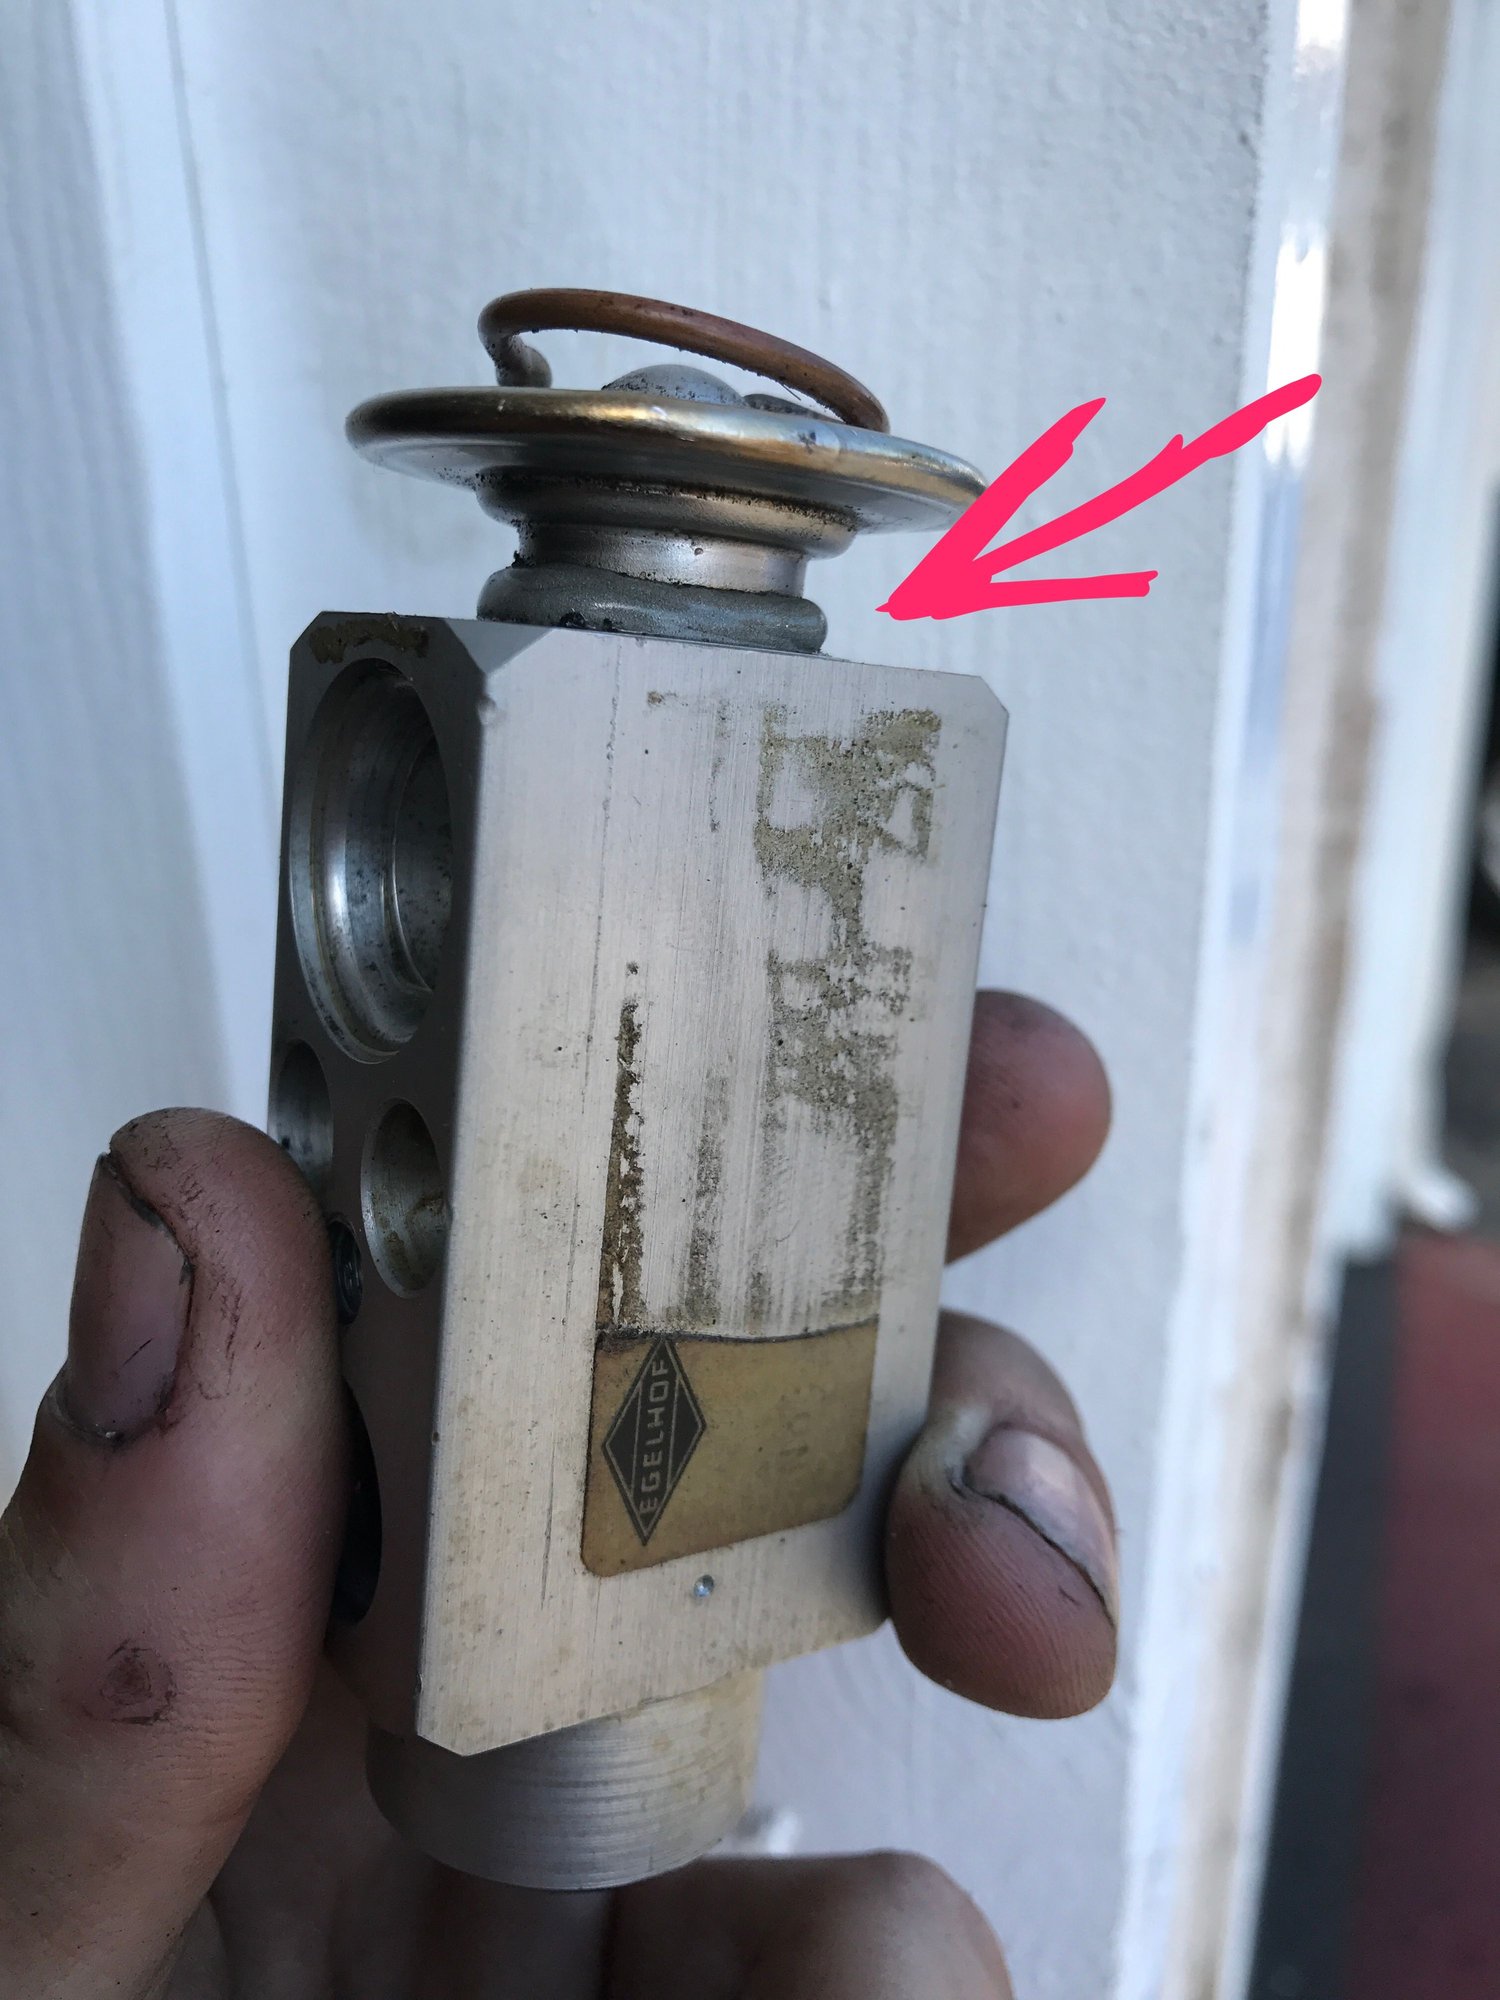
I had the system evacuated and took the expansion valve out to take a look at it. Something looks fishy other than the fact that it's covered in oil, enough to soak the stickers and have them fall off. It looks like someone put JB weld around where the diaphragm meets the valve body. None of the pictures online have it. Looks like a previous owner tried to rig up the AC like they did the rest of the car. Maybe the valve wasn't working properly and that's why it was running lean. I am assuming the material added to fix a leak changed the heat transfer properties of the expansion valve causing it to not adjust properly. Time pick up a new one and get it installed and see. Ill change the pressure switch o-ring while I'm in there and all o-rings will be the new green type.
New OE expansion valve has cured any leaks in the system. I picked up a decent DMM with thermocouple port to measure the superheat to fill the system to the right amount. Problem is the low side pressure will not go above 20psi while running the AC. At idle it hovers around 20, at 2000rpm it drops to about 15. I tried calculating the superheat by placing a thermocouple on the suction line up by the expansion valve under the insulation. The temperature of the line oscilates up and down by about 10 degrees, 23-33 deg F. The low side suction pressure is roughly 15-20psi and that translates to 14-22 deg F. According to everything I have read about superheat calculations, the suction temperature should be 8-12 degrees hotter than the evaporator outlet temperature. Even with the new expansion valve something is up. Any ideas? I dont want to just throw parts at it. My refrigerant detector doesnt detect a leak in the evaporator when i slide the probe up the floor vents or anywhere else in the system. I am ready to give up.
Update- I did a little more reading. I am going to go pull the inner fender liner out and measure the inlet and outlet temps of the dryer. Maybe the driers clogged?
Can you take out the expansion valve without removing the whole suitcase? I can see the EV but there's three control valve motors in the way, and it looks like the mounting bracket isn't easy to remove.
Can you take out the expansion valve without removing the whole suitcase? I can see the EV but there's three control valve motors in the way, and it looks like the mounting bracket isn't easy to remove.
Yes.
That part R&R they were thoughtful of in the design of the evap system.
Will I destroy my A/C system if I just add some 134?
Very new to me 1990 964. I have receipts for a new A/C condenser and R134 from about 18 months ago. I also see the red and blue R134 caps on the compressor so I believe it was converted to 134.
A/C blew cool (not cold but cool) when I test drove and did the PPI. It has mostly been sitting in my garage as I go through and fix shoddy previous repairs and replace missing fasteners. This past weekend it was hot and A/C was not cooling. Quick inspection revealed the compressor was not kicking on.
I have done no other tests. Seems like the quick and easy fix (even if temporary) is to pick up a 134 kit from the auto parts store and recharge the system I just want to be sure I don't damage it by doing so.
Based on the other work I have seen, previous owners / mechanics did everything the cheapest, fastest, easiest way they could. I would not be surprised if it was under-charged from the start. Also, because it is now not working, I believe I probably have a slow leak somewhere. I say slow because based on the receipts it has taken a good 18 months for the system to stop working. I can live with a DYI recharge every 12-18 months if that will keep me cool until I can pull the entire system and do a proper R&R.
Ideally, you want to properly pull a vacuum on the system and then add refrigerant.
You would expect that you could simply add refrigerant (referred to as 'topping off') because in theory what ever existing refrigerant is in the system should prevent outside atmosphere from entering the system. However, that tends not to be the situation all the time. So, smartly you evacuate, charge and test.
Once you do get the system charged you should try to track down the leak with an electronic leak detector. Common leak points are:
TEV
Evaporator (sniff the vent and drain tube)
Compressor manifold, schrader valves and nose seal
2 lines on the compressor
There could be other leak sources but the ones above are typical.
What ever you do, don't put leak sealant in the system.
And, although the system has a low side pressure cut off switch (prevents compressor clutch from engaging when system pressures are low), its not a good practice to run the system with low refrigerant levels; that model compressor does not hold up
well to it. If the compressor starts to break down (toss off metal) the time required to properly liquid flush the system is quite long.
The TXV (expansion valve) is easy to change out. You just need to remove the expansion tank on top of the fuel tank, then pull the fuse box out and lay it on the fender, then remove the firewall. There are (2) rubber grommets where the accelerator sensor wires go through the firewall that you need to pop out. Once that's out the TXV is easy to replace.
On a second note, I believe I found the restriction in my system. The condenser is plugged up. The temp going into the condenser is 135F and over a 6in section of condenser in the first vertical row where the temp drops 25-30F and only drops 5-7F over the remaining 13 rows. I measured it with a thermocouple but you can actually feel the heat difference with you hand. I will report back once I get it take care of.
Ideally, you want to properly pull a vacuum on the system and then add refrigerant.
You would expect that you could simply add refrigerant (referred to as 'topping off') because in theory what ever existing refrigerant is in the system should prevent outside atmosphere from entering the system. However, that tends not to be the situation all the time. So, smartly you evacuate, charge and test.
Once you do get the system charged you should try to track down the leak with an electronic leak detector. Common leak points are:
TEV
Evaporator (sniff the vent and drain tube)
Compressor manifold, schrader valves and nose seal
2 lines on the compressor
There could be other leak sources but the ones above are typical.
What ever you do, don't put leak sealant in the system.
And, although the system has a low side pressure cut off switch (prevents compressor clutch from engaging when system pressures are low), its not a good practice to run the system with low refrigerant levels; that model compressor does not hold up
well to it. If the compressor starts to break down (toss off metal) the time required to properly liquid flush the system is quite long.
Originally Posted by mystert
The TXV (expansion valve) is easy to change out. You just need to remove the expansion tank on top of the fuel tank, then pull the fuse box out and lay it on the fender, then remove the firewall. There are (2) rubber grommets where the accelerator sensor wires go through the firewall that you need to pop out. Once that's out the TXV is easy to replace.
On a second note, I believe I found the restriction in my system. The condenser is plugged up. The temp going into the condenser is 135F and over a 6in section of condenser in the first vertical row where the temp drops 25-30F and only drops 5-7F over the remaining 13 rows. I measured it with a thermocouple but you can actually feel the heat difference with you hand. I will report back once I get it take care of.
Sooooo No? No I won't destroy my A/C system by simply adding some 134 from the auto parks store?
Clearly in the future I will need to pull the fender liner and gas tank and replace the drier and expansion valve and all of the o rings and possibly the evaporator etc...
But in the mean time, for this summer, I can simply add some 134. Right?

 06-12-2017, 01:36 AM