When you click on links to various merchants on this site and make a purchase, this can result in this site earning a commission. Affiliate programs and affiliations include, but are not limited to, the eBay Partner Network.
I too just used one of those Impact Screw drivers after soaking the Disc screws in PB Blaster on my parts car, all came out but one stripped, now have to drill
There is another tool that I have recently found works GREAT on removing old/stuck Philips screws, a super long screw driver, like a two footer that HF sells.
You can really lay into it pressing into the screw and the long shaft has a torsion bar effect that breaks the screw loose.
Try it and you will be amassed how it works on stubborn Philips heads w/o stripping them out.
I have had to drill out several of these on different 928s over the years. In each case the threads themselves were not frozen just the head. Once the head was drilled out the threaded remains of the screw were easy to remove and replace with a new screw during re-assembly. So if you resort to drilling be careful not to get into the threads and maybe you can avoid needing a thread insert.
The original screws are soft, and with a large drill bit you can get the head to break from the disk hat without getting into the threaded part of the screw. Then remove the rotor, using the 8mm jack screw holes if necessary. You are left with a stub end of the screw sticking out of the hub face. Follow Jeff's advice then with a MAPP gas torch, quickly heating the stub and letting it cool a couple times to break any remaining corrosion bond. The stub will then un-thread quite easily.
Use Anti-Seize On the Replacement Screw, both the threads and the tapered/countersunk head. Use the correct cad-plated screws too. They only need to be tight enough to keep dirt from getting between the hat and the hub face, so maybe 5 lbs/ft is plenty. That's two fingers and a thumb gently on the screwdriver. Anything more primes you for a repeat performance next time the rotor needs to come off.
If you have left-hand drill bits available, use them here. As soon as the screw head gets heated a bit (sorry...) by the drilling, it will release and spin right (actually 'left') out with no further drama.
The hammer on manual impact screwdriver is the right tool for this, but make sure you're using it correctly. Some of them you have to push in and twist to set the correct impact direction that happens when you hit it. Others you just hold against the stop in the direction you want it to turn the screw when you hit it.
Whenever I get these original rotor holding screws out, I replace them with stainless versions and use marine anti-seize on the threads and the tapered head. They always come out easily after that.
decided to drill out. That sucker wasn't going anywhere otherwise.
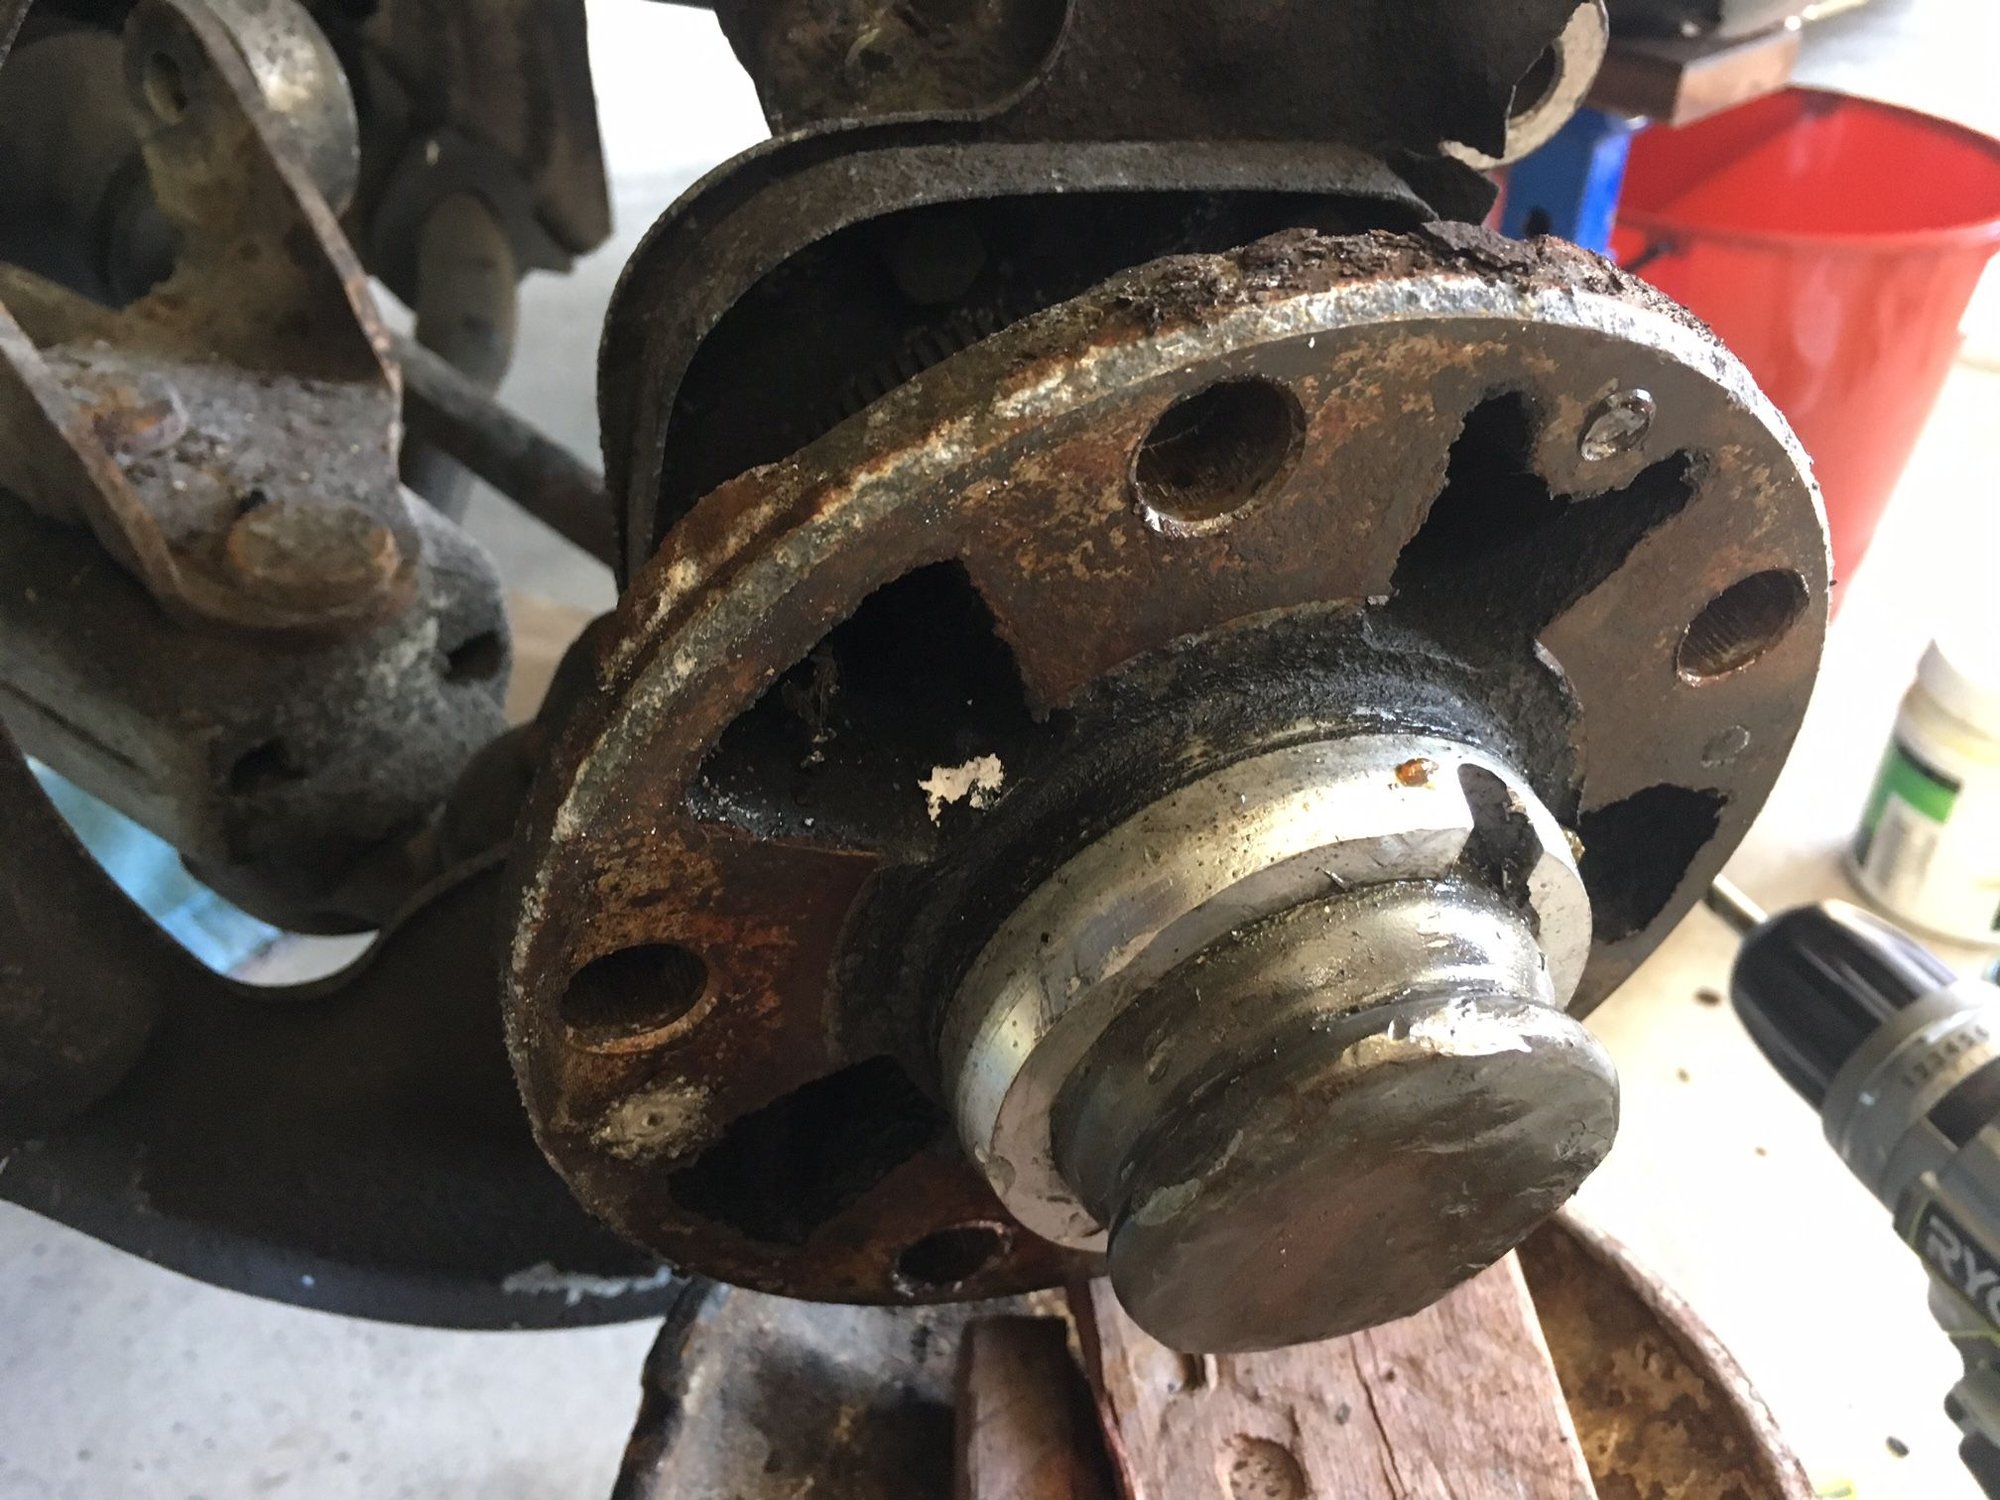
Rotor is stuck as I suspected, so I'll try the 8mm Jack holes (thanks Dr Bob) to free it. Otherwise I've seen a method using the mount holes for the calipers and two bolts and nuts to ease it off.
Its times like these I wish she wasn't a UK import and spent 2/3 of her life in the year round sodden conditions. Give me good old dry Aussie climate any time. Nothing corrodes unless your just damn lazy.
The hammer on manual impact screwdriver is the right tool for this, but make sure you're using it correctly. Some of them you have to push in and twist to set the correct impact direction that happens when you hit it. Others you just hold against the stop in the direction you want it to turn the screw when you hit it.
Whenever I get these original rotor holding screws out, I replace them with stainless versions and use marine anti-seize on the threads and the tapered head. They always come out easily after that.
Exactly the required way to get an impact screwdriver to actually twist the bit when you hit it. Turn the handle full counterclockwise hard enough to -almost- twist the bit out of the screw head. Then a firm hammer hit should do it.
----
The jack screw holes are 8mm, but will have a tough time when the rotor is corroded to the hub face. The critical joint is where the rotor indexes over the center of the hub. Some heat on that area of the rotor, with some pressure from the jack screws, is usually enough to get it moving.
Otherwise, some pressure with the screws, followed by a few hard bumps with the hammer may be enough to get the rotor loose. The bolts are standard and maybe half a dozen threads in the hat, so go easy on the jackbolt torque or risk having more to drill out. With normal pressure (no more than 20 lbs/ft on torque) on the jack bolts, the hammer blows will "ring" the rotor and hat enough to break most bonds to the centering ring.
1) soaked in penetration fluid - ATF / Acetone mix
2) Gave it a few taps around the studs holes and centre hub
3) removed studs.
4) got two 8mm bots into the jack holes and tighten slowly.
5) Once a small gap opened up, more penetrating fliud.
6) Still very tight so left for 2 hours then tried again and she came free.
get some Zimmerman E coated discs they have a zinc coating and will not corrode like these did.
Not really sure why you removed the wheel studs
BUT if you hit them out with a hammer now is the time to see if the old lug nuts will thread on by hand, if not then it might be time for new studs
get some Zimmerman E coated discs they have a zinc coating and will not corrode like these did.
Not really sure why you removed the wheel studs
BUT if you hit them out with a hammer now is the time to see if the old lug nuts will thread on by hand, if not then it might be time for new studs
I recently had a hand operation so was still a bit weak and clumsy with the mallet. It was just easier to have them out, plus I did not even have to hit them, they just pushed out. Nuts go back on just fine.
The hub seems to spin pretty freely so do think I've damaged the bearings.
Make sure to surface the mounting area for the new rotors,
the cleaner the surface is the less radial play you have.
If the studs are corroded on their splines and they pushed out of the hub,
it might be time to replace them,
these studs are a press fit,
When fitting studs, they should be set with some flat washers and steel nuts,
or better yet pressed into place.


 01-05-2017, 05:17 PM