When you click on links to various merchants on this site and make a purchase, this can result in this site earning a commission. Affiliate programs and affiliations include, but are not limited to, the eBay Partner Network.
We recently did a very similar surgery in Jim C's '78, including tank removal. We had the luxury of working with the car on his lift, but from memory you'llwant a couple feet between rear of the bumper and the ground minimum. So maybe a bit more than a foot higher than the car normally sits on the ground.
Invest the time in pulling the hose off the tank outlet and recover as much fuel as you can there, if you haven't already. I was the luck recipient of the last dregs of fuel as I did the under-car part and Jim managed the filler-snout end.
The "balancing" hose between the filler-snout end and the top of the main tank section passes through a hole in what would normally be the right-side rear frame horn. Pull the fill neck "bib" and mating collar inside the gas cap body opening (remove the filler door and store it safely...), and get a screwdriver onto the filler-snout clamp so you can remove the hose. Check the price before you cut that hose, as it has a bend in it that somewhat precludes just using a piece of generic hose for replacement. Regardless, that hose needs to be disconnected and pulled through the hole in the body section before the tank can come down more than a short way.
Perhaps I'd recommend that you save dropping the tank for a time when you really need to. Knowing what we know now, we could have easily and more safely left the tank in Jim's car for the work we did. He may chime in here with his thoughts and perspective, since it was all on his toy budget and schedule.
It is amazing how absolutely helpful this board is!
Bob...thanks for the additional points. I'm pretty darn close to being in too deep to back out now (to your last paragraph), but after poking around underneath the car on lunch today I'm going to go ahead with it regardless.
I was looking at the cradle/the (mostly-lacking) padding, and I'd really like to get it cleaned up. The padding is almost all gone, there's a fair amount of rust throughout the cradle that I'd like to remove/repaint, I found a couple of other bolts that don't appear to be appropriate and there are some places where the foam around the fuel lines are degraded or missing.
Plus, while I was in that area, I've noticed that my rear bumper is missing ~70% of its supporting bolts/nuts, so that's going to come out too. I'm planning on cleaning it, fixing the spaghetti wires to the lights/license plate, replacing any missing seals/padding, realigning it (as it's currently askew), better attach the impact absorbers (currently askew as well), fix the muffler hanger (rigged up currently) and anything else that I manage to find.
Like many of our projects here, I didn't expect it to come to this. But, I'll have piece of mind that everything is buttoned up as it should.
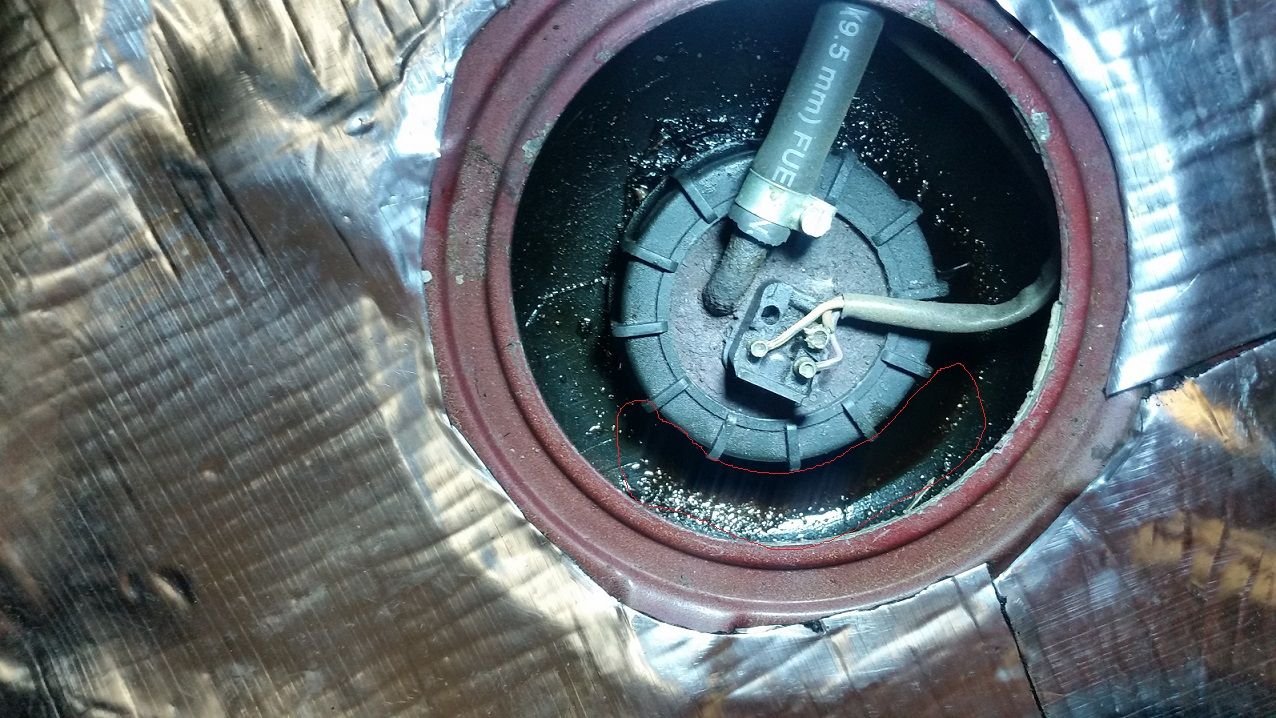
Got around to the cover on the sender unit last night, and found some gas puddled in the rear part of it. I suppose it's possible that it was filling up there then running down the bank of the tank to the FP/FF area, but that's of course only speculation.
New gasket on the way to go along with the other stuff...one more source identified and taken care of soon.

 09-21-2016, 02:30 AM