
Anyone have a camber gage that I can borrow?
 11-14-2007, 09:05 PM
#1
Drifting
Thread Starter

Anyone have a camber gage that I can borrow for a weekend? I used to borrow my buddy's but it went AWOL during the summer.

 12-18-2007, 02:07 AM
#3
Drifting
Thread Starter
UPDATE: Out of necessity and partly out of boredom I made it a project to build a camber gage based on the ones I have seen. What was surprising was I was able to find all the parts and put it togeather in an afternoon for under $40CA including the dreaded taxes, he!! if I was in the US I could build it for under $30USD. Bearing in mind that camber gages can range in price from $70USD to $600, some of which are inferior to the one I made. Most of you may be think twice about using this cheap tools, all I can say is "it works".
The basis of my BLUEJ Camber Gage is a basic angle finder that the Radio Controled Model Racing community have been using for years to adjust their cars.
Here is a list of parts and the store where you can buy them:
1 RPM Monster Camber Gage ($11-$18) @ Hobby Shop
1 Aluminum Angle Rod ($7) @ Canadian Tire
1 Precision Level (package of 2 for $7) @ Canadian Tire
2 Cabinet ***** ($2.40 each) @ Rona Hardware Center
2 Nuts, bolts and washers @ Rona Hardware Center
Last edited by Mark Lue; 12-18-2007 at 12:38 PM.
12-18-2007, 02:44 AM
#4
Drifting
Thread Starter
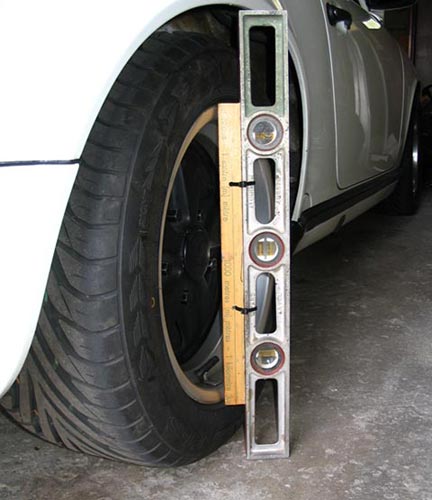
The accuracy of this tool will depend on making sure that everything is straight and square and that the stand offs (cabinet *****) were even in height, I was able to get the same exact camber angles with the tool if I used the tool upside down or right side up.
Measure and cut the rod to fit the largest wheel you intend to measure and drill holes to fit the different wheel sizes. Make sure the cabinet ***** you buy are long enough to serve as stand offs so the center of the wheel does not interfer with the operation of the camber gage. You could cheap out and use bolts but I opted for the "thinest" cabinet ***** I could find because they were smooth, so less chance of the scratching the finish on the wheels.
Glue the Bubble Level to the base of the angle finder (Monster Camber Gage). By coincidence the bubble level I bought fit the base of the angle finder perfectly as if I had planned it.
The angle finder screw sticks up a fair bit, to ensure that everything sits flush drill a relief hole and the two mounting holes for mounting the angle finder.
Secure the angle finder to the aluminum rod. NOTE: The angle finder can be mounted upside down so that the buble level can be easily read, if you do this you should reverse your prespective when reading the camber gage, essentially positive will become negative and negative becomes positive when the camber angle is read. I don't think I am explaining this well but if you understand what camber is you should have no trouble grasping what I trying to convey.
Last edited by Mark Lue; 12-18-2007 at 12:59 PM.
12-18-2007, 02:54 AM
#6
Drifting
Thread Starter
The camber gage is simple to use: Make sure the car is sitting on perfectly level ground or use pieces of wood under the tires to level out the car (front & rear). The basic operation to find the camber angle is to place the camber gage against the wheel and perpendicular to the ground, making sure you move the angle finder until the bubble is centered, then check the camber reading. Remember to be consistent - always center the bubble in the same location each time you take a measurement.
Last edited by Mark Lue; 12-18-2007 at 10:43 AM.
Trending Topics
12-18-2007, 07:25 PM
#8
Instructor
Join Date: Dec 2001
Location: Off grid in Eastern Ontario
Posts: 219
Received 0 Likes
on
0 Posts
Nice at-home fabrication.
The scale you are using might not give enough accuracy - it looks like it is calibrated in degrees.
If you search around a bit you should be able to find a vernier-type scale that will let you read in tenths of a degree.
The scale you are using might not give enough accuracy - it looks like it is calibrated in degrees.
If you search around a bit you should be able to find a vernier-type scale that will let you read in tenths of a degree.
12-18-2007, 08:25 PM
#9
Addict
Rennlist Member
Rennlist Member
Good job!
I use:
It sure doesn't look as cool as yours. I measure offset distance at the top in 32nds & plunk it into an Excel sheet that I got from somewhere. It converts 32nds into degrees to give the camber.
Alignment isn't tough but it is exacting. Next spring I am going to try tripoding for corner balance.
Ian
12-18-2007, 10:33 PM
#10
Drifting
Thread Starter
I am thinking of starting another project to create a cheaper version of the $400 Smart String Alignment System.
I've heard of "tripoding for corner balance" but I'm not that adventurous yet. I'm curous on how it's done so if you need a hand give me a shout.
 12-19-2007, 01:45 AM
#11
Rennlist Member
Join Date: Sep 2006
Location: Vancouver, BC, Canada
Posts: 1,968
Likes: 0
Received 0 Likes
on
0 Posts
Hey guys,
For those of you using bubble levels for this type of stuff, step #1 is as follows:
1) Make sure your bubble level is really level.
This is the easy way to check a simple bar level like the one zip tied to the ruler in the post a couple above this one.
Take the level and lay it on a counter, table, floor, etc in front of you. Make a very careful note of where the bubble is in relation to the black lines on the glass (edge of bubble 1mm away from line, etc). Now rotate the level 180 degrees (right for left, etc) and put it EXACTLY where it was before. Now look at the bubble in relation to the black lines. It should be the same 1mm away (or whatever it was). If it isn't the same, the level isn't level and you should adjust it or throw it away.
When I'm buying a new level you'll see me at the store checking them out on the floor or counter. Often I have to go through three or four to find one accurate enough for me. But I'm a picky SOB.
Cheers,
12-19-2007, 08:06 AM
#12
Addict
Rennlist Member
Rennlist Member
Mark
I've been aligning my own since I got the car. I use the above for camber & strings for toe.
For tripoding (aka weight jacking) see this thread on Pelican * CORNER balanced - numbers from this...and the weight. Another Corner Balancing, Weight Jacking, Tripod Method and Home ride height and corner balance success story
Ian
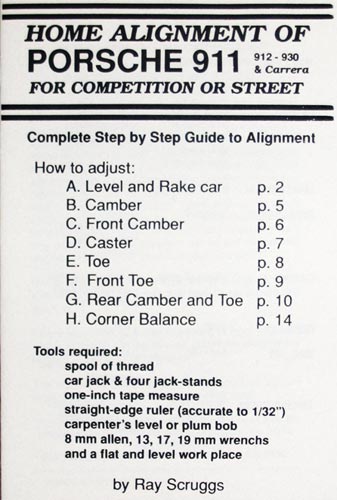
Here is the 911 alignment bible:
I've been aligning my own since I got the car. I use the above for camber & strings for toe.
For tripoding (aka weight jacking) see this thread on Pelican * CORNER balanced - numbers from this...and the weight. Another Corner Balancing, Weight Jacking, Tripod Method and Home ride height and corner balance success story
Ian
Here is the 911 alignment bible:
12-19-2007, 01:29 PM
#13
Drifting
Thread Starter
Hey guys,
For those of you using bubble levels for this type of stuff, step #1 is as follows:
1) Make sure your bubble level is really level.
This is the easy way to check a simple bar level like the one zip tied to the ruler in the post a couple above this one.
Take the level and lay it on a counter, table, floor, etc in front of you. Make a very careful note of where the bubble is in relation to the black lines on the glass (edge of bubble 1mm away from line, etc). Now rotate the level 180 degrees (right for left, etc) and put it EXACTLY where it was before. Now look at the bubble in relation to the black lines. It should be the same 1mm away (or whatever it was). If it isn't the same, the level isn't level and you should adjust it or throw it away.
When I'm buying a new level you'll see me at the store checking them out on the floor or counter. Often I have to go through three or four to find one accurate enough for me. But I'm a picky SOB.
Cheers,
For those of you using bubble levels for this type of stuff, step #1 is as follows:
1) Make sure your bubble level is really level.
This is the easy way to check a simple bar level like the one zip tied to the ruler in the post a couple above this one.
Take the level and lay it on a counter, table, floor, etc in front of you. Make a very careful note of where the bubble is in relation to the black lines on the glass (edge of bubble 1mm away from line, etc). Now rotate the level 180 degrees (right for left, etc) and put it EXACTLY where it was before. Now look at the bubble in relation to the black lines. It should be the same 1mm away (or whatever it was). If it isn't the same, the level isn't level and you should adjust it or throw it away.
When I'm buying a new level you'll see me at the store checking them out on the floor or counter. Often I have to go through three or four to find one accurate enough for me. But I'm a picky SOB.
Cheers,
12-19-2007, 01:53 PM
#14
Drifting
Thread Starter