

Replacing Rear Hatch Shocks


 11-12-2011, 07:35 PM
#18
Addict
Rennlist Member
Rennlist Member
Thread Starter
Just finished the install... Took about 3 hours total and I didn't rush it. Not too bad a job, but not what I would call easy either... Probably about a 4 on a 1-10 scale. I took some pictures and will try to put them together for all soon. For now, I am just happy that my rear hatch and glass will stay up unassisted! 
 11-12-2011, 11:14 PM
#21
Addict
Rennlist Member
Rennlist Member
Why does Porsche still use these things? The always fail. Seems like in the last 50 years one of their genius engineers would have come up with a better idea.
11-13-2011, 12:35 AM
#22
Addict
Rennlist Member
Rennlist Member
better yes,cheaper no.
11-13-2011, 01:13 AM
#23
Rennlist Member

Add me to the list of slackers waiting for your pics before considering whether to tackle this or not. If you annotate your pics with instructions, arrows, callouts, etc., I'll send you a SBUX gift card. BTW, what was the total cost of parts? Not including beer?
11-13-2011, 03:29 PM
#24
Addict
Rennlist Member
Rennlist Member
Thread Starter
Ok... Here goes...
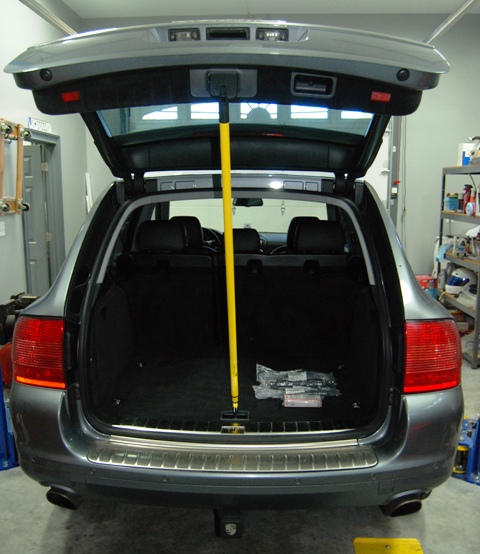
Picture #1 - I used an adjustable pole from a light removal and dusting kit to prop the rear hatch open. It fit perfectly into the recess for the spare tire handle and under the latch. Please use caution here! If you were to knock the support out while your legs (or other parts) are dangling out the rear, you could/would be severly injured!
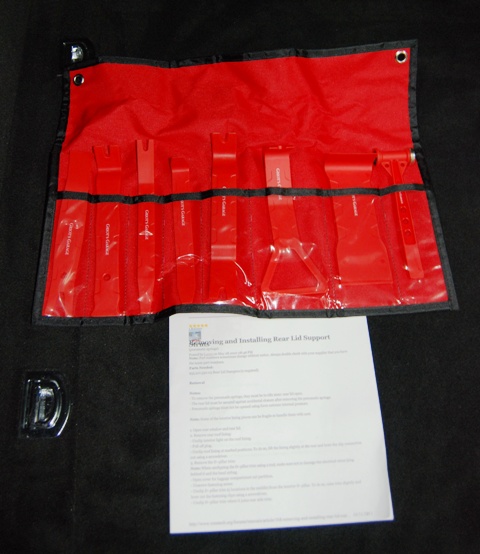
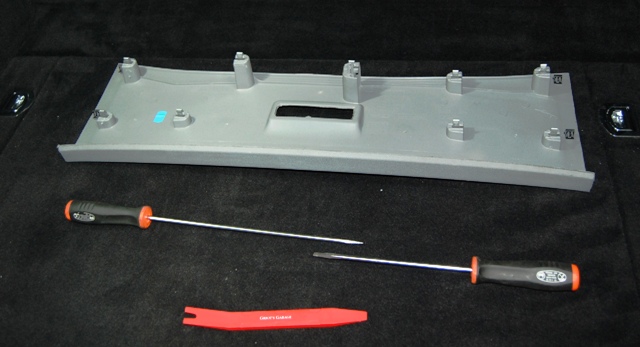
Picture # 2 and #3 are just the tools and the parts used... The parts were ordered from Sunset at a cost of $170.94 + shipping. The tools needed include a variety of screwdrivers (extra long drivers are helpful) for prying trim clips free, trim tools for the same, a T-20 torx for the grab handle screws and the C-pillar trim screws, and a small Phillips for the D-Trim screws. The instructions I used were printed from Renntech.org ( http://www.renntech.org/forums/tutor...-hatch-struts/ ). I beleive you must be a member there to view the forums... I also used the video at http://www.renntech.org/forums/video...hatch-springs/ ... If you aren't a member at Renntech, you should definitely consider it! Both the DIYs were very helpful!
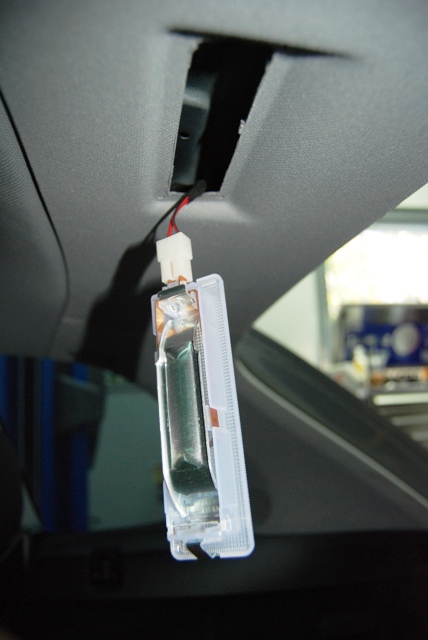
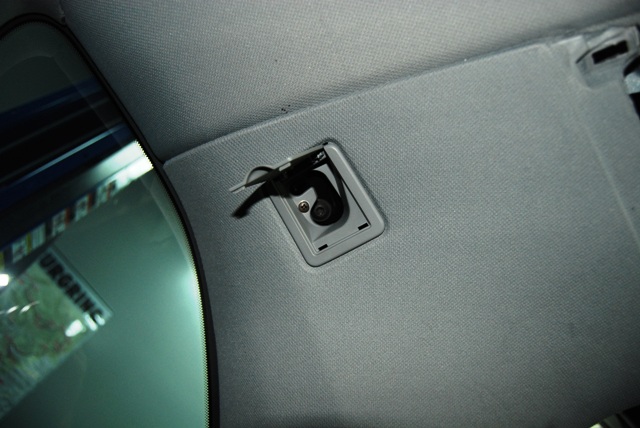
Picture #4 - 6 show the Rear Trim Valance that must be removed... First remove the light by gently prying the driver's side down with a small screwdriver, then remove the electrical connection by simply pulling it free (no latch). To get the valance free, just pull down on it from the back edge and look underneath. There are 9 large clips that are best removed by inserting a long screwdriver under the edge and gently prying it free.
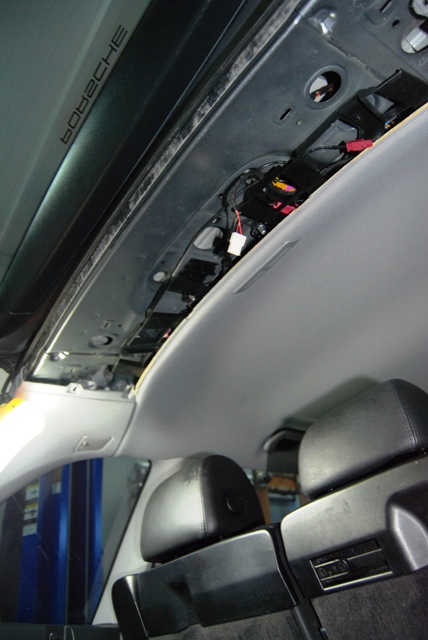
Pictures 7 - 10 show the D-pillar and C-pillar trim being removed.
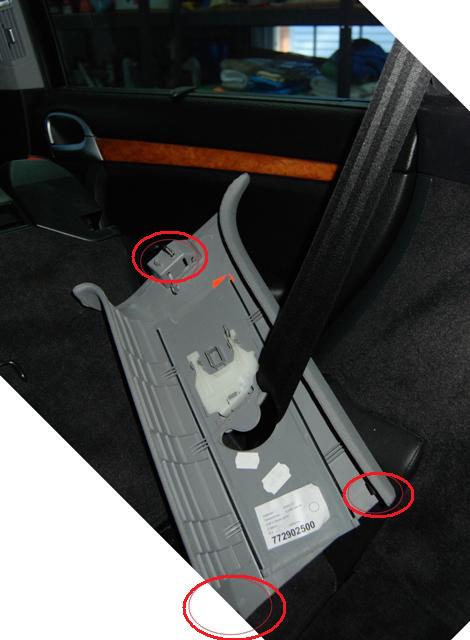
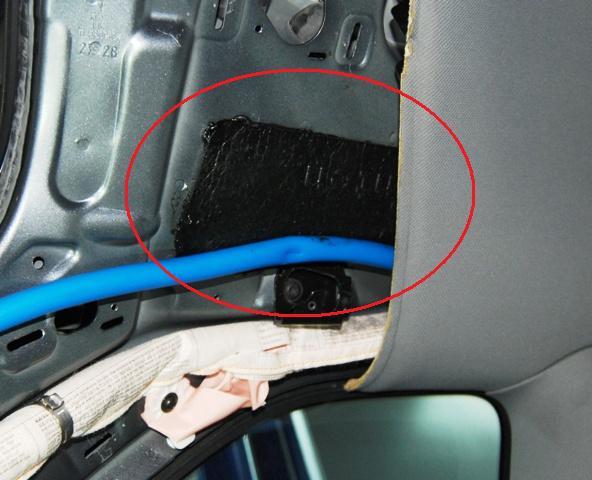
The D-pillar trim has a small phillips screw behind the small door at the top of the panel, 9 large clips, three smaller ones along the bottom edge, and an electrical connection to the small speaker (some may not have this). Unfortunately, I discovered that the two clips at the bottom front of my panel were previously broken off (within blue circle) by the technician who did this job some 4 years ago (doesn't that just **** you off?). They are a bit fragile, so pry them free first.
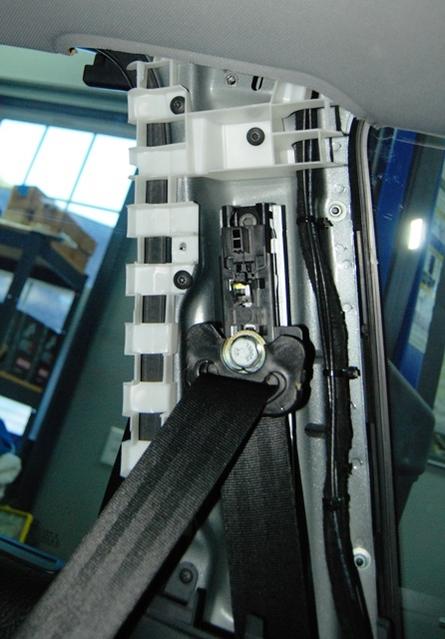
The C-pillar trip has a T-20 torx screw behind the Airbag trim cover, as well as two small clips at the bottom (one at the front corner, one at the rear). Pull this panel free and allow it to just slide down the seatbelt... The only reason you are removing this trim is to allow the headliner to be gently pryed down at the rear.
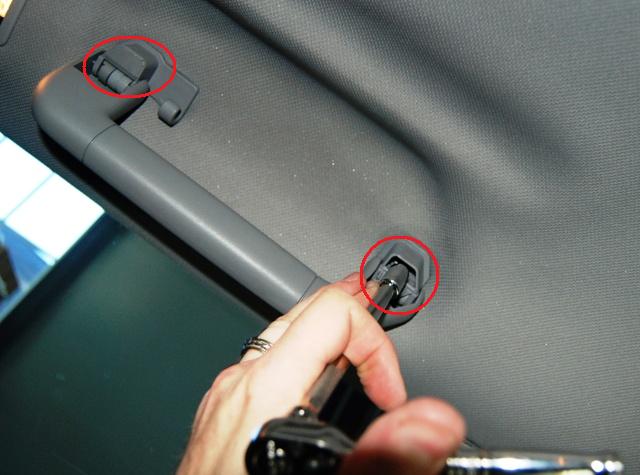
Picture 11 shows the grab handle being removed... Do this on both sides. The screws are T-20 torx.
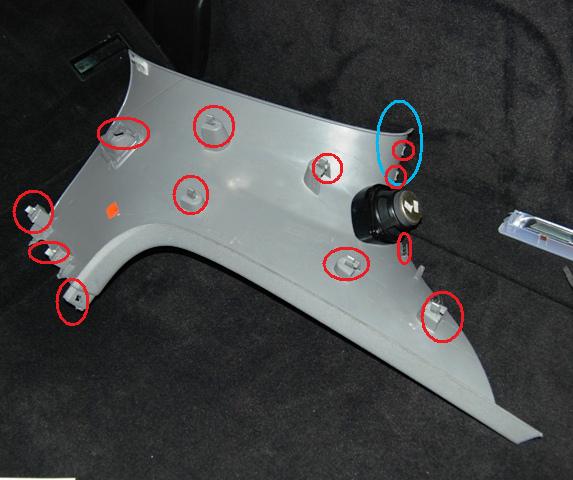
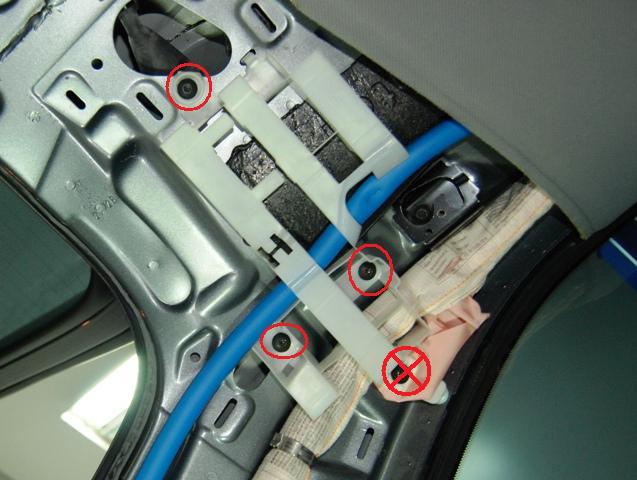
Picture #12 is of the white plastic "supports" at the rear corners that must both be removed. There are three T-20 torx that hold this piece in place. NOTE: You do not need to remove the torx holding the airbag in place (see red X). Remove both of these and set them aside...
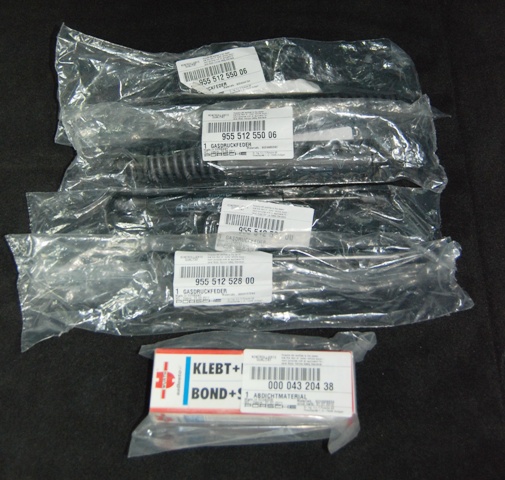
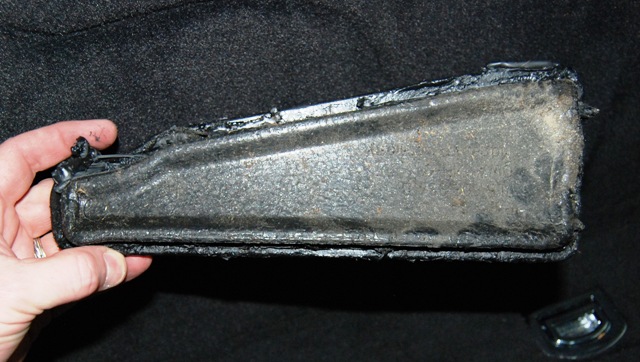
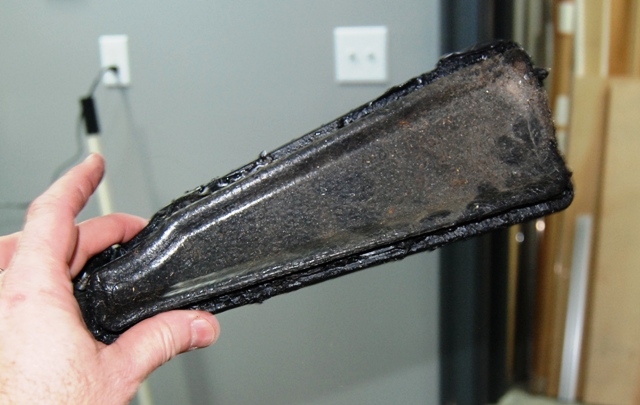
Pictures 13 - 15 show the "deformable elements" that now must be removed. They are rigid foam pieces that seal the struts mounting locations from the interior so that any water that might find its way into the mounting cavity does not intrude into the interior. The "glue" used to hold these in is a pliable, sticky, mess, but you must remove it so that you reapply the new adhesive properly. Some have suggested that you could just use silicon in place of the recommended adhesive. That might well work just fine, but I purchased the recommended stuff when I bought the parts, and I am glad that I did... It is messy to work with, but the way it remains flexible tells me that it is better suited for the task.
Since I can only upload 15 files per post, I will continue with a second post...
Picture #1 - I used an adjustable pole from a light removal and dusting kit to prop the rear hatch open. It fit perfectly into the recess for the spare tire handle and under the latch. Please use caution here! If you were to knock the support out while your legs (or other parts) are dangling out the rear, you could/would be severly injured!
Picture # 2 and #3 are just the tools and the parts used... The parts were ordered from Sunset at a cost of $170.94 + shipping. The tools needed include a variety of screwdrivers (extra long drivers are helpful) for prying trim clips free, trim tools for the same, a T-20 torx for the grab handle screws and the C-pillar trim screws, and a small Phillips for the D-Trim screws. The instructions I used were printed from Renntech.org ( http://www.renntech.org/forums/tutor...-hatch-struts/ ). I beleive you must be a member there to view the forums... I also used the video at http://www.renntech.org/forums/video...hatch-springs/ ... If you aren't a member at Renntech, you should definitely consider it! Both the DIYs were very helpful!
Picture #4 - 6 show the Rear Trim Valance that must be removed... First remove the light by gently prying the driver's side down with a small screwdriver, then remove the electrical connection by simply pulling it free (no latch). To get the valance free, just pull down on it from the back edge and look underneath. There are 9 large clips that are best removed by inserting a long screwdriver under the edge and gently prying it free.
Pictures 7 - 10 show the D-pillar and C-pillar trim being removed.
The D-pillar trim has a small phillips screw behind the small door at the top of the panel, 9 large clips, three smaller ones along the bottom edge, and an electrical connection to the small speaker (some may not have this). Unfortunately, I discovered that the two clips at the bottom front of my panel were previously broken off (within blue circle) by the technician who did this job some 4 years ago (doesn't that just **** you off?). They are a bit fragile, so pry them free first.
The C-pillar trip has a T-20 torx screw behind the Airbag trim cover, as well as two small clips at the bottom (one at the front corner, one at the rear). Pull this panel free and allow it to just slide down the seatbelt... The only reason you are removing this trim is to allow the headliner to be gently pryed down at the rear.
Picture 11 shows the grab handle being removed... Do this on both sides. The screws are T-20 torx.
Picture #12 is of the white plastic "supports" at the rear corners that must both be removed. There are three T-20 torx that hold this piece in place. NOTE: You do not need to remove the torx holding the airbag in place (see red X). Remove both of these and set them aside...
Pictures 13 - 15 show the "deformable elements" that now must be removed. They are rigid foam pieces that seal the struts mounting locations from the interior so that any water that might find its way into the mounting cavity does not intrude into the interior. The "glue" used to hold these in is a pliable, sticky, mess, but you must remove it so that you reapply the new adhesive properly. Some have suggested that you could just use silicon in place of the recommended adhesive. That might well work just fine, but I purchased the recommended stuff when I bought the parts, and I am glad that I did... It is messy to work with, but the way it remains flexible tells me that it is better suited for the task.
Since I can only upload 15 files per post, I will continue with a second post...
Last edited by Michael S.; 11-13-2011 at 05:07 PM.
11-13-2011, 04:05 PM
#25
Addict
Rennlist Member
Rennlist Member
Thread Starter
Continued...
After cleaning up the adhesive from both the deformable elements and from the car itself, it is now time to actually replace the struts (that is why we are here, right?) I purchased all 4 struts (2 for the glass, and 2 for the hatch). The struts for the glass were only an additional $32.14, so it didn't make sense to me to go to all this trouble and not replace everything...
Pictures 16 - 18 show the mounting points for the struts... They are difficult to see and to get to (and to photograph), but they are actually relatively easy to replace. You might want to enlist the help of a friend or spouse here, as it is easier to reinstall the struts if you can lift up on the hatch to precisely align the ball mounts. I removed all four struts before reinstalling any...
The old struts are best removed by either prying the small clip back from the ball mount (look at the new parts and you will see what I am talking about), or by simply prying them off the ball mounts with a large screwdriver.
To install the new parts, you simply apply moderate pressure to the rear of the ball socket and they will pop on... It may be easier to gently pry the retaining clips back before doing this, but then you must be sure the clips return to the correct position or the socket may pop off the ball. I simply popped them on.
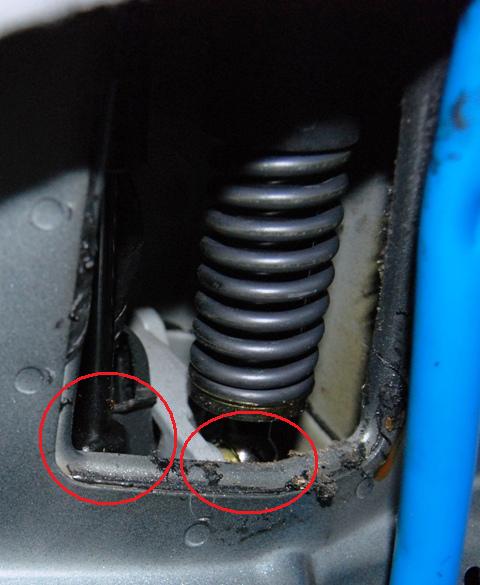
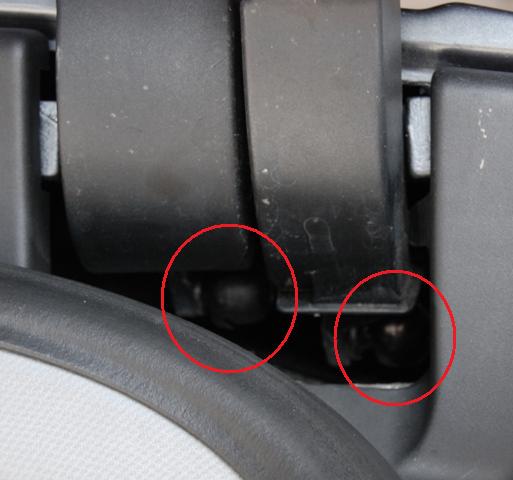
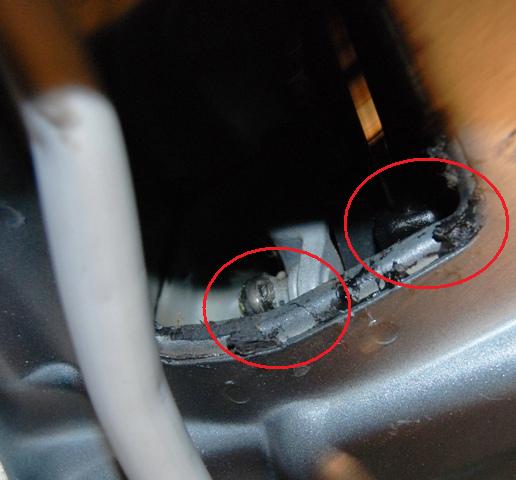
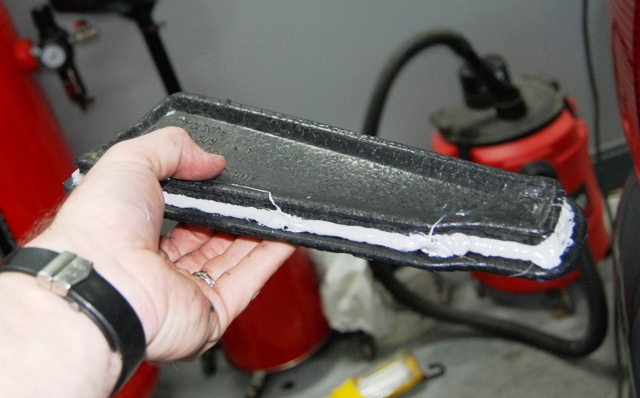
Photo #19 just shows the deformable element with the new adhesive applied before being pressed into place...
By the time I got the new struts installed, I was pretty tired... It's not that this task is particularly difficult... It's just that working over you head, in tight spaces makes for a tedious and tiring job. Of course, beer helps! As would the company of an accomplice... Unfortunately, I was going it alone on this one.
Reassembly was just the reverse of disassembly... Once you get the panels in place, a sharp rap at the right spot usually popped the clips into place. There were no problems encountered in reassembly, and I was very glad that this was done!
Start to finish the job took me about 3 hours... an hour of which was spent removing the old adhesive from the car and from the foam inserts. It wasn't all that bad, and should last another 4 or 5 years. By that time, we will be over 200k miles with the Cayenne (hopefully). It was deifnitely worth the 2-3 hours of shop time the local dealer would have charged me!
Hope this helps... Feel free to PM me or post any questions...
Cheers!
After cleaning up the adhesive from both the deformable elements and from the car itself, it is now time to actually replace the struts (that is why we are here, right?) I purchased all 4 struts (2 for the glass, and 2 for the hatch). The struts for the glass were only an additional $32.14, so it didn't make sense to me to go to all this trouble and not replace everything...
Pictures 16 - 18 show the mounting points for the struts... They are difficult to see and to get to (and to photograph), but they are actually relatively easy to replace. You might want to enlist the help of a friend or spouse here, as it is easier to reinstall the struts if you can lift up on the hatch to precisely align the ball mounts. I removed all four struts before reinstalling any...
The old struts are best removed by either prying the small clip back from the ball mount (look at the new parts and you will see what I am talking about), or by simply prying them off the ball mounts with a large screwdriver.
To install the new parts, you simply apply moderate pressure to the rear of the ball socket and they will pop on... It may be easier to gently pry the retaining clips back before doing this, but then you must be sure the clips return to the correct position or the socket may pop off the ball. I simply popped them on.
Photo #19 just shows the deformable element with the new adhesive applied before being pressed into place...
By the time I got the new struts installed, I was pretty tired... It's not that this task is particularly difficult... It's just that working over you head, in tight spaces makes for a tedious and tiring job. Of course, beer helps! As would the company of an accomplice... Unfortunately, I was going it alone on this one.
Reassembly was just the reverse of disassembly... Once you get the panels in place, a sharp rap at the right spot usually popped the clips into place. There were no problems encountered in reassembly, and I was very glad that this was done!
Start to finish the job took me about 3 hours... an hour of which was spent removing the old adhesive from the car and from the foam inserts. It wasn't all that bad, and should last another 4 or 5 years. By that time, we will be over 200k miles with the Cayenne (hopefully). It was deifnitely worth the 2-3 hours of shop time the local dealer would have charged me!
Hope this helps... Feel free to PM me or post any questions...
Cheers!
 11-13-2011, 06:04 PM
#29
Addict
Rennlist Member
Rennlist Member
Thread Starter
The red tools are a trim removal toolkit from Griot's Garage...
http://www.griotsgarage.com/product/...ortby=ourPicks
They really aren't necessary, as I ended up using a screwdriver for most of the removal tasks... But, when you are dealing with easily scratched trim, the plastic tools do help...
http://www.griotsgarage.com/product/...ortby=ourPicks
They really aren't necessary, as I ended up using a screwdriver for most of the removal tasks... But, when you are dealing with easily scratched trim, the plastic tools do help...
11-13-2011, 10:45 PM
#30
Racer
Join Date: Aug 2011
Location: Sydney, NSW, Australia.
Posts: 425
Likes: 0
Received 3 Likes
on
3 Posts
Nice work with the photos! I actually did my struts without taking off the grab handle or "C" pillar trim. Also, with the hatch hinges, you can pull off the black surrounding trim off quite easily which gives you more room to play (not the trim on the actual hinges but the trim below the hinges).
Also, my parts guy suggested I buy new foam "deformable lements" at the same time I bought the struts. They came in a sealed packet with the adhesive already applied. Made the job a bit easier and less messy. There weren't expensive.
Oh, I reckon you definitely need a second person when clicking in the new struts too - I found it near impossible and ultimately had to put the wife to work to push up the hatch as I clicked in the heads.