DIY: Panamera turbo spark plug / coil replacement
 09-25-2018, 03:38 PM
#1

Here is a DIY for spark plug replacement. If your coils need changing, use this DIY as well.
Hope it helps others.
This is a simple maintenance item. Dealer will charge upwards of 500 dollars. you can do this spending about $60 on plugs, and few hours of time.
Think how much beer money you will have left over.
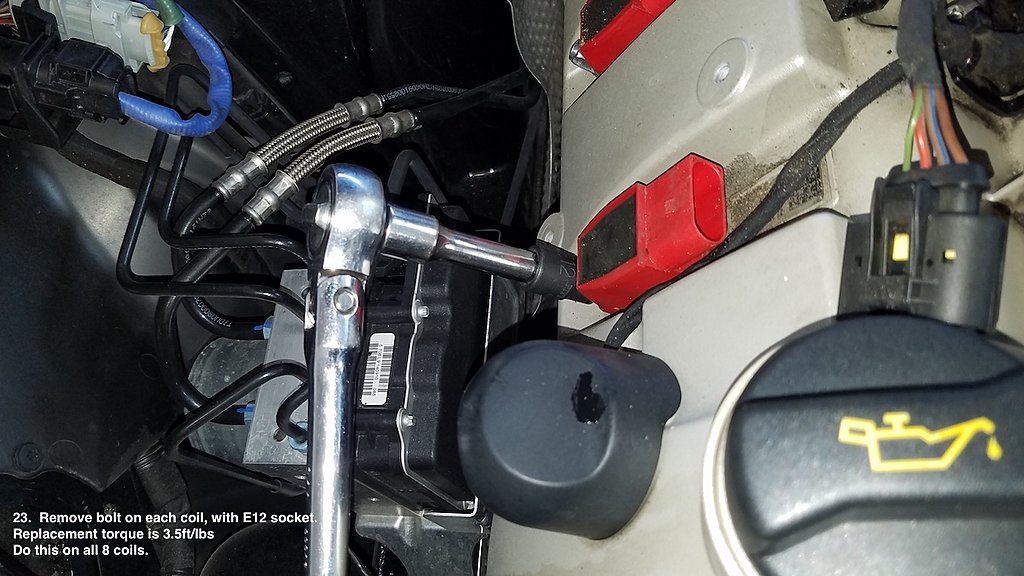
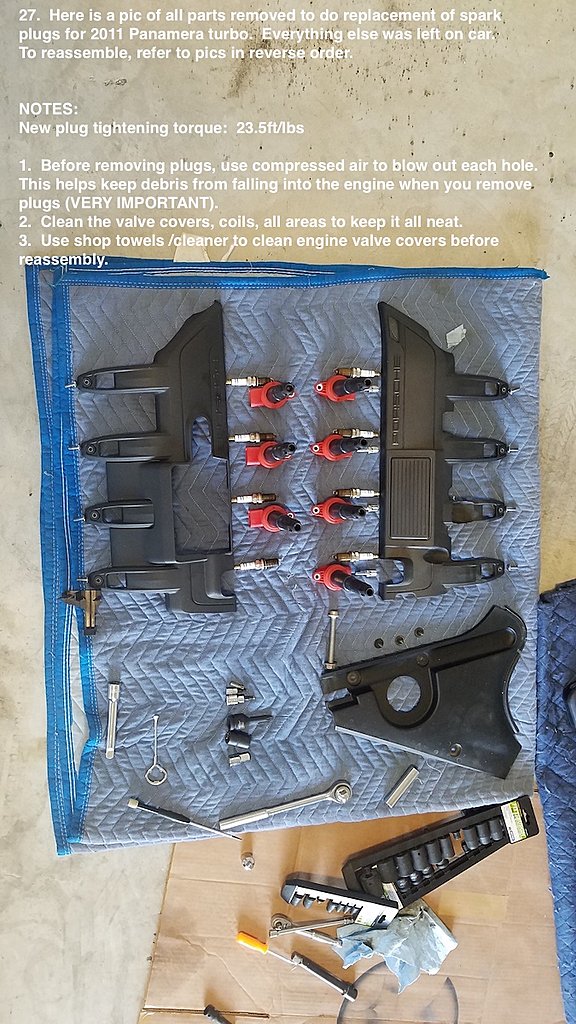
Coil bolt torque: 3.5ft/lbs
New plug torque: 23ft/lbs (old plug reinstall torque is 19ft/lbs)
If you don't normally work on cars, expect to take about half day. Still real easy to do, just take your time, don't rush.
If you do other DIY stuff on the car, I would estimate 2-3 hours with cleaning.
Subsequent replacement would be about an hour and an half at most.
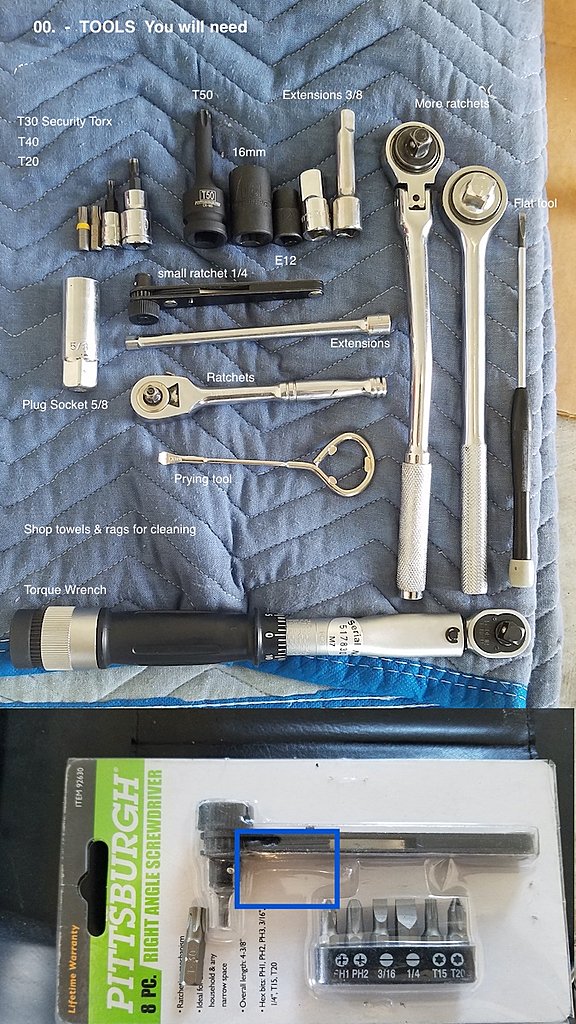
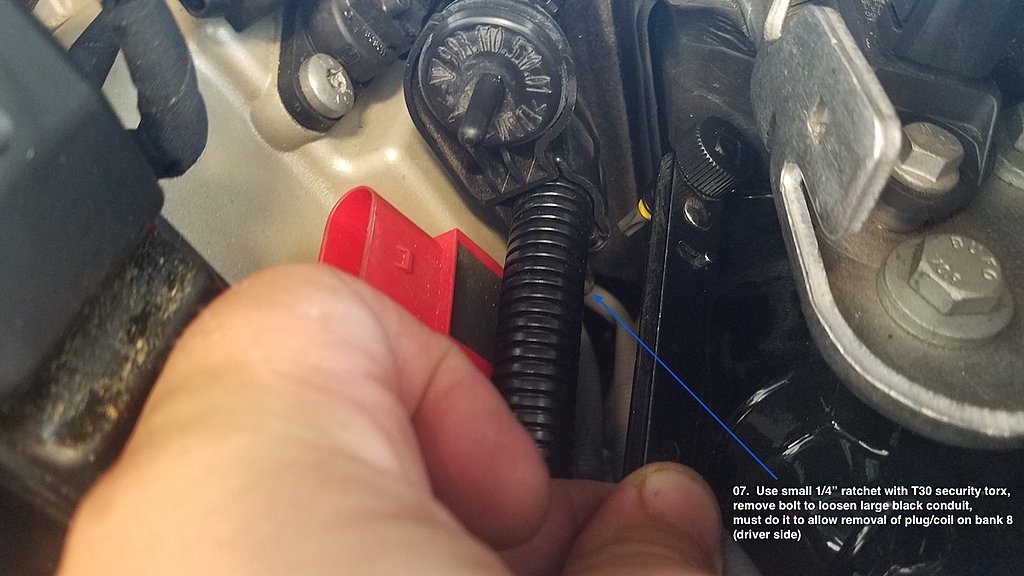
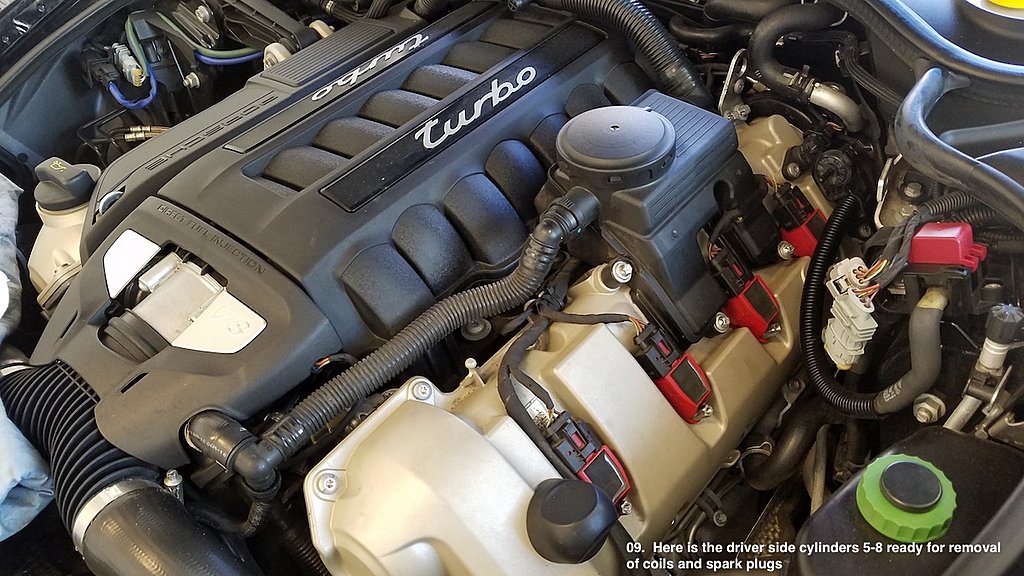
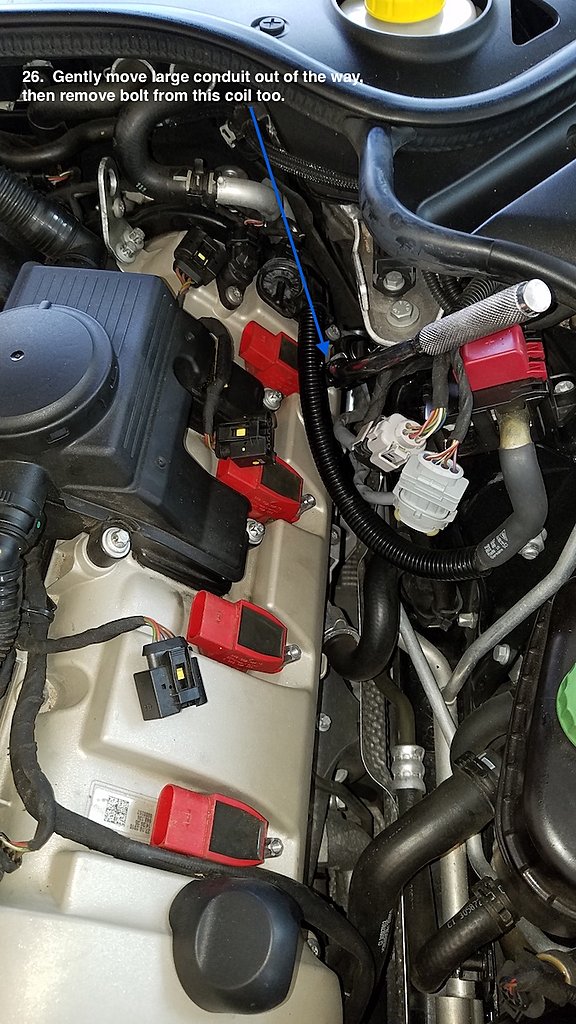
Wobble extension needed for the job, to remove rear most plugs (cyliner 4 and 8.) Those are the nearest to passenger and driver.
The way to use it is to plug wobble extension into plug socket, then plug in extension into the wobble, then insert that into the hole. Then attache ratchet and loosen up.
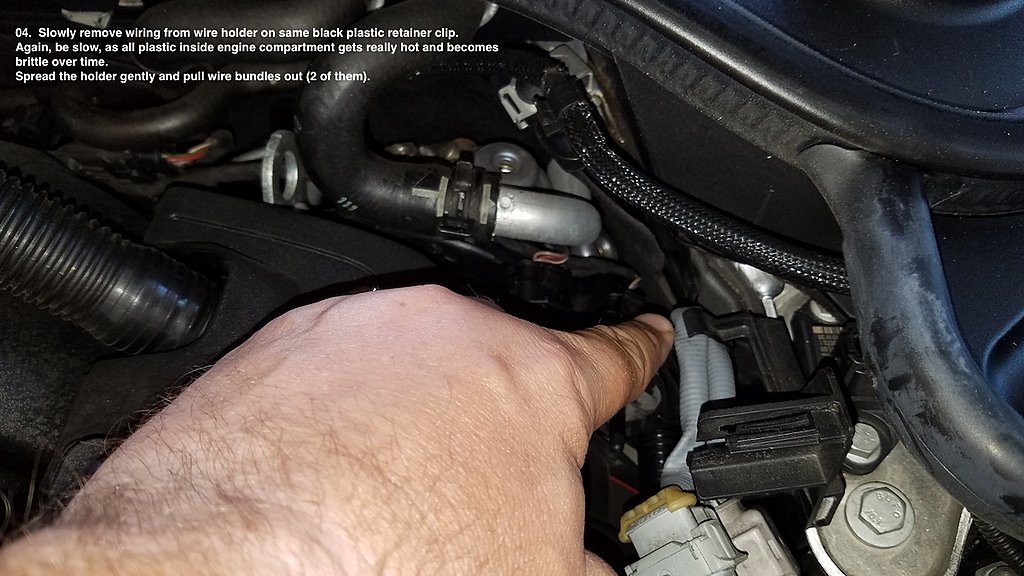
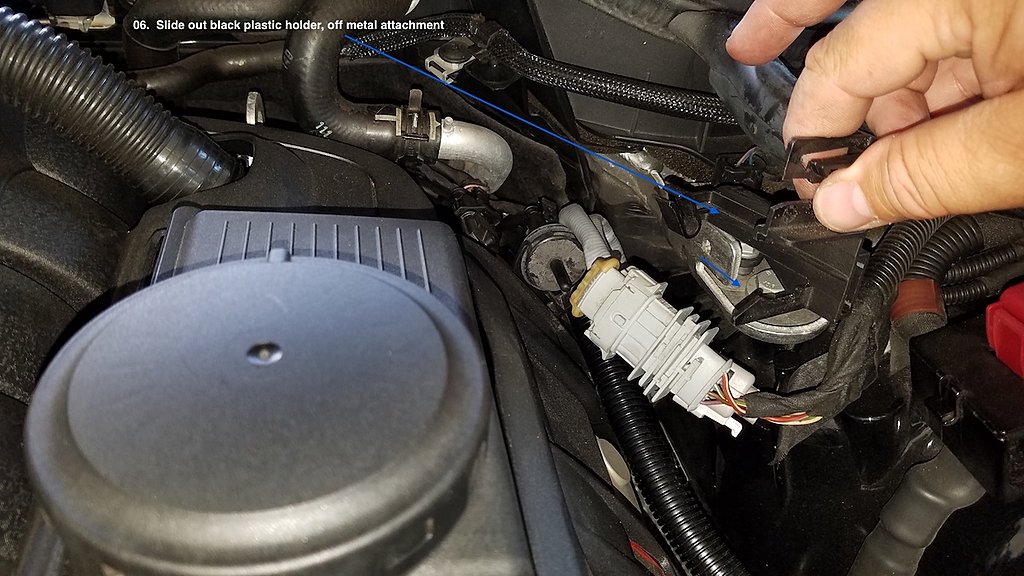
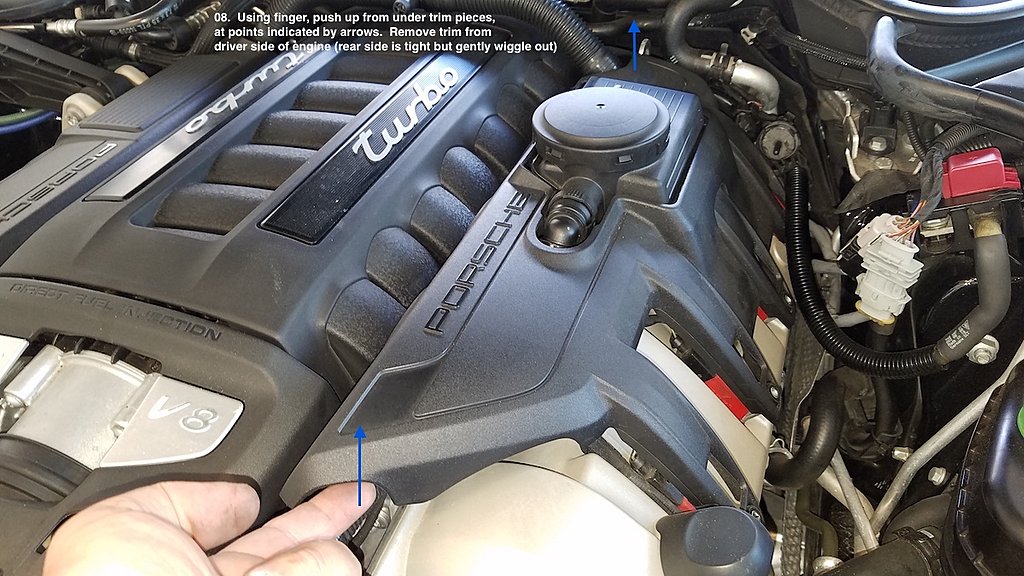
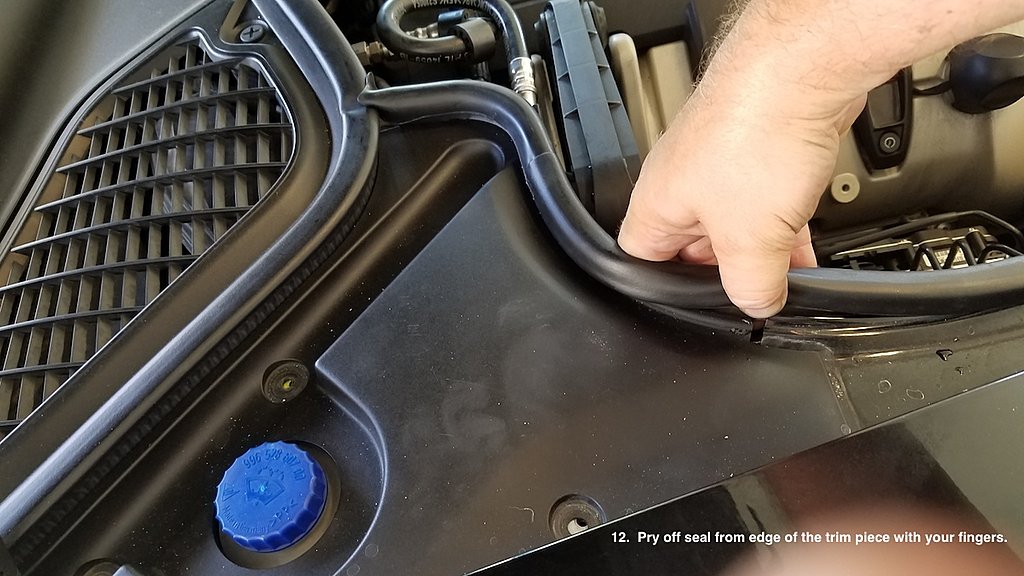
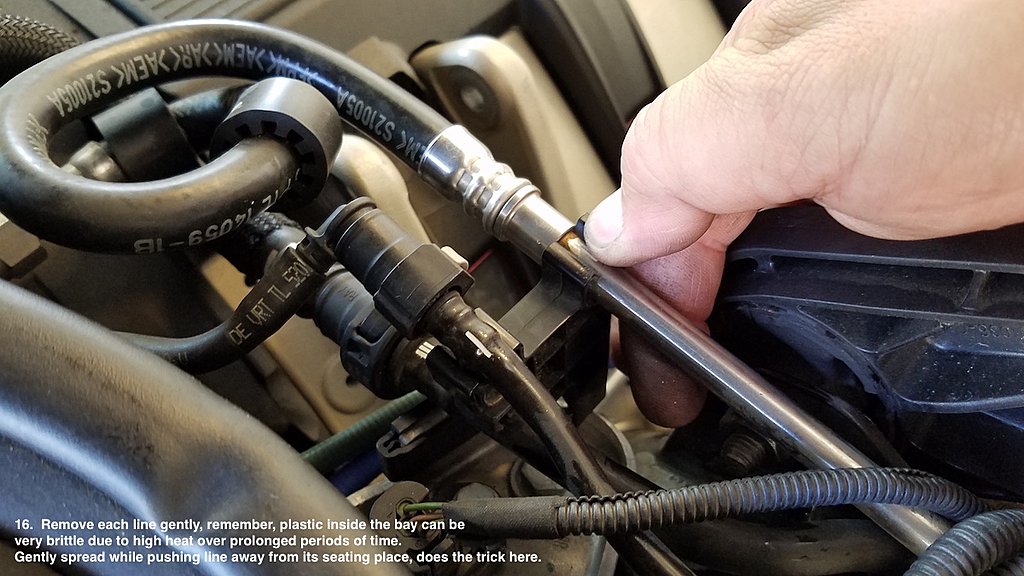
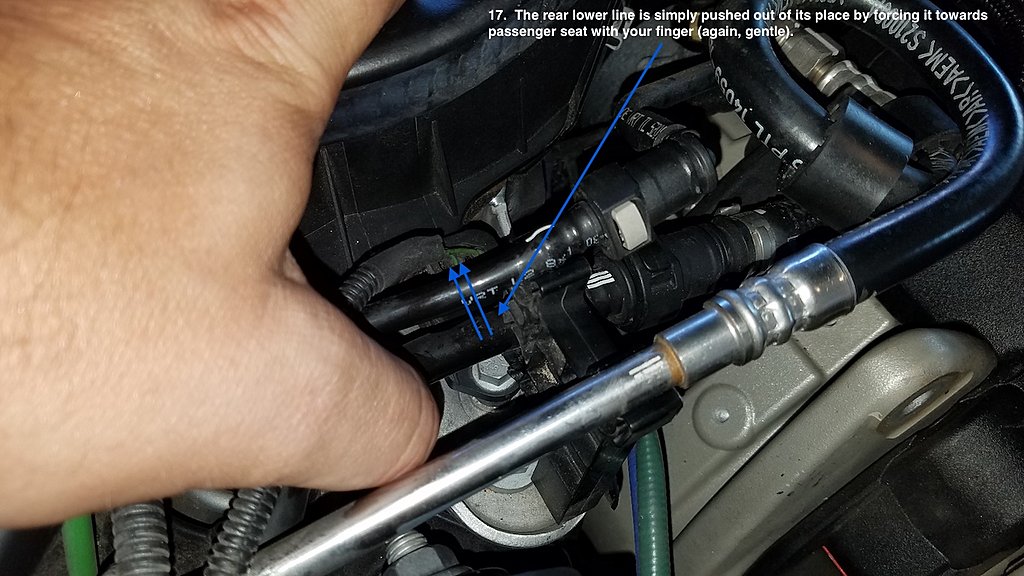
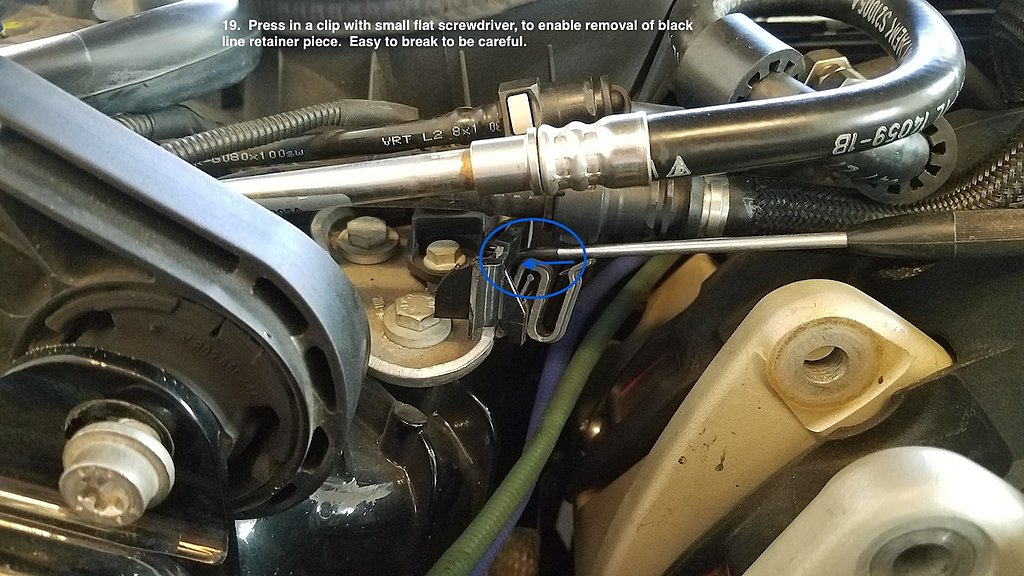
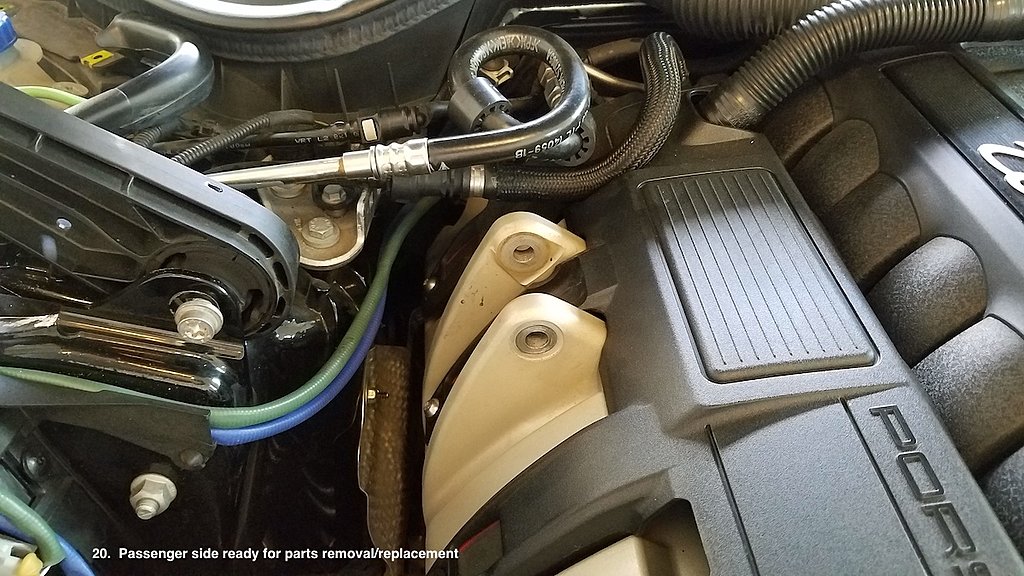
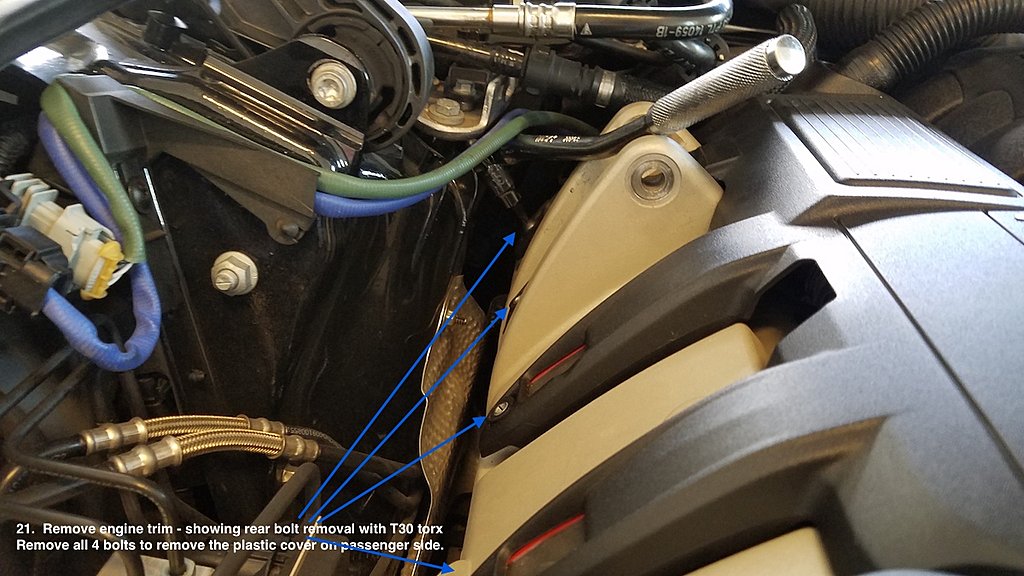
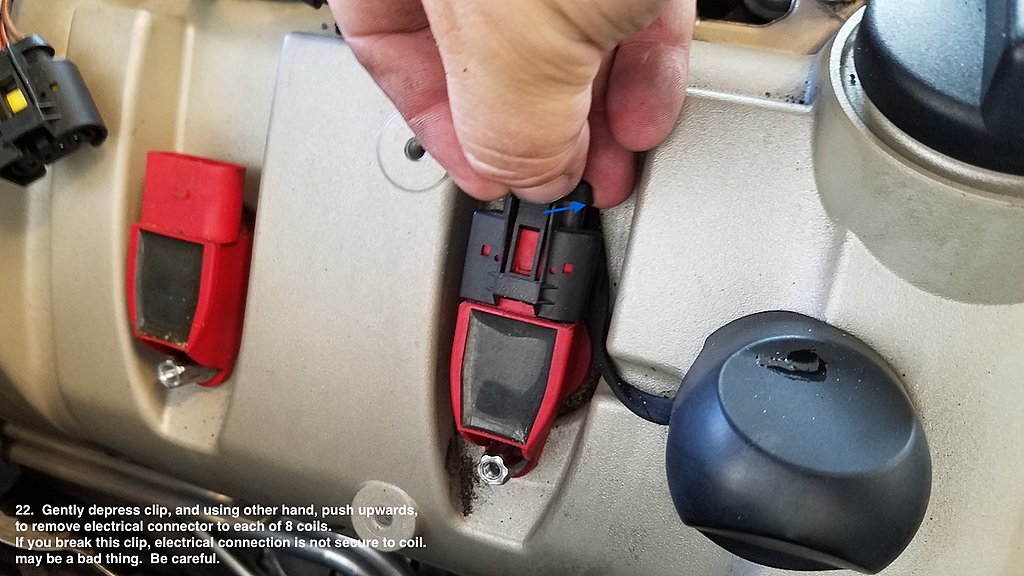
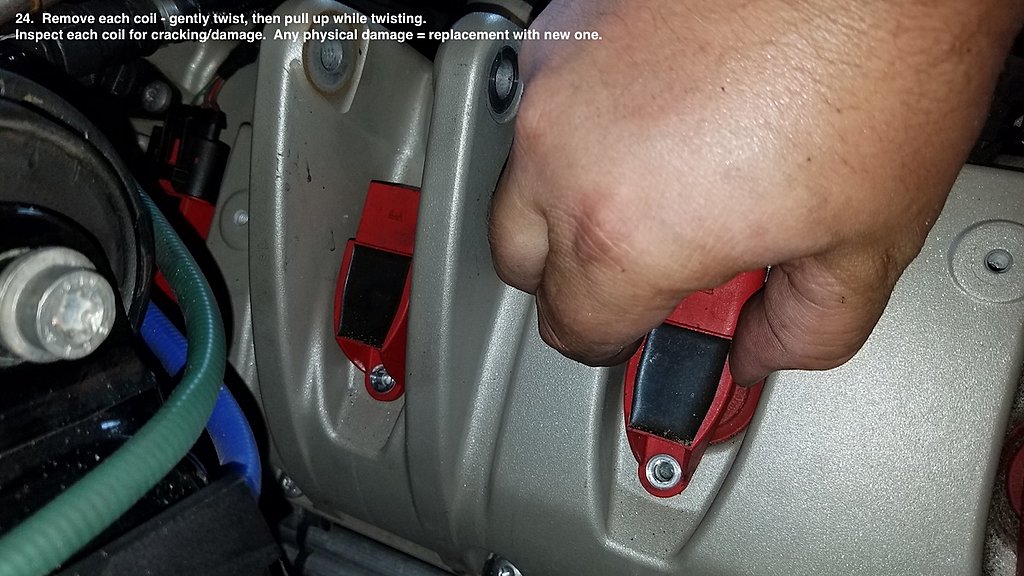
Follow pics in their order and look for instructions in them.
EDITS:
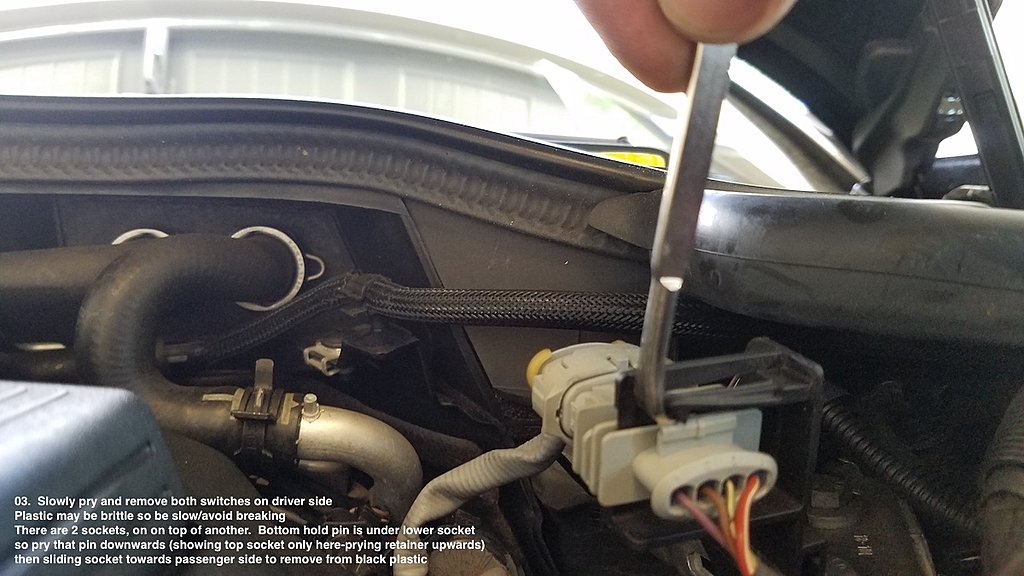
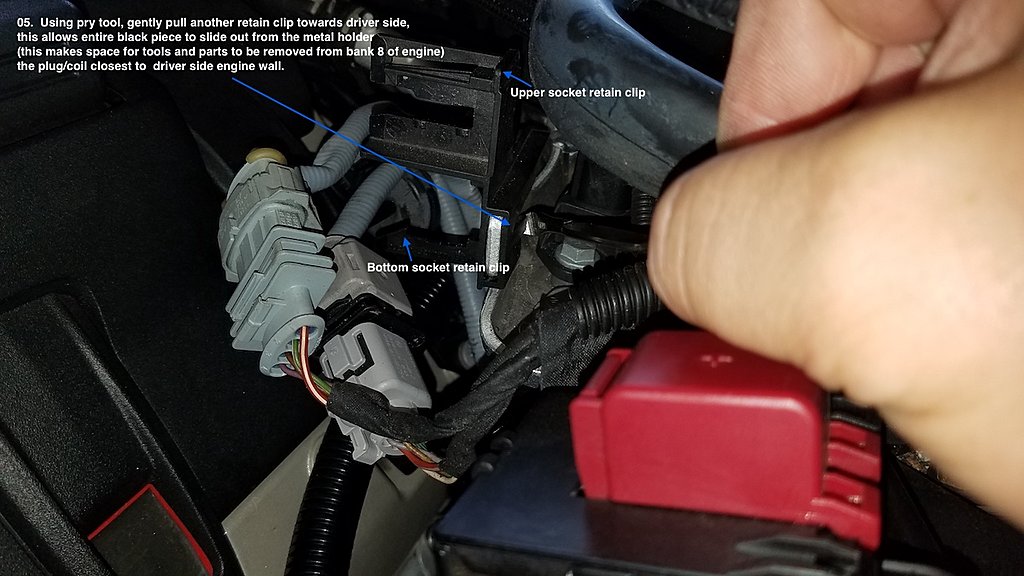
- In Photo 5 - the paint can opener prying tool, is used to gently pull a locking tab away from metal bracket, so plastic can slide off it. Look at photo carefully to see this.
SPARK PLUG & IGNITION COILS INFO:
Spark Plugs:
Bosch
FR6NPP332 - OEM gap: 0.031
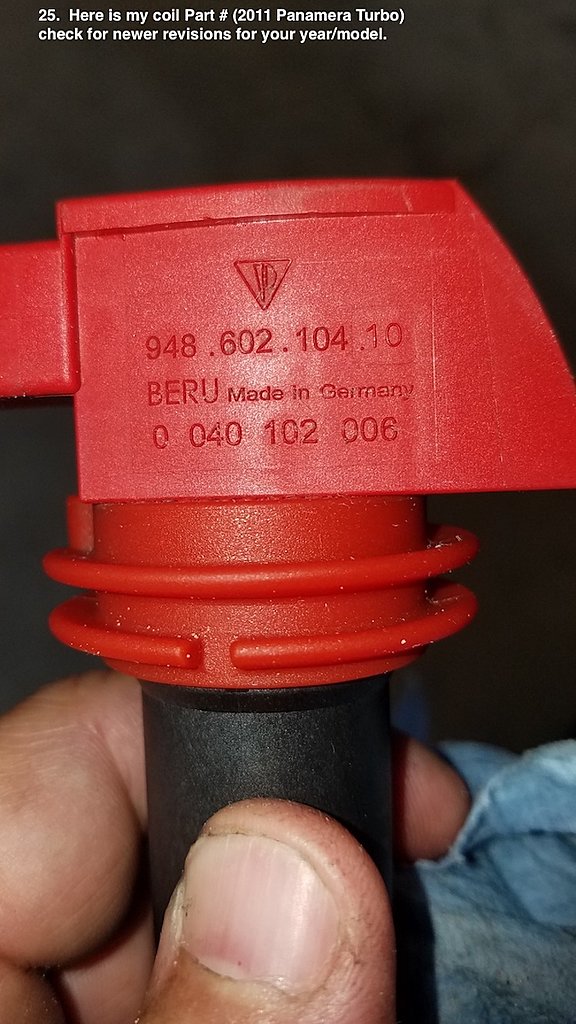
Ignition Coils:
Mfg: Beru
PN: ZSE 042 from Beru website - 2010-2013 Panamera Turbo (500HP engines).
Porsche PN for coil is: 948 602 104 14
Good luck.

Hope it helps others.
This is a simple maintenance item. Dealer will charge upwards of 500 dollars. you can do this spending about $60 on plugs, and few hours of time.
Think how much beer money you will have left over.
Coil bolt torque: 3.5ft/lbs
New plug torque: 23ft/lbs (old plug reinstall torque is 19ft/lbs)
If you don't normally work on cars, expect to take about half day. Still real easy to do, just take your time, don't rush.
If you do other DIY stuff on the car, I would estimate 2-3 hours with cleaning.
Subsequent replacement would be about an hour and an half at most.
Wobble extension needed for the job, to remove rear most plugs (cyliner 4 and 8.) Those are the nearest to passenger and driver.
The way to use it is to plug wobble extension into plug socket, then plug in extension into the wobble, then insert that into the hole. Then attache ratchet and loosen up.
Follow pics in their order and look for instructions in them.
EDITS:
- In Photo 5 - the paint can opener prying tool, is used to gently pull a locking tab away from metal bracket, so plastic can slide off it. Look at photo carefully to see this.
SPARK PLUG & IGNITION COILS INFO:
Spark Plugs:
Bosch
FR6NPP332 - OEM gap: 0.031
Ignition Coils:
Mfg: Beru
PN: ZSE 042 from Beru website - 2010-2013 Panamera Turbo (500HP engines).
Porsche PN for coil is: 948 602 104 14
Good luck.
Last edited by ciaka; 10-30-2018 at 09:17 PM.
 09-25-2018, 07:05 PM
#2
Burning Brakes
As always beautiful write up!
09-29-2018, 01:56 AM
#4
 12-26-2018, 01:21 AM
#7
3rd Gear

Wanted to thank you for the great step by step instructions. I just replaced the spark plugs on my 2013 GTS today, and the car is running well. The only step that I could not duplicate was sliding the plastic retainer off of the metal piece next to the closest plug to the firewall on the driver�s side. I ended up breaking it when I put everything back together, but it is no big deal to find another way to keep those cables in place.
Huge thanks for the instructions!
Huge thanks for the instructions!
Trending Topics
01-14-2019, 06:04 PM
#8
6th Gear

Join Date: Jan 2019
Location: Santa Fe, New Mexico
Posts: 6
Likes: 0
Received 0 Likes
on
0 Posts
I really like your write up! I have a 2010 4S and the instructions were especially helpful for removing both rear coils.
I had a vibration issue during startup that would last 30 to 90 seconds, then smooth out. Also was getting DTC code P0421 (Warm up catalytic converter efficiency below threshold on Bank 1) after a day of driving. I changed coils and plugs on the drivers side first hoping to solve the P0421. After the work, I started the motor and was disappointed to still have the startup vibration issue? I then did the coils and plugs on the passenger side, which solved the startup vibration. Have not driven enough to see if P0421 went away.
I would like to know which coil and or plug was causing the issue. Does anyone know the way to measure resistance on the coils? Primary and secondary resistances, which pins are which?
Thanks,
Patrick in Sant Fe, NM
2010 Panamera 4S, 78k miles
2014 Cayenne S, 66k miles


 02-15-2019, 06:44 PM
#11
Burning Brakes

 02-18-2019, 11:58 AM
#13
You can use a tool like durametric, which will pull code and will tell you which cylinder is involved. To determine plug or coil, clear codes, move coil to different cylinder, pull codes again. If error stays, it is the plug, but if code moved to new cylinder, it is the coil.
When I took the ohmmeter and measured resistance between the pins (you can find what coil pin out is), there was a substantial resistance difference. If you do not have the code diags solution, you can try this way. Resistance on the used coil was much higher from what I remember. I think I posted pics somewhere.
When I took the ohmmeter and measured resistance between the pins (you can find what coil pin out is), there was a substantial resistance difference. If you do not have the code diags solution, you can try this way. Resistance on the used coil was much higher from what I remember. I think I posted pics somewhere.
I...I would like to know which coil and or plug was causing the issue. Does anyone know the way to measure resistance on the coils? Primary and secondary resistances, which pins are which?
Thanks,
Patrick in Sant Fe, NM
2010 Panamera 4S, 78k miles
2014 Cayenne S, 66k miles
Thanks,
Patrick in Sant Fe, NM
2010 Panamera 4S, 78k miles
2014 Cayenne S, 66k miles
