Notices
Macan 2014-Current

PAPAYA interior DIY...

Thread Tools
 
Search this Thread
 
Old 05-06-2022, 08:48 PM
  #1  
alex_c
Rennlist Member
Thread Starter
 
alex_c's Avatar
 
Join Date: Jan 2018
Location: Houston, TX
Posts: 877
Received 371 Likes on 124 Posts
Default PAPAYA interior DIY...

As some of you may already know, we finally got our 2022 Macan S a couple of weeks ago in Houston, after the SFL Composer fiasco.

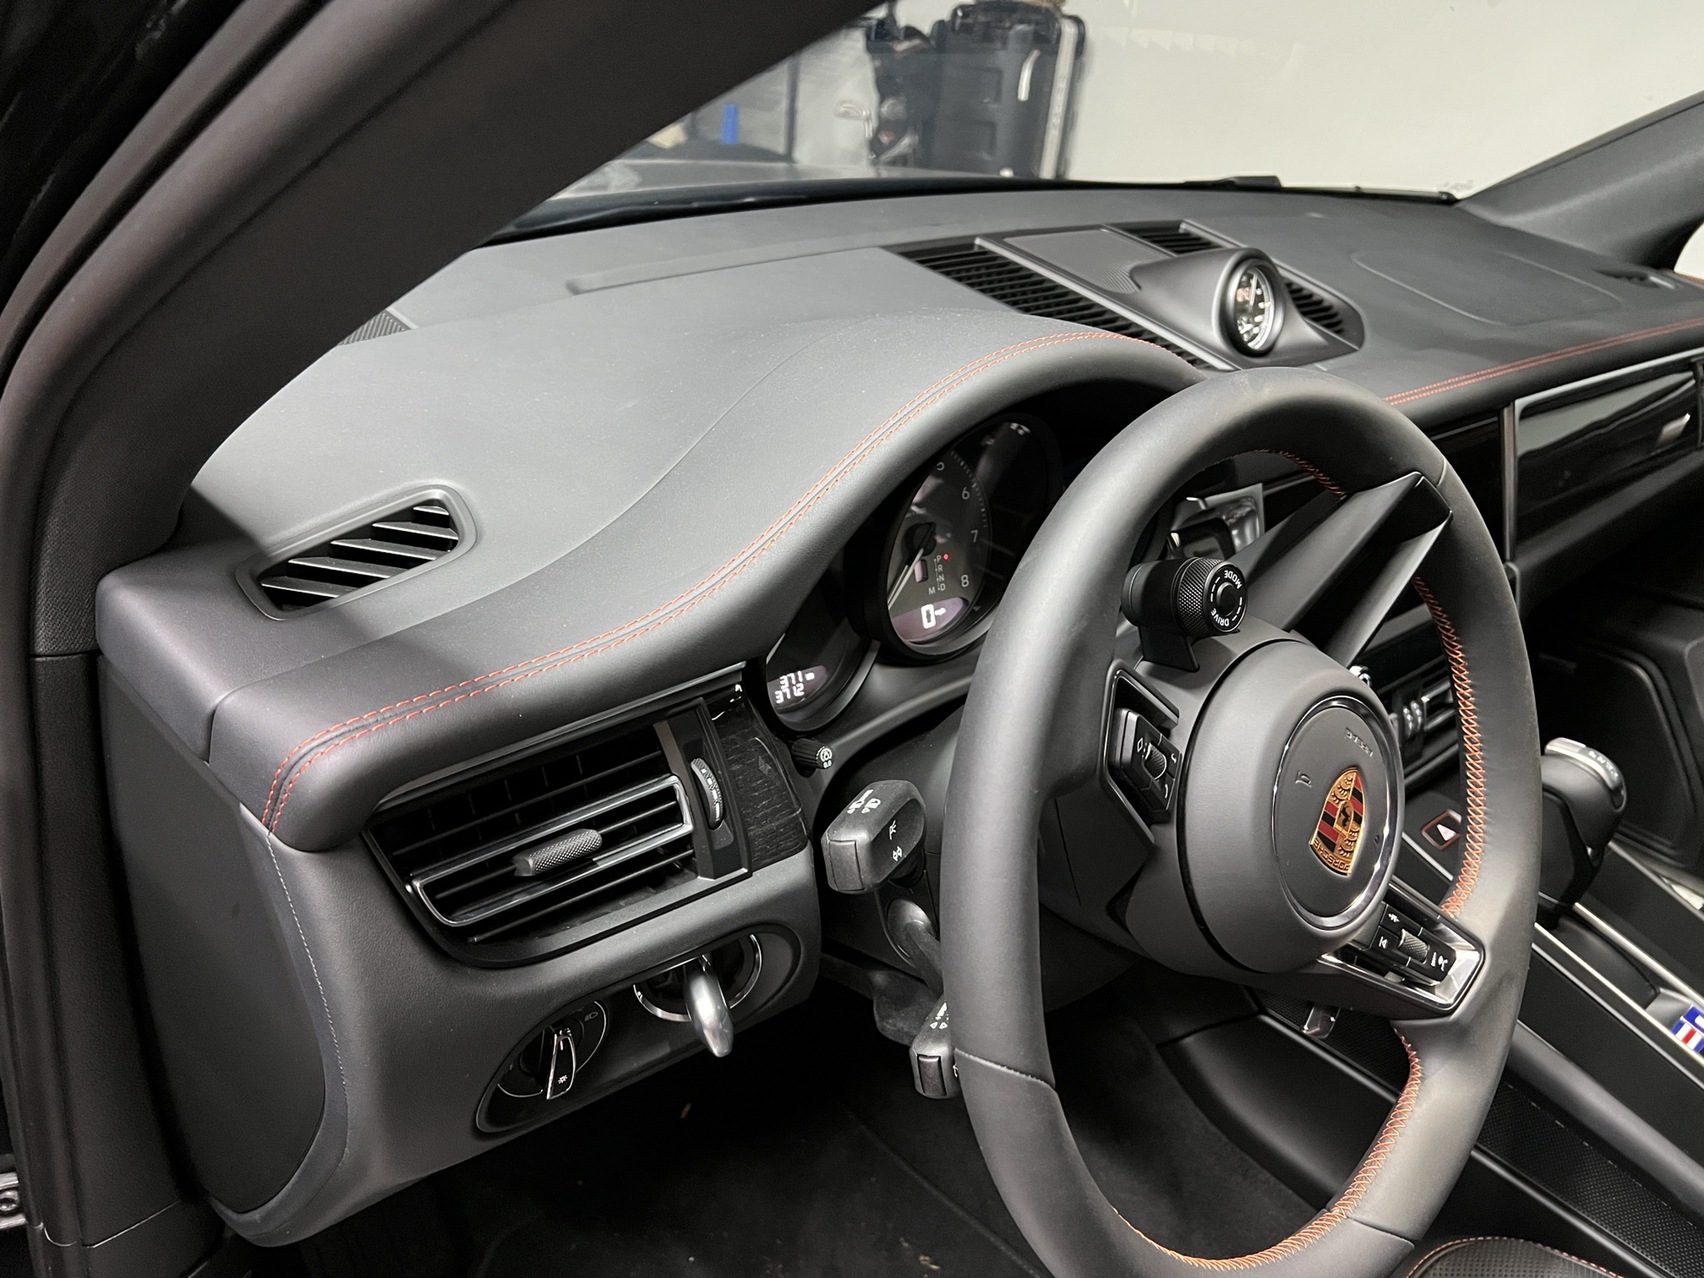
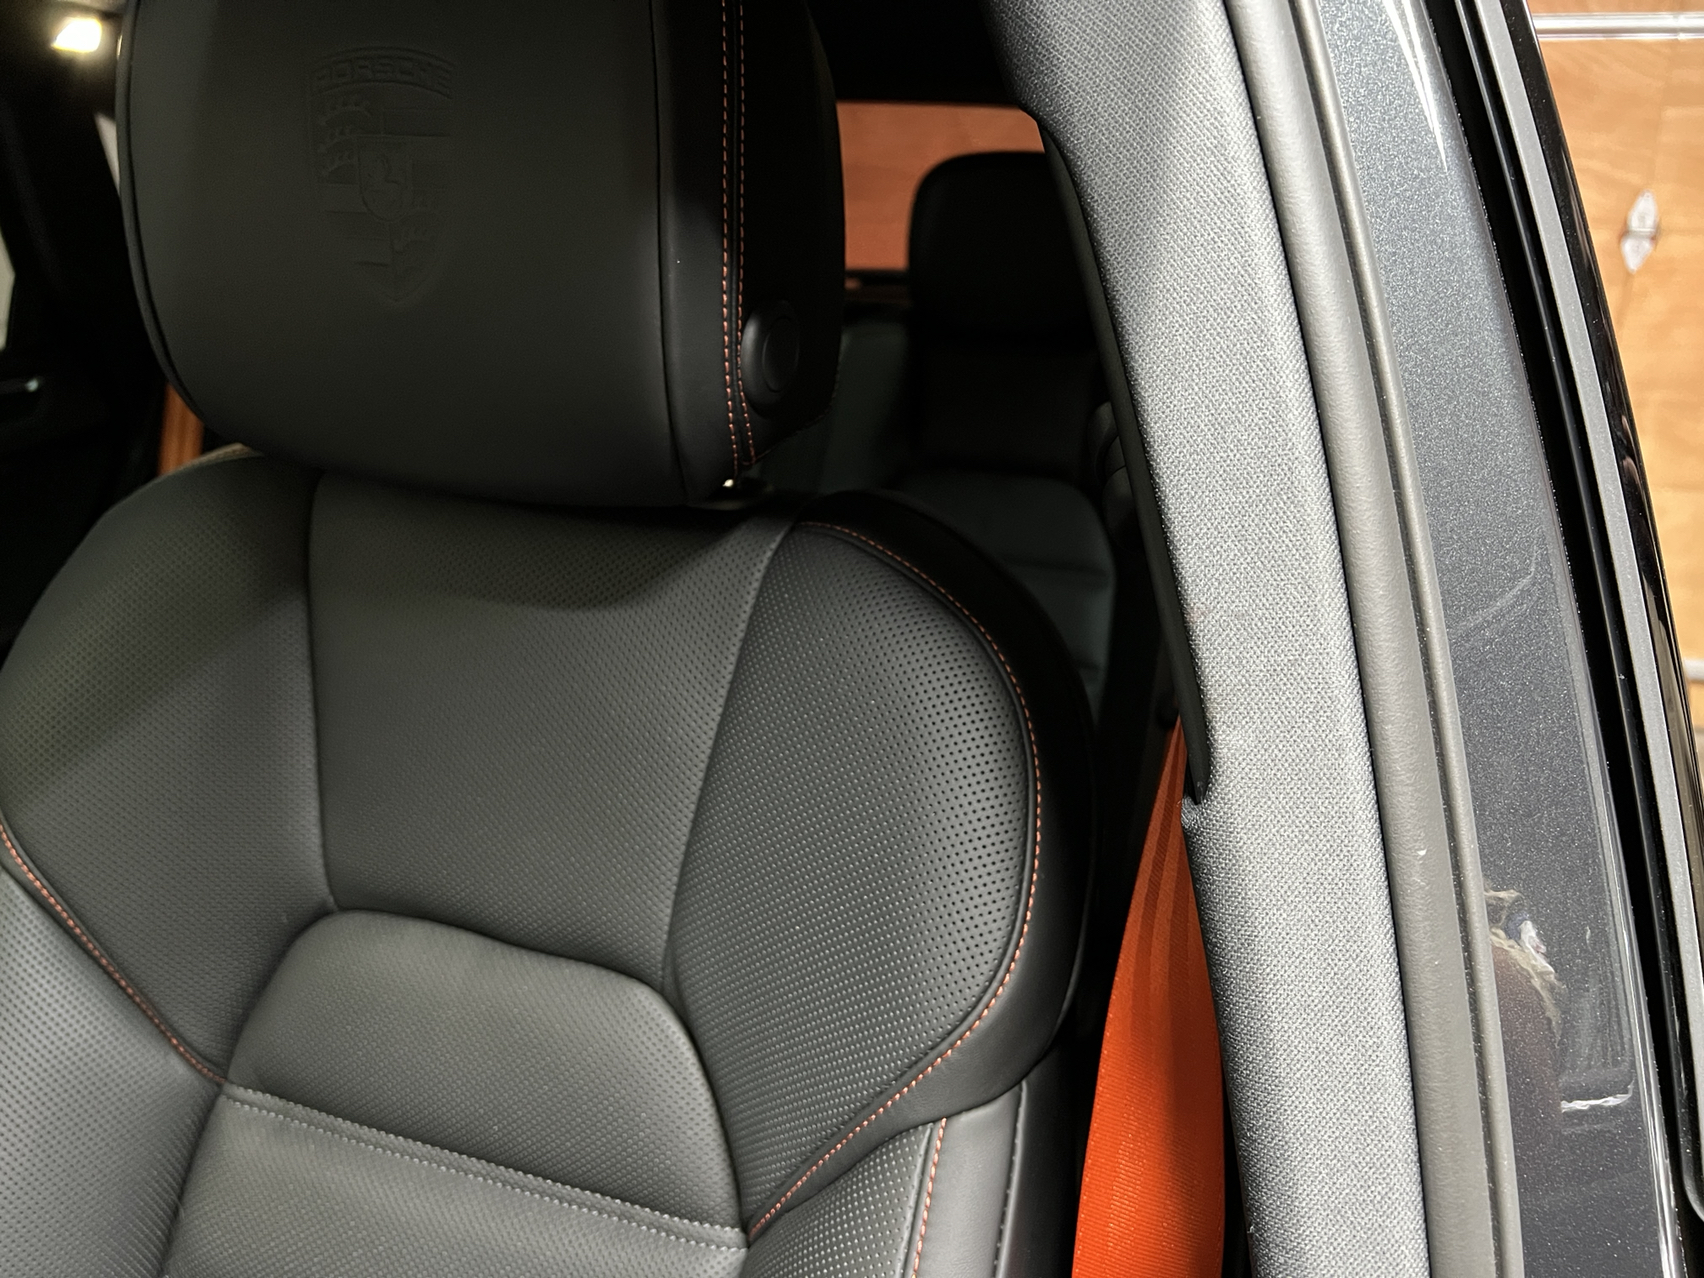
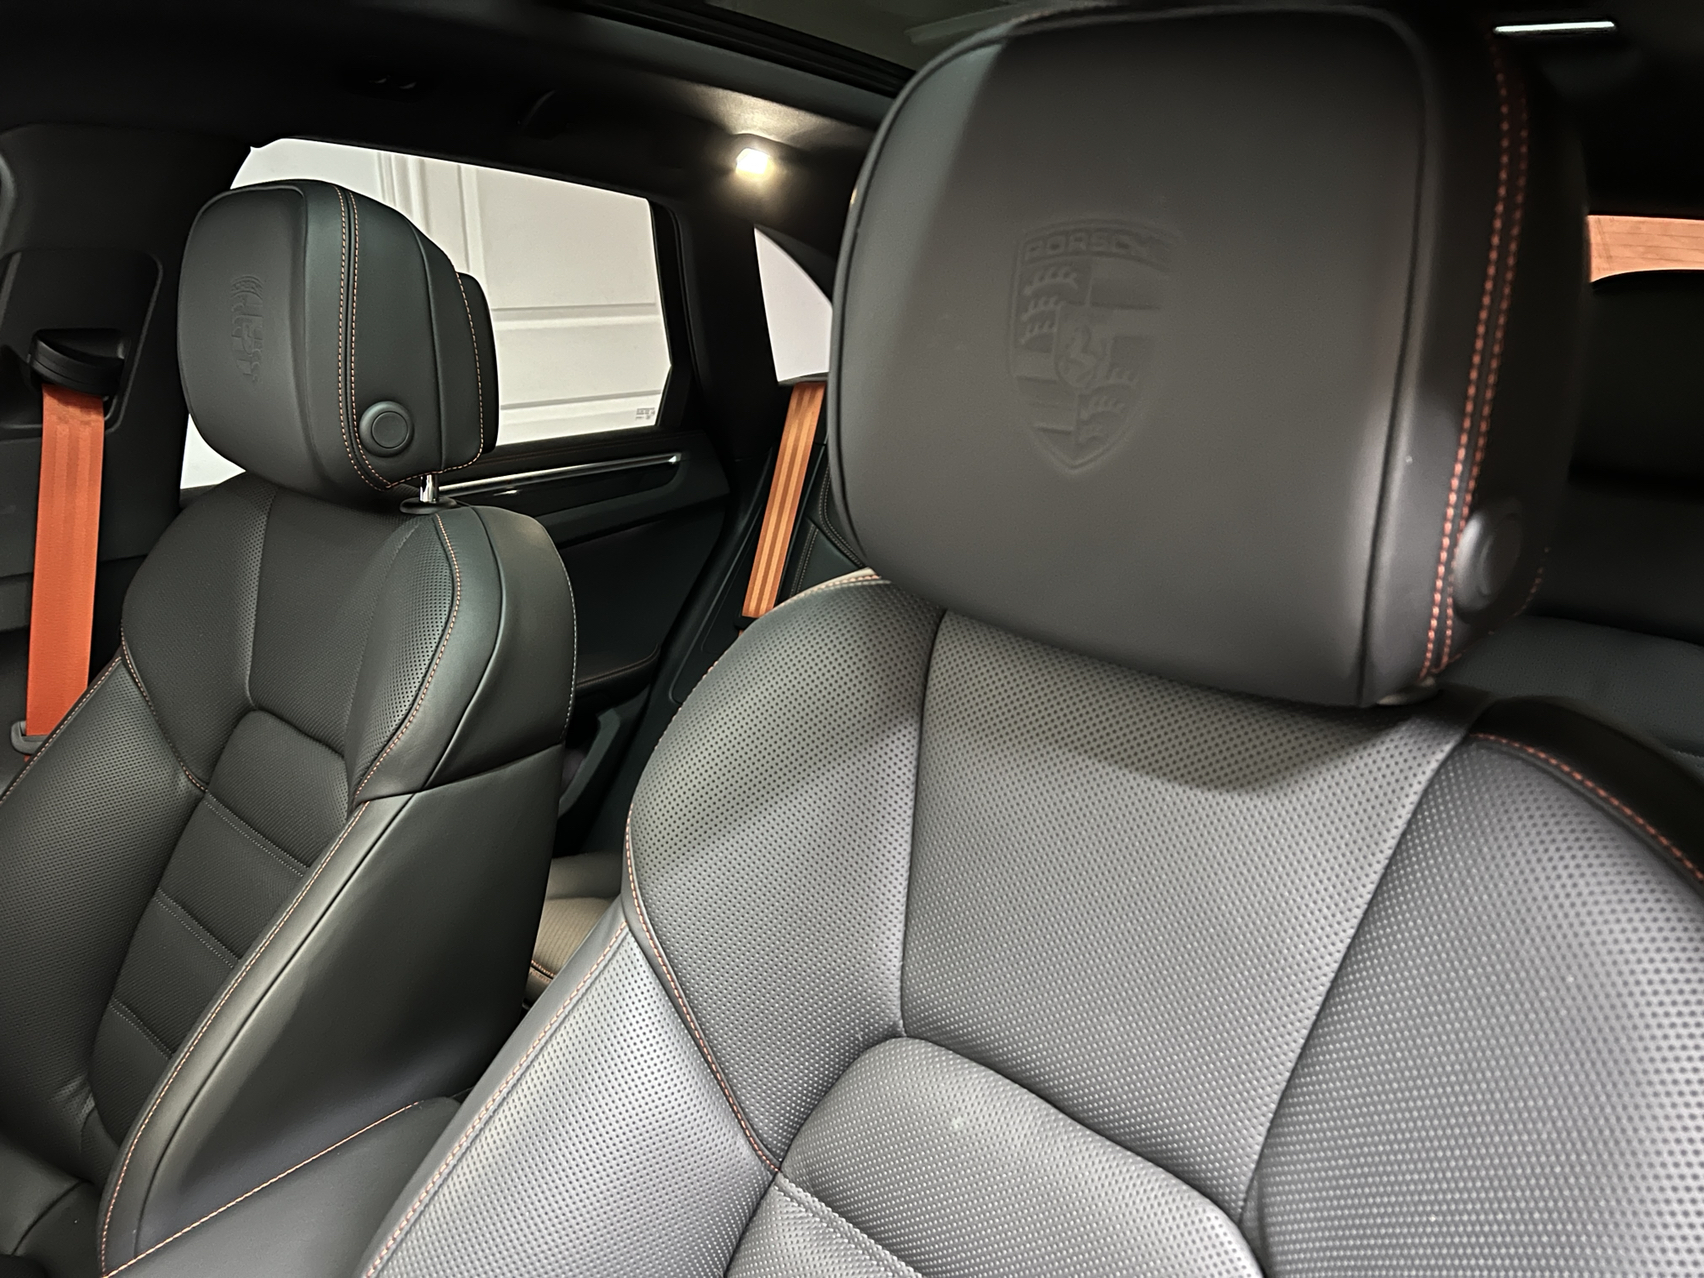
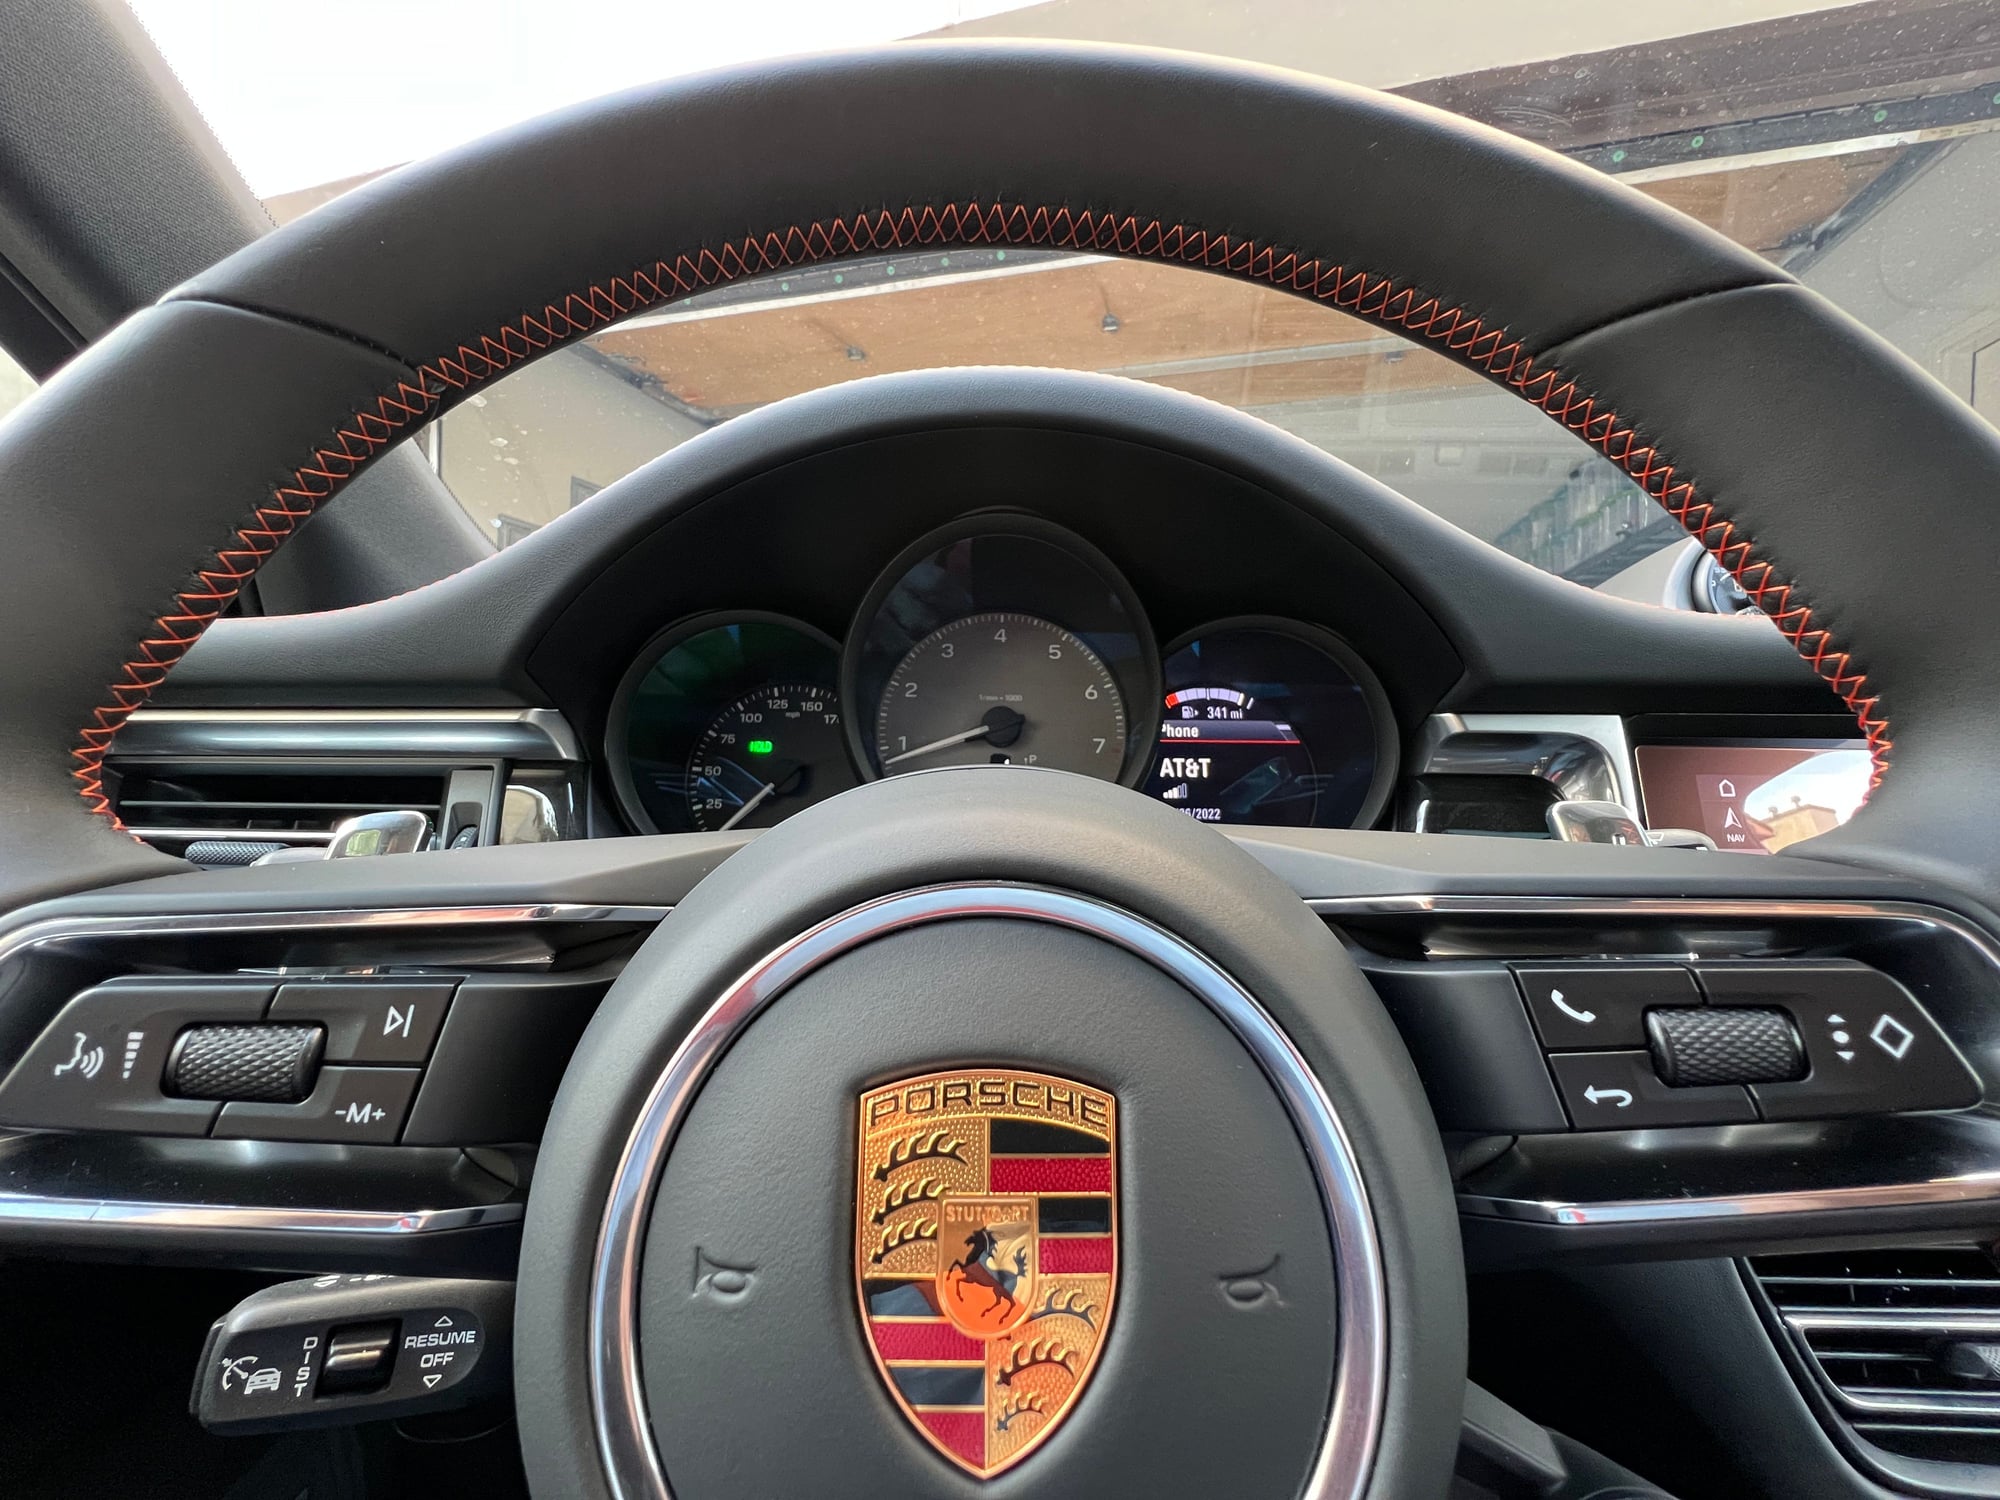
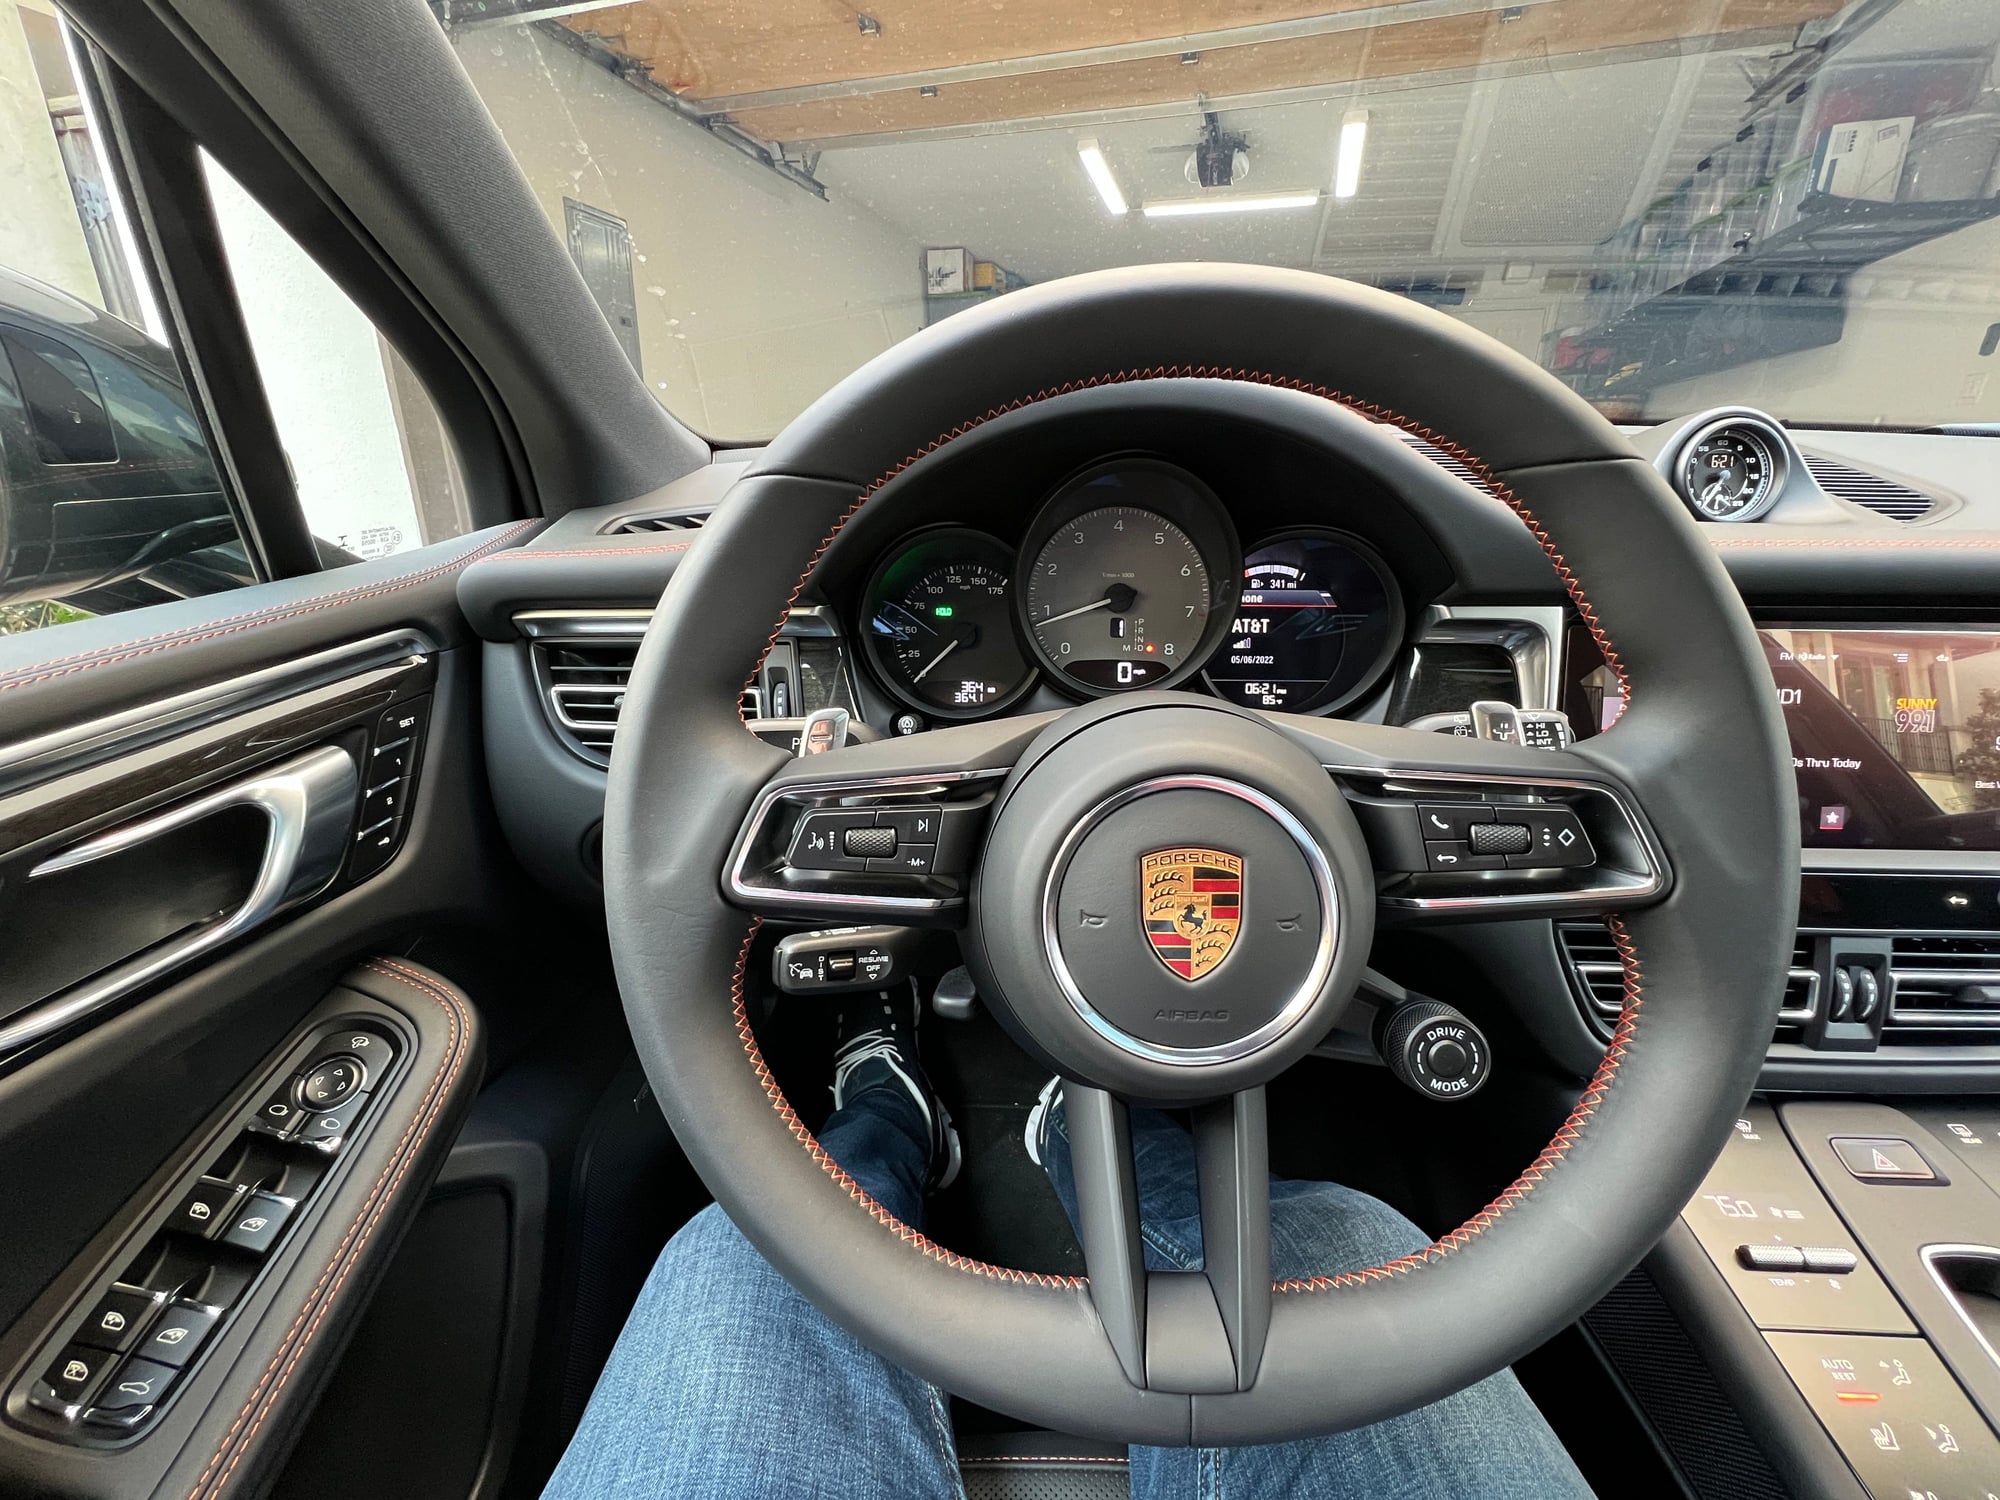
We ordered a Volcano Gray with the full Black leather with Papaya deviated stitching interior sight unseen. After it arrived we were convinced it was the right choice, the Black with the Papaya deviated stitching looks incredible!

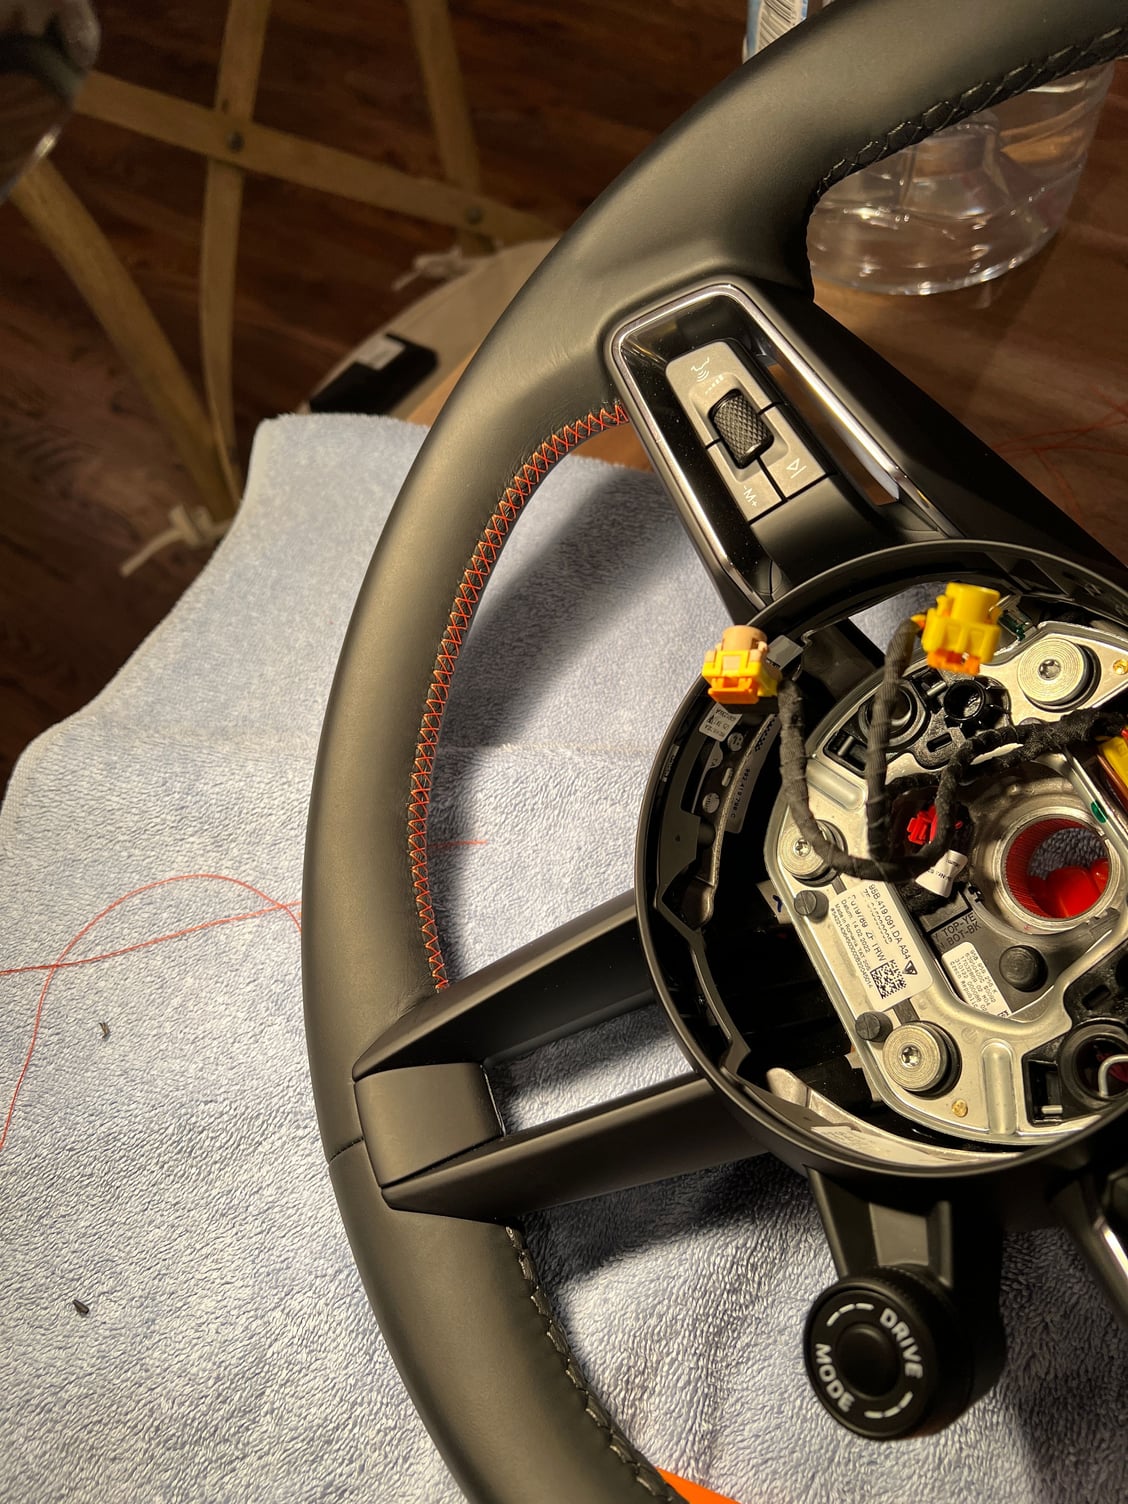
But as nice as it was, there was something still missing... the stitching on the steering wheel was plain black.

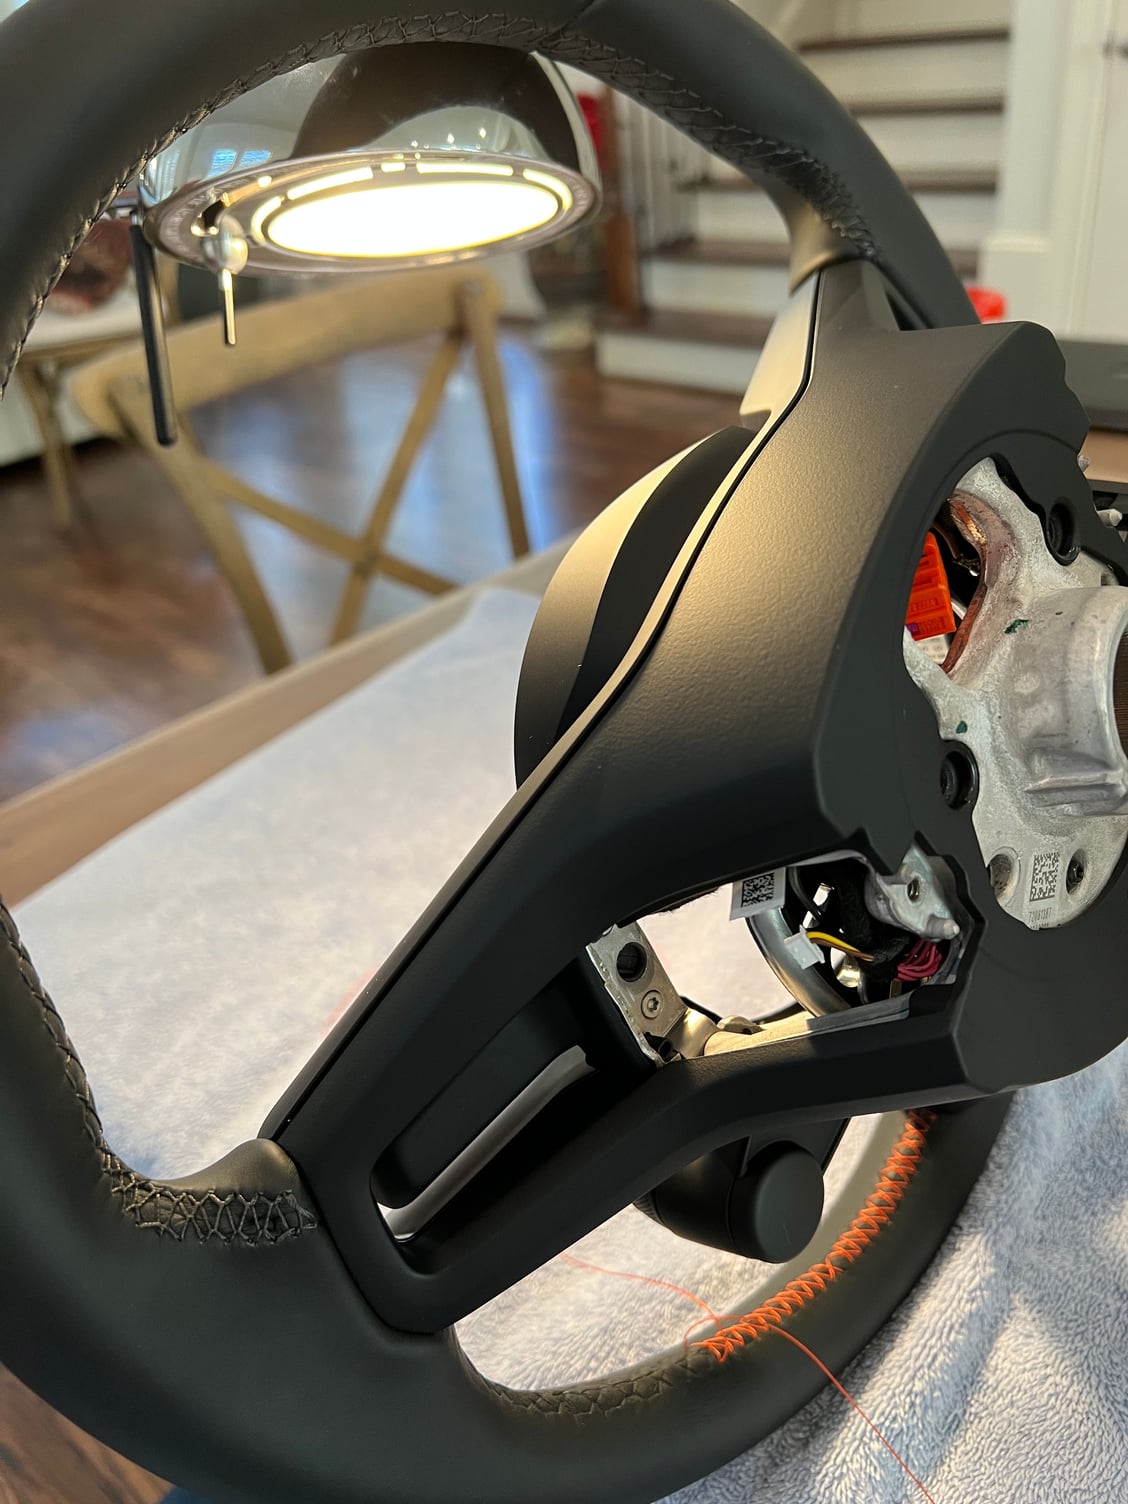
So, armed with the experience of re-stitching the steering wheel on my Carrera T, I decided to give it a go. The most difficult part was finding the right thread color, but after several attempts, we found the right one.

And without much further ado, here are the pictures of the steering wheel while in the re-stitching process, and then the final product installed. You can see how it looks alongside the other deviated stitched panels.

Thoughts?


The following 9 users liked this post by alex_c:
boog (05-07-2022), CatVaux (05-07-2022), georgej (05-14-2022), luv2sleep (05-06-2022), MarkinMD (05-15-2022), patrickoleas (05-16-2022), peterp (05-07-2022), Terry Adams (05-12-2022), wingless (05-07-2022) and 4 others liked this post. (Show less...)
Old 05-06-2022, 09:35 PM
  #2  
luv2sleep
Burning Brakes
 
luv2sleep's Avatar
 
Join Date: Oct 2016
Location: SoCal
Posts: 1,016
Received 274 Likes on 182 Posts
Default

Wow, nice work! Now we can all sleep at night knowing that if you quit your day job, there will always be a position for you at the local garment factory.
The following users liked this post:
alex_c (05-06-2022)
Old 05-06-2022, 10:07 PM
  #3  
secondtimer
Advanced
 
secondtimer's Avatar
 
Join Date: Jul 2020
Location: Northern CA
Posts: 86
Received 60 Likes on 29 Posts
Default

Looks very good !
The following users liked this post:
alex_c (05-06-2022)
Old 05-07-2022, 01:22 AM
  #4  
mikebrinda
Instructor
 
mikebrinda's Avatar
 
Join Date: Nov 2021
Location: Irvine, CA
Posts: 136
Received 88 Likes on 44 Posts
Default

Excellent.
The following users liked this post:
alex_c (05-07-2022)
Old 05-07-2022, 08:45 AM
  #5  
jhbrennan
Rennlist Member
 
jhbrennan's Avatar
 
Join Date: Mar 2006
Location: Austin
Posts: 6,571
Received 81 Likes on 73 Posts
Default

OK...it looks great but raises more questions -

How long did it take?
Where did you source the thread?
What special tools (needles) required?
Did you have to remove the steering wheel?

Did I say it looks great!!
The following 2 users liked this post by jhbrennan:
alex_c (05-07-2022), patrickoleas (05-16-2022)
Old 05-07-2022, 10:03 AM
  #6  
alex_c
Rennlist Member
Thread Starter
 
alex_c's Avatar
 
Join Date: Jan 2018
Location: Houston, TX
Posts: 877
Received 371 Likes on 124 Posts
Default

Originally Posted by jhbrennan
OK...it looks great but raises more questions -

How long did it take?
Where did you source the thread?
What special tools (needles) required?
Did you have to remove the steering wheel?

Did I say it looks great!!
Thank you for your comments!

Here are the answers:

it took me a total of 6 hours. This was a bit more complicated than the previous version of the steering wheel. For one thing, I just couldn’t figure out how to remove the trim from the steering wheel. I just couldn’t find any source of information for that. And of course, without removing the plastic trim, it is much more difficult to access the ends of the leather, and thus harder to un-stitch and de-stitch. Also, heavier to manipulate with the extra pieces in place.

I bought the thread from Luthread on eBay. It is 92-T90 4 oz. Bonded Polyester & Nylon for canvas, upholstery. Bright Orange. This was the most frustrating part since it was really hard to tell from just a picture of it would match the real color, so I bought quite a few versions until I found the right one. The match is spor-on.

As for tools, you just need a couple of regular needles an exacto knife and a dental tool scraper to help pull out the old thread. Of course this is after removing the steering wheel, and for that you require a long thin screwdriver to pop-out the airbag, and a large Torx bit to remove the steering wheel bolt. You will need also a torque wrench to put the bolt back in at 22 lb-ft + 90 degree, and you will need a new bolt according to Porsche.

And regarding your last question, it may not be 100% necessary to remove the steering wheel, but it makes it easier to manipulate once it’s off.


Old 05-07-2022, 10:30 AM
  #7  
Nickshu
Rennlist Member
 
Nickshu's Avatar
 
Join Date: Mar 2017
Location: Northern Colorado, USA
Posts: 4,038
Received 963 Likes on 643 Posts
Default

Nice work! Looks great!
The following users liked this post:
alex_c (05-07-2022)
Old 05-07-2022, 12:17 PM
  #8  
STKDoctor
Advanced
 
STKDoctor's Avatar
 
Join Date: Jul 2017
Posts: 76
Received 7 Likes on 2 Posts
Default

Looks great. Can you please post more pics of the interior though? I'd like ot see the full stitch on the seats/doors/backsetats if you could... I have yet to see Papaya stitching! Thank you
The following users liked this post:
alex_c (05-07-2022)
Old 05-07-2022, 03:32 PM
  #9  
dak911
Three Wheelin'
 
dak911's Avatar
 
Join Date: Jul 2004
Location: Ex NY, now Palm Beach
Posts: 1,316
Received 144 Likes on 117 Posts
Default

Hats off to you I just would not have the patience or skill to do that... (Slight OCD?)
The following users liked this post:
alex_c (05-07-2022)
Old 05-08-2022, 09:56 AM
  #10  
alex_c
Rennlist Member
Thread Starter
 
alex_c's Avatar
 
Join Date: Jan 2018
Location: Houston, TX
Posts: 877
Received 371 Likes on 124 Posts
Default

Originally Posted by STKDoctor
Looks great. Can you please post more pics of the interior though? I'd like ot see the full stitch on the seats/doors/backsetats if you could... I have yet to see Papaya stitching! Thank you
Here are a couple more pics of the interior:


Name:  photo90.jpg
Views: 620
Size:  1.55 MB


Name:  photo779.jpg
Views: 688
Size:  1.62 MB


Name:  photo708.jpg
Views: 679
Size:  1.77 MB


Name:  photo828.jpg
Views: 841
Size:  1.65 MB
The following users liked this post:
STKDoctor (05-08-2022)
Old 05-09-2022, 01:47 PM
  #11  
asteve
1st Gear
 
asteve's Avatar
 
Join Date: Apr 2022
Posts: 1
Received 0 Likes on 0 Posts
Default

Was this a mistake from the factory or does the wheel normally not receive the deviated stitching color?

Last edited by asteve; 05-09-2022 at 02:04 PM.
Old 05-09-2022, 01:54 PM
  #12  
alex_c
Rennlist Member
Thread Starter
 
alex_c's Avatar
 
Join Date: Jan 2018
Location: Houston, TX
Posts: 877
Received 371 Likes on 124 Posts
Default

Originally Posted by asteve
Was this a mistake from the factory or does the wheel normally not receiving the deviated stitching color?

Unless you do CXX (Porsche Exclusive) options I have not seen the steering wheel in deviated stitching on most Porsches.

I had to do the same thing to my 911 Carrera T.
Old 05-09-2022, 02:11 PM
  #13  
Greg Wolfe
Rennlist Member
 
Greg Wolfe's Avatar
 
Join Date: Dec 2017
Location: North of Pittsburgh
Posts: 1,529
Received 539 Likes on 276 Posts
Default

Great work my man!! Turned out amazing.

Mr. Wolfe
Old 05-11-2022, 11:28 PM
  #14  
9ELOVIN
Racer
 
9ELOVIN's Avatar
 
Join Date: Aug 2017
Location: Los Angeles, CA
Posts: 400
Received 72 Likes on 36 Posts
Default

Very nice!
Old 05-11-2022, 11:29 PM
  #15  
alex_c
Rennlist Member
Thread Starter
 
alex_c's Avatar
 
Join Date: Jan 2018
Location: Houston, TX
Posts: 877
Received 371 Likes on 124 Posts
Default

Thank you all for your kind comments!


Quick Reply: PAPAYA interior DIY...


All times are GMT -3. The time now is 06:45 PM.